

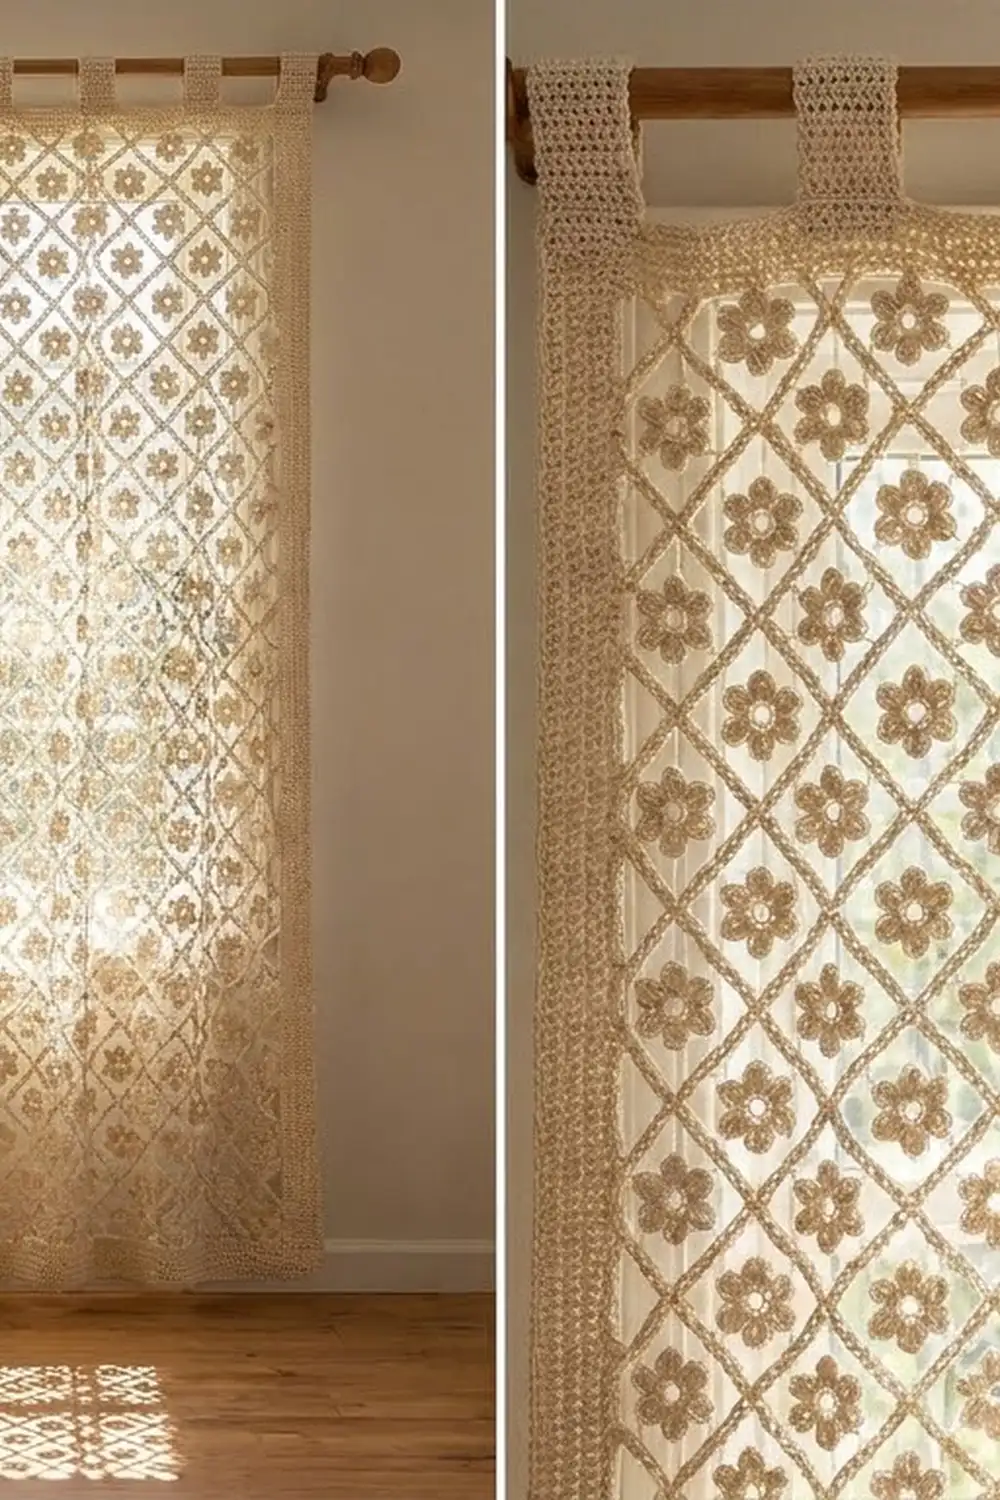
The Linen Bloom Lattice Curtain is an airy, floor-length panel made of tiny six-petal flowers linked by thick, corded bars. Light pours through the open diamond cells, and the flowers add soft texture you can see from across the room.
The panel is worked in a single shade of natural cream cotton, which gives it a calm, cottage-meets-boho look. A solid single-crochet frame keeps the lace edges straight, and simple folded tabs slide over a wooden rod. This pattern uses US crochet terms throughout.
One finished panel measures 31.25 in x 79.25 in (79.4 cm x 201.3 cm), plus 2 in (5.1 cm) tab loops above the top edge. Make two panels for a pair, as shown.
Construction is join-as-you-go. You make each flower in two rounds. While working its upper petals, you create corded bars that link it to the flowers in the row above. When the mesh is complete, you work a border foundation round that fills the edge gaps, then a straightening round, five plain rounds, and finally the tabs.
Finished Size and Construction
- Finished size: 31.25 in x 79.25 in (79.4 cm x 201.3 cm), plus tab loops
- Skill level: Intermediate
- Terminology: US crochet terms
- Yarn weight: Worsted (#4) cotton
- Hook: 5.0 mm (H-8)
- Number of pieces: 295 flower motifs, joined as you go into one panel
- Layout: 31 staggered rows; odd rows (A) have 10 flowers, even rows (B) have 9
- Piece size: one flower = 1.25 in (3.2 cm) across, petal tip to petal tip
- Size before border: 28.25 in x 76.25 in (71.8 cm x 193.7 cm)
- Border depth: 1.5 in (3.8 cm) on every side
Materials
Choose a smooth, mercerized or combed worsted cotton. Cotton keeps the bars crisp, hangs well, and washes easily. Avoid fuzzy or very stretchy yarns, because the lattice will sag.
- Natural cream (one color only): 1,100 g, approximately 1,870 m (2,045 yd) per panel. Double this for a pair.
These quantities include a margin of about 15 percent for swatching, joining tails, and gauge differences.
Tools:
– 5.0 mm (H-8) crochet hook
– Tapestry needle
– Locking stitch markers
– Measuring tape
– Rust-proof pins and a large blocking surface (a bed or clean floor with towels)
– Spray bottle
– Wooden curtain rod up to 1.25 in (3.2 cm) in diameter
Abbreviations (US Terms)
- ch – chain
- sl st – slip stitch
- sc – single crochet
- hdc – half double crochet
- dc – double crochet
- tr – treble crochet
- st(s) – stitch(es)
- RS / WS – right side / wrong side
- P1–P6 – petals 1 to 6 of a flower
Special stitch – Corded Bar: Ch 7, sl st into the dc at the tip of the target petal on the earlier flower. Then work 1 sc in each of the 7 ch back toward your current flower, and sl st into the top of the dc you just made. The bar is not counted in the flower’s stitch count.
Petal orientation: Place every flower RS up with P1 pointing right (east). Working counterclockwise, P2 points upper right, P3 upper left, P4 left, P5 lower left, and P6 lower right.
Gauge and Checkpoints
Test one flower and one short border swatch before you begin.
- Flower: 1.25 in (3.2 cm) across after Round 2, petal tip to petal tip.
- Corded Bar: about 1.75 in (4.4 cm) long between petal tips.
- Border gauge: 16 sc and 16 rounds = 4 in (10.2 cm) in sc. Work the chains on the border foundation round to the same 4-per-inch length.
Checkpoints:
1. After the first flower: 1.25 in (3.2 cm).
2. After Rows 1–2: flower centers in a row are 3 in (7.6 cm) apart, and rows are 2.5 in (6.4 cm) apart.
3. After Row 5: 28.25 in (71.8 cm) wide and 11.25 in (28.6 cm) tall.
4. Before the border: 28.25 in x 76.25 in (71.8 cm x 193.7 cm).
5. After the border: 31.25 in x 79.25 in (79.4 cm x 201.3 cm).
If your flower is larger than 1.25 in (3.2 cm), go down a hook size. If it is smaller, go up a hook size. If the flower is correct but the bars are too long or too short, change the bar chain by 1 ch and keep that change the same for every bar.
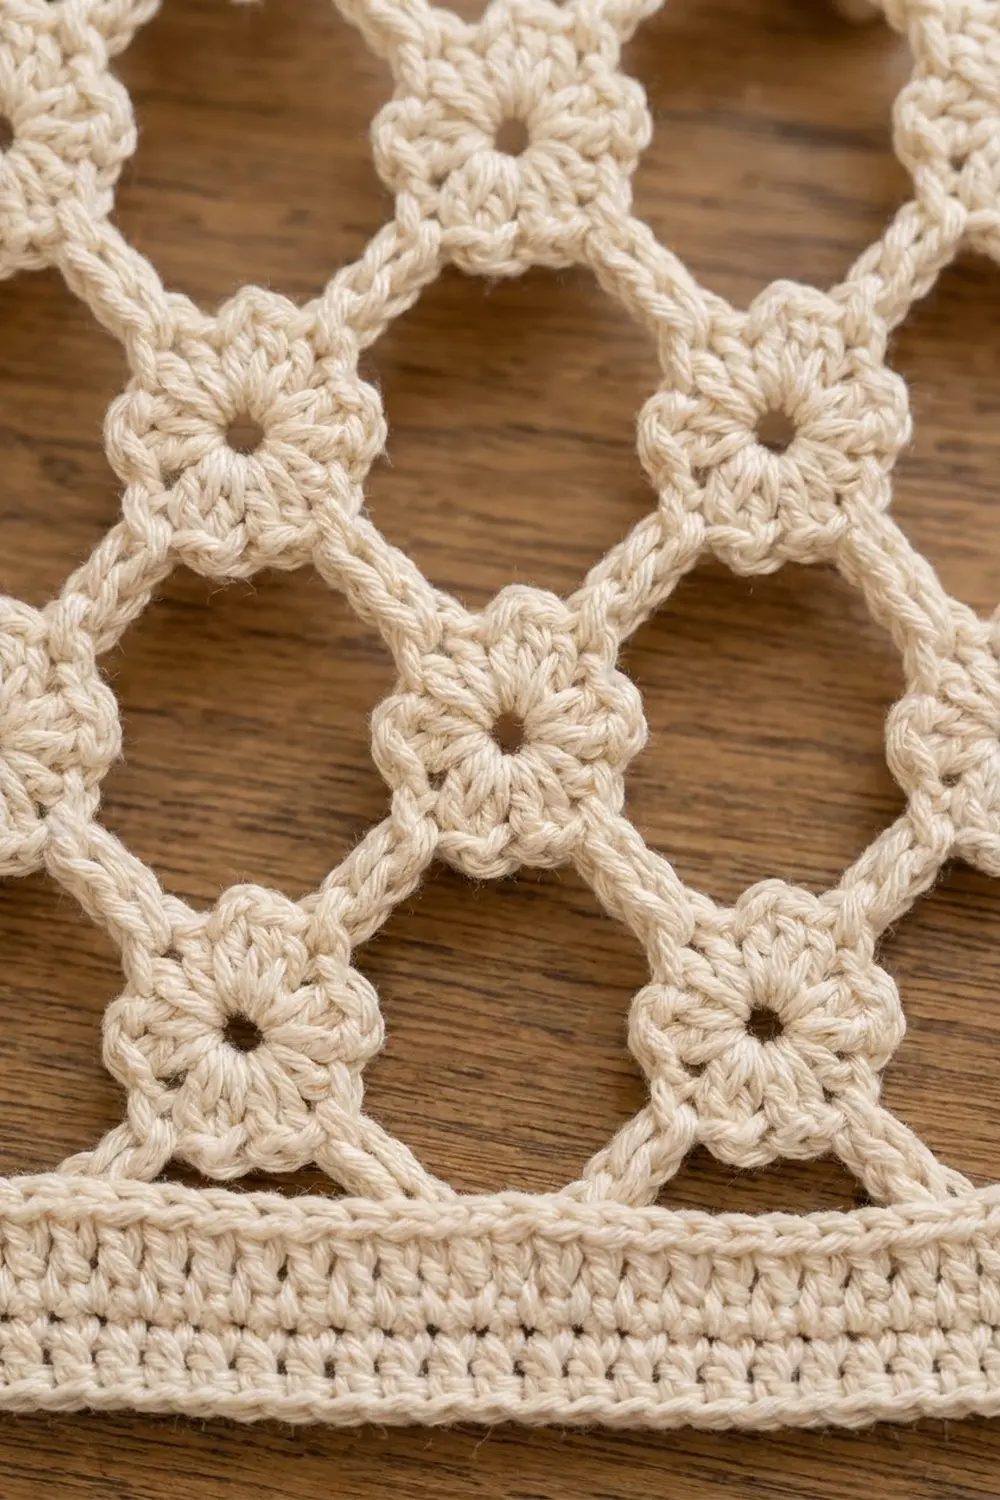
Flower Motif
Round 1: Make a magic ring, ch 1, work 12 sc into the ring, sl st to the first sc. Pull the ring snug but leave a small open center about 0.125 in (0.3 cm) wide. (12 sts)
Round 2: *(Hdc, dc, hdc) in next st, sl st in next st; repeat from * 5 more times, working the last sl st into the joining sl st. (6 petals, 24 sts: 6 x 3 petal sts + 6 sl sts)
Fasten off, leaving a 4 in (10.2 cm) tail to weave in. The dc in each petal is the petal tip, and every bar joins there.
Joining As You Go
Every bar is made by the newer flower and joins to an older flower above it. Only P2 and P3 make bars while you work. The P5 and P6 tips receive bars from the next row.
To make a joining petal, work (hdc, dc) in the st, make a Corded Bar to the target petal, then finish the petal with hdc in the same st. The count stays at 24 sts.
Row 1 (A row, 10 flowers): Make 10 plain flowers. Lay them in a straight line with P1 pointing right and centers 3 in (7.6 cm) apart. Row 2 links them.
Row 2 (B row, 9 flowers): Each flower sits centered below the gap between two Row 1 flowers. Work Round 2 as follows: P1 plain; P2 joins to P5 of the flower above right; P3 joins to P6 of the flower above left; P4, P5 and P6 plain. (24 sts, 2 bars)
Row 3 (A row, 10 flowers): Each flower sits directly below a Row 1 flower.
– First (leftmost) flower: P2 joins to P5 of the first B flower above right; no P3 bar.
– Flowers 2–9: P2 joins to P5 above right; P3 joins to P6 above left.
– Last (rightmost) flower: P3 joins to P6 of the last B flower above left; no P2 bar.
Rows 4–31: Repeat Row 2 on even rows and Row 3 on odd rows. Row 31 is an A row.
Free petals: Interior flowers keep P1 and P4 free, pointing into the diamond cells. These free petals give each node its full flower shape inside the open diamonds.
Joining Logic and Tension
Each bar runs from one dc petal tip to another dc petal tip, so every node is attached at a single, clearly defined point. The sc worked back along the chain doubles the bar into a firm cord that won’t stretch much when the curtain hangs.
Keep the 7 ch loose and even, the same size as your sc. Tight chains pucker the lattice and shorten the panel, and loose chains make the diamonds droop. Lay the work flat every few rows to check that the diamonds are even.
Size checkpoint after Row 5: 28.25 in (71.8 cm) wide from P4 of the left flowers to P1 of the right flowers. It should be 11.25 in (28.6 cm) tall (4 row gaps x 2.5 in plus one 1.25 in flower).
Make All Pieces
All 295 flowers are natural cream:
– A rows: 16 rows x 10 flowers = 160
– B rows: 15 rows x 9 flowers = 135
– Total: 295 flowers and 540 corded bars
Layout grid (first rows shown; F = flower):
Row 1 (A):  F     F     F     F     F     F     F     F     F     F
Row 2 (B):     F     F     F     F     F     F     F     F     F
Row 3 (A):  F     F     F     F     F     F     F     F     F     F
Row 4 (B):     F     F     F     F     F     F     F     F     F
...continue alternating to Row 31 (A)
Mesh width: 9 gaps x 3 in + 1.25 in = 28.25 in (71.8 cm). Mesh length: 30 row gaps x 2.5 in + 1.25 in = 76.25 in (193.7 cm).
Border
Border gauge: 16 sts and 16 rounds = 4 in (10.2 cm). One sc round adds 0.25 in (0.6 cm) of depth.
Round 1 (foundation): With RS facing, join with a standing sc in P2 of the top-right flower (corner st). Work around the panel counterclockwise:
- Top edge (right to left), per flower: sc in P2, ch 3, sc in P3 (5 sts). Between flowers: ch 7. Count: 10 x 5 + 9 x 7 = 50 + 63 = 113 sts. The P3 sc of the top-left flower is the corner st.
- Left side (downward), per A flower: sc in P3, ch 1, sc in P4, ch 1, sc in P5 (5 sts). Between A flowers: ch 7, sc in P4 of the B-row edge flower, ch 7 (15 sts). Count: 16 x 5 + 15 x 15 = 80 + 225 = 305 sts.
- Bottom edge (left to right), per flower: sc in P5, ch 3, sc in P6; ch 7 between flowers. 113 sts.
- Right side (upward), per A flower: sc in P6, ch 1, sc in P1, ch 1, sc in P2; between A flowers: ch 7, sc in P1 of the B-row edge flower, ch 7. 305 sts.
Each corner sc belongs to both sides it touches, so the same stitch appears in both side counts. Sl st to the first sc. Round total: 2 x 113 + 2 x 305 – 4 shared corners = 832 sts.
Why the math works: each flower spans 1.25 in = 5 sts, each top gap spans 1.75 in = 7 sts, and each side gap spans 3.75 in (9.5 cm) = 15 sts. So 113 sts = 28.25 in and 305 sts = 76.25 in, which exactly matches the mesh.
Round 2 (straightening): Ch 1, 3 sc in the corner st. Along the top and bottom, sc in each st. Along each side, sc in each st of the flower sections. Over every 15-st gap, work 2 sc, 2 hdc, 2 dc, 3 tr (with the middle tr in the B-flower sc), 2 dc, 2 hdc, 2 sc. Work 3 sc in each corner st. Sl st to first sc.
Count: 832 sts worked 1 per st + 8 extra (2 at each corner) = 840 sts. Per side, including the corner center st at each end, top and bottom have 115 and the sides have 307.
The taller stitches fill the inward dip toward each B-row flower, so the side edges become straight.
Rounds 3–7: Ch 1, sc in each st, working 3 sc in each corner center st. Sl st to first sc. Each round adds 2 sts per side.
– Round 3: 117 / 309 per side, 848 total
– Round 4: 119 / 311, 856 total
– Round 5: 121 / 313, 864 total
– Round 6: 123 / 315, 872 total
– Round 7: 125 / 317, 880 total
Fasten off. Check: 125 sts / 4 = 31.25 in (79.4 cm) and 317 sts / 4 = 79.25 in (201.3 cm). Border depth: 6 rounds x 0.25 in = 1.5 in (3.8 cm).
Tabs
With RS facing, join at the top-right corner center st.
Row 1: Ch 1, sc in same st and next 5 sts. (6 sc)
Rows 2–16: Ch 1, turn, sc in each st. (6 sc)
Fasten off with a 12 in (30.5 cm) tail. Skip 11 sts after this tab, then make the next tab in the following 6 sts. Make 8 tabs total: 8 x 6 + 7 x 11 = 48 + 77 = 125 sts, ending at the top-left corner.
Each tab is 1.5 in (3.8 cm) wide and 4 in (10.2 cm) long. Fold each tab to the WS and whipstitch Row 16 to the base of the tab along border Round 5, forming a 2 in (5.1 cm) loop.
Final Blocking
- Weave in all ends securely along the bars or inside the flower rounds.
- Soak the panel in cool water for 15 minutes, then gently press out the water. Do not wring.
- Roll it in towels to remove excess moisture.
- Lay it flat and smooth the border to 31.25 in x 79.25 in (79.4 cm x 201.3 cm).
- Pin the border straight first, then pin a few flower rows so the diamonds sit evenly.
- Open each flower’s petals with your fingertips.
- Let it dry completely, then hang it. Gravity will relax the lattice slightly within a day.
Final Quality-Control Checklist
- Every flower has 6 petals and 24 sts.
- Every interior flower has 4 bars (P2, P3, P5, P6) and 2 free petals.
- A rows have 10 flowers, B rows have 9, and there are 31 rows.
- The mesh measures 28.25 in x 76.25 in (71.8 cm x 193.7 cm) before the border.
- Border Round 1 = 832 sts; Round 7 = 880 sts.
- The side edges are straight, with no dips at the B-row flowers.
- All 8 tabs are evenly spaced and the same length.
Troubleshooting
Diamonds look uneven: Your chain tension varies. Count every bar to 7 ch and redo any bars that are clearly short.
Panel narrower than 28.25 in (71.8 cm): The bars are too tight. Go up a hook size for the chains only.
Border ruffles: The border is too loose. Go down a hook size for Rounds 3–7.
Border pulls in or curls: The border is too tight. Go up a hook size.
Side edge still dips: Repeat the Round 2 graduated sequence once more on the sides before Round 3.
Flower center closes up: Leave the magic ring slightly open before weaving the tail.
Care
Hand wash in cool water with mild soap and dry flat. A short re-block after washing keeps the diamonds even.
Final Notes
The measurement chain is simple. One flower is 1.25 in (3.2 cm), flowers sit 3 in (7.6 cm) apart in each row, and rows sit 2.5 in (6.4 cm) apart. That gives a 28.25 in x 76.25 in (71.8 cm x 193.7 cm) mesh. Border Round 1 turns that mesh into exactly 113 and 305 sts per side, and six rounds of border depth bring the panel to 31.25 in x 79.25 in (79.4 cm x 201.3 cm). Check each stage, and your lattice will hang straight and bright.
Happy crocheting!