

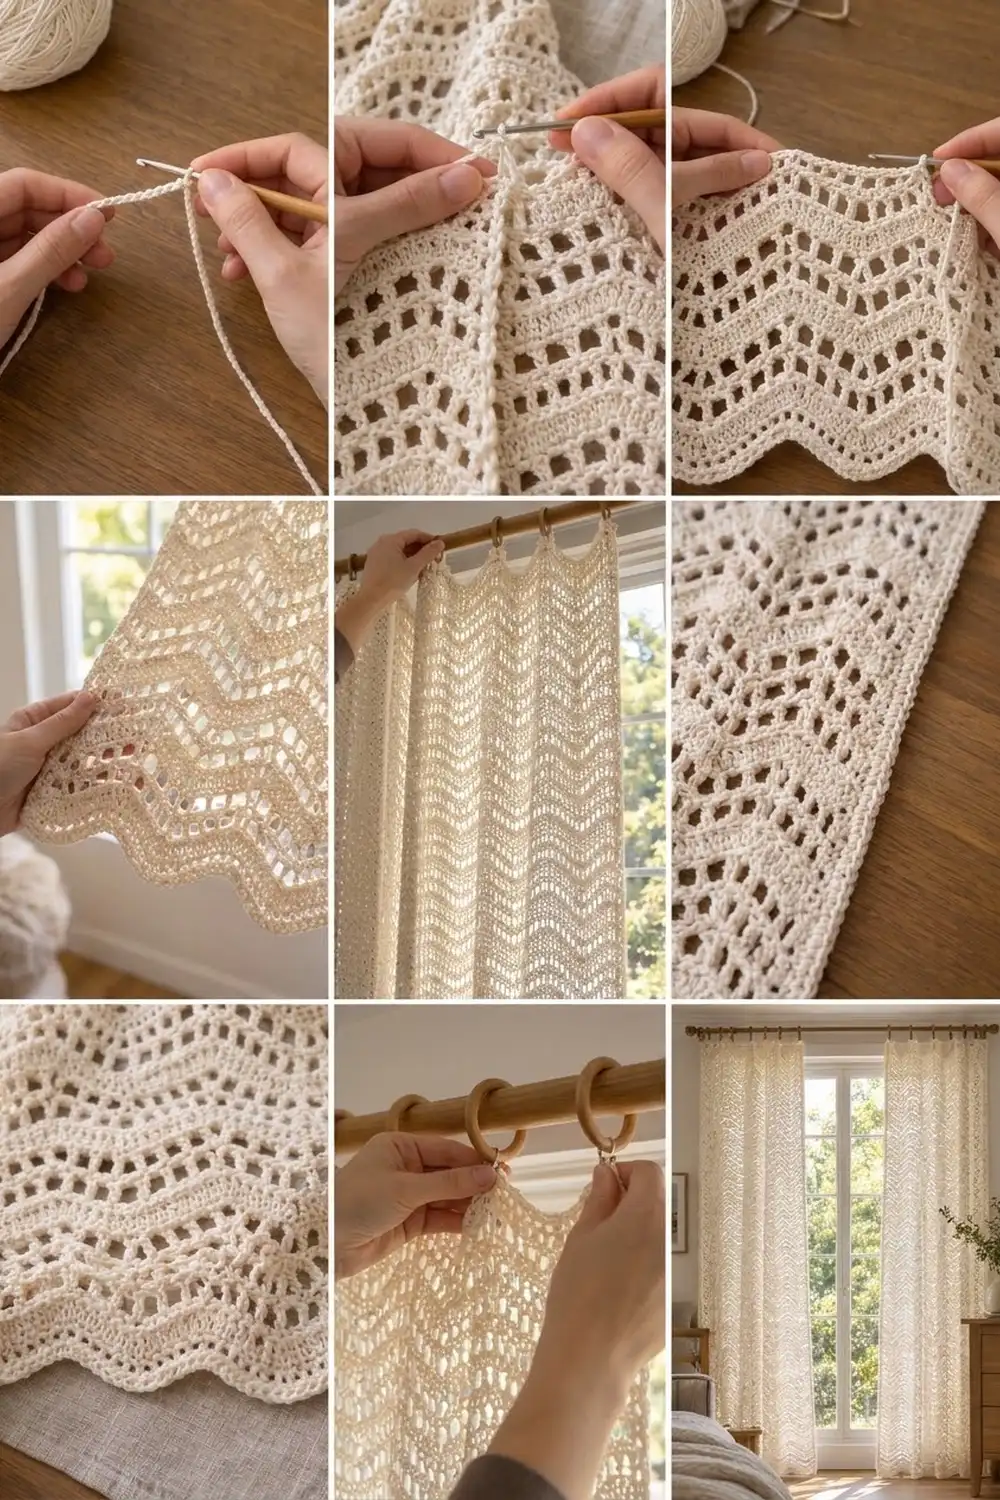
The Morning Tide panel is a light, airy curtain built from soft chevron waves. Bands of solid double crochet alternate with bands of open mesh. Light comes through the mesh in staggered rows of small windows, and the solid bands give the waves their shape. The bottom hem ends in gentle scallops, and the top edge rises into peaks that grip neatly in curtain clip rings.
The panel is worked in one color, a warm cream or ivory cotton. It suits a relaxed, natural room: linen, wood, and plants. It filters sunlight beautifully and still gives a little privacy.
This pattern uses US crochet terms. One finished panel measures 41 in (104.1 cm) wide and 83.5 in (212.1 cm) long, measured peak to peak. To dress a window with a pair, make two identical panels.
The construction is simple. You chain a foundation and work the panel flat, from the bottom up, in a 16-stitch ripple. Two solid rows and two mesh rows alternate the whole way. One round of single crochet then tidies all four edges, and the panel is blocked and hung on clip rings. There is no joining and no sewing.
Finished Size and Construction
- Finished size: 41 in (104.1 cm) wide × 83.5 in (212.1 cm) long
- Skill level: Easy–Intermediate
- Terminology: US crochet terms
- Yarn weight: Worsted (#4), cotton or cotton blend
- Hook: US H-8 (5.0 mm)
- Number of pieces: 1 (a single panel worked flat)
- Layout: one rectangle with 9 ripple repeats across and 166 rows tall
- Piece size before border: 40.5 in (102.9 cm) × 83 in (210.8 cm)
- Border depth: 1 round of sc, about 0.25 in (0.6 cm) on each edge
Materials
Yarn: Use a smooth worsted-weight cotton or cotton blend. It should hold its shape and show the stitches clearly. Pure mercerized cotton gives crisp holes. A cotton-linen or cotton-acrylic blend drapes more softly and weighs a little less on the rod. Avoid fuzzy yarns, because they blur the mesh.
- Cream / Ivory (Main Color): 1,100 g, about 2,200 m (2,406 yd). That is 11 skeins of 100 g / 200 m each.
These quantities include a margin of about 10–15% for gauge differences and the swatch. Buy all skeins from the same dye lot.
Tools:
– US H-8 (5.0 mm) crochet hook
– Tapestry needle
– Stitch markers (at least 10)
– Measuring tape
– Scissors
– Blocking surface, rust-proof pins, and a spray bottle
– 11 curtain clip rings sized for your rod
Abbreviations (US Terms)
- ch – chain
- sk – skip
- st(s) – stitch(es)
- sp – space
- sc – single crochet
- dc – double crochet
- RS / WS – right side / wrong side
- rep – repeat
Special stitches:
- dc2tog (double crochet 2 together): [Yarn over, insert hook in next st, pull up a loop, yarn over, pull through 2 loops] 2 times. Then yarn over and pull through all 3 loops on the hook. Uses 2 sts and makes 1.
- dc3tog (double crochet 3 together): Work the same as dc2tog, but over 3 sts. Then yarn over and pull through all 4 loops. Uses 3 sts and makes 1. Each dc3tog forms a valley.
- sc3tog (single crochet 3 together): [Insert hook in next st, pull up a loop] 3 times. Then yarn over and pull through all 4 loops. Uses 3 sts and makes 1.
Counting rule: In every row, each ch-1 counts as 1 stitch. On the next row, work into the ch-1 sp exactly as if it were a stitch. The turning ch-2 never counts as a stitch.
Gauge and Checkpoints
Gauge in pattern (blocked): One 16-st ripple repeat is 4.5 in (11.4 cm) wide, measured peak to peak. Four rows (2 solid + 2 mesh) are 2 in (5.1 cm) tall, so one row is 0.5 in (1.3 cm).
Border gauge: 16 sc = 4 in (10.2 cm), which is 4 sc per 1 in (2.5 cm).
Test one piece first. Make a swatch before you start the full panel:
- Ch 35 (33 sts plus 2 turning ch). This gives 2 repeats.
- Work Rows 1–10 of the pattern below, using 1 repeat between the edge stitches instead of 8. The swatch has 33 sts per row.
- Block the swatch the way you will block the panel.
Swatch checkpoints:
– Width: about 9 in (22.9 cm), measured from the edge stitch across both peaks
– Height after Row 10: 5 in (12.7 cm)
– The mesh holes should look square, not stretched tall
If your swatch is too big, go down one hook size to US G-6 (4.0 mm). If it is too small, go up to US I-9 (5.5 mm). Width matters most on a curtain. Row height is easy to adjust: add or remove 4-row repeats to fit your window, and see the Final Notes.
Panel checkpoints (blocked or lightly smoothed):
– After Row 2: width 40.5 in (102.9 cm)
– After Row 40: height 20 in (50.8 cm)
– After Row 82: height 41 in (104.1 cm)
– After Row 166: height 83 in (210.8 cm)
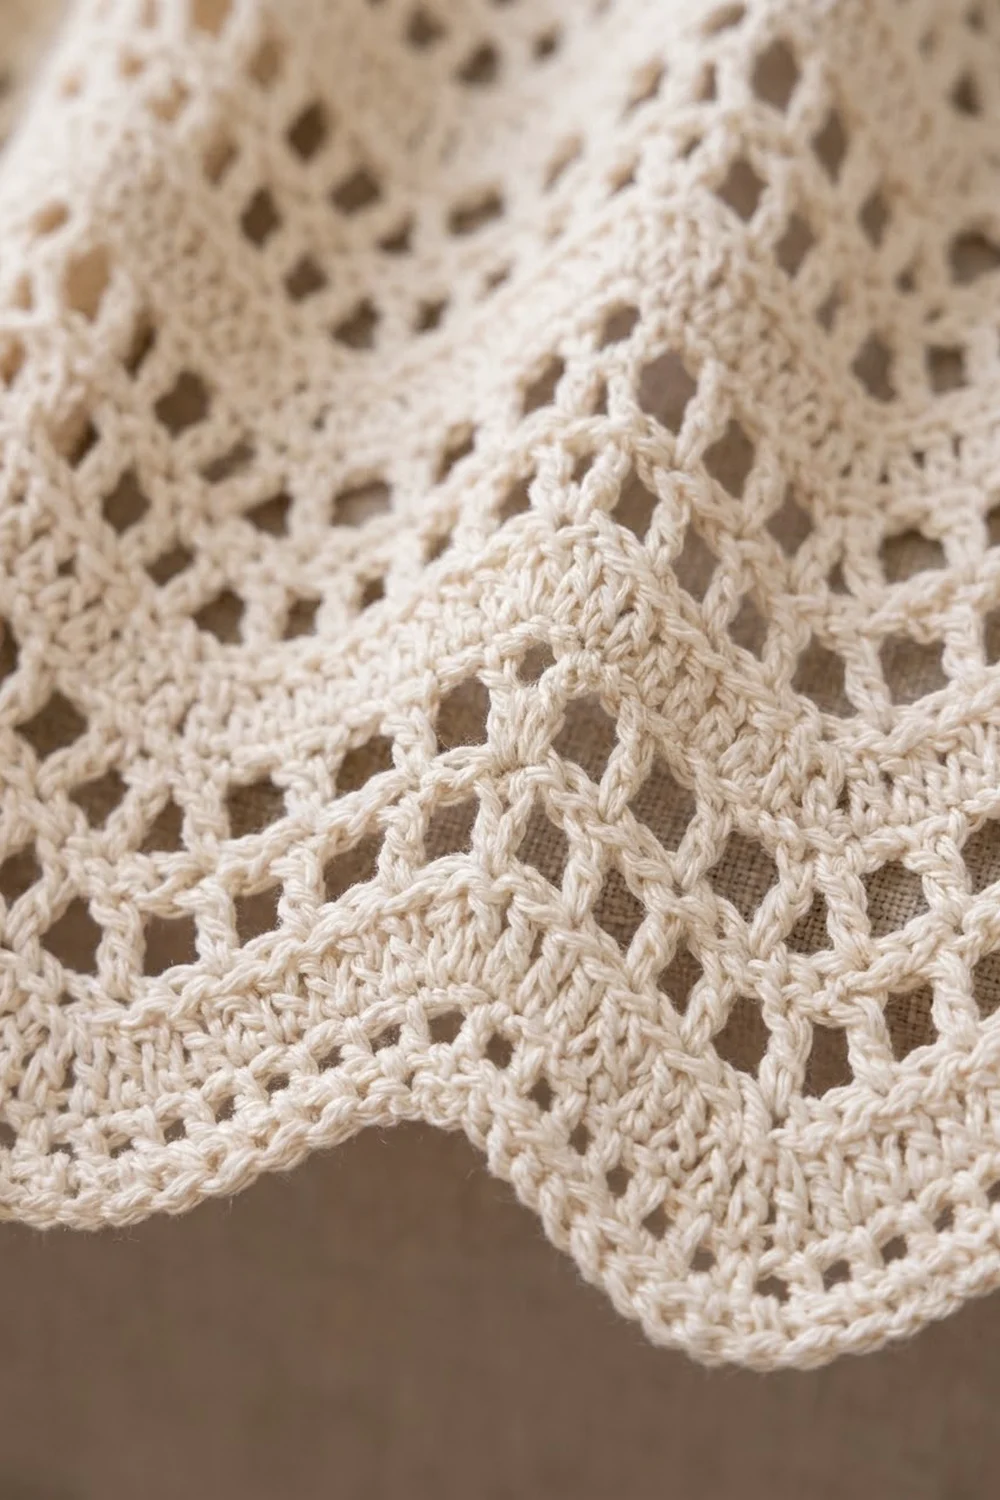
Pattern: Ripple Lace Panel
Row structure: Every row has 145 sts: a 1-st half-valley at each edge, plus 9 peaks and 8 full valleys in between. That is 16 sts × 9 repeats + 1 = 145. Place a marker in the center st of each peak in Row 2 and move the markers up every few rows. This keeps your repeats aligned.
Foundation: Ch 147.
Row 1 (RS, solid): Dc2tog over the 3rd and 4th ch from hook (the 2 skipped ch do not count). Dc in next 6 ch, 3 dc in next ch, dc in next 6 ch, dc3tog over next 3 ch. Rep from * 7 more times (8 times total). Then dc in next 6 ch, 3 dc in next ch, dc in next 6 ch, dc2tog over last 2 ch.
Count: 145 sts (1 + 8 × 16 + 15 + 1), with 9 peaks and 8 valleys.
Row 2 (WS, solid): Ch 2 (does not count), turn. Dc2tog over first 2 sts. Dc in next 6 sts, 3 dc in next st, dc in next 6 sts, dc3tog over next 3 sts. Rep from * 7 more times. Then dc in next 6 sts, 3 dc in next st, dc in next 6 sts, dc2tog over last 2 sts.
Count: 145 sts.
Each 3-dc peak should land on the center dc of the peak below. Each dc3tog should center over the valley below.
Row 3 (RS, mesh): Ch 2 (does not count), turn. Dc2tog over first 2 sts. [Ch 1, sk next st, dc in next st] 3 times. (Dc, ch 1, dc) in next st. [Ch 1, sk next st, dc in next st] 3 times. Dc3tog over next 3 sts. Rep from * 7 more times. Then [ch 1, sk next st, dc in next st] 3 times, (dc, ch 1, dc) in next st, [ch 1, sk next st, dc in next st] 3 times, dc2tog over last 2 sts.
Count: 145 sts, counting each ch-1 as 1 st. Each repeat is 6 + 3 + 6 + 1 = 16 sts, with 7 ch-1 sps. The row has 63 ch-1 sps.
Row 4 (WS, mesh): Work as Row 3, treating every ch-1 sp as a st. The peak (dc, ch 1, dc) is worked into the center ch-1 sp of the peak below. The holes now sit offset from Row 3, which gives the staggered window look.
Count: 145 sts, 63 ch-1 sps.
Rows 5–6 (solid): Work as Row 2, working 1 dc in each dc and in each ch-1 sp. In Row 5, each 3-dc peak is worked into the center ch-1 sp of the peak below.
Count: 145 sts in each row.
Rows 7–166: Repeat Rows 3–6 forty more times. The pattern is always 2 mesh rows followed by 2 solid rows.
You will have 166 rows in total: 2 starting solid rows plus 41 four-row repeats (2 + 164 = 166). The panel ends on a solid band, so the top edge matches the bottom hem. Height: 83 in (210.8 cm). Do not fasten off.
Stitch-count check: 145 sts in every row. Any row with 144 or 146 sts has a missed or extra stitch. This usually happens at a dc3tog or a peak.
Border
The border is one round of sc around all four edges. It firms up the side edges and outlines the waves.
Border gauge: 4 sc per 1 in (2.5 cm), and 2 sc per dc row end.
Corner rule for this pattern: Each corner gets a 3-sc group worked into the corner st or corner row end. In the counts below, “between corners” excludes these 3-sc groups. They are listed separately, so no corner is counted twice.
Round 1 (RS): Ch 1, turn so the RS faces you, and work along the top edge (Row 166).
- Top corner: 3 sc in the first st.
- Top edge: Work across sts 2–144: sc in each st, but work 3 sc in the center st of each of the 9 peaks, and work each of the 8 valleys as sc3tog over the st before the valley, the valley st, and the st after.
Top count between corners: 143 + (9 × 2) − (8 × 2) = 145 sc. - Top corner: 3 sc in the last st (st 145).
- Left side: 2 sc in each row end, working down from Row 166 to Row 1.
Side count between corners: 166 × 2 = 332 sc. - Bottom corner: 3 sc in the first foundation ch.
- Bottom edge: Sc in each foundation ch from ch 2 to ch 144. Work into the free loop on the underside of the chain. The waves along this edge are already formed by Row 1, so 1 sc per ch lies flat.
Bottom count between corners: 143 sc. - Bottom corner: 3 sc in the last foundation ch (ch 145).
- Right side: 2 sc in each row end, working up from Row 1 to Row 166.
Side count between corners: 332 sc. - Join with a sl st to the first sc. Fasten off.
Round 1 total: 145 + 143 + 332 + 332 + (4 × 3) = 964 sc.
Why the math works: Each dc row is 0.5 in (1.3 cm) tall, and the sc gauge is 4 sc per 1 in (2.5 cm). Two sc per row end therefore matches the row height exactly: 332 sc ÷ 4 = 83 in (210.8 cm), the full side length. The side edges will not ruffle or pull in.
On the top edge, the 3-sc peaks and sc3tog valleys repeat the shaping of the solid rows below, so the waves stay sharp. The foundation chain already sits in the wave shape, so it only needs 1 sc per ch.
The border adds about 0.25 in (0.6 cm) on each edge. Width: 40.5 + 0.5 = 41 in (104.1 cm). Length: 83 + 0.5 = 83.5 in (212.1 cm).
Final Blocking
- Weave in all ends along the solid bands, where they hide best. Leave about 6 in (15.2 cm) of each tail to weave, and split the plies as you go.
- Lay the panel flat on a clean surface large enough to hold it. Foam mats on a carpeted floor work well, and a large bed with towels also works.
- Spray the panel evenly until it is damp, not soaked. Cotton gets very heavy when soaked and can stretch out of shape.
- Smooth the side edges into straight lines 41 in (104.1 cm) apart. Use the measuring tape every 12 in (30.5 cm) or so.
- Pin each top peak and each bottom scallop point to sharpen the waves. The peaks are about 4.5 in (11.4 cm) apart.
- Gently open the mesh holes with your fingertips so they look square.
- Check the length: 83.5 in (212.1 cm) from the top peaks to the bottom scallop points.
- Let the panel dry completely before unpinning it. Allow at least 24 hours.
Hanging
Clip one ring at each top corner and one at each of the 9 top peaks, for 11 rings in total. The peaks are 4.5 in (11.4 cm) apart, and each corner ring sits about 2.25 in (5.7 cm) from the nearest peak. Clip into the sc border and the solid row just below it so the full weight hangs from firm fabric.
Final Quality-Control Checklist
- Every row has 145 sts, with 9 peaks and 8 valleys.
- The peaks and valleys line up vertically all the way up the panel.
- The pattern alternates 2 solid rows and 2 mesh rows with no skipped bands.
- The holes in each pair of mesh rows are staggered evenly.
- The side edges are straight and the width stays 40.5 in (102.9 cm) before the border.
- The border counts match: 145 on top, 143 on the bottom, 332 on each side, and four 3-sc corners.
- The finished size is 41 in (104.1 cm) × 83.5 in (212.1 cm).
- All ends are woven into solid bands and trimmed close.
- There are no loose or loopy stitches at the dc3tog valleys.
Troubleshooting
The panel is getting narrower or wider. Count the stitches in the last few rows. Most often a dc3tog was worked as a dc2tog, or a ch-1 sp was skipped instead of counted. Frog back to the last correct row.
The peaks drift sideways. A peak was worked one stitch off center. Use the peak markers, and remember that on mesh rows the peak goes into the center ch-1 sp.
The side edges wave. Keep the turning ch-2 snug and work the edge dc2tog firmly. In the border, check that you have exactly 2 sc per row end.
The mesh holes look tall and stretched. Your dc stitches are too loose for the ch-1 spaces. Pull the ch-1 a little tighter, or go down a hook size for the mesh rows only.
The bottom hem flares. The foundation chain is too loose. Next time, chain with a hook one size larger and work Row 1 with the main hook. For now, block the hem firmly.
The panel is too short or too long for your window. Each 4-row repeat adds or removes 2 in (5.1 cm). Always end on the 2 solid rows.
Care
Hand wash or machine wash on a gentle cold cycle in a mesh laundry bag. Lay the panel flat to dry and reshape it while damp. Never hang it wet, because the weight of the water will stretch it.
Final Notes
The measurements build in a clear chain. One 16-st repeat is 4.5 in (11.4 cm) wide, and 9 repeats plus edges give 40.5 in (102.9 cm). Each row is 0.5 in (1.3 cm) tall, so 166 rows give 83 in (210.8 cm). One sc border round adds 0.25 in (0.6 cm) on every edge, for a finished panel of 41 in (104.1 cm) × 83.5 in (212.1 cm).
If you check your gauge on the swatch and count to 145 stitches on every row, the waves will stay aligned and the edges will hang straight. Make a second panel to the same counts, and you will have a matching pair of curtains.
Happy crocheting!