

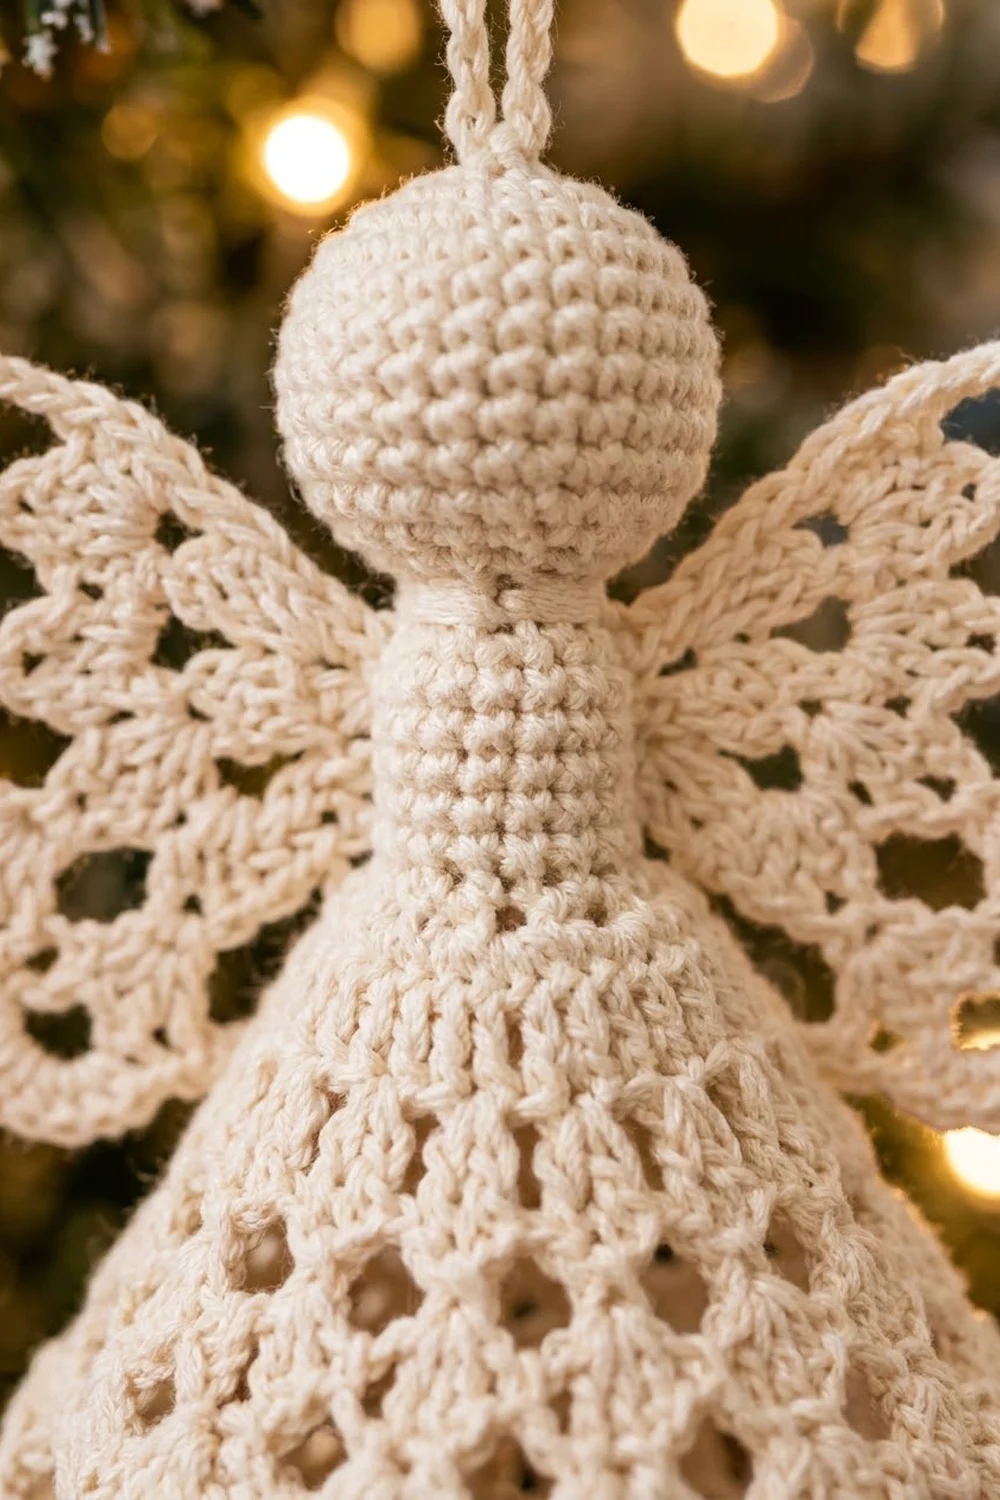
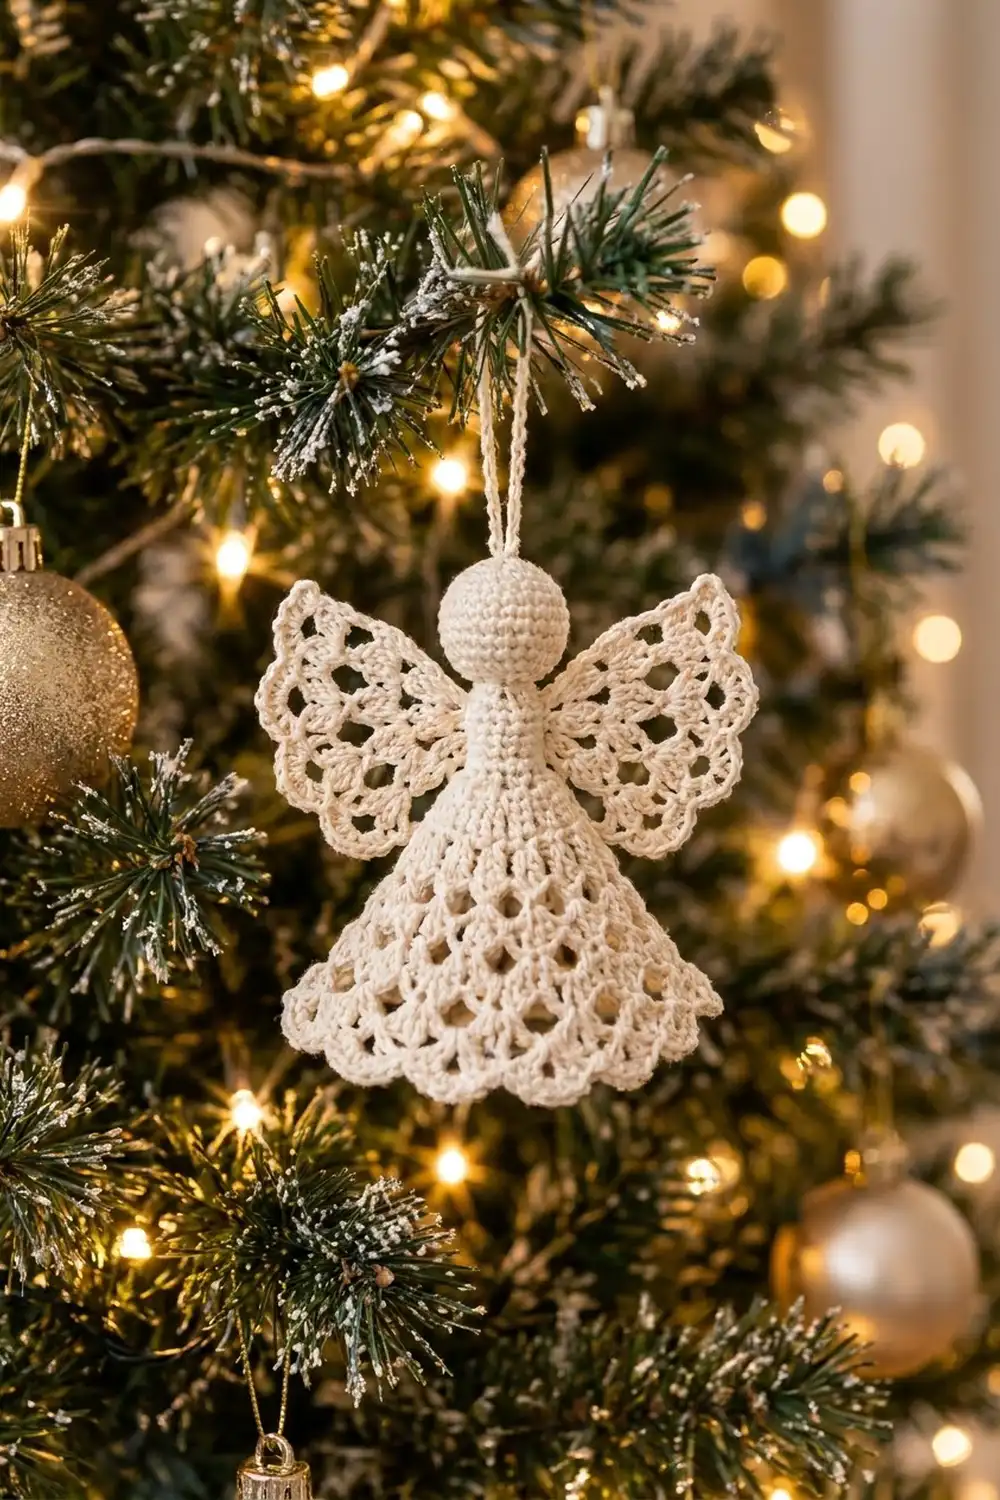
This little angel is a classic heirloom ornament. It has a round stuffed head, a narrow bodice, a bell-shaped lace skirt with a scalloped hem, and two fan wings that frame the head. Hung on a tree with warm lights behind it, the open lace glows.
The whole ornament is made in one color, a soft cream or ivory cotton thread. One neutral color keeps the look elegant and vintage and lets the shell texture stand out. Bright white, pale gold or a metallic blend also suit the design.
This pattern uses US crochet terms. The finished angel measures about 4.5 in (11.4 cm) tall without the hanging loop and about 4.5 in (11.4 cm) across the wings. Flattened lightly, it is about 3.75 in (9.5 cm) wide at the hem.
Construction is simple. The head and body are one continuous piece, worked from the top of the head down: a stuffed sc ball, a short neck, a solid dc bodice, then flaring shell rounds and a scalloped hem. You make the two wings separately as small fans and sew them to the back. A chain loop finishes the top, and you stiffen the skirt over a cone.
Finished Size and Construction
- Finished size: 4.5 in (11.4 cm) tall, 4.5 in (11.4 cm) wingspan
- Skill level: Intermediate (small thread work, stuffing, shell rounds)
- Terminology: US crochet terms
- Yarn weight: Size 3 crochet cotton thread (Lace / 0)
- Hook: 2.25 mm (US B-1)
- Number of pieces: 1 finished ornament (made from 1 head-and-body piece + 2 wings)
- Layout: Head on top, cone skirt below, one wing on each side of the neck
- Head size: about 1 in (2.5 cm) diameter, stuffed
- Body size before hem edging: about 3.2 in (8.1 cm) from neck to Round 22
- Hem edging depth: about 0.3 in (0.8 cm)
- Wing size: about 1.75 in (4.4 cm) from point to scalloped edge
Materials
Choose a mercerized cotton thread in size 3. It has a slight sheen and crisp stitch definition, and it holds its shape well after stiffening. Avoid fuzzy or very stretchy blends: they blur the lace and sag on the tree.
- Cream / ivory size 3 cotton thread: 15 g, about 38 m (41 yd), for one angel
- 2.25 mm (US B-1) crochet hook
- Small amount of polyester fiberfill for the head
- Tapestry needle with an eye large enough for the thread
- Stitch marker
- Scissors
- Fabric stiffener (or a 1:1 mix of white glue and water)
- Blocking cone: a paper or plastic cone about 3.75 in (9.5 cm) wide at the base and 3.5 in (8.9 cm) tall, wrapped in plastic wrap
- Rust-proof pins and a foam blocking board
All quantities include a margin of roughly 25%. One angel actually uses about 12 g.
Abbreviations (US Terms)
- ch – chain
- sl st – slip stitch
- sc – single crochet
- dc – double crochet
- inc – 2 sc in the same stitch
- dec – single crochet 2 together (invisible decrease recommended)
- sp(s) – space(s)
- st(s) – stitch(es)
- MR – magic ring
- rep – repeat
Special stitches
- Small shell: (2 dc, ch 2, 2 dc) in the same stitch or space.
- Large shell: (3 dc, ch 2, 3 dc) in the same space.
- Wide shell: (3 dc, ch 3, 3 dc) in the same space.
- V-stitch (V-st): (dc, ch 2, dc) in the same space.
- Beginning shell: sl st into the shell’s ch sp, ch 3 (counts as first dc), then work the rest of the shell in that same sp.
Gauge and Checkpoints
Gauge is less critical than in a garment, but a tight, even fabric hides the stuffing and keeps the skirt crisp. Make the head first and use it as your test piece.
- Sc gauge: 8 sc and 8 sc rounds = 1 in (2.5 cm).
- Checkpoint 1, head Round 4 (24 sts): the flat circle measures just under 1 in (2.5 cm) across.
- Checkpoint 2, after Round 14 (bodice): body measures about 0.75 in (1.9 cm) from neck to bottom edge.
- Checkpoint 3, after Round 18: the four shell rounds add about 1.2 in (3.0 cm); each shell round is about 0.3 in (0.8 cm) tall.
- Checkpoint 4, after Round 22: body measures about 3.2 in (8.1 cm) from neck to edge.
- Checkpoint 5, finished wing: about 1.75 in (4.4 cm) from point to edge.
If your head circle is larger than 1 in (2.5 cm) at Round 4, go down to a 2.0 mm hook or tighten your tension. If it is much smaller, go up to 2.5 mm. You use the same hook for the skirt and wings, so getting the head right sets the size of the whole ornament.
Head and Body (One Piece)
Work the head in a continuous spiral and place a marker in the first st of each round. From Round 12 on, the body is worked in joined rounds.
Head
- Round 1: 6 sc in MR. (6 sts)
- Round 2: inc in each st around. (12 sts)
- Round 3: (sc in next st, inc) 6 times. (18 sts)
- Round 4: (sc in next 2 sts, inc) 6 times. (24 sts) Checkpoint 1.
- Rounds 5–8: sc in each st around. (24 sts each round)
- Round 9: (sc in next 2 sts, dec) 6 times. (18 sts)
- Round 10: (sc in next st, dec) 6 times. (12 sts)
Stuff the head firmly now and shape it into a smooth ball. Push the fiberfill up so none sits at the opening.
- Round 11 (neck): sc in each st around, then sl st to the first st to end the spiral. (12 sts)
Add a last pinch of stuffing through the neck if needed. The neck is narrow enough to keep the stuffing in the head.
Bodice
- Round 12: ch 3 (counts as dc throughout), dc in same st, 2 dc in each remaining st around, join with sl st to top of ch-3. (24 dc)
- Round 13: ch 3, dc in each st around, join. (24 dc)
- Round 14: ch 3, dc in each st around, join. (24 dc) Checkpoint 2.
These three solid dc rounds form the smooth, tight bodice under the head.
Skirt
- Round 15: ch 3, (dc, ch 2, 2 dc) in same st as join, skip next 2 sts, small shell in next st; rep from * 6 more times, skip last 2 sts, join to top of ch-3. (8 small shells = 32 dc, 8 ch-2 sps) The 24 bodice sts divide evenly into 8 repeats of 3 sts.
- Round 16: beginning small shell in first shell sp, ch 1, small shell in next shell sp, ch 1; rep from * 6 more times, join. (8 small shells = 32 dc, 8 ch-1 sps between)
- Round 17: beginning small shell in first shell sp, ch 2, small shell in next shell sp, ch 2; rep from * 6 more times, join. (8 small shells = 32 dc, 8 ch-2 sps between)
- Round 18: beginning small shell in first shell sp, ch 3, small shell in next shell sp, ch 3; rep from * 6 more times, join. (8 small shells = 32 dc, 8 ch-3 sps between) Checkpoint 3.
In Rounds 16–18 only the chain spaces get longer. This opens the lace and starts the cone flare.
- Round 19: beginning large shell in first shell sp, ch 3, large shell in next shell sp, ch 3; rep from * 6 more times, join. (8 large shells = 48 dc, 8 ch-3 sps between)
- Round 20: beginning large shell in first shell sp, ch 2, V-st in next ch-3 sp, ch 2, large shell in next shell sp, ch 2, V-st in next ch-3 sp, ch 2; rep from * 6 more times, join. (8 large shells + 8 V-sts = 48 dc + 16 dc = 64 dc; 16 ch-2 sps between)
- Round 21: beginning large shell in first shell sp, ch 2, skip next ch-2 sp, large shell in ch-2 sp of next V-st, ch 2, skip next ch-2 sp, large shell in next shell sp, ch 2, skip next ch-2 sp, large shell in next V-st sp, ch 2, skip next ch-2 sp; rep from * 6 more times, join. (16 large shells = 96 dc, 16 ch-2 sps between)
- Round 22: beginning wide shell in first shell sp, ch 3, wide shell in next shell sp, ch 3; rep from * 14 more times, join. (16 wide shells = 96 dc, 16 ch-3 sps between) Checkpoint 4.
Round 20 is the only round that doubles the number of repeats. That is what turns the narrow upper skirt into the wide bell at the hem. Do not fasten off; the hem edging comes next.
Wings (Make 2)
Each wing is a half-circle fan worked in turned rows from a magic ring.
- Row 1: MR, ch 3 (counts as dc throughout), 6 dc in ring, pull ring closed but keep it as a flat half-circle; turn. (7 dc)
- Row 2: ch 3, dc in same st, 2 dc in each remaining st across; turn. (14 dc)
- Row 3: ch 3, dc in next st, ch 2, dc in next 2 sts; rep from * 5 more times; turn. (14 dc in 7 pairs, 6 ch-2 sps)
- Row 4: ch 3, small shell in each ch-2 sp across, dc in top of turning ch; turn. (6 small shells + 2 edge dc = 26 dc)
- Row 5: ch 3, large shell in next shell sp, ch 1; rep from * 4 more times, large shell in last shell sp, dc in top of turning ch; turn. (6 large shells + 2 edge dc = 38 dc, 5 ch-1 sps)
- Row 6 (edging): ch 1, sc in first st, 7 dc in next shell sp, sc in next ch-1 sp; rep from * 4 more times, 7 dc in last shell sp, sc in top of turning ch. (6 scallops = 42 dc + 7 sc) Checkpoint 5.
Fasten off, leaving a 10 in (25.4 cm) tail for sewing.
Hem Edging (Border)
The hem border turns the 16 wide shells of Round 22 into 16 rounded scallops.
Border gauge: each scallop is about 0.47 in (1.2 cm) wide along the hem. Sixteen scallops give a hem circumference of about 7.5 in (19.1 cm), or 3.75 in (9.5 cm) across when flattened. The edging adds about 0.3 in (0.8 cm) to the length.
- Round 23: sl st in next 2 dc and into the ch-3 sp of the first wide shell, ch 3 (counts as dc), 6 dc in same sp, sc in next ch-3 sp, 7 dc in next shell sp, sc in next ch-3 sp; rep from * 14 more times, join with sl st to top of ch-3. (16 scallops = 112 dc + 16 sc = 128 sts)
Counts per side: the skirt is round with no corners, so count it as two halves when flattened. Each half (front and back) has 8 scallops: 56 dc + 8 sc = 64 sts per half, and 64 + 64 = 128.
Why the math works: each ch-3 shell space gets exactly one 7-dc scallop, and each ch-3 space between shells gets exactly one sc. Round 22 has 16 of each, so the edging has 16 scallops and 16 anchoring sc, with nothing added or skipped.
Fasten off and weave in the end.
Assembly
- Lay the angel face down. Find the back center of the bodice (the side with the round joins).
- Place one wing on each side so the ring point sits on Round 13, about 0.25 in (0.6 cm) from back center. The straight edges of Row 1 face the neck, and the scallops face outward and up.
- Sew each wing point on firmly with 5–6 small whipstitches through the bodice. Then add a few stitches up the wing’s straight edge so it doesn’t flop.
- Hanging loop: join thread at the top center of the head (Round 1), ch 30, sl st into the same spot, fasten off. The loop rises about 1.5 in (3.8 cm) above the head.
- Weave in all ends inside the body.
Final Blocking
- Mix fabric stiffener following the label, or use 1 part white glue to 1 part water.
- Dip only the skirt and wings. Keep the head dry so it stays soft and round. Squeeze out the excess and blot with a towel.
- Slide the skirt over the plastic-wrapped cone. Pull it down evenly so the hem is level and measures 3.75 in (9.5 cm) across.
- Open every shell space with a pin tip or toothpick, and pin each of the 16 scallops so they curve evenly.
- Lay the wings flat on the foam board. Pin the point and each scallop, opening the fan to about 1.75 in (4.4 cm) from point to edge.
- Gently pinch each wing at the sc between scallops 3 and 4 and pin that point slightly inward. This forms the upper and lower lobes.
- Let everything dry completely, for at least 12 hours. Remove the pins, slide the angel off the cone, and clear any glue film from the spaces.
Final Quality-Control Checklist
- Head is firm, round, and about 1 in (2.5 cm) across; no stuffing shows.
- Bodice has 3 smooth dc rounds of 24 sts each.
- Skirt has 8 shells through Round 19 and 16 shells from Round 21.
- Hem has 16 scallops, 128 sts total, with a level edge.
- Angel stands about 4.5 in (11.4 cm) tall without the loop.
- Both wings have 6 scallops, match in size, and sit at the same height.
- Wingspan is about 4.5 in (11.4 cm).
- Loop is centered and the angel hangs straight.
- All ends are woven in and trimmed.
Troubleshooting
- Stuffing pokes through the head: your tension is too loose. Go down a hook size, use invisible decreases, and keep the stuffing away from the stitches.
- Skirt ruffles instead of forming a cone: the chains are too long or loose. Check that Round 20 uses ch 2, not ch 3, on both sides of each V-st.
- Skirt is too narrow at the hem: look for a missed V-st in Round 20. Round 21 should have 16 shells.
- Scallops look flat: make sure each scallop has 7 dc and that the sc goes into the ch-3 space, not on top of a dc.
- Wings curl: block them flat and let the stiffener dry fully before handling.
- Angel tilts on the tree: reattach the loop at the exact top of the head and check that both wings are at the same height.
Care
Dust gently with a soft brush and store flat, wrapped in tissue, in a box. If the angel gets dirty, spot clean it with cool water, then stiffen and block it again as above.
Final Notes
The measurements build in a short chain. A head circle just under 1 in (2.5 cm) at Round 4 confirms your gauge. The bodice reaches 0.75 in (1.9 cm) and the body reaches 3.2 in (8.1 cm) at Round 22. The hem edging brings the body to 3.5 in (8.9 cm) below the neck. Add the 1 in (2.5 cm) head and the angel stands 4.5 in (11.4 cm) tall, and the 1.75 in (4.4 cm) wings give it a 4.5 in (11.4 cm) span.
Make one angel and check it against the checklist. Then make a small choir of them for the tree or for gift tags.
Happy crocheting!