

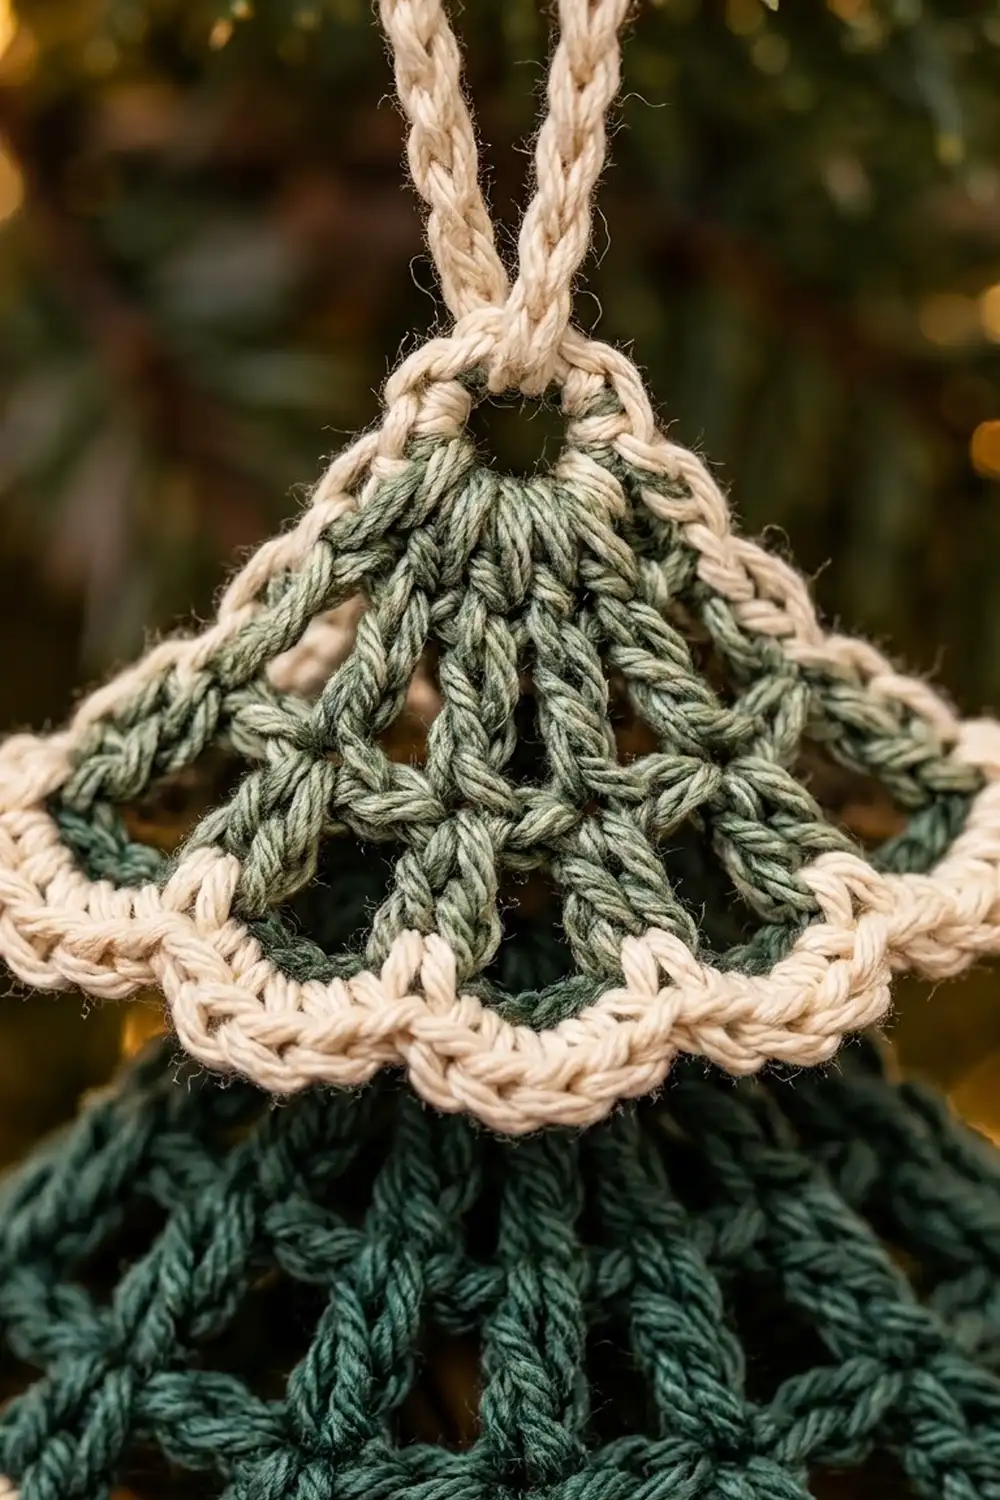
This little tree ornament is made from three lacy fan-shaped tiers stacked on a cream chain cord. The top tier is a soft heathered sage. The two lower tiers are deep forest green. Every tier ends with a bright cream scalloped edge that looks like a dusting of snow.
The style is cozy and classic. Each fan has open spokes and small windows, a neat scalloped edge, and the ornament hangs from a simple chain loop. It looks good on a real tree, a wreath, or a gift box.
The pattern uses US crochet terms. The finished ornament is 5 in (12.7 cm) wide and 4.5 in (11.4 cm) tall. The hanging loop adds 2 in (5.1 cm), so it hangs 6.5 in (16.5 cm) long in total.
The construction is short and simple. You crochet three fans in turned rows, each starting from a small ring. Then you add a two-row cream scalloped border to the curved edge of each fan. Last, you make one cream chain cord and sew the tiers onto it so that each tier overlaps the one below.
Finished Size and Construction
- Finished size: 5 in (12.7 cm) wide x 4.5 in (11.4 cm) tall, plus a 2 in (5.1 cm) loop
- Skill level: Easy
- Terminology: US crochet terms
- Yarn weight: Worsted (#4), cotton or cotton blend
- Hook: 4.0 mm (G-6)
- Number of pieces: 4 (three fan tiers and one chain cord)
- Layout: 3 tiers stacked vertically, smallest on top, largest on the bottom
- Piece sizes with border (width x height): top 3 in x 1.5 in (7.6 x 3.8 cm); middle 4 in x 2 in (10.2 x 5.1 cm); bottom 5 in x 2.5 in (12.7 x 6.4 cm)
- Piece sizes before border: top 2 in x 1 in (5.1 x 2.5 cm); middle 3 in x 1.5 in (7.6 x 3.8 cm); bottom 4 in x 2 in (10.2 x 5.1 cm)
- Border depth: 0.5 in (1.3 cm), worked on the curved edge of each tier
To measure height, go from the center of the starting ring straight down to the middle of the bottom edge. To measure width, go from corner to corner across the lower edge.
Materials
Choose a smooth, plied worsted cotton. Cotton shows the lace spokes clearly and keeps the scallops crisp after blocking. Acrylic also works, but it relaxes more and may need extra blocking.
- Sage green (top tier): 3 g, about 6 m
- Forest green (middle and bottom tiers): 8 g, about 15 m
- Cream (borders and cord): 6 g, about 11 m
Tools:
- 4.0 mm (G-6) crochet hook
- Tapestry needle
- Scissors
- Stitch markers (3)
- Ruler or tape measure
- Blocking mat, rust-proof pins, and a spray bottle
All quantities include extra yarn for gauge checks and sewing tails.
Abbreviations (US Terms)
- ch – chain
- sl st – slip stitch
- sc – single crochet
- hdc – half double crochet
- dc – double crochet
- sp – space
- st(s) – stitch(es)
- beg – beginning
Special stitch – scallop: work (hdc, dc, hdc) all in the same stitch.
Gauge and Checkpoints
Gauge: 16 dc and 8 rows = 4 in (10.2 cm) in worsted cotton with a 4.0 mm hook. In practice, each dc row adds about 0.5 in (1.3 cm) to the radius of the fan.
Border gauge: 4 sc = 1 in (2.5 cm) along the edge.
Make the top tier first and use it as your swatch. Measure at each stage:
- After Row 1: about 0.5 in (1.3 cm) from the ring center to the row edge
- After Row 2: about 1 in (2.5 cm) tall and 2 in (5.1 cm) wide
- After Row 3: about 1.5 in (3.8 cm) tall and 3 in (7.6 cm) wide
- After Row 4: about 2 in (5.1 cm) tall and 4 in (10.2 cm) wide
- After the border: the height grows by 0.5 in (1.3 cm) and the width by about 1 in (2.5 cm)
If your tier is too big, switch to a 3.75 mm hook. If it is too small, switch to a 4.5 mm hook. If the height is right but the fan ruffles, your chains are too loose, so work them a little tighter. If the fan cups, loosen the chains.
Tier Pattern
All three tiers start with the same rows. The top tier stops after Row 2, the middle tier after Row 3, and the bottom tier after Row 4. Each tier opens into a fan of about 150 degrees, so its straight sides slope down from the ring like a little tree.
Leave an 8 in (20.3 cm) beginning tail on every tier. You will use it later to sew the tier to the cord.
Ring: Ch 4, sl st in first ch to form a ring.
Row 1: Ch 3 (counts as dc), 5 dc in ring. Turn. (6 dc)
Row 2: Ch 4 (counts as dc + ch 1), skip first dc, dc in next dc, ch 1 4 times, dc in top of beg ch-3. Turn. (6 dc, 5 ch-1 sp; 11 sts counting chains)
These six dc are the spokes of the fan.
Top tier: Work the Ring through Row 2 in sage green. Fasten off. Checkpoint: 2 in (5.1 cm) wide, 1 in (2.5 cm) tall.
Row 3: Ch 3 (counts as dc), dc in first dc, ch 1, skip ch-1 sp, 2 dc in next dc 5 times, working the last 2 dc into the 3rd ch of the turning ch-4. Turn. (12 dc in 6 pairs, 5 ch-1 sp; 17 sts counting chains)
Middle tier: Work the Ring through Row 3 in forest green. Fasten off. Checkpoint: 3 in (7.6 cm) wide, 1.5 in (3.8 cm) tall.
Row 4: Ch 3 (counts as dc), dc in next dc, ch 2, skip ch-1 sp, dc in each of next 2 dc 5 times, working the last dc into the top of the turning ch-3. Turn. (12 dc in 6 pairs, 5 ch-2 sp; 22 sts counting chains)
The ch-2 spaces open up small windows between the paired spokes.
Bottom tier: Work the Ring through Row 4 in forest green. Fasten off. Checkpoint: 4 in (10.2 cm) wide, 2 in (5.1 cm) tall.
Chain Cord
With cream, ch 16, then sl st in the first ch to form the hanging loop. Ch 9 more for the spine. Fasten off, leaving a 6 in (15.2 cm) tail.
At 4 ch per 1 in (2.5 cm), the loop is 4 in (10.2 cm) around and hangs about 2 in (5.1 cm) tall. The spine is 2.25 in (5.7 cm) long.
Counting down from the loop join, mark spine chains 1, 4, and 9. These are where the tiers attach.
Make All Pieces
- Sage green: 1 top tier (Rows 1–2)
- Forest green: 1 middle tier (Rows 1–3) and 1 bottom tier (Rows 1–4)
- Cream: 3 borders (one per tier) and 1 chain cord
Layout, front view:
        [ loop ]
           |
      [ TOP - sage ]        ring at spine ch 1
     [ MIDDLE - green ]     ring at spine ch 4
    [  BOTTOM - green  ]    ring at spine ch 9
Joining
Finish the Border section on all three tiers before you join them.
Method: sew each tier’s ring to the cord with that tier’s own beginning tail. Lay the cord face down on the table. Then place the tiers face down on top of it, starting with the bottom tier. When you turn the ornament over, each upper tier will sit in front of the tier below it.
Stitch-to-stitch logic:
- Center the bottom tier’s ring over spine ch 9. Thread the forest green tail onto the needle and pass it through the ring and around the chain 3 times. Knot it on the back.
- Center the middle tier’s ring over spine ch 4, which is 5 ch (1.25 in / 3.2 cm) above the bottom ring. Sew it the same way.
- Center the top tier’s ring over spine ch 1, which is 3 ch (0.75 in / 1.9 cm) above the middle ring. Sew it the same way.
- Use the cream cord tail to tack the end of the spine to the back of the bottom tier’s ring.
Tension: pull the wraps snug so the ring hugs the chain, but not so hard that the ring puckers. The fans should hang straight and flat.
Size checkpoint: each upper tier overlaps the tier below by about 0.75 in (1.9 cm). From the top ring to the bottom scallops, the tree measures 0.75 in + 1.25 in + 2.5 in = 4.5 in (11.4 cm). The widest point is the bottom tier, at 5 in (12.7 cm).
Border
Work the border on each tier separately, along the curved edge only. It has two rows: a sc base row and a scallop row. Border gauge is 4 sc = 1 in (2.5 cm), and the border is 0.5 in (1.3 cm) deep.
With the front of the tier facing you, join cream with a sl st in the first dc of the last row.
Top tier – Border Row 1: Ch 1, 2 sc in first dc, sc in next ch-1 sp, sc in next dc 4 times, sc in last ch-1 sp, 2 sc in last dc. Turn. Count: 11 sts worked 1-per-existing stitch + 2 extra at the corners = 13 sc.
Middle tier – Border Row 1: Ch 1, 2 sc in first dc, sc in next dc, sc in next ch-1 sp, sc in each of next 2 dc 4 times, sc in last ch-1 sp, sc in next dc, 2 sc in last dc. Turn. Count: 17 sts worked 1-per-existing stitch + 2 extra at the corners = 19 sc.
Bottom tier – Border Row 1: Ch 1, 2 sc in first dc, sc in next dc, [2 sc in next ch-2 sp, sc in each of next 2 dc] twice, 3 sc in next (center) ch-2 sp, [sc in each of next 2 dc, 2 sc in next ch-2 sp] twice, sc in next dc, 2 sc in last dc. Turn. Count: 22 sts worked 1-per-existing stitch (one per dc, one per chain of each ch-2 sp) + 3 extra (2 corners, 1 center) = 25 sc.
Border Row 2 (all tiers): Ch 1, sc in first sc, scallop in next sc, sc in next sc across. Fasten off and weave in the end.
- Top: 6 scallops, 7 sc (25 sts)
- Middle: 9 scallops, 10 sc (37 sts)
- Bottom: 12 scallops, 13 sc (49 sts)
Why the math works: the scallop row needs an odd stitch count so it starts and ends with a sc. Each Row 1 total (13, 19, 25) is odd, which gives 6, 9, and 12 scallops. Row 1 also sits about 0.25 in (0.6 cm) farther from the ring than the last green row, so it needs a little more length. At that radius, a 150-degree arc is about 3.25 in (8.3 cm), 4.5 in (11.4 cm), and 6 in (15.2 cm) for the three tiers. That closely matches 13, 19, and 25 sc at 4 sc per inch. The bottom tier has a few stitches to spare, which gives its scallops room to fan out.
Final Blocking
- Weave in any remaining ends on the back without disturbing the sewn rings.
- Spray each tier until it is damp, or dunk the whole ornament in cool water and press it in a towel.
- Pin each tier flat on the mat, face up. Pin the ring first, then the two corners, then the tip of every scallop.
- Check the widths while pinning: top 3 in (7.6 cm), middle 4 in (10.2 cm), bottom 5 in (12.7 cm).
- Gently open each window with a pin so the spokes run straight out from the ring.
- Let the ornament dry completely, for at least 6 hours.
- Hang the ornament and check that all three tiers sit centered on the cord.
Final Quality-Control Checklist
- The top tier has 6 single spokes and 5 windows. The middle and bottom tiers each have 6 paired spokes and 5 windows.
- Border Row 1 counts are 13, 19, and 25 sc.
- Scallop counts are 6, 9, and 12.
- Each tier lies flat without cupping or ruffling.
- The rings are sewn at spine ch 1, 4, and 9.
- Each tier overlaps the one below by about 0.75 in (1.9 cm).
- The tree is 4.5 in (11.4 cm) tall and 5 in (12.7 cm) wide.
- All ends are hidden on the back.
Troubleshooting
The fan cups into a cone. Your chain spaces are too tight. Loosen the chains or go up half a hook size.
The fan ruffles. Either your chains are too loose or you added an extra dc. Recount against the row totals.
The scallop row doesn’t end on a sc. Border Row 1 has an even count. Recount it and fix the corner or center increases.
The border pulls the edge inward. Your sc are too tight. Work Border Row 1 with a 4.5 mm hook.
The tiers twist on the cord. Add one more wrap at each ring. Then lightly tack the lower edge of each upper tier to the tier behind it.
The loop is too long or too short. Change the loop chain in multiples of 4. Each 4 ch changes the loop height by about 0.5 in (1.3 cm).
Care
Hand wash in cool water, press out the extra water in a towel, and dry flat, reshaping lightly. Store flat in tissue paper so the scallops keep their shape.

Final Notes
The whole ornament rests on one simple chain of measurements. Each dc row adds 0.5 in (1.3 cm), so before the border the tiers are 1 in, 1.5 in, and 2 in (2.5, 3.8, and 5.1 cm) tall. The 0.5 in (1.3 cm) border brings them to 1.5 in, 2 in, and 2.5 in (3.8, 5.1, and 6.4 cm) tall and 3 in, 4 in, and 5 in (7.6, 10.2, and 12.7 cm) wide. Sewn to the cord with 0.75 in (1.9 cm) overlaps, the tree measures 4.5 in (11.4 cm) tall, plus a 2 in (5.1 cm) loop.
Check your top tier against these numbers first, and the rest of the tree will fall into place.
Happy crocheting!