

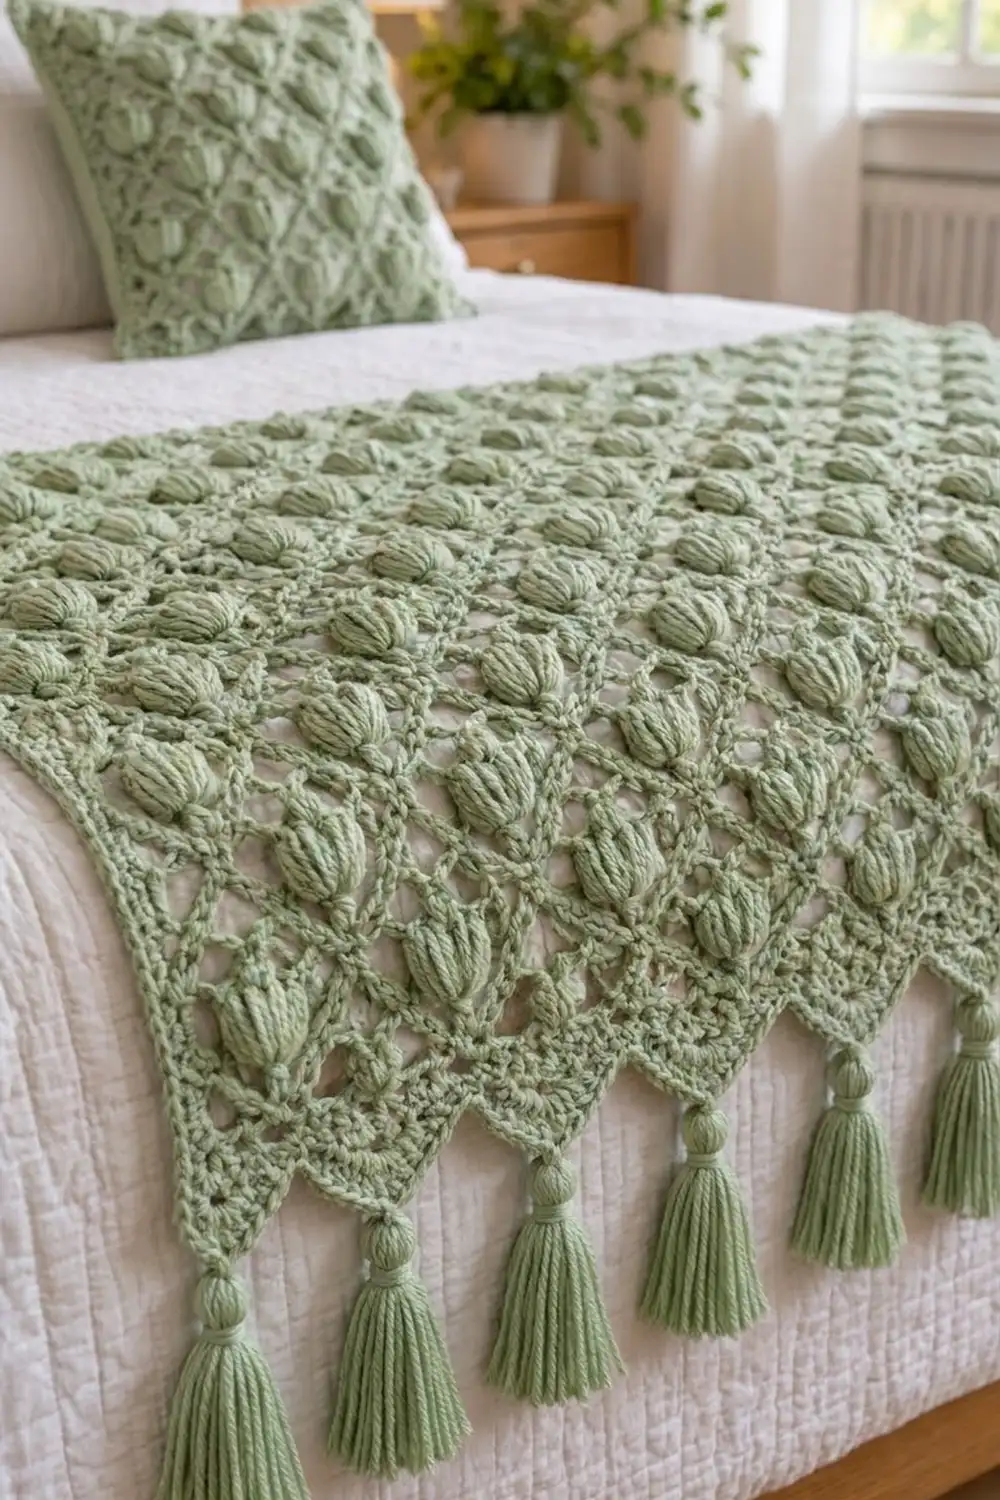
This runner pairs an airy diamond lattice with rows of plump tulip puffs. It is worked in a single soft sage green, and the colour, the texture and the tassels together give it a calm, cottage-style look at the foot of a bed.
The pattern uses US crochet terms. The finished runner is 18.5 in (47.0 cm) wide at the point tips and 80.5 in (204.5 cm) long, and the tassels hang another 4 in (10.2 cm) below each point.
The runner is one piece. You work the lattice body in rows along the length, then add a single round of sc all the way around. Finally you work a pointed edging along each long side and hang a tassel from every point. There are no motifs and no joining.
The pattern repeat is simple, but the counts matter: the edging only works if the body keeps its exact stitch count.
Finished Size and Construction
- Finished size: 18.5 × 80.5 in (47.0 × 204.5 cm), measured at the point tips
- Skill level: Intermediate
- Terminology: US
- Yarn weight: Worsted (#4)
- Hook: 5.5 mm (I-9)
- Number of pieces: 1
- Layout: One rectangle worked in rows along the length
- Body size before border: 14.5 × 80 in (36.8 × 203.2 cm)
- Border depth: 2 in (5.1 cm) on each long side; 0.25 in (0.6 cm) on each short end
Materials
Yarn: Use a smooth worsted-weight yarn, such as a cotton-acrylic blend, so the puffs look crisp. Fuzzy yarns blur the tulip shapes.
- Sage green: 500 g / about 1,000 m (1,094 yd)
- Body: about 550 m
- Border and edging: about 120 m
- 40 tassels: about 220 m
These quantities include a margin of about 13%. Buy all the yarn from one dye lot.
Tools:
– 5.5 mm (I-9) crochet hook
– Tapestry needle
– Scissors
– Stitch markers
– Tape measure
– A stiff card 4.5 in (11.4 cm) tall, for the tassels
– Blocking mats and rustproof pins
Abbreviations (US Terms)
- ch – chain
- sl st – slip stitch
- sc – single crochet
- hdc – half double crochet
- dc – double crochet
- tr – treble crochet
- dtr – double treble crochet
- sk – skip
- sp – space
- st(s) – stitch(es)
- tp – tulip puff
Tulip puff (tp): [Yo, insert hook in the st, yo, pull up a loop to 0.75 in (1.9 cm)] 5 times (11 loops on hook). Yo and draw through 10 loops, then yo and draw through the remaining 2 loops. Ch 1 to lock. The locking ch does not count as a stitch.
Positions: Rows 1 and 2 introduce “sc positions” and “loop centers”. Every row places its stitches on one of those two sets of positions, and switching between them is what staggers the tulips.
Gauge and Checkpoints
Gauge: One pattern repeat (6 sts) = 2 in (5.1 cm) wide. Net rows are about 0.5 in (1.3 cm) tall and tulip rows about 1 in (2.5 cm) tall. Rows 1–7 measure 5 in (12.7 cm).
Test swatch: Ch 26 and work Rows 1–7 of the pattern below.
Your swatch should have:
– Row 1: 5 sc and 4 loops
– Row 3: 4 tulips
– Row 5: 3 tulips
Block the swatch lightly. It should measure 8 × 5 in (20.3 × 12.7 cm).
If the swatch is too big: go down 0.5 mm.
If it is too small: go up 0.5 mm.
If only the height is off: your tulip loops are the wrong length. Pull them up taller or shorter rather than changing the hook.
Checkpoints for the full runner (width measured across the rows):
– After Row 1: 80 in (203.2 cm) long
– After Row 3: 2 in (5.1 cm)
– After Row 7: 5 in (12.7 cm)
– After Row 11: 8 in (20.3 cm)
– After Row 15: 11 in (27.9 cm)
– After Row 19: 14 in (35.6 cm)
– After Row 20: 14.5 in (36.8 cm)

Body
The body is worked in rows. Rows 1–3 set up the pattern, Rows 4–7 form the repeat, and Row 20 closes it. Turn at the end of every row.
Foundation: Ch 242 loosely. If your chains are tight, make the foundation chain with a hook one size larger.
Row 1: Sc in the 2nd ch from hook. Ch 5, sk 5 ch, sc in next ch; rep from * across.
(41 sc, 40 ch-5 loops)
Number the sc 0 to 240 in steps of 6. These are the sc positions. The middle of each loop (3, 9, … 237) is a loop center.
Row 2: Ch 1, sc in first sc, ch 2, sc in 3rd ch of next loop. Ch 5, sc in 3rd ch of next loop; rep from * 38 more times. Ch 2, sc in last sc.
(42 sc, 39 ch-5 loops, 2 ch-2 sps)
Row 3 (Tulip Row A): Ch 1, sc in first sc, ch 2, tp in next sc. Ch 2, sc in 3rd ch of next loop, ch 2, tp in next sc; rep from * 38 more times. Ch 2, sc in last sc.
(40 tp, 41 sc, 80 ch-2 sps)
The tulips now sit on the loop centers.
Row 4: Ch 1, sc in first sc. Ch 5, sk (ch 2, tp, ch 2), sc in next sc; rep from * across.
(41 sc, 40 ch-5 loops)
Each loop arches over one tulip and closes the top of its diamond.
Row 5 (Tulip Row B): Ch 1, sc in first sc, ch 2, sc in 3rd ch of next loop. Ch 2, tp in next sc, ch 2, sc in 3rd ch of next loop; rep from * 38 more times. Ch 2, sc in last sc.
(39 tp, 42 sc, 80 ch-2 sps)
These tulips sit on the sc positions, offset half a diamond from Row 3.
Row 6: Ch 1, sc in first sc, ch 2, sc in next sc. Ch 5, sk (ch 2, tp, ch 2), sc in next sc; rep from * 38 more times. Ch 2, sc in last sc.
(42 sc, 39 ch-5 loops, 2 ch-2 sps)
Row 7: Work as Row 3.
(40 tp, 41 sc, 80 ch-2 sps)
Rows 8–19: Work Rows 4–7 three more times.
Row 20: Work as Row 4.
(41 sc, 40 ch-5 loops)
Do not fasten off.
Body totals:
– 20 rows
– 5 A-rows × 40 + 4 B-rows × 39 = 356 tulips
– Size: 14.5 × 80 in (36.8 × 203.2 cm)
Border
Border gauge: 3 sc = 1 in (2.5 cm) along the long edges.
Corner rule: Each corner is (sc, ch 2, sc) worked into one st. The per-side counts below include the 2 sc worked into that side’s own corners and do not include the ch-2 corner sps.
Round 1 (all four sides)
Work this round with the Row 20 side facing.
Long side 1 (top of Row 20):
– Ch 1. Work (sc, ch 2, sc) in the first sc.
– 5 sc in next loop, sc in next sc; rep from * 38 times.
– 5 sc in the last loop.
– (sc, ch 2, sc) in the last sc.
Count: 1 + (40 × 5) + 39 + 1 = 241 sc.
Short end 1 (row ends):
– 1 sc in the end of each net row (11 rows)
– 3 sc in the end of each tulip row (9 rows)
That is 11 + 27 = 38 sc. With the 2 corner sc, the count is 40 sc.
Long side 2 (foundation side):
– (sc, ch 2, sc) in the first foundation ch.
– Sc in each of the next 239 ch.
– (sc, ch 2, sc) in the last ch.
Count: 241 sc.
Short end 2: Work as short end 1. Count: 40 sc.
Join with a sl st to the first sc.
(Round total: 562 sc and 4 ch-2 sps)
Why the math works:
– On the long sides, each 2 in repeat holds 6 sc (5 in the loop + 1 on the sc), so 240 sc ÷ 80 in gives exactly 3 sc per inch.
– On the short ends, open mesh row ends stretch, so 40 sc across 14.5 in (36.8 cm) lies flat without rippling.
Pointed edging (each long side)
Work the edging on one long side, then repeat it on the other.
Edging Row 1: Join yarn in the first sc of the long side (the sc worked into the corner). Ch 3 (counts as dc), then dc in each of the next 240 sc.
(241 dc)
Turn.
Edging Row 2:
– Sl st in the first dc.
– Point:
– sc, hdc, dc, tr, dtr in the next 5 sts (one st in each)
– (dtr, ch 3, dtr) in the next st, which is the peak
– dtr, tr, dc, hdc, sc in the next 5 sts (one st in each)
– sl st in the next st
– Rep from * across, working the last sl st in the top of the ch-3.
(20 points, 21 sl sts, 261 sts plus 20 ch-3 peaks)
Fasten off.
Why the math works: Each point uses 12 sts of Edging Row 1, and 1 + (12 × 20) = 241. Every 12 sts cover 4 in (10.2 cm), so the 20 points fill the full 80 in (203.2 cm).
Border depth on each long side:
– Round 1: 0.25 in (0.6 cm)
– Edging Row 1: 0.75 in (1.9 cm)
– Points: 1 in (2.5 cm)
Total: 2 in (5.1 cm) per long side. The finished width is 14.5 + 4 = 18.5 in (47.0 cm) at the tips and 16.5 in (41.9 cm) at the valleys.
Tassels (make 40)
- Wrap yarn 20 times around the 4.5 in (11.4 cm) card.
- Thread a 10 in (25.4 cm) strand under the wraps at the top and tie tightly.
- Cut the wraps at the bottom.
- Wrap a 24 in (61.0 cm) strand around the bundle 0.5 in (1.3 cm) below the top. This forms the rounded head. Knot the wrapping strand, then bury its tails inside the tassel.
- Trim the tassel to 4 in (10.2 cm).
- Use the tie strand to attach the tassel through the ch-3 peak of a point. Knot it securely and hide the ends in the tassel.
Attach one tassel to each of the 40 points (20 per long side).
Final Blocking
- Weave in all ends along the sc and dc stitches, not through the open chain loops.
- Soak the runner in cool water with wool wash for 15 minutes, then press the water out in a towel. Do not wring it.
- Lay it on mats and pin the long edges straight to 80.5 in (204.5 cm).
- Pin each ch-3 peak so the points sit 18.5 in (47.0 cm) apart across the width. Pin the valleys at 16.5 in (41.9 cm).
- Gently open each diamond with your fingers and round the tulips.
- Let the tassels hang free off the mats so they dry straight.
- Let everything dry completely, then comb the tassels and trim any stray strands.
Final Quality-Control Checklist
- Rows 1, 4, 8, 12, 16 and 20 each have 41 sc and 40 loops.
- Every A-row has 40 tulips and every B-row has 39.
- The tulips are staggered with no stacked columns.
- Round 1 has 241 sc on each long side and 40 on each short end.
- There are 20 even points per long side and 40 tassels in total.
- The width is 18.5 in (47.0 cm) at the tips and 16.5 in (41.9 cm) at the valleys.
- All tassels are 4 in (10.2 cm) long, with matching heads.
Troubleshooting
Tulips stack straight up instead of staggering: You worked a Row 3 where a Row 5 belonged, or the other way round. Check the row counts: a B-row has 39 tulips, an A-row has 40.
The runner narrows along one edge: Your turning stitches are tight. Make sure the edge ch-2 sps in Rows 2 and 6 are not pulled snug.
The foundation edge puckers: The foundation chain was too tight. Rework it with a larger hook.
Points lean sideways: You miscounted a point. Each point must use exactly 12 sts.
The short ends ripple: Work 2 sc instead of 3 in some tulip-row ends, then reblock.
Tulips look flat: Pull the loops up evenly to 0.75 in (1.9 cm), and lock every tulip with its ch 1.
Tassels look different sizes: Use the same card, the same 20 wraps and one trim length for all of them.
Care
Hand wash cool, or machine wash on a gentle cycle in a laundry bag, then dry flat. Do not hang the runner wet, because its weight will stretch the lattice.
Final Notes
Measurement chain:
1. 6-st repeats at 2 in (5.1 cm) give a body 80 in (203.2 cm) long.
2. 20 rows build the width to 14.5 in (36.8 cm).
3. Round 1 sets 241 sc per long side at exactly 3 per inch.
4. The pointed edging turns those 241 sts into 20 points of 12 sts each, adding 2 in (5.1 cm) per side.
5. The finished runner is 18.5 × 80.5 in (47.0 × 204.5 cm).
If one checkpoint is right, the next one will be too.
Happy crocheting!