

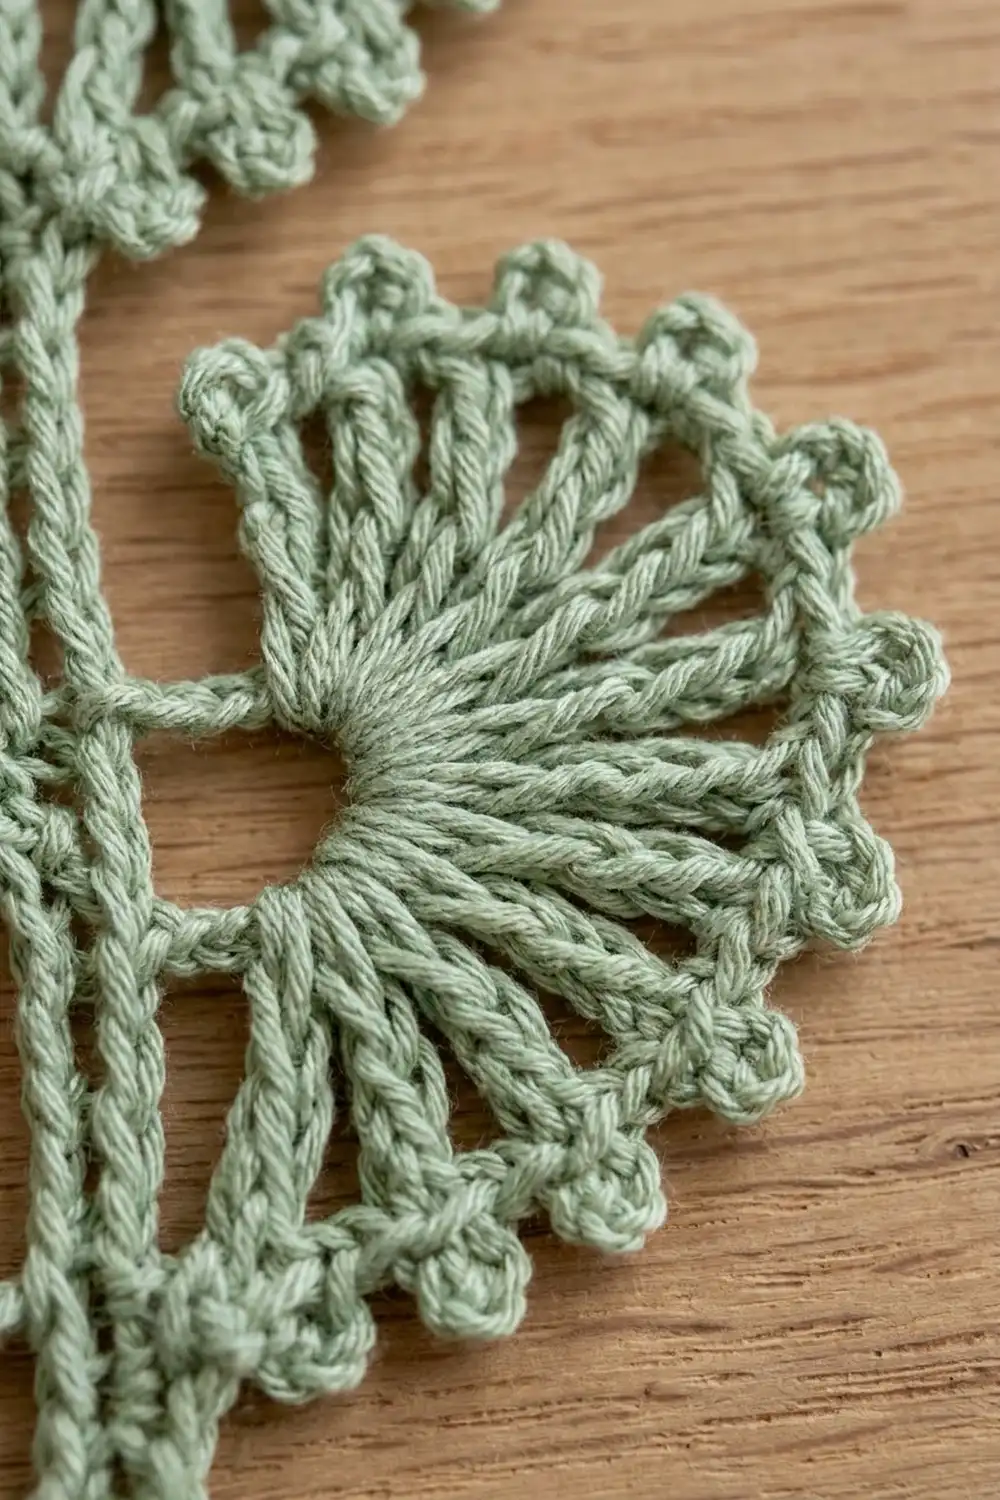
This lace strip looks like a single fern frond drawn in thread. A slim, cord-like stem runs down the center. Twelve open fan leaves branch off it, alternating left and right. Each fan is made of long spoke stitches with open spaces between them, and the rim is edged with small picots that look like beads of dew.
The sample uses one quiet color, sage green, in a smooth mercerized cotton. The look is light, airy, and botanical, so it suits a winter window as well as a spring one. You can hang one strip as a wall accent, or make several and clip each one to its own curtain ring for a sheer curtain.
The pattern uses US crochet terms. The finished strip measures 4.25 in (10.8 cm) at its widest and 17 in (43.2 cm) long, including the top hanging loop and the bottom ring.
Here’s how it’s built: first you chain the stem in one go, adding a ring at the bottom and a loop at the top. Pass 1 works down one side of the chain and adds six fans on the right. Pass 2 works up the other side and adds six fans on the left, offset halfway between the first ones. A single border round then goes all the way around, adding the picot rims.
Finished Size and Construction
- Finished size: 4.25 in (10.8 cm) wide × 17 in (43.2 cm) long
- Skill level: Intermediate
- Terminology: US crochet terms
- Yarn weight: Fingering / super fine (#1) mercerized cotton
- Hook: 2.5 mm (US B-1)
- Number of pieces: 1 strip
- Layout: 1 central stem with 12 fans, 6 per side, alternating
- Piece size before border: 3.75 in (9.5 cm) wide × 17 in (43.2 cm) long
- Stem length (between loops): 15 in (38.1 cm)
- Border depth: about 0.25 in (0.6 cm) on each fan rim. Along the stem, the border is slip stitches only.
Materials
Yarn: Use a smooth, mercerized fingering-weight cotton or cotton blend. Mercerized cotton gives crisp spokes and round picots, and it holds its shape after blocking. Avoid fuzzy or very soft yarns, because they blur the open spaces.
- Sage green: 15 g, about 50 m (55 yd) per strip
These amounts include a margin of about 25% for your gauge swatch and for weaving in ends. If you’re making several strips for a curtain, multiply by the number of strips and buy everything from the same dye lot.
Tools:
- 2.5 mm (US B-1) crochet hook
- Tapestry needle
- Scissors
- Rust-proof pins and a blocking board or foam mat
- Spray bottle, plus light spray starch (optional)
- Tape measure or ruler
Abbreviations (US Terms)
- ch – chain
- sl st – slip stitch
- sc – single crochet
- dc – double crochet
- tr – treble crochet
- sp – space
- st(s) – stitch(es)
Special stitch – Picot: Ch 3, then sl st in the 3rd ch from the hook.
Fan method: Every fan is made the same way. Only the numbers change.
- Arch: Ch the arch length, skip the stated number of stem chains, then sl st in the next stem ch. This is the “join ch.” The last stem stitch worked before the arch is the “anchor ch.”
- Fan Row: Turn so you can work into the arch. Ch 1, then work the fan stitches into the arch, moving back toward the anchor ch.
- Anchor: Sl st in the anchor ch.
- Return: Sl st loosely in each skipped stem ch under the arch, then sl st in the join ch. Keeping these slip stitches loose leaves the eyelet open.
| Fan | Arch | Skip | Fan Row (all into arch) | Fan Row count |
|---|---|---|---|---|
| Small (S) | ch 5 | 2 ch | sc, [dc, ch 2] 4 times, dc, sc | 5 dc, 4 ch-2 sps, 2 sc |
| Medium (M) | ch 7 | 3 ch | sc, [tr, ch 2] 6 times, tr, sc | 7 tr, 6 ch-2 sps, 2 sc |
| Large (L) | ch 9 | 4 ch | sc, [tr, ch 2] 8 times, tr, sc | 9 tr, 8 ch-2 sps, 2 sc |
Along the stem, each fan uses its skipped chains plus the join ch: 3 chains for Small, 4 for Medium, and 5 for Large.
Gauge and Checkpoints
Stem gauge: After both passes, 12 stem sts = 2 in (5.1 cm).
Fan gauge: Before the border, a Large fan reaches 1.75 in (4.4 cm) out from the stem, a Medium fan 1.5 in (3.8 cm), and a Small fan 1 in (2.5 cm).
Test first: Ch 24. Sl st in the 2nd ch from the hook and in the next 4 ch, for 5 lead sts. Work one Large fan over the next 5 ch, then sl st in each of the remaining 13 ch. Measure 12 sl sts on the plain section, and measure how far the fan reaches from the stem.
- Fan too big or stem too long: Go down to a 2.25 mm hook.
- Fan too small or stem too short: Go up to a 2.75 mm hook.
- Stem curls: Your chain is tighter than your slip stitches. Make the foundation chain with a hook one size larger.
Checkpoints during the work:
- After the foundation, the stem chain measures about 15 in (38.1 cm), not counting the loops.
- After Pass 1, the right-side fans reach 1 in, 1.5 in, and 1.75 in (2.5 cm, 3.8 cm, and 4.4 cm).
- After Pass 2, the strip is 3.75 in (9.5 cm) across the Large fans.
- After the border and blocking, the strip is 4.25 in (10.8 cm) × 17 in (43.2 cm).
Foundation
Chain loosely.
Bottom ring: Ch 8, then sl st in the first ch to form a ring.
Stem: Ch 90. These are the stem chains. They’re numbered ch 1 to ch 90, starting at the bottom ring and counting up.
Top loop: Ch 14, then sl st in ch 90 (the 14th ch from the hook) to form the hanging loop.
The top loop should be about 1.25 in (3.2 cm) tall and the bottom ring about 0.75 in (1.9 cm). Together with the 15 in (38.1 cm) stem, that gives the 17 in (43.2 cm) total length.
Pass 1 – Right-Side Fans (Worked Down)
Work into one loop of each stem chain, leaving the remaining loops free for Pass 2. The sl st that closed the top loop counts as the stitch in ch 90.
- Lead: Sl st in ch 89 through ch 82. That makes 9 stem sts, including ch 90.
- Small fan: Ch 82 is the anchor. Skip ch 81–80, and ch 79 is the join.
- Gap: Sl st in ch 78–70 (9 sts).
- Small fan: Skip ch 69–68, and ch 67 is the join.
- Gap: Sl st in ch 66–58 (9 sts).
- Medium fan: Skip ch 57–55, and ch 54 is the join.
- Gap: Sl st in ch 53–45 (9 sts).
- Medium fan: Skip ch 44–42, and ch 41 is the join.
- Gap: Sl st in ch 40–32 (9 sts).
- Large fan: Skip ch 31–28, and ch 27 is the join.
- Gap: Sl st in ch 26–18 (9 sts).
- Large fan: Skip ch 17–14, and ch 13 is the join.
- Tail: Sl st in ch 12–1 (12 sts).
- Sl st in the bottom ring.
Count check: 9 lead + 45 gap + 12 tail = 66 visible stem sts. Add the 24 chains used by the fans (3 + 3 + 4 + 4 + 5 + 5), and you get 90.
Pass 2 – Left-Side Fans (Worked Up)
Work into the free loops of the stem chain, starting at ch 1.
- Lead: Sl st in ch 1–6 (6 sts).
- Large fan: Ch 6 is the anchor. Skip ch 7–10, and ch 11 is the join.
- Gap: Sl st in ch 12–20 (9 sts).
- Large fan: Skip ch 21–24, and ch 25 is the join.
- Gap: Sl st in ch 26–34 (9 sts).
- Medium fan: Skip ch 35–37, and ch 38 is the join.
- Gap: Sl st in ch 39–47 (9 sts).
- Medium fan: Skip ch 48–50, and ch 51 is the join.
- Gap: Sl st in ch 52–60 (9 sts).
- Small fan: Skip ch 61–62, and ch 63 is the join.
- Gap: Sl st in ch 64–72 (9 sts).
- Small fan: Skip ch 73–74, and ch 75 is the join.
- Tail: Sl st in ch 76–90 (15 sts).
- Sl st in the base of the top loop. Don’t fasten off.
Count check: 6 + 45 + 15 = 66 visible stem sts, and 66 + 24 = 90.
Why the fans alternate: The fans are centered at these stem positions:
- Left side: 8.5, 22.5, 36, 49, 61.5, and 73.5
- Right side: 15.5, 29.5, 43, 56, 68.5, and 80.5
That leaves about 7 chains between each fan and the next one on the opposite side. The lowest fan is on the left and the highest is on the right, as in the photo.
Border – Picot Rim Round
Border gauge: Each ch-2 sp gets 2 sc and 1 picot, and each spoke gets 1 sc. The rim adds about 0.25 in (0.6 cm) to each fan. Along the stem, the border is 1 sl st per visible stem st, so the length doesn’t change.
The round continues from the top-left corner. It goes over the top loop, down the right side, around the bottom ring, up the left side, and joins.
Fan rims:
- Small rim: Sc in the end sc, then sc in the next dc. [(Sc, picot, sc) in the next ch-2 sp, sc in the next dc] 4 times, then sc in the end sc. That’s 15 sc and 4 picots.
- Medium rim: Sc in the end sc, then sc in the next tr. [(Sc, picot, sc) in the next ch-2 sp, sc in the next tr] 6 times, then sc in the end sc. That’s 21 sc and 6 picots.
- Large rim: Sc in the end sc, then sc in the next tr. [(Sc, picot, sc) in the next ch-2 sp, sc in the next tr] 8 times, then sc in the end sc. That’s 27 sc and 8 picots.
Skip the join ch and the hidden return sl sts under each arch.
Top loop: Work 18 sc in the ch-14 loop.
Right side (worked down): Work these sections in order:
- Sl st in each of the 9 lead sts.
- Small rim.
- Sl st in 9 gap sts, then work a Small rim.
- Sl st in 9 gap sts, then work a Medium rim.
- Sl st in 9 gap sts, then work a Medium rim.
- Sl st in 9 gap sts, then work a Large rim.
- Sl st in 9 gap sts, then work a Large rim.
- Sl st in each of the 12 tail sts.
That’s 66 sl sts, 126 sc (15 + 15 + 21 + 21 + 27 + 27), and 18 picots.
Bottom ring: Work 10 sc in the ring.
Left side (worked up): Work these sections in order:
- Sl st in each of the 6 lead sts.
- Large rim.
- Sl st in 9 gap sts, then work a Large rim.
- Sl st in 9 gap sts, then work a Medium rim.
- Sl st in 9 gap sts, then work a Medium rim.
- Sl st in 9 gap sts, then work a Small rim.
- Sl st in 9 gap sts, then work a Small rim.
- Sl st in each of the 15 tail sts.
That’s 66 sl sts, 126 sc, and 18 picots.
To finish, join with a sl st to the first sc of the top loop. Fasten off.
Round total: 18 + 10 + 126 + 126 = 280 sc, plus 132 sl sts. That’s 412 sts plus 36 picots.
Why the math works: A ch-2 sp is about two sc wide, so 2 sc per space lets the rim follow the fan’s curve without cupping or ruffling. Working 1 sl st per stem st adds nothing to the stem, so it stays 15 in (38.1 cm). The 0.25 in (0.6 cm) rim on each side turns the 3.75 in (9.5 cm) width into 4.25 in (10.8 cm).
Final Blocking
- Weave in both ends through the back of the stem slip stitches. Don’t trim them yet.
- Soak the strip in cool water, then press the water out in a towel. Don’t wring it.
- Pin the top loop and bottom ring 17 in (43.2 cm) apart, keeping the stem straight.
- Open each fan and pin its outer spokes. Check the reach from the stem: 1 in (2.5 cm) for Small, 1.5 in (3.8 cm) for Medium, and 1.75 in (4.4 cm) for Large, plus the 0.25 in (0.6 cm) rim.
- Pin each picot outward so the rim forms an even arc.
- Check that the strip is 4.25 in (10.8 cm) across the Large fans.
- Mist the strip, and add light starch if it will hang in a window. Let it dry completely.
- Unpin the strip and trim the ends.
Final Quality-Control Checklist
- 12 fans in total, 6 per side, alternating left and right
- Fans in pairs on each side, from Large at the bottom to Small at the top
- An open eyelet under each arch
- Spokes per fan: 5 dc (Small), 7 tr (Medium), 9 tr (Large)
- Picots per fan: 4, 6, and 8, with 36 in total
- A straight, untwisted stem measuring 15 in (38.1 cm)
- A firm top loop with 18 sc
- A finished strip of 4.25 in (10.8 cm) × 17 in (43.2 cm)
Troubleshooting
- The stem spirals: The foundation chain was too tight. Block it firmly, and next time chain with a larger hook.
- The fans cup: The arch is too tight. Chain it more loosely, or add 1 ch to the arch length without changing the stitch count.
- The fans ruffle: The ch-2 spaces are too loose. Go down a hook size for the Fan Rows only.
- Fans are on the wrong side: Make sure Pass 1 uses only one loop of each chain and Pass 2 uses the remaining loops.
- A count is off along the stem: Check against the chain numbers in the pass lists. Each side must total 90 chains.
- The picots look flat: Pull each picot sl st snug, and pin each picot during blocking.
Care
Hand wash in cool water with a mild soap, press out the water, and dry flat. Re-block and re-starch as needed.

Final Notes
Measurements to check along the way:
- 12 stem sts = 2 in (5.1 cm), which gives a 90-chain stem of 15 in (38.1 cm).
- With the top loop and bottom ring, the strip is 17 in (43.2 cm) long.
- The fans reach 1 in (2.5 cm), 1.5 in (3.8 cm), and 1.75 in (4.4 cm) from the stem, for a width of 3.75 in (9.5 cm) before the border.
- The 0.25 in (0.6 cm) picot rim brings the finished width to 4.25 in (10.8 cm).
If those numbers match, your frond is right. For a curtain, make as many identical strips as you need and hang each one from its own ring. They don’t need to be joined.
Happy crocheting!