

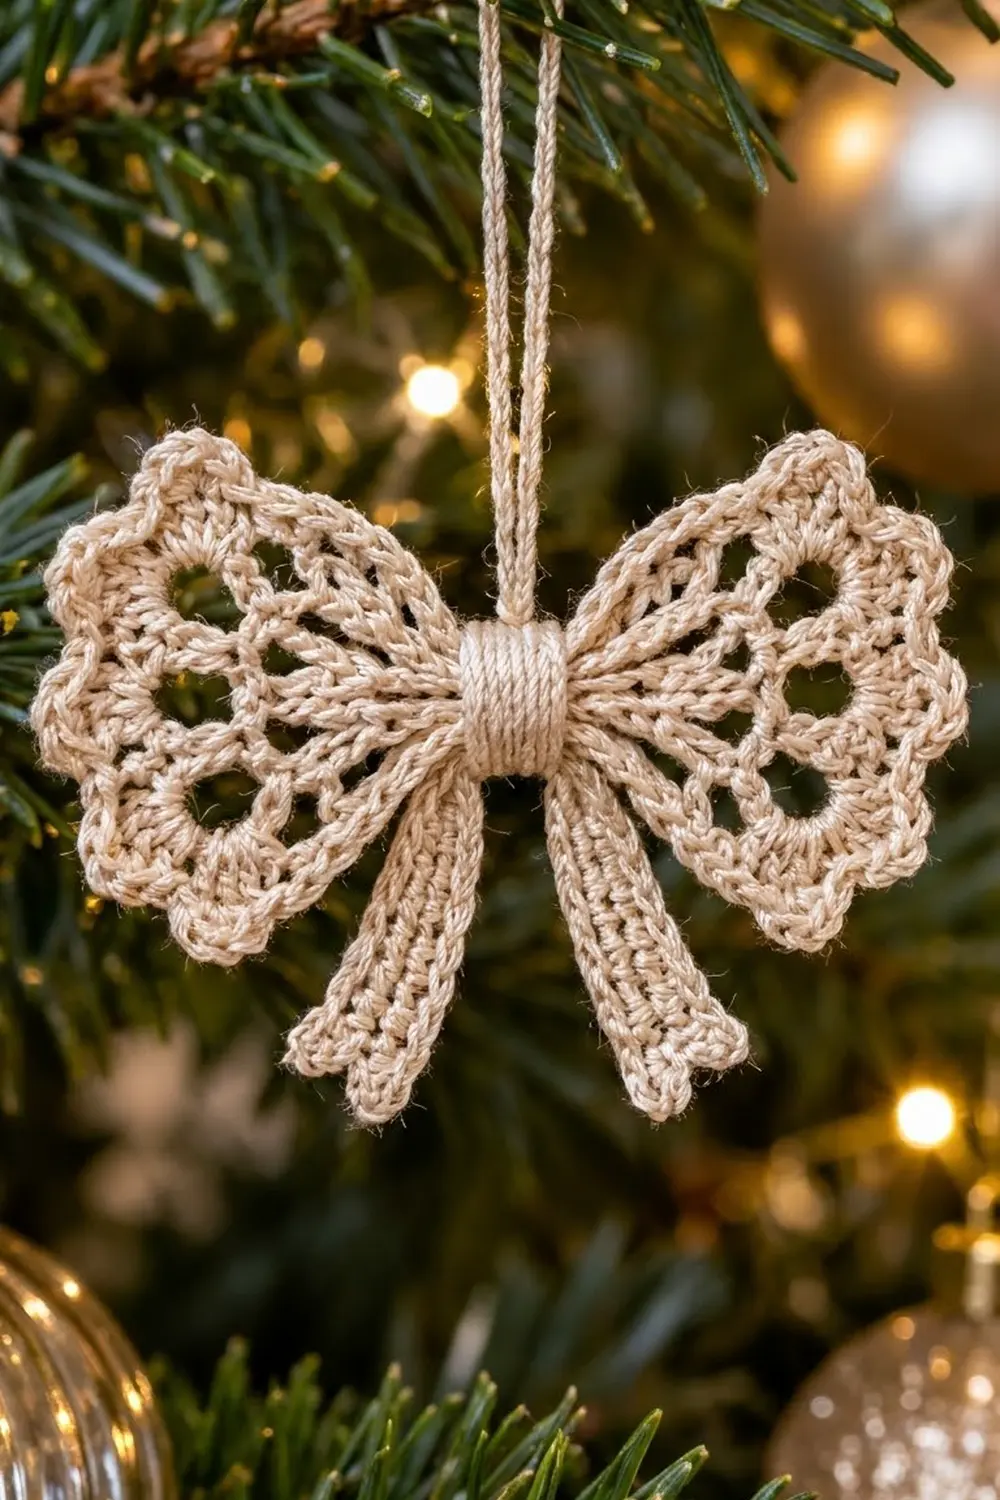
This little bow is pure vintage holiday charm. Two lacy fan wings with radiating openings and a soft scalloped edge are pinched at the center by a ridged wrap. Two flared tails with notched tips hang below, and a fine cord loop lets the bow hang from a branch.
The sample uses one color, a warm cream thread that reads as champagne next to gold ornaments. Stitch a whole set in the same shade for a calm, heirloom-style tree, or switch to white or metallic gold thread for a different look.
This pattern uses US crochet terms. The finished bow measures about 2.5 in (6.4 cm) wide and 2.5 in (6.4 cm) tall, not counting the hanging loop.
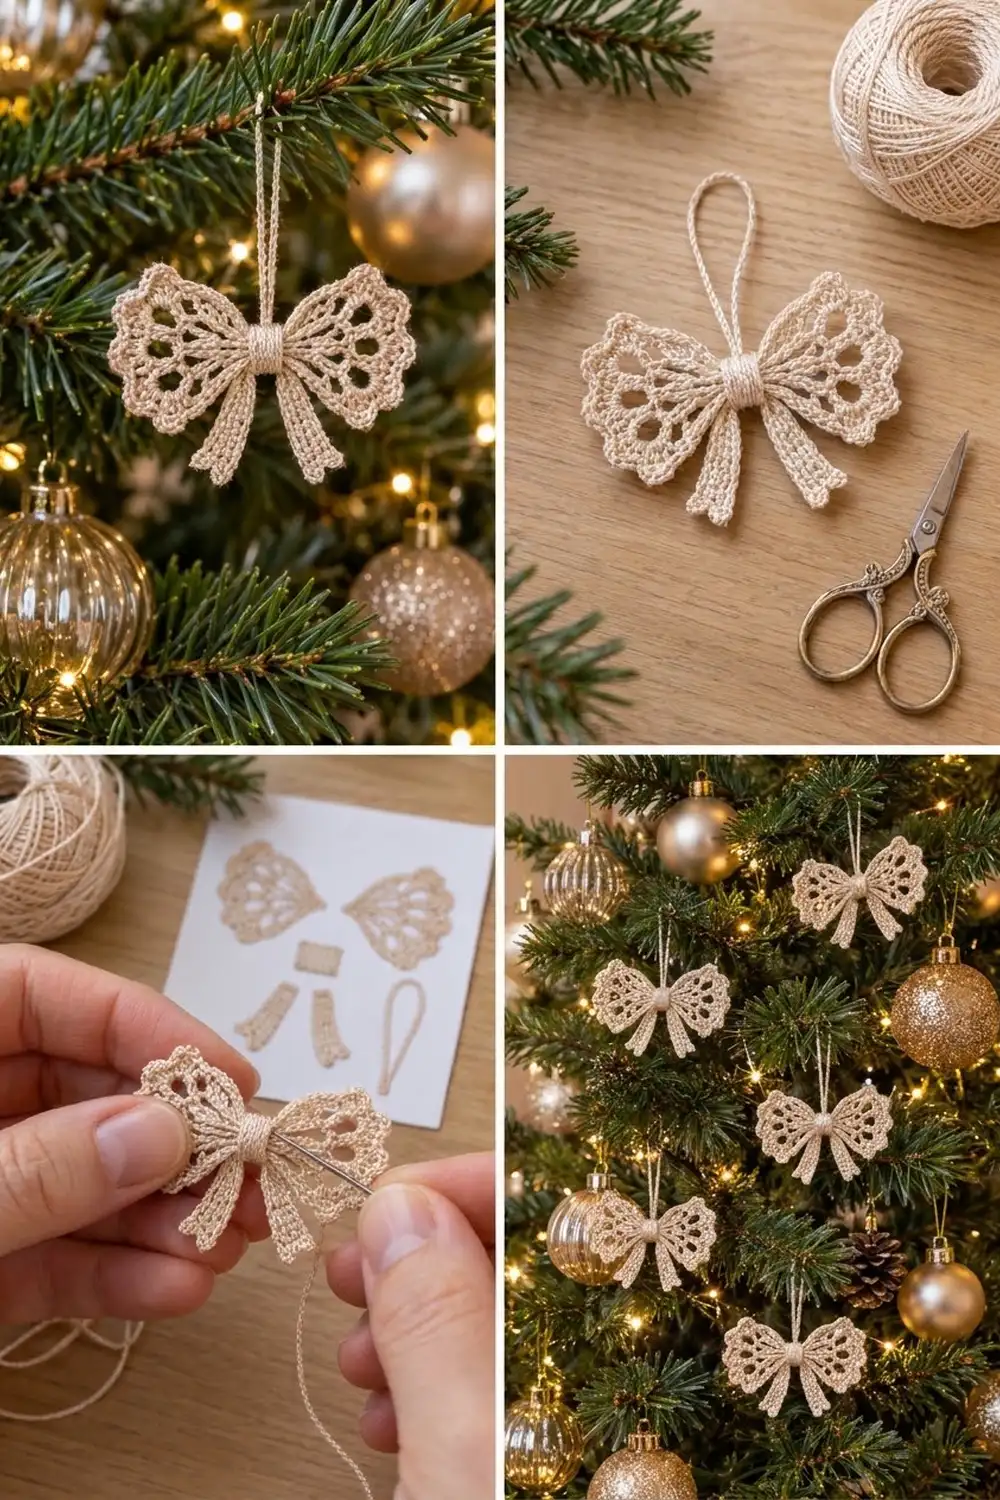
You’ll make six small parts: two wings worked as half-circle fans in rows, one center band, two tails worked lengthwise, and one chain cord loop. Each wing gets a scalloped border, and then its straight edge is gathered. Finally, you stack the parts and wrap them with the band.
Finished Size and Construction
- Finished size: 2.5 in (6.4 cm) wide x 2.5 in (6.4 cm) tall, excluding the loop
- Skill level: Intermediate (thread crochet, simple shaping)
- Terminology: US crochet terms
- Yarn weight: Size 10 crochet cotton thread (Lace / 0)
- Hook: 1.75 mm steel hook
- Number of pieces: 6 (2 wings, 1 band, 2 tails, 1 loop)
- Layout: Wings side by side with points meeting at center; tails in a V below; loop above
- Piece size (wing, flat): 1.25 in (3.2 cm) from ring center to scallop tips, 2.5 in (6.4 cm) along the straight edge
- Wing size before border: 1.1 in (2.8 cm) from ring center to outer edge
- Border depth: 0.15 in (0.4 cm)
Materials
Thread: Choose mercerized size 10 cotton with good twist and sheen, because it shows lace openings crisply and holds starch well. A matte, soft cotton will work too, but the bow will look softer and slightly larger.
- Cream (champagne): 8 g, about 26 m, per ornament
The quantity above includes a margin of roughly 30% for your gauge check, sewing tails, and the gathering strands. A single ball of size 10 thread will make many bows.
Tools:
- 1.75 mm steel crochet hook
- Fine tapestry needle (size 24 or 26)
- Small sharp scissors
- Stitch marker
- Rustproof pins and a small blocking mat or foam board
- Spray starch or a stiffening solution
- Ruler marked in inches and cm
Abbreviations (US Terms)
- ch – chain
- sl st – slip stitch
- sc – single crochet
- hdc – half double crochet
- dc – double crochet
- sp(s) – space(s)
- BLO – back loop only
- st(s) – stitch(es)
- [ ] – repeat the bracketed steps the stated number of times
Special stitch – Scallop: Skip 1 st, 5 dc in next st, skip 1 st, sc in next st. One Scallop uses 4 sts.
Back-bump sl st: Insert the hook under the single bump on the back of the chain, then sl st. This makes a firm, rounded cord.
Gauge and Checkpoints
Gauge isn’t critical for an ornament, but it does control how the parts fit together. Make one wing first and measure it before you do anything else.
Checkpoints (wing, measured flat from ring center outward):
- After Row 1: 0.3 in (0.8 cm)
- After Row 4: 1 in (2.5 cm)
- After Row 5: 1.1 in (2.8 cm)
- After the border: 1.25 in (3.2 cm); straight edge 2.5 in (6.4 cm)
Other parts:
- Band: 5 sc = 0.4 in (1.0 cm) wide; 10 rows = 0.9 in (2.3 cm)
- Tail: Row 1 (16 sts) = 1.4 in (3.6 cm); with trim, 1.5 in (3.8 cm)
If your wing is too big: go down to a 1.5 mm hook. If it is too small: go up to a 2.0 mm hook. Whichever hook gives the right wing, use it for every part so the band still fits around the gathered center.
Wings (Make 2)
The wings are worked in turned rows from a half-used ring, so each one opens into a half-circle fan. The ring becomes the center point of the bow.
Ch 4, sl st in first ch to form a ring.
Row 1: Ch 3 (counts as dc), 6 dc in ring. Turn. (7 dc)
The 7 dc sit on only half of the ring. Don’t join.
Row 2: Ch 5 (counts as dc + ch 2), [dc in next dc, ch 2] 5 times, dc in 3rd ch of beginning ch-3. Turn. (7 dc, 6 ch-2 sps)
Row 3: Ch 3 (counts as dc), dc in same st, [ch 3, skip ch-2 sp, 2 dc in next dc] 6 times. Work the last 2 dc into the 3rd ch of the turning ch-5. Turn. (14 dc, 6 ch-3 sps)
The dc pairs are now the radiating spokes.
Row 4: Ch 3 (counts as dc), dc in next dc, [ch 5, skip ch-3 sp, dc in each of next 2 dc] 6 times. Work the last dc into the top of the turning ch. Turn. (14 dc, 6 ch-5 sps)
The ch-3 and ch-5 spaces stack into six long, petal-shaped openings.
Row 5 (conversion row): Ch 1, 2 sc in first dc, sc in next dc, [7 sc in next ch-5 sp, sc in each of next 2 dc] 6 times. Turn. (57 sc = 14 sc worked 1-per-dc + 1 extra sc in the first dc + 42 sc in the spaces)
Measure now: the wing should be 1.1 in (2.8 cm) from ring center to edge. Don’t fasten off. Continue with the Border section below.
Center Band (Make 1)
Ch 6.
Row 1: Sc in 2nd ch from hook and in each ch across. Turn. (5 sc)
Rows 2–10: Ch 1, sc BLO in each st across. Turn. (5 sc)
Fasten off, leaving an 8 in (20.3 cm) tail for sewing. Working in BLO makes fine ridges that look like thread wound around the bow’s center. The band measures 0.4 in (1.0 cm) x 0.9 in (2.3 cm).
Tails (Make 2)
The tails are worked lengthwise with graduated stitches, so they flare from a narrow top to a wider bottom. Mark the dc end of the work as the bottom.
Ch 17.
Row 1: Sl st in 2nd ch from hook, sc in next 3 ch, hdc in next 4 ch, dc in next 8 ch. Turn. (16 sts)
Row 2: Ch 3 (counts as dc), dc in next 7 sts, hdc in next 4 sts, sc in next 3 sts, sl st in last st. Turn. (16 sts)
Row 3: Ch 1 (does not count), sl st in first st, sc in next 3 sts, hdc in next 4 sts, dc in next 8 sts, working the last dc in the top of the ch-3. Don’t turn. (16 sts)
Notched trim: Ch 1, rotate to work across the bottom row-ends: (dc, hdc, sc) in end of Row 3, sl st in end of Row 2, (sc, hdc, dc) in end of Row 1. Fasten off. (7 sts)
The taller dc at each outer corner and the sl st at the center make the notched, dovetail tip. Each tail is about 1.5 in (3.8 cm) long, 0.3 in (0.8 cm) wide at the top, and 0.65 in (1.7 cm) wide at the bottom. Leave one tail facing up and flip the other so they mirror each other.
Hanging Loop (Make 1)
Leave a 4 in (10.2 cm) starting tail. Ch 50.
Row 1: Sl st in back bump of 2nd ch from hook and in each ch across. (49 sl sts)
Fasten off, leaving a 4 in (10.2 cm) tail. The cord is about 5 in (12.7 cm) long. Folded in half, it makes a 2.5 in (6.4 cm) loop.
Make All Pieces
Every piece uses Cream:
- Wings: 2
- Center band: 1
- Tails: 2
- Hanging loop: 1
Layout (front view):
            [  LOOP  ]
[ WING L ]  [  BAND  ]  [ WING R ]
          [TAIL L] [TAIL R]
Joining
Gather the wings. Finish the Border on both wings first. Thread the needle with a 10 in (25.4 cm) strand. Work a running stitch through all 27 sc along a wing’s straight edge, going in and out of each stitch. Pull until the edge measures 0.5 in (1.3 cm), then knot it firmly. The wing will cup and stand about 1.75 in (4.4 cm) tall. Repeat with the second wing.
Stack the parts. Lay both wings right side up, with their gathered points touching. Put the two tail tops behind the center, overlapping by 0.25 in (0.6 cm) and angled into a V. Fold the loop in half and place both cord ends behind the tails, so they extend 0.4 in (1.0 cm) below the gathered points.
Tack. Using the gathering strands, sew 3–4 stitches straight through all the layers at the center. Pull just enough to hold the layers together. If you pull too hard, the wings will twist forward.
Wrap. Lay the band vertically over the front of the center, with its ridges running horizontally. Wrap it around to the back and whipstitch its two short ends together stitch to stitch, joining each of the 5 foundation chs to one of the 5 sts of Row 10. The band should feel snug but shouldn’t crush the lace.
Size checkpoint: 2.5 in (6.4 cm) wide x 2.5 in (6.4 cm) tall, excluding the loop.
Border
Each wing gets its own border, worked right after Row 5. The border gauge is 1 Scallop per 4 sts, and the Scallops add 0.15 in (0.4 cm) of depth.
Row 6 (scallop edge, outer curve): Ch 1, sc in first sc, [Scallop] 14 times. (14 Scallops: 15 sc + 70 dc)
Why the math works: Row 5 has 57 sts. The first sc uses 1 st and each Scallop uses 4 sts, so 1 + (14 x 4) = 57. The 14th Scallop ends with its sc in the last st, so the curve is even at both ends.
Row 7 (straight edge): Ch 1, rotate to work along the straight edge: sc in end of Row 5, 3 sc in end of each of Rows 4, 3, 2 and 1, sc into ring, 3 sc in end of each of Rows 1, 2, 3 and 4, sc in end of Row 5, sl st in first sc of Row 6. Fasten off. (27 sc = 1 + 12 + 1 + 12 + 1)
Why it fits: Each dc row-end is about 0.22 in (0.6 cm) tall, and 3 sc fill that height without flaring. The 27 sc cover the 2.5 in (6.4 cm) straight edge and give the gathering strand a firm, even line to run through.
Final Blocking
- Mix the spray starch, or dilute the stiffener according to its label.
- Dampen the assembled bow evenly, then gently squeeze out the excess.
- Pin each wing flat on the mat with the Scallops opened out, so each wing measures 1.25 in (3.2 cm) from the band to the Scallop tips.
- Put one pin into each petal opening to keep it open and clear.
- Pin the tails into a V with their notched tips opened.
- Pin the loop straight up, centered above the band.
- Spray again lightly and let the bow dry completely, usually overnight.
- Unpin the bow and use your fingertips to shape the wings slightly forward.
Final Quality-Control Checklist
- Each wing has 6 petal openings and 14 Scallops
- Each wing’s straight edge has 27 sc and is gathered to 0.5 in (1.3 cm)
- The band is 5 sc wide, its ridges run horizontally, and its seam is hidden at the back
- The tails mirror each other and have clear notched tips
- The loop is centered, with its ends hidden behind the band
- The bow measures 2.5 in (6.4 cm) x 2.5 in (6.4 cm)
- All ends are woven in and trimmed close
Troubleshooting
- Wing curls into a cone: Row 5 has too many stitches. Recount 7 sc per ch-5 sp.
- Wing ruffles: Your tension is loose. Go down a hook size or tighten the ch-5 sps.
- Scallops don’t end evenly: Row 5 isn’t 57 sts. Check the 2 sc in the first dc.
- Band won’t close: The gathered center is too thick. Pull the gathers tighter, or add 1–2 rows to the band.
- Tails flare unevenly: Check that the sc, hdc, and dc sections line up from row to row.
- Loop flops forward: Tack the cord ends to the back of the band.
Care
Hand wash in cool water with mild soap, then reshape the bow and re-starch it if needed. Store it flat, or wrapped in tissue, so the wings don’t get crushed.
Final Notes
The measurement chain is short and easy to check. Each wing measures 1.1 in (2.8 cm) after Row 5 and 1.25 in (3.2 cm) after the border. Its 2.5 in (6.4 cm) straight edge gathers to 0.5 in (1.3 cm). The tails measure 1.5 in (3.8 cm), and the 0.4 in (1.0 cm) band ties everything into a 2.5 in (6.4 cm) bow. If the first wing measures correctly, the rest of the bow will fit together. Make one for a gift tag, or a dozen for the whole tree.
Happy crocheting!