

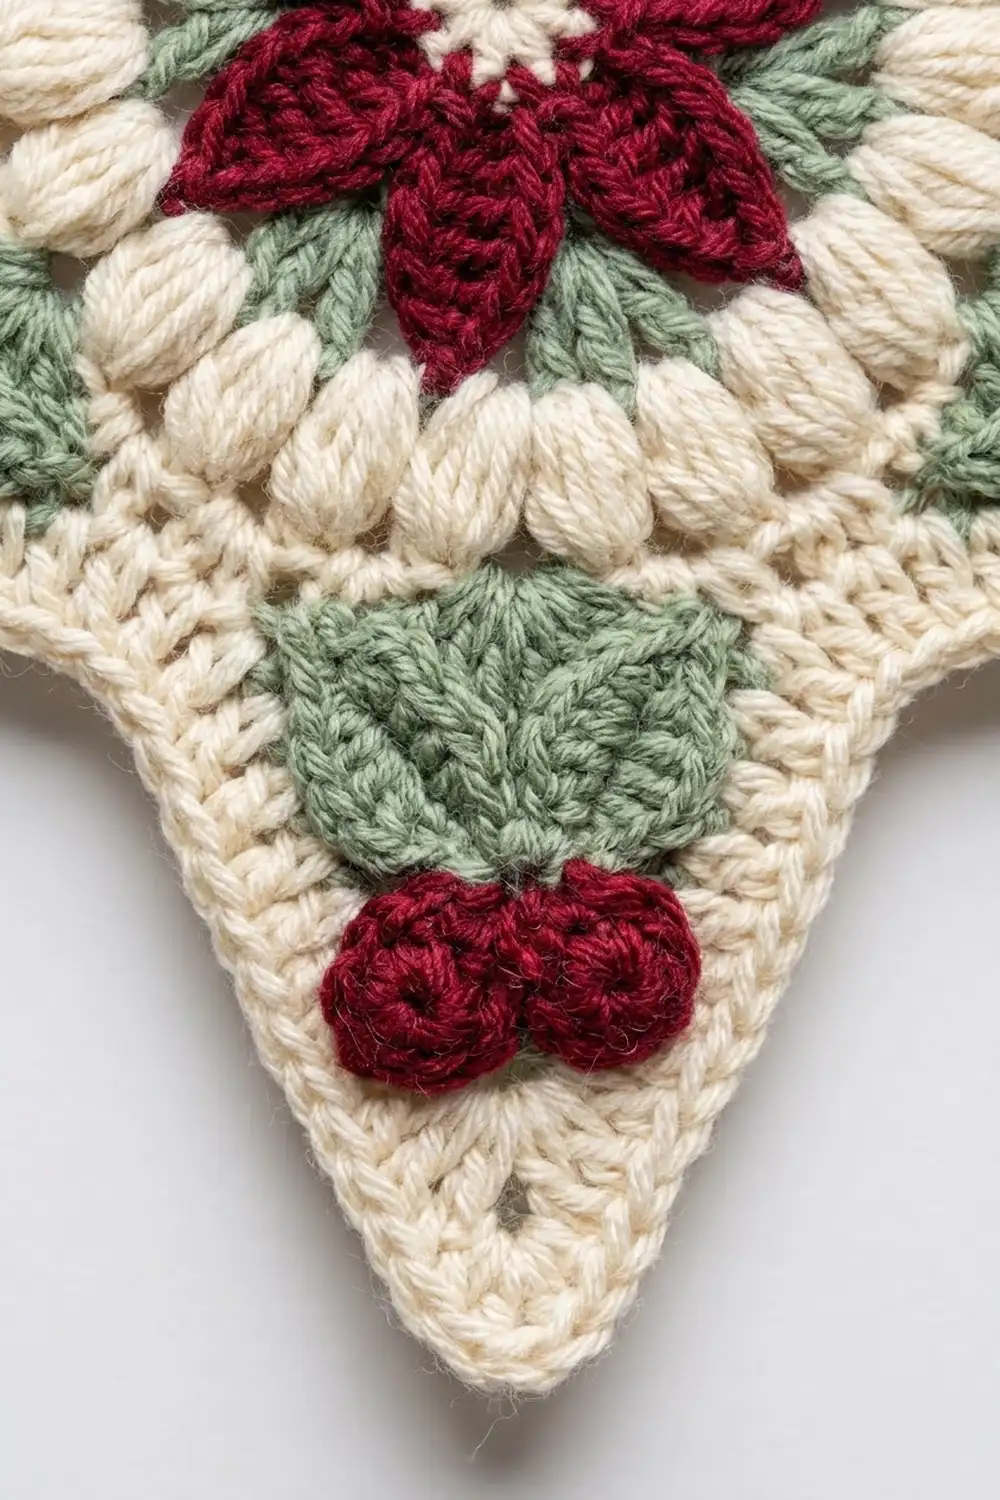
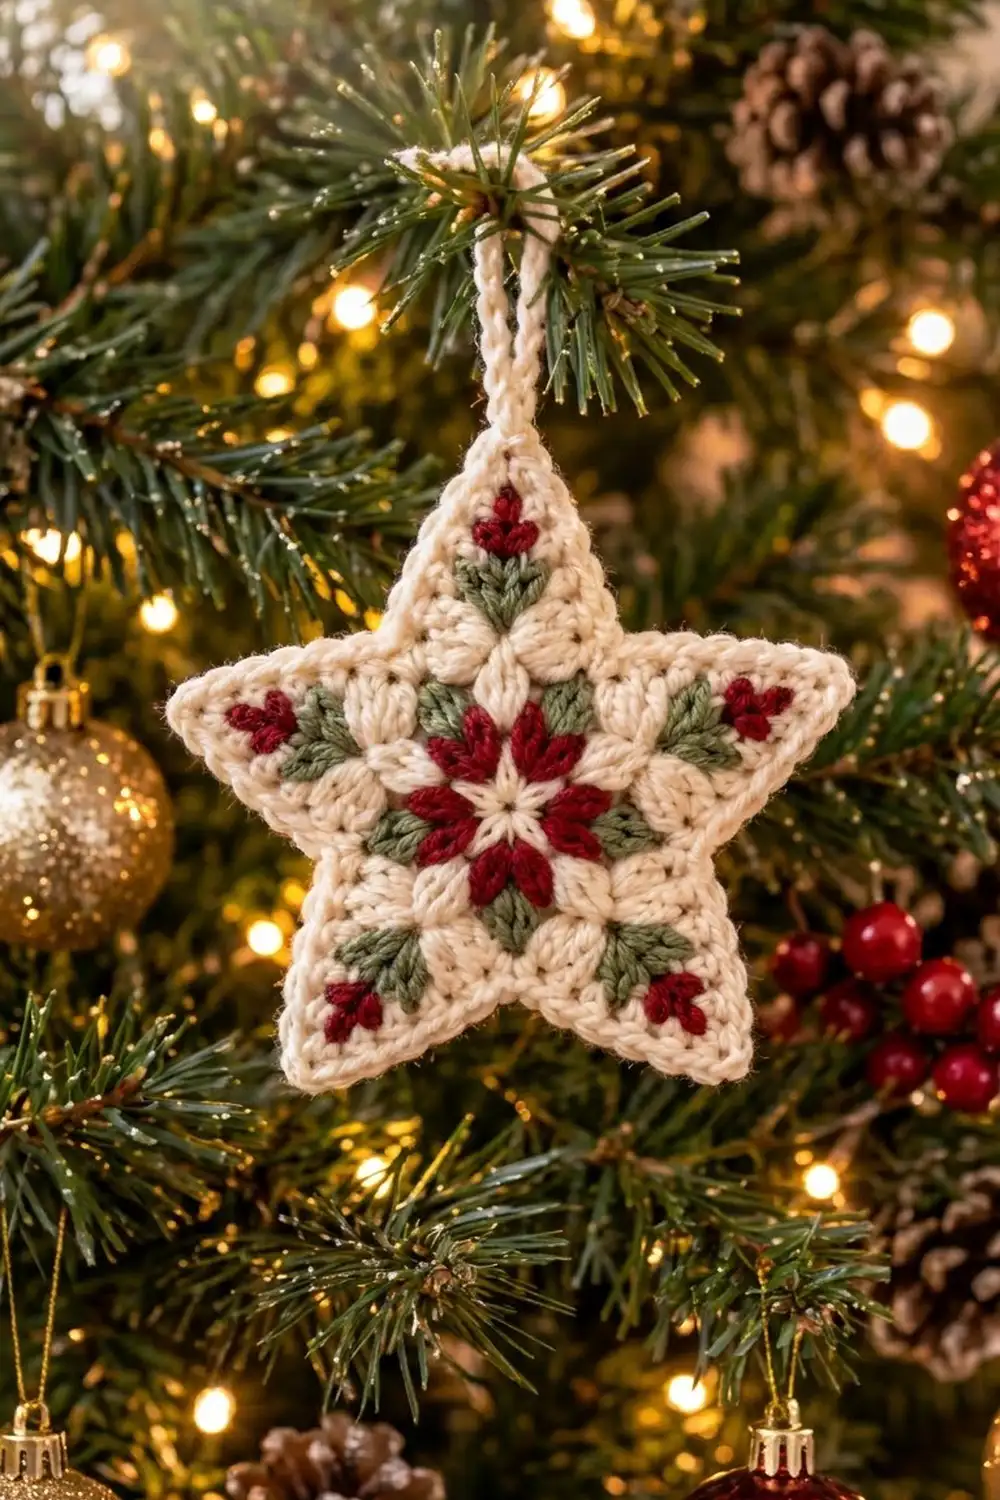
This five-pointed star ornament has a small poinsettia worked into its center. A ring of deep red cluster petals surrounds a tiny cream center. Sage green leaves frame the petals, and each arm has a pair of green leaves under a red berry tip. A cream single crochet outline finishes the edge and continues into a chain hanging loop at the top point.
The colors are warm and traditional: soft cream, cranberry red, and muted sage green. The textured clusters give it a cozy, vintage look on a tree, on a gift tag, or in a window.
The pattern uses US crochet terms. The finished star is 5 in (12.7 cm) from point to point and about 4.75 in (12.1 cm) tall, not counting the 2 in (5.1 cm) hanging loop.
The star is one piece, worked in joined rounds from the center out. Rounds 1 to 4 make a flat circle. Round 5 sets out five points and Round 6 grows them. Round 7 adds the green leaves and red tips with tapestry color changes, and Round 8 is the cream border with the hanging loop.
Finished Size and Construction
- Finished size: 5 in (12.7 cm) point to point; 4.75 in (12.1 cm) tall
- Skill level: Intermediate (clusters, tapestry color changes, simple shaping)
- Terminology: US crochet terms
- Yarn weight: DK (light worsted, category 3)
- Hook: 4.0 mm (G-6)
- Number of pieces: 1
- Layout: Single star motif, worked in the round
- Piece size before border: 4.5 in (11.4 cm) point to point
- Border depth: 0.25 in (0.6 cm), one round of single crochet
- Hanging loop: 2 in (5.1 cm), worked into the border
Materials
Choose a smooth DK yarn in cotton, a cotton blend, or soft acrylic. Cotton gives the crispest clusters and holds the star points sharply after blocking. Avoid fuzzy or brushed yarns, because they blur the small colorwork.
Yarn for one ornament:
- Cream (main color): 10 g, about 23 m
- Deep red: 3 g, about 7 m
- Sage green: 3 g, about 7 m
These amounts include a margin of about 20% for swatching, color tails, and weaving in ends.
Tools:
- 4.0 mm (G-6) crochet hook
- Tapestry needle
- Scissors
- Stitch marker
- Rustproof pins and a blocking mat or folded towel
- Spray bottle with water
- Ruler or tape measure
Abbreviations (US Terms)
- MR: magic ring
- ch: chain
- sl st: slip stitch
- sc: single crochet
- hdc: half double crochet
- dc: double crochet
- sc2tog: single crochet 2 together
- sc3tog: single crochet 3 together
- cl: 3-dc cluster
- beg cl: beginning cluster
- sp(s): space(s)
- st(s): stitch(es)
- yo: yarn over
- rep: repeat
3-dc cluster (cl): *Yo, insert hook into the stitch or space, yo and pull up a loop, yo and pull through 2 loops; rep from * 2 more times in the same place, then yo and pull through all 4 loops on the hook.
Beginning cluster (beg cl): Ch 2, then work a 2-dc cluster in the same place. Make it like the cl above, but rep only once and finish by pulling through 3 loops. The ch 2 and the 2-dc cluster count as one cl.
sc3tog in this pattern: Pull up a loop in each of the next 3 stitches, yo, and pull through all 4 loops. This decrease forms each valley between two points.
Gauge and Checkpoints
Exact gauge matters less here than for a garment, but it controls the final size. Make one star first and check it at each stage below. Measure flat without stretching.
- Round 1: 0.75 in (1.9 cm) across
- Round 2: 1.25 in (3.2 cm) across
- Round 3: 1.75 in (4.4 cm) across
- Round 4: 2.25 in (5.7 cm) across. This circle is your gauge swatch.
- Round 5: 3.25 in (8.3 cm) point to point
- Round 6: 4 in (10.2 cm) point to point
- Round 7: 4.5 in (11.4 cm) point to point
- Round 8: 5 in (12.7 cm) point to point
If Round 4 is more than 0.25 in (0.6 cm) too large, change to a 3.5 mm hook. If it is more than 0.25 in (0.6 cm) too small, change to a 4.5 mm hook. If the circle cups, your Round 4 tension is too tight. If it ruffles, your tension is too loose. Start a new circle rather than changing hooks partway through.
Pattern
Work every round with the right side facing you and join each round with a sl st. Do not turn.
Round 1 (cream center)
With cream, make a MR. Ch 3 (counts as dc), then work 9 dc in the ring. Pull the ring closed. Join with a sl st to the top of the ch-3. Fasten off.
Count: 10 dc.
Round 2 (red petals)
Join red in any dc. Beg cl in the same st, ch 1. *Cl in next dc, ch 1; rep from * 8 more times. Join with a sl st to the top of the beg cl. Fasten off.
Count: 10 cl and 10 ch-1 sps.
The petals lie flat and point outward from the cream center.
Round 3 (green leaves)
Join green in any ch-1 sp. Beg cl in the same sp, ch 2. *Cl in next ch-1 sp, ch 2; rep from * 8 more times. Join with a sl st to the top of the beg cl. Fasten off.
Count: 10 cl and 10 ch-2 sps.
Each green leaf sits between two red petals, so the ring alternates red and green.
Round 4 (cream circle)
Join cream in any ch-2 sp. Ch 3 (counts as dc), then work 2 dc in the same sp. Work 3 dc in each of the remaining 9 ch-2 sps. Join with a sl st to the top of the ch-3. Do not fasten off.
Count: 30 dc (10 sps x 3 dc).
Place a marker in the joining stitch. Divide the round into 5 groups of 6 dc. Each group becomes one arm of the star.
Round 5 (setting out the points)
Ch 1. *Sc in next st, hdc in next st, 2 dc in next st, ch 2, 2 dc in next st, hdc in next st, sc in next st; rep from * 4 more times. Join with a sl st to the first sc.
Count: 40 sts and 5 ch-2 tip sps. Each arm has 8 sts: sc, hdc, dc, dc, (ch-2 sp), dc, dc, hdc, sc. This is a conversion round. All 30 sts are worked 1 per existing st, and the two increases on each arm add 10 dc in total (30 + 10 = 40).
Round 6 (growing the points)
Ch 1. Skip the first sc and work into the hdc after it.
*Hdc in next hdc, dc in next dc, 2 dc in next dc, (2 dc, ch 2, 2 dc) in ch-2 sp, 2 dc in next dc, dc in next dc, hdc in next hdc, sc2tog over next 2 sc; rep from * 4 more times. On the last repeat, work the sc2tog over the last sc of the round and the skipped first sc. Join with a sl st to the first hdc.
Count: 65 sts and 5 ch-2 tip sps (13 sts per arm). Each arm has 1 hdc, 5 dc, a ch-2 sp, 5 dc, and 1 hdc, plus 1 sc2tog at the valley.
The sc2tog at each valley keeps the inner corners sharp while the points grow.
Round 7 (green leaves and red tips)
This round uses tapestry crochet, with cream as the working color. Lay the green and red strands along the top of Round 6 and work over them with every cream stitch so they stay hidden. To change color, work the last yo of the stitch before the change with the new color.
With cream, ch 1. Skip the first hdc.
*With cream, hdc in next dc. With green, cl in next dc. With cream, dc in next 3 dc. With red, (cl, ch 2, cl) in the ch-2 sp. With cream, dc in next 3 dc. With green, cl in next dc. With cream, hdc in next dc, then sc3tog over next hdc, sc2tog, and hdc; rep from * 4 more times. On the last repeat, work the sc3tog over the last hdc, the last sc2tog, and the skipped first hdc. Join with a sl st to the first hdc. Fasten off green and red, but leave cream attached.
Count: 65 sts and 5 ch-2 tip sps (13 sts per arm). Each arm has 1 hdc, 1 green cl, 3 dc, 2 red cl with a ch-2 sp between them, 3 dc, 1 green cl, and 1 hdc, plus 1 sc3tog at the valley.
The two green clusters form the leaf pair on each arm. The two red clusters sit side by side at the point to form the berry tip.
Round 8
Round 8 is the border, explained in the next section.
Border
Border gauge: About 4 sc per inch (1.6 sc per cm) along the arm edges. Each straight edge measures about 1.5 in (3.8 cm) from valley to tip. It holds 6 sc, counting the tip sc but not the shared valley decrease.
Round 8 (cream): Ch 1. Skip the first hdc.
*Sc in next 5 sts (green cl, 3 dc, red cl), (sc, ch 2, sc) in ch-2 tip sp, sc in next 5 sts (red cl, 3 dc, green cl), sc3tog over next hdc, sc3tog, and hdc; rep from * 4 more times. On the last repeat, work the sc3tog over the last hdc, the last sc3tog, and the skipped first hdc. Join with a sl st to the first sc.
Hanging loop: Choose one arm as the top. On that arm, work (sc, ch 20, sc) in the tip sp instead of (sc, ch 2, sc). Twenty chains make a 2 in (5.1 cm) loop in DK.
Count: 65 sc and 5 tip sps (4 ch-2 sps and 1 ch-20 loop). Each arm has 13 sts: 5 sc + 2 tip sc + 5 sc + 1 sc3tog.
Why the math works: Round 6 grows each arm from 8 to 13 stitches. Rounds 7 and 8 keep that count. In each of these rounds, the tip adds 2 stitches and the valley sc3tog takes away 2, so every arm stays at 13. The edges still get longer because each round pushes the tips outward and pulls the valleys inward. A single crochet border on this base lies flat and adds 0.25 in (0.6 cm) at each point. That takes the star from 4.5 in (11.4 cm) to 5 in (12.7 cm).
Fasten off. Weave each end into stitches of the same color.
Final Blocking
- Weave in every tail before blocking. Hide red and green tails inside red and green stitches so they don’t show through the cream.
- Lay the star right side up on a blocking mat or folded towel.
- Spray it evenly until it is damp but not dripping.
- Pin the 5 tip sps first, spacing them evenly. Adjacent tips should be about 3 in (7.6 cm) apart, and the two side tips 5 in (12.7 cm) apart.
- Pin each of the 5 valleys toward the center so the inner corners stay crisp.
- Press the clusters flat with your fingertips so the petals and leaves sit evenly.
- Pin the hanging loop straight up from the top point.
- Let the star dry completely, usually 6 to 12 hours. Acrylic can also be steam-blocked: hold an iron just above the star without touching it.
Final Quality-Control Checklist
- The width from point to point is 5 in (12.7 cm), within 0.25 in (0.6 cm).
- The height is about 4.75 in (12.1 cm).
- The center shows 10 red petals and 10 green leaves, alternating evenly.
- Each arm has 2 green leaf clusters and a red 2-cluster tip.
- No green or red carried strands show between cream stitches.
- The border has 65 sc plus 5 tip sps.
- All 5 valleys are sharp and the same depth.
- The hanging loop is 2 in (5.1 cm) and centered on the top point.
- The star lies flat with no cupping or ruffling.
Troubleshooting
The center circle cups. Round 4 is too tight. Loosen your dc, or go up one hook size for Rounds 1 to 4 only.
The center ruffles. Your clusters are too tall. Pull the final loop of each cluster snug, or go down one hook size.
The points are rounded. Check that each tip has a ch-2 sp, not a ch-1. Pin the tips firmly when blocking.
The valleys are shallow. Check that you used sc2tog at the valleys in Round 6 and sc3tog in Rounds 7 and 8.
Carried strands show through. Keep the carried yarn snug against the top of the round and work the cream stitches slightly tight. DK cotton hides carried strands best.
The arms are uneven. Check that each arm has 8 sts in Round 5. Every later round builds on that count.
Round 7 count is wrong. Each arm should read: hdc, green cl, 3 dc, red cl, ch 2, red cl, 3 dc, green cl, hdc, valley decrease.
Care
Hand wash in cool water with mild soap. Roll the star in a towel to press out the water, then dry it flat, pinning the points again if they lose their shape.
Final Notes
The measurements build on each other in a simple chain. The 2.25 in (5.7 cm) circle at Round 4 becomes a 3.25 in (8.3 cm) star at Round 5. It grows to 4 in (10.2 cm) at Round 6 and 4.5 in (11.4 cm) after the colorwork, then reaches 5 in (12.7 cm) with the border. If your Round 4 circle matches, the rest of the star will follow. Keep 13 stitches per arm from Round 6 on, and the points will stay balanced.
Happy crocheting!