

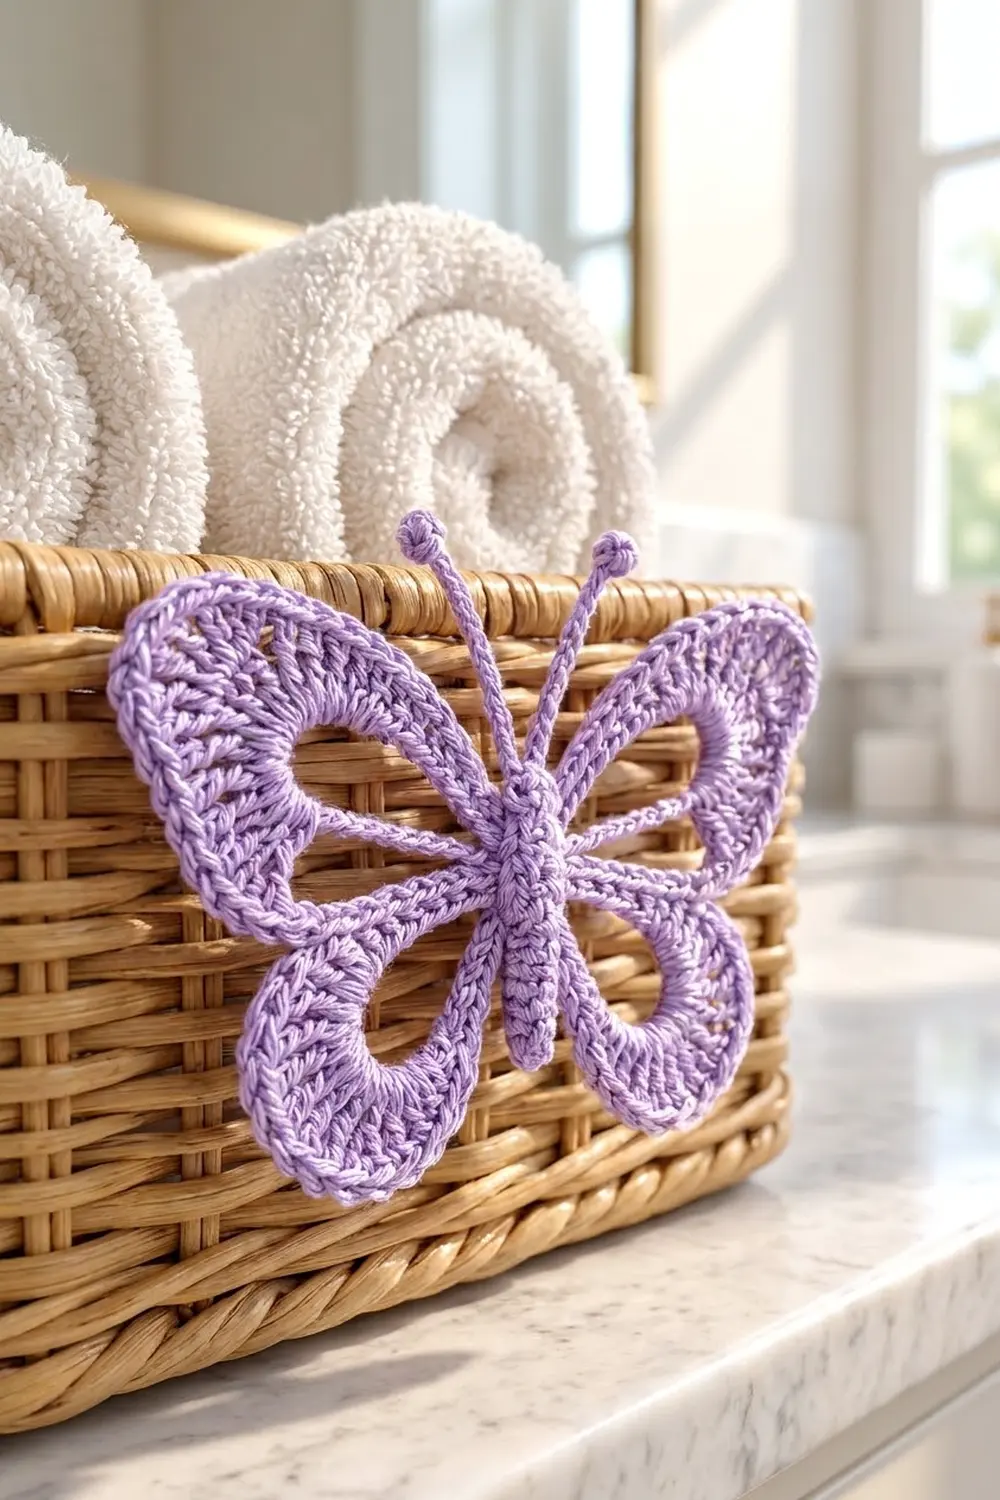
This butterfly appliqué is light and airy, with clean lines. Each wing has a large open window framed by a chain loop. Rows of taller stitches fan out around the outer side of each window, so the wings look like stained glass made of yarn. A slim, ridged body and two antennae with puff-stitch tips finish the design.
The sample is worked in one lavender cotton, which keeps the outlines crisp and the stitch texture easy to see. Pastel lilac gives a fresh spring look. You can also use any solid color that shows texture well.
The pattern uses US crochet terms. The finished butterfly is about 5.5 in (14.0 cm) wide and 5.25 in (13.3 cm) tall including the antennae. It is one piece, so there is no sewing between parts.
Construction is simple. You make the body first in one round worked around a foundation chain. Then you add the antennae to the head. Each wing starts as a chain loop anchored to the side of the body and grows outward in short rows. A reverse single crochet edge finishes the outer curve of each wing.
Finished Size and Construction
- Finished size: 5.5 in (14.0 cm) wide × 4.5 in (11.4 cm) tall across the wings; 5.25 in (13.3 cm) tall including the antennae
- Skill level: Easy-intermediate
- Terminology: US crochet terms
- Yarn weight: DK / light worsted (weight 3) cotton
- Hook: 3.5 mm (E-4)
- Number of pieces: 1 (worked in one piece)
- Layout: Single motif: center body, 2 upper wings, 2 lower wings, 2 antennae
- Body size: 2.25 in (5.7 cm) long × 0.5 in (1.3 cm) wide
- Size before border: 5.25 in (13.3 cm) wide × 4.25 in (10.8 cm) tall across the wings
- Border depth: about 1/8 in (0.3 cm) per edge
Materials
Yarn: Use a smooth, mercerized or combed DK cotton (weight 3). Cotton gives the wing edges and windows clear definition, and it holds its shape when stitched onto baskets, bags or cushions. Avoid fuzzy or very stretchy yarns because they blur the open windows.
- Lavender: 15 g, about 38 m (42 yd)
The quantity includes a margin for your gauge swatch and weaving in ends. One butterfly actually uses about 8–9 g.
Tools:
– 3.5 mm (E-4) crochet hook
– Tapestry needle
– 4 locking stitch markers
– Scissors
– Rustproof pins
– Blocking mat or folded towel
– Spray bottle with water
– Ruler or tape measure
Abbreviations (US Terms)
- ch – chain
- sl st – slip stitch
- sc – single crochet
- hdc – half double crochet
- dc – double crochet
- rev sc – reverse single crochet (crab stitch)
- st(s) – stitch(es)
- rep – repeat
Special stitches
Puff: (Yarn over, insert hook in the stitch indicated, yarn over and pull up a loop) 3 times. You now have 7 loops on the hook. Yarn over and pull through all 7 loops, then ch 1 to close.
Reverse single crochet (rev sc): Work from left to right (right-handed). Insert the hook in the next stitch to the right, yarn over and pull up a loop, then yarn over and pull through both loops. This gives the corded wing edge.
Gauge and Checkpoints
Gauge: 20 sc and 22 rows = 4 in (10.2 cm) in sc, with a 3.5 mm hook.
Rather than making a large swatch, make the body first and use it as your test piece. Then check each stage:
- Body: 2.25 in (5.7 cm) long and 0.5 in (1.3 cm) wide.
- Upper wing after Row 1: the loop lies about 2 in (5.1 cm) long and 0.75 in (1.9 cm) wide when flattened.
- Upper wing after Row 3: it reaches about 2.375 in (6.0 cm) out from the edge of the body and is about 2.5 in (6.4 cm) tall.
- Lower wing after Row 3: it reaches about 2 in (5.1 cm) out from the body and is about 1.75 in (4.4 cm) tall.
- Before the border: 5.25 in (13.3 cm) wide × 4.25 in (10.8 cm) tall across the wings.
If your body is too long (over 2.5 in / 6.4 cm), go down to a 3.25 mm hook. If it is too short (under 2 in / 5.1 cm), go up to a 3.75 mm hook. A small gauge difference only changes the overall size slightly. However, if the wing rows curl or ruffle, change the hook rather than the stitch counts.

Body
The body is one round of sc worked around both sides of a foundation chain. The end with 3 sc is the head, and the other end is the tail.
Ch 13.
Rnd 1: Sc in 2nd ch from hook (tail corner), sc in next 10 ch (Side A), 3 sc in last ch (head). Working along the opposite side of the foundation chain, sc in next 10 ch (Side B), 2 sc in the same ch as the first sc (tail). Join with sl st to the first sc. (26 sc)
Count check: 1 tail + 10 Side A + 3 head + 10 Side B + 2 tail = 26.
Fasten off, leaving a 6 in (15.2 cm) tail for tacking later.
Number the side stitches 1 to 10 starting from the head end on both Side A and Side B. Put a marker in st 2 and st 6 on each side. These are the wing anchor points.
Checkpoint: 2.25 in (5.7 cm) × 0.5 in (1.3 cm). The paired sc rows on both sides of the chain create the slightly raised, ridged look of the body.
Antennae
Join yarn with sl st in the first sc of the 3-sc head group.
Antenna 1: Ch 9, puff in 3rd ch from hook, sl st in each of next 6 ch, sl st in the same head st where you started. (6 sl st + 1 puff)
Sl st in the center head st, then sl st in the third head st.
Antenna 2: Ch 9, puff in 3rd ch from hook, sl st in each of next 6 ch, sl st in the same head st. Fasten off.
Each antenna is about 1.25 in (3.2 cm) long, with a round knob at the tip.
Upper Wings (make 2: one on Side A, one on Side B)
Lay the body flat with the head at the top and the side you are working on facing right.
Foundation loop: Join yarn with sl st in side st 2. Ch 24, sl st in side st 5. You now have an open chain loop anchored across side sts 2–5.
Row 1: Turn. Sc in each of the 24 ch, then sl st in side st 2. (24 sc)
This row frames the window. Do not work anything into the inner side of the loop. The open center stays empty from here on.
Row 2 (growth row): Ch 1, turn. Skip the sl st. Sc in next 4 sts, hdc in next 2 sts, dc in next 2 sts, 2 dc in each of next 8 sts, dc in next 2 sts, hdc in next 2 sts, sc in next 4 sts. (32 sts)
Stitches used: 4 + 2 + 2 + 8 + 2 + 2 + 4 = 24 ✓
Stitches made: 4 + 2 + 2 + 16 + 2 + 2 + 4 = 32 ✓
Row 3 (growth row): Ch 1, turn. Sc in next 5 sts, hdc in next 3 sts, (dc in next st, 2 dc in next st) 8 times, hdc in next 3 sts, sc in next 5 sts. (40 sts)
Stitches used: 5 + 3 + 16 + 3 + 5 = 32 ✓
Stitches made: 5 + 3 + 24 + 3 + 5 = 40 ✓
Fasten off, leaving a 6 in (15.2 cm) tail.
The short sc sections at each end stay low next to the body. The doubled dc section in the middle fans out to form the rounded outer edge of the wing.
Checkpoint: each upper wing reaches 2.375 in (6.0 cm) from the body and is 2.5 in (6.4 cm) tall.
Lower Wings (make 2: one on Side A, one on Side B)
Foundation loop: Join yarn with sl st in side st 6. Ch 18, sl st in side st 9.
Row 1: Turn. Sc in each of the 18 ch, then sl st in side st 6. (18 sc)
Row 2 (growth row): Ch 1, turn. Skip the sl st. Sc in next 3 sts, hdc in next 2 sts, dc in next st, 2 dc in each of next 6 sts, dc in next st, hdc in next 2 sts, sc in next 3 sts. (24 sts)
Stitches used: 3 + 2 + 1 + 6 + 1 + 2 + 3 = 18 ✓
Stitches made: 3 + 2 + 1 + 12 + 1 + 2 + 3 = 24 ✓
Row 3 (growth row): Ch 1, turn. Sc in next 4 sts, hdc in next 2 sts, (dc in next st, 2 dc in next st) 6 times, hdc in next 2 sts, sc in next 4 sts. (30 sts)
Stitches used: 4 + 2 + 12 + 2 + 4 = 24 ✓
Stitches made: 4 + 2 + 18 + 2 + 4 = 30 ✓
Fasten off, leaving a 6 in (15.2 cm) tail.
Checkpoint: each lower wing reaches 2 in (5.1 cm) from the body and is 1.75 in (4.4 cm) tall. The upper and lower wings meet where side st 5 sits next to side st 6, so the body shows no gap between them. Overall size should now be 5.25 in (13.3 cm) × 4.25 in (10.8 cm).
Border
The border is worked separately on each wing, along the last row only. The window edges and the body are left unbordered.
Border gauge: 1 rev sc into each stitch of Row 3. This adds about 1/8 in (0.3 cm) all along the outer edge.
Upper wing border (each): With the right side facing, join yarn with sl st in the first st of Row 3 at the end nearest the head. Ch 1. Rev sc in each st across. (40 rev sc) Sl st into the body next to the last st. Fasten off.
Lower wing border (each): Join in the first st of Row 3 at the end nearest the upper wing. Ch 1. Rev sc in each st across. (30 rev sc) Sl st into the body. Fasten off.
Totals per wing: upper 40, upper 40, lower 30, lower 30 = 140 rev sc around the butterfly.
Why the math works: The curve is already built into Rows 2 and 3, where the increases add 8 sts per row on each upper wing and 6 sts per row on each lower wing. The border is a trim round worked 1-per-existing-stitch with 0 extra stitches, so its counts match Row 3 exactly: 40 + 0 and 30 + 0. Adding more stitches would make the edge ruffle, and skipping stitches would cup the wing. The border adds 1/8 in (0.3 cm) on each outer edge. That takes the size from 5.25 in (13.3 cm) to 5.5 in (14.0 cm) wide, and from 4.25 in (10.8 cm) to 4.5 in (11.4 cm) tall across the wings.
Final Blocking
- Use the yarn tails to tack the short row ends of each wing flat against the side of the body, then weave in all ends.
- Lightly spray the butterfly until damp, not soaked.
- Lay it right side up on the blocking mat.
- Pin the body straight, 2.25 in (5.7 cm) long.
- Pin each upper wing tip so the wingspan measures 5.5 in (14.0 cm).
- Pin the lower wings so the total wing height measures 4.5 in (11.4 cm).
- Open each window with your fingertip and pin the chain frame into a smooth teardrop shape.
- Shape each antenna into a gentle outward curve and pin the knobs.
- Leave it to dry completely before unpinning.
Final Quality-Control Checklist
- Body has 26 sc, with 3 sc at the head and 3 at the tail.
- Both antennae are the same length and have a firm, round puff tip.
- Upper wings: 24 / 32 / 40 sts; lower wings: 18 / 24 / 30 sts.
- All four windows are open, with nothing worked into the inner side of the chain loops.
- The left and right wings mirror each other in size and position.
- Border counts are 40, 40, 30 and 30 rev sc.
- Finished size is 5.5 in (14.0 cm) × 4.5 in (11.4 cm) across the wings, and 5.25 in (13.3 cm) tall including the antennae.
- All ends are woven in invisibly on the wrong side.
Troubleshooting
Wing ruffles: Your tension is too loose on the dc increases, or you added an extra increase. Recount Row 3 and try a hook 0.25 mm smaller.
Wing cups or curls toward the body: The rev sc border is too tight. Loosen the loops or use a hook one size larger for the border only.
Window closes up: You probably worked Row 1 over the loop instead of into each chain. Work into the chains so the frame keeps its length.
Body twists: The foundation chain was twisted. Make sure the V’s of the chain face the same way before you work back along the opposite side.
Puff tips look flat: Pull up taller loops and close each puff firmly with the ch 1.
Wings are uneven: Check that each wing starts in the correct side stitches: 2–5 for the upper wings and 6–9 for the lower wings.
Care
Hand wash in cool water with a mild detergent, press out the water in a towel, and dry flat, reshaping the windows while damp. If the butterfly is sewn onto a basket, spot clean only.
Final Notes
The measurements build up in this order:
- Body: 2.25 in (5.7 cm).
- Chain loops: about 2 in (5.1 cm) for the upper wings and 1.5 in (3.8 cm) for the lower wings.
- After Row 3: 5.25 in (13.3 cm) × 4.25 in (10.8 cm).
- After the 1/8 in (0.3 cm) rev sc edge: 5.5 in (14.0 cm) × 4.5 in (11.4 cm), and 5.25 in (13.3 cm) tall including the antennae.
If you check each stage, the butterfly will come out symmetrical and lie flat. It is ready to stitch onto a basket, tote, cushion or card.
Happy crocheting!