

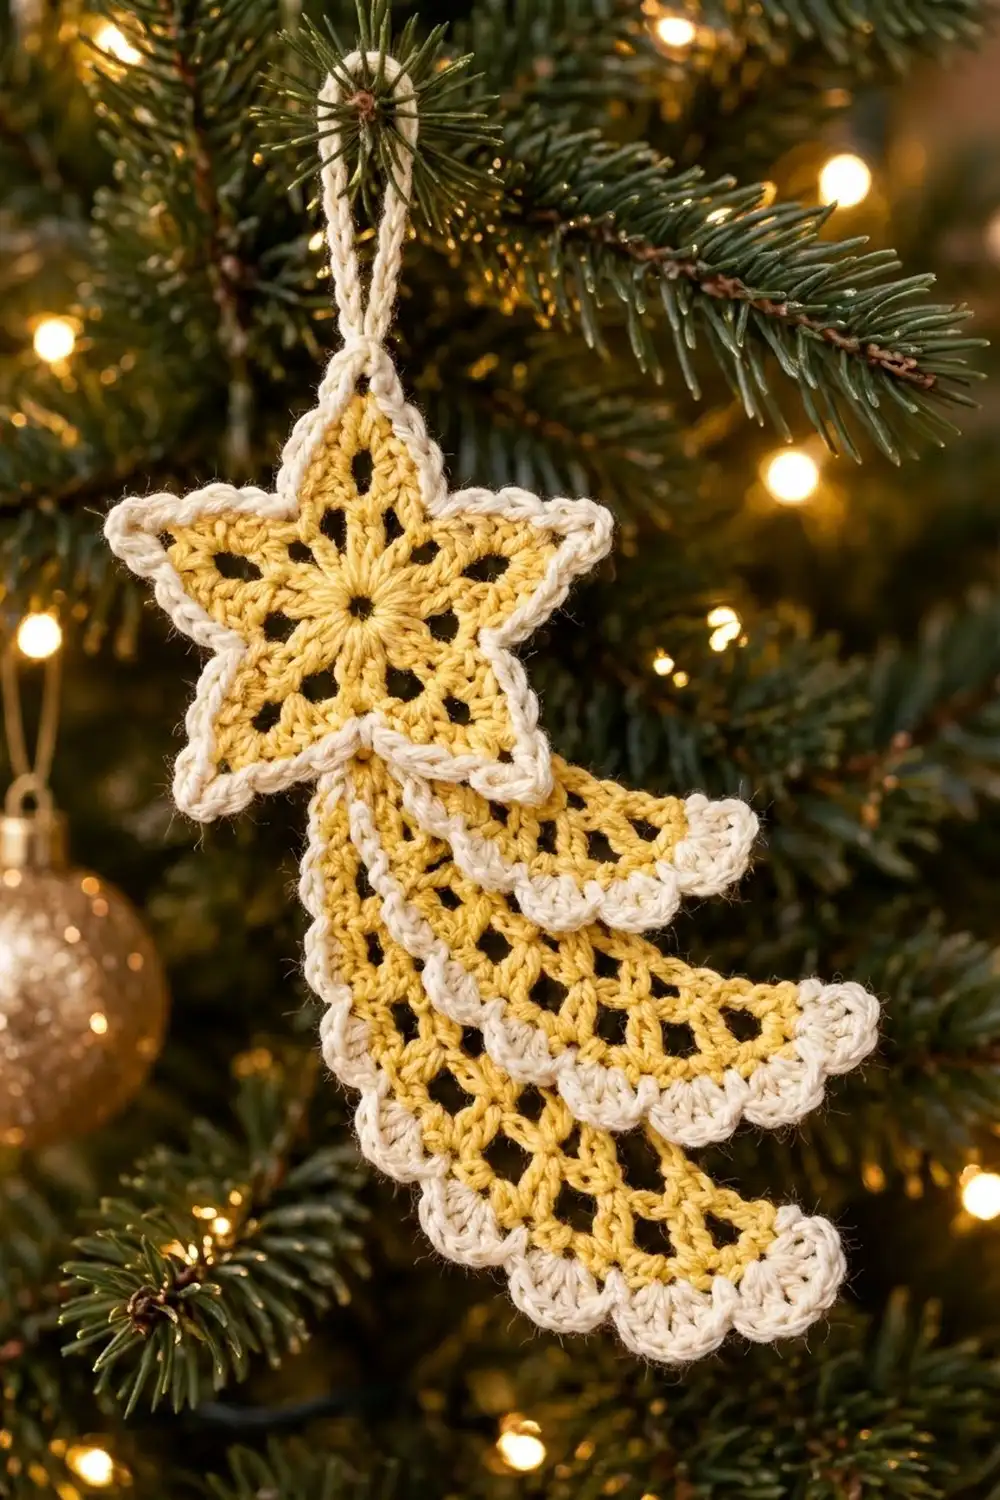
The Golden Comet is a lacy shooting-star ornament. A butter-yellow lace star sits on top, and three layered fan tails sweep out beneath it. Cream edging outlines the star and puts a soft scallop on the curve of each fan, so the ornament reads clearly against dark green branches and twinkle lights.
The style is classic thread-lace: open windows, crisp points and a light, airy finish. The pattern uses US crochet terms throughout.
The finished ornament measures about 4.25 in (10.8 cm) wide and 7 in (17.8 cm) tall, not counting the hanging loop. The loop adds about 2 in (5.1 cm).
You make four separate pieces: one star and three fans in three sizes. Each piece gets its own cream edging. You then stack the fans, sew them together, and sew the star over the point where the fans meet.
Finished Size and Construction
- Finished size: 4.25 in (10.8 cm) wide × 7 in (17.8 cm) tall, plus a 2 in (5.1 cm) loop
- Skill level: Intermediate
- Terminology: US crochet terms
- Yarn weight: Fine (#2) mercerized cotton
- Hook: 2.5 mm (US B/1 or C/2)
- Number of pieces: 4 (1 star, 3 fans)
- Layout: Stacked layers, with the large fan at the back, then medium, then small, and the star on top
- Piece sizes (edged): Star 3.5 in (8.9 cm) tip to tip. Small fan 2 in (5.1 cm), medium fan 2.5 in (6.4 cm) and large fan 3 in (7.6 cm), each measured from the point to the edge of the curve.
- Size before edging: Star 3 in (7.6 cm). Fans 1.5 in (3.8 cm), 2 in (5.1 cm) and 2.5 in (6.4 cm).
- Edging depth: Star 0.25 in (0.6 cm) per side. Fan scallops 0.5 in (1.3 cm).
Materials
Choose a smooth mercerized cotton in fine (#2) weight, about 170 m per 50 g. Mercerized cotton holds crisp points and lace windows, and it blocks well. Avoid fuzzy or very stretchy yarns, because they blur the open mesh.
Yarn:
– Color A – Butter Yellow: 10 g / 34 m
– Color B – Cream: 6 g / 20 m
These amounts include a margin for gauge swatching and sewing tails.
Tools:
– 2.5 mm crochet hook
– Tapestry needle
– Scissors
– Rustproof pins
– Blocking mat or folded towel
– Spray bottle with water (spray starch is optional, for a firmer ornament)
Abbreviations (US Terms)
- ch – chain
- sl st – slip stitch
- sc – single crochet
- hdc – half double crochet
- dc – double crochet
- sp(s) – space(s)
- tch – turning chain
- st(s) – stitch(es)
- RS – right side
Special stitch – Scallop: Work (hdc, a set number of dc, hdc) into one chain space. Each fan’s edging tells you how many dc to use.
Gauge and Checkpoints
Make the star first and use it as your test piece. Its checkpoints show you right away whether your tension matches.
- Star Rounds 1–2: 1.5 in (3.8 cm) across
- Star Round 4: 3 in (7.6 cm) tip to tip
- Star with border: 3.5 in (8.9 cm) tip to tip
- Fan Rows 1–3: 1.5 in (3.8 cm) from point to curve. Each later row adds 0.5 in (1.3 cm).
- Cream border gauge: 5 sc = 1 in (2.5 cm)
If your pieces are too big, go down to a 2.25 mm hook. If they are too small, go up to a 2.75 mm hook. Being off by about 0.125 in (0.3 cm) on the star is fine. Being off by more makes the fans look out of proportion, so adjust before you go on.
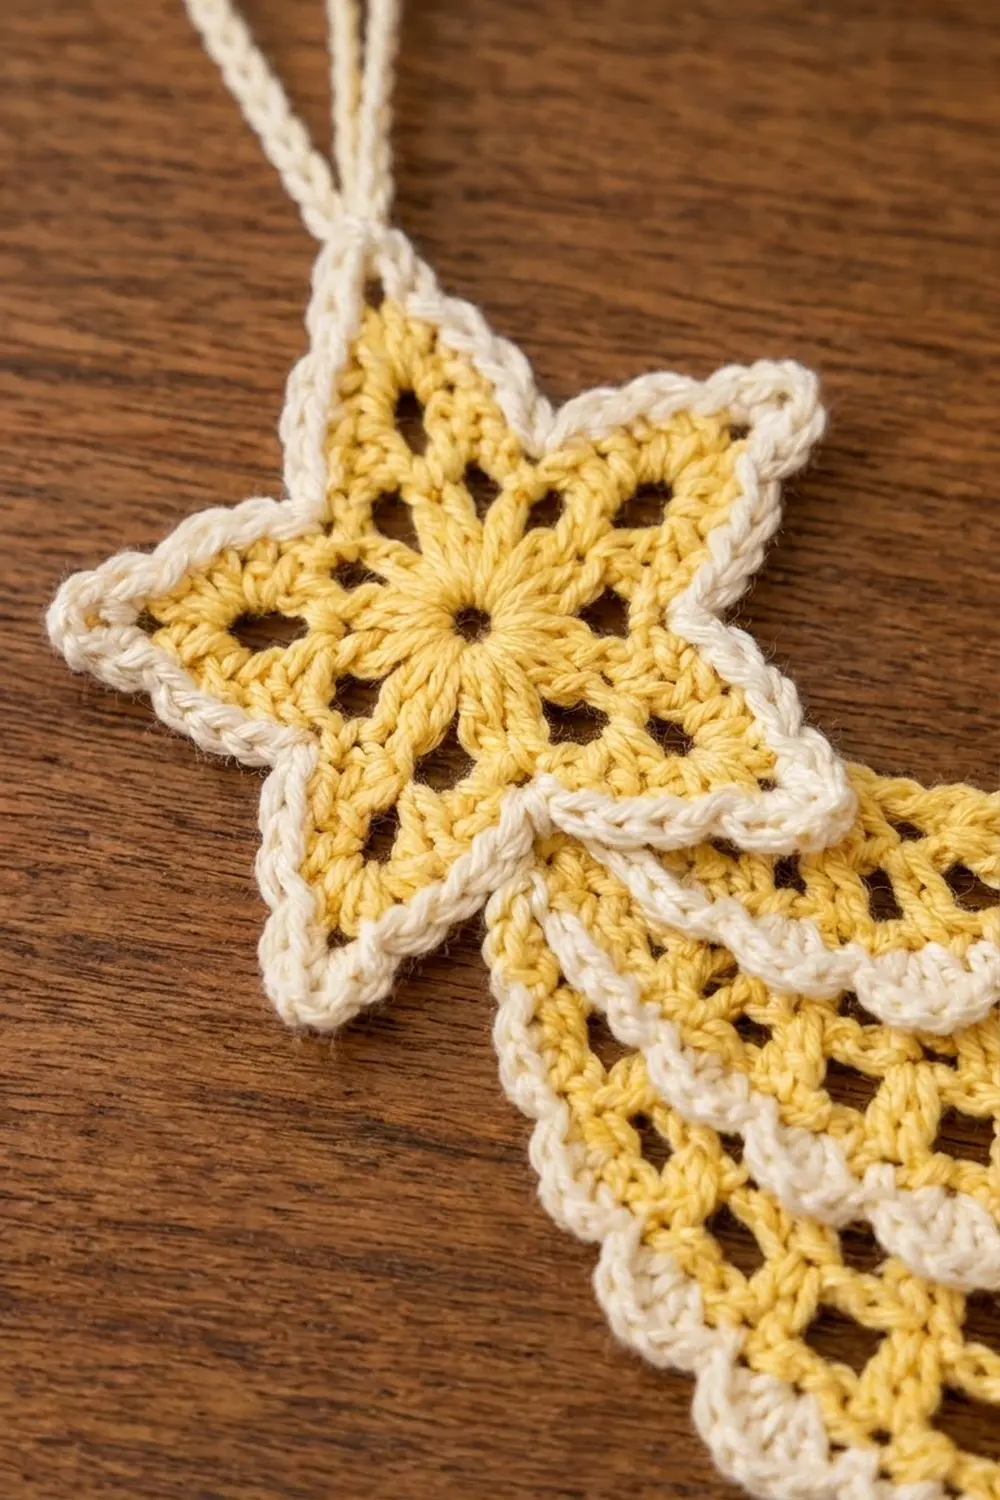
Star (Make 1)
Use Color A.
Round 1: Make a magic ring. Ch 3 (counts as a dc), then work 9 dc into the ring. Pull the ring closed and sl st to the top of the ch-3. (10 dc)
Round 2: Ch 5 (counts as a dc plus a ch-2). Dc in next dc, ch 2. Repeat from * 8 more times. Sl st to the 3rd ch of the beginning ch-5. (10 dc, 10 ch-2 sps)
This round makes the spoked center ring. Check that it measures 1.5 in (3.8 cm) across.
Round 3: Sl st into the first ch-2 sp. Ch 1, sc in the same sp, ch 8, sc in the next ch-2 sp, ch 1. Sc in next ch-2 sp, ch 8, sc in next ch-2 sp, ch 1. Repeat from * 3 more times. Sl st to the first sc. (10 sc, 5 ch-8 loops, 5 ch-1 sps)
Each ch-8 loop becomes one star point. The open space under the loop becomes the window inside that point.
Round 4: Sl st into the first ch-8 loop. Ch 1, then work (2 sc, 2 hdc, 2 dc, ch 3, 2 dc, 2 hdc, 2 sc) into the same loop. Sl st in the next ch-1 sp.
Work (2 sc, 2 hdc, 2 dc, ch 3, 2 dc, 2 hdc, 2 sc) into the next ch-8 loop, then sl st in the next ch-1 sp. Repeat from * 3 more times. Fasten off.
(60 sts, 5 ch-3 tips, 5 valley sl sts)
The stitches climb from sc up to dc and back down. That shapes a true pointed tip, with a sl st valley between points. The star should now measure 3 in (7.6 cm) tip to tip.
Fans (Make 3: Small, Medium, Large)
Use Color A. All three fans start with the same Rows 1–3. You only add extra rows for the larger sizes.
Row 1: Ch 4. Work (ch 2, dc) 4 times into the 4th ch from the hook, then turn. The skipped 3 chains count as the first dc. (5 dc, 4 ch-2 sps)
Row 2: Ch 5 (counts as a dc plus a ch-2). Dc in the first ch-2 sp, then ch 2.
Dc in the next dc, ch 2, dc in the next ch-2 sp, ch 2. Repeat from * 2 more times. Dc in the 3rd ch of the tch, then turn. (9 dc, 8 ch-2 sps)
Row 3: Ch 6 (counts as a dc plus a ch-3). Dc in next dc, ch 3. Repeat from * 6 more times. Dc in the 3rd ch of the tch. (9 dc, 8 ch-3 sps)
Small fan: Stop here, fasten off and go to the Border section. It measures 1.5 in (3.8 cm) from the point to the curve.
Row 4 (medium and large only): Turn. Ch 7 (counts as a dc plus a ch-4). Dc in next dc, ch 4. Repeat from * 6 more times. Dc in the 3rd ch of the tch. (9 dc, 8 ch-4 sps)
Medium fan: Stop here and fasten off. It measures 2 in (5.1 cm).
Row 5 (large only): Turn. Ch 8 (counts as a dc plus a ch-5). Dc in next dc, ch 5. Repeat from * 6 more times. Dc in the 3rd ch of the tch. (9 dc, 8 ch-5 sps)
Fasten off. The large fan measures 2.5 in (6.4 cm).
The spokes stay at 9 dc in every row, while the chains get longer. That gives the fan its flared shape and the stacked tiers of open windows.
Make All Pieces
| Piece | Qty | Color A rows/rounds | Color B edging |
|---|---|---|---|
| Star | 1 | Rounds 1–4 | Round 5 + loop |
| Small fan | 1 | Rows 1–3 | 49 sts |
| Medium fan | 1 | Rows 1–4 | 57 sts |
| Large fan | 1 | Rows 1–5 | 65 sts |
Layer layout (front view):
            [  STAR  ]        ← top layer, covers fan tips
             \
          [ SMALL FAN ]       ← layer 3, sweeps right
            [ MEDIUM FAN ]    ← layer 2, sweeps lower right
              [ LARGE FAN ]   ← layer 1 (back), lowest
Border
All edgings use Color B. Work them before you assemble the ornament, with the RS facing you.
Border gauge: 5 sc = 1 in (2.5 cm). The star border adds 0.25 in (0.6 cm) on each side. The fan scallops add 0.5 in (1.3 cm) to the curve.
Star Border
Round 5: Join Color B with a sl st in any ch-3 tip. Ch 1, then work (2 sc, ch 2, 2 sc) in the same tip.
Sc in each of the next 6 sts, skip the valley sl st, sc in each of the next 6 sts, then work (2 sc, ch 2, 2 sc) in the next ch-3 tip. Repeat from * 3 more times.
Sc in each of the next 6 sts, skip the valley sl st, sc in each of the next 6 sts. Sl st to the first sc. (80 sc, 5 ch-2 tips)
Why the math works: Each point has 12 stitches below the tip: 2 sc, 2 hdc and 2 dc on each side. You work 1 sc into each of those, plus 4 sc into the tip, for 16 sc per point. Five points × 16 sc = 80 sc.
Skipping the valley sl st keeps the inner corners sharp. The ch-2 at each tip keeps the points crisp. The star now measures 3.5 in (8.9 cm) tip to tip.
Hanging loop: Without fastening off, sl st into the ch-2 sp at whichever point you choose as the top. Ch 40, then sl st into the same ch-2 sp. Fasten off. The loop hangs about 2 in (5.1 cm).
Fan Edgings
The edging goes only along the outer curve. The straight sides stay yellow.
Small fan: Join Color B with a sl st in the top of the last row’s tch. Ch 1 and sc in the same st. Work (hdc, 3 dc, hdc) in the next ch-3 sp, then sc in the next dc. Repeat from * 7 more times. Fasten off. (9 sc + 8 scallops × 5 sts = 49 sts)
Medium fan: Work the same way, but make each scallop (hdc, 4 dc, hdc) in the ch-4 sps. (9 sc + 8 × 6 = 57 sts)
Large fan: Work the same way, but make each scallop (hdc, 5 dc, hdc) in the ch-5 sps. (9 sc + 8 × 7 = 65 sts)
Why the math works: Every fan has 9 dc spokes and 8 spaces. Each spoke gets 1 sc, and each space gets 1 scallop, so every fan ends up with 8 even scallops. Bigger spaces get 1 extra dc per scallop, which lets the edging lie flat along the longer curve without ruffling.
Each fan should now measure 2 in (5.1 cm), 2.5 in (6.4 cm) or 3 in (7.6 cm) from the point to the edge of the scallops.
Joining
The pieces are layered and sewn with a needle, not crocheted together. Use Color A tails, so the stitches disappear into the yellow lace.
Step 1 – Large and medium fans. Lay the large fan RS up with its point at the upper left and its curve sweeping toward the lower right. Place the medium fan on top with the points matched.
Turn the medium fan slightly clockwise, so its scallops lie across the large fan’s Row 3 mesh. About 0.75 in (1.9 cm) of the large fan’s curve should show below.
Step 2 – Stitch-to-stitch tacking. Match the medium fan’s left straight edge to the large fan’s left straight edge, row-end to row-end. Rows 1–4 of the medium fan match Rows 1–4 of the large fan, which is 4 matched pairs.
Whipstitch each matched pair with 1 stitch. Then tack the center scallop of the medium fan to the dc spoke directly behind it.
Step 3 – Small fan. Place the small fan on the medium fan in the same way, with the points matched. About 0.75 in (1.9 cm) of the medium fan’s curve should show below.
Match Rows 1–3 of the small fan to Rows 1–3 of the medium fan, and whipstitch the 3 pairs. Tack the center scallop.
Step 4 – Star. Center the star over the three matched points, with the hanging loop at the top. The 2 lower star points should hide every fan point.
Sew around the star’s center ring through all layers. Then tack the 2 lower star points to the fans with 2 stitches each.
Tension advice: Pull each stitch just snug. Stitches that are too tight pucker the lace, and loose ones let the layers shift.
Size checkpoint: The assembled ornament should measure 4.25 in (10.8 cm) wide and 7 in (17.8 cm) tall without the loop. If it’s taller, overlap the fans more. If it’s shorter, overlap them less.
Final Blocking
- Weave in all tails, sewing them through stitches of the same color.
- Spray the ornament with water until it is damp all the way through.
- Lay it RS up on the mat and smooth it to 4.25 in × 7 in (10.8 cm × 17.8 cm).
- Pin each star tip at its ch-2 so the point is sharp.
- Pin the center of each scallop so the scallops are evenly rounded.
- Open the mesh windows with your fingertip.
- Spray with starch if you’d like a firmer piece.
- Let it dry completely, then remove the pins.
Final Quality-Control Checklist
- Star has 80 sc and 5 crisp ch-2 tips
- Each star point has an open window
- Every fan has 9 spokes and 8 scallops
- Fan straight edges stay yellow, with no cream on them
- Fan points are hidden under the star
- Each lower fan shows about 0.75 in (1.9 cm) of its curve
- Hanging loop sits at the top point and is firmly attached
- Finished size: 4.25 in × 7 in (10.8 cm × 17.8 cm)
Troubleshooting
- Star points curl: The Round 3 chains are too tight. Use a larger hook for the ch-8 loops only.
- Round 4 crowds the loop: Push the stitches together as you work, or chain 9 instead of 8.
- Fan cups: The chains are too short. Loosen your chain tension.
- Fan ruffles: Use one fewer dc per scallop.
- Layers shift: Add tacking stitches at the center scallops.
- Ornament leans: Move the loop to the point that sits directly above the fans’ center of weight.
Care
Hand wash the ornament in cool water and press it gently in a towel. Reshape it and dry it flat, and re-starch it if you like.
Final Notes
Here is the measurement chain to check as you go:
- The star center measures 1.5 in (3.8 cm).
- The star measures 3 in (7.6 cm) after Round 4 and 3.5 in (8.9 cm) after the border.
- Before edging, the fans measure 1.5 in, 2 in and 2.5 in (3.8 cm, 5.1 cm and 6.4 cm).
- After edging, the fans measure 2 in, 2.5 in and 3 in (5.1 cm, 6.4 cm and 7.6 cm).
- Layered with about 0.75 in (1.9 cm) showing on each lower fan, the ornament comes to 4.25 in × 7 in (10.8 cm × 17.8 cm).
If you check each stage, your comet will hang straight and sparkle on the tree.
Happy crocheting!