

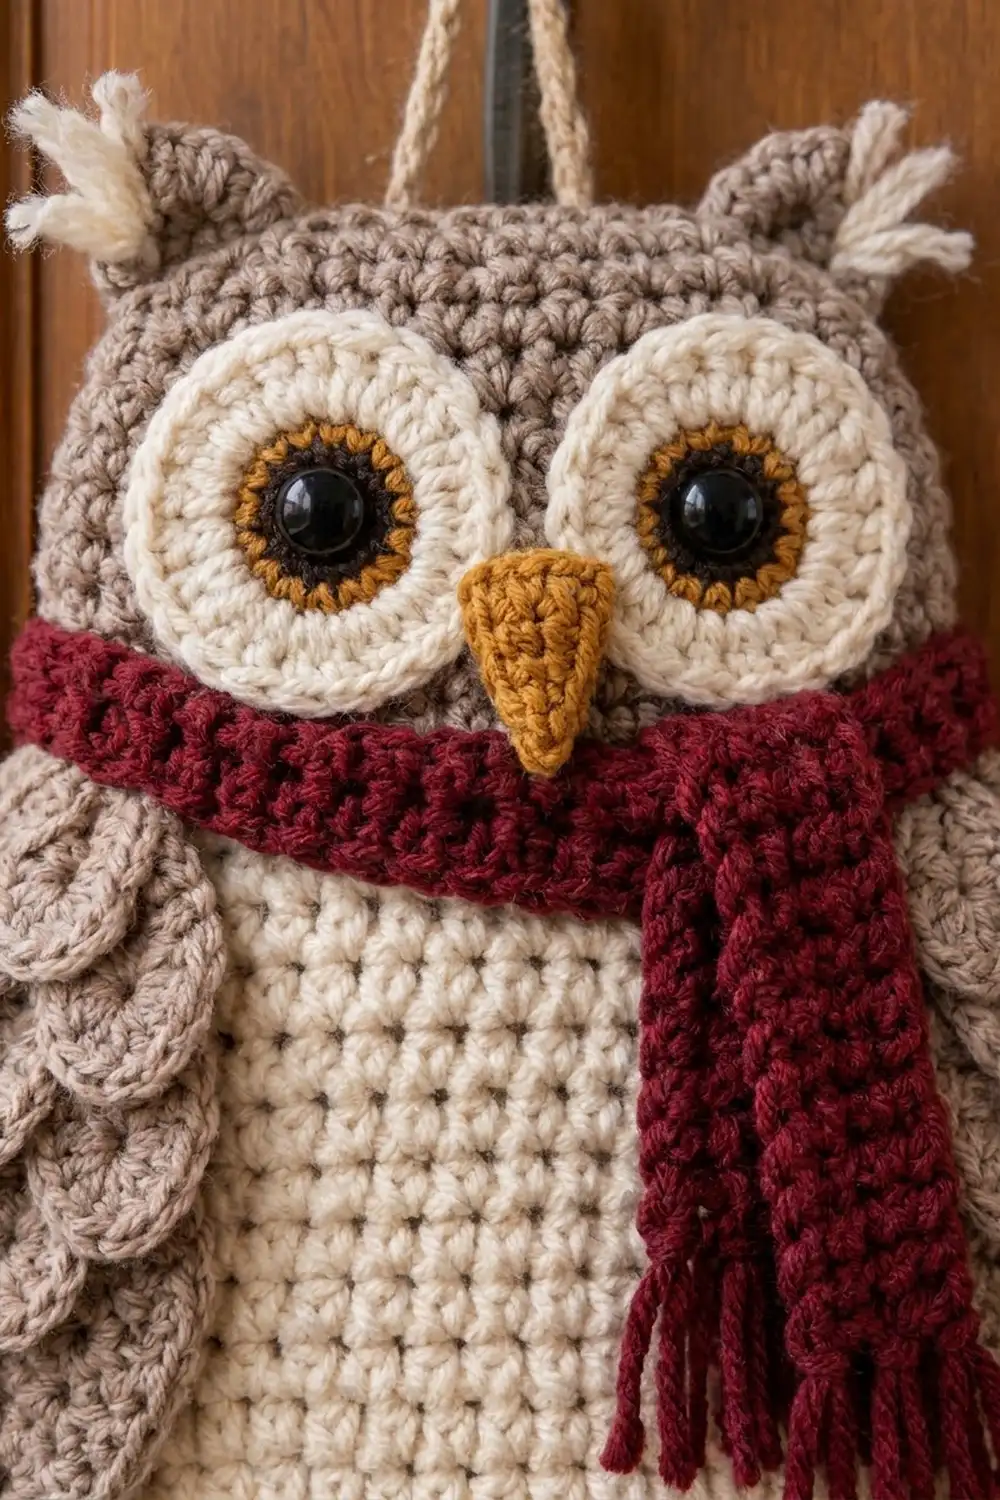
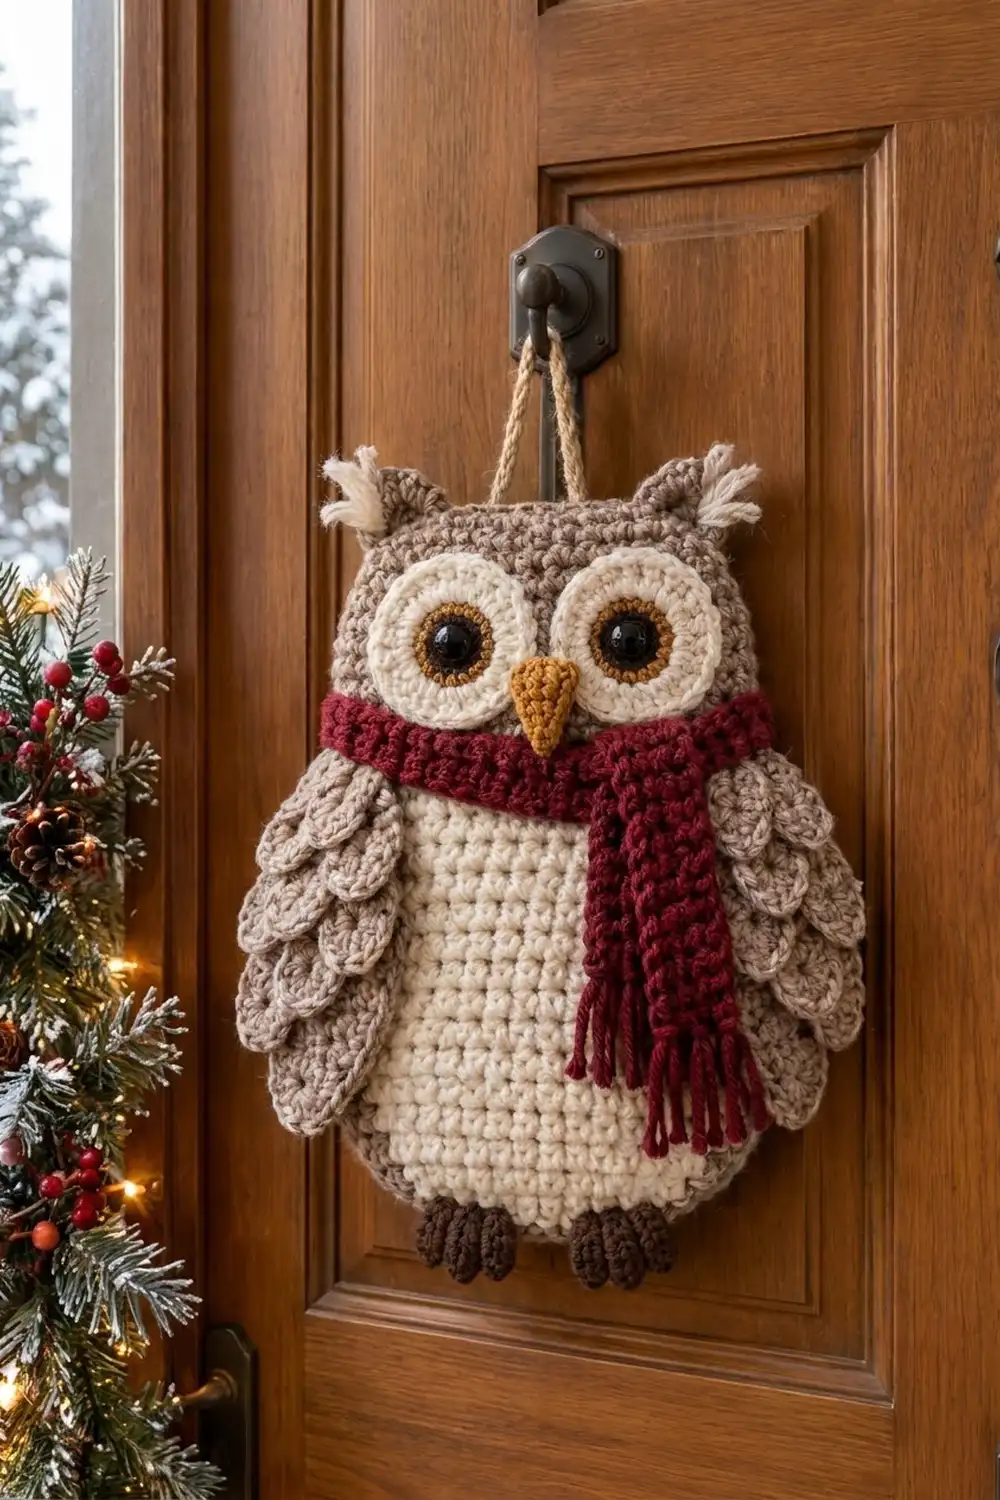
This owl hangs flat against a door. It has a cream belly, a heathered taupe head and two big round eyes. A burgundy scarf crosses its neck, its wings are covered in rows of round scales, and two small brown feet peek out at the bottom.
The colors are cream, taupe, burgundy, mustard and dark brown, plus a tan hanging cord. The look is rustic and wintry, so it suits a front door, a cabin wall or a holiday mantel all season long.
The pattern uses US crochet terms. The body is 7.5 in (19.1 cm) wide and 9.9 in (25.1 cm) tall. With the wings, ears and feet, the whole owl is about 10.5 in (26.7 cm) wide and 11 in (27.9 cm) tall, not counting the cord.
You crochet one oval body in joined rounds and a half-circle head panel in rows. The border round sc’s through both layers to join the head to the body. Then you sew on the eyes, beak, wings, scales, scarf and feet.
Finished Size and Construction
- Finished size: 10.5 in (26.7 cm) wide x 11 in (27.9 cm) tall overall
- Skill level: Intermediate
- Terminology: US
- Yarn weight: Worsted (#4)
- Hook: 5 mm (H-8)
- Number of pieces: One finished owl. It has a single body, and the head panel and appliqués are layered onto it.
- Layout: Head panel over the top end of the body, wings at the sides, scarf over the neck seam
- Body size: 7.5 x 9.9 in (19.1 x 25.1 cm)
- Size before border (after Rnd 12): 6 x 8.4 in (15.2 x 21.3 cm)
- Border depth: 3 rounds = 0.75 in (1.9 cm)
Materials
Use a smooth worsted acrylic or wool blend with about 200 m per 100 g. A slightly heathered taupe gives the feathery look shown. Meters below are based on that weight.
- Cream: 30 g (60 m), for the belly, eye rings and ear tufts
- Taupe: 65 g (130 m), for the body edge, head, wings and scales
- Burgundy: 15 g (30 m), for the scarf and fringe
- Mustard: 5 g (10 m), for the irises and beak
- Dark brown: 5 g (10 m), for the feet
- Tan (worsted or soft jute): 5 g (10 m), for the hanging cord
All quantities include a margin of about 25 percent.
Tools: 5 mm (H-8) hook, two 15 mm black safety eyes with washers, tapestry needle, stitch markers, scissors, rustproof pins, and a ruler or tape measure.
Abbreviations (US Terms)
- ch – chain
- sc – single crochet
- dc – double crochet
- sl st – slip stitch
- st(s) – stitch(es)
- inc – 2 sc in the same st
- sc2tog / sc3tog – single crochet 2 or 3 sts together
- BLO – back loop only
- MR – magic ring
- rnd(s) – round(s)
- RS / WS – right side / wrong side
Special stitch, 3-dc cluster (cl): Yarn over, insert hook into the ring, pull up a loop, yarn over, pull through 2 loops. Repeat from * 2 more times, then yarn over and pull through all 4 loops on the hook.
Gauge and Checkpoints
Gauge: 15 sc and 16 rows or rounds = 4 in (10.2 cm).
Work the body through Rnd 4 as your test piece. It should measure 2 in (5.1 cm) wide and 4.4 in (11.2 cm) long.
Checkpoints:
- Body after Rnd 8: 4 x 6.4 in (10.2 x 16.3 cm)
- Body after Rnd 12: 6 x 8.4 in (15.2 x 21.3 cm)
- Body after Rnd 15: 7.5 x 9.9 in (19.1 x 25.1 cm)
- Head after Row 7: 3.5 in (8.9 cm) across the straight edge
- Eye after Rnd 5: 2.5 in (6.4 cm) across
If your piece is larger, go down 0.5 mm in hook size. If it is smaller, go up 0.5 mm. Fix gauge before moving past Rnd 4. Every later piece is sized to match the body.
Body (Cream)
Join each round with a sl st to the first sc. The ch 1 at the start of a round does not count as a stitch.
Ch 12.
Rnd 1: Sc in the 2nd ch from hook, sc in the next 9 ch, 3 sc in the last ch. Working along the other side of the chain, sc in the next 9 ch, then 2 sc in the last ch (the same ch as your first sc). Join. (24)
Rnds 2–12: Ch 1. Work [sc X, inc] once, sc 9, [sc X, inc] 3 times, sc 9, [sc X, inc] twice. Join.
Here X is the round number minus 2. In Rnd 2, X is 0, so each bracket is just one inc.
Each round adds 6 sts, 3 at each end. The straight sides stay at 9 sts. These are each round’s own complete counts:
- Rnd 2: 30
- Rnd 3: 36
- Rnd 4: 42
- Rnd 5: 48
- Rnd 6: 54
- Rnd 7: 60
- Rnd 8: 66
- Rnd 9: 72
- Rnd 10: 78
- Rnd 11: 84
- Rnd 12: 90
On the last sl st of Rnd 12, change to taupe. Keep the taupe attached and set the body aside.
The 3 brackets in the middle of each round form the top end. Mark its first and last st.
Optional: on even-numbered rounds you can work the inc in the middle of each bracket instead of at the end. This rounds off the corners and does not change any count.
Head Panel (Taupe)
The head is worked in rows. Turn at the end of each row. The ch 1 does not count as a stitch.
Row 1: MR, ch 1, 3 sc in the ring. Pull the ring closed. (3)
Row 2: Ch 1, turn, inc in each st. (6)
Rows 3–14: Ch 1, turn, [sc X, inc] 3 times, where X is the row number minus 2. (each row = 3 x row number)
Row 3 has 9 sts, Row 7 has 21 and Row 14 has 42. Fasten off. The head is a flat half-circle 7 in (17.8 cm) across and 3.5 in (8.9 cm) tall.
Eyes (Make 2)
Rnd 1 (mustard): MR, ch 1, 6 sc in the ring. Join. (6)
Rnd 2: Ch 1, inc in each st. Join. (12) The piece should measure 1 in (2.5 cm) across.
Rnd 3 (change to cream): Ch 1, [sc, inc] 6 times. Join. (18)
Rnd 4: Ch 1, [sc 2, inc] 6 times. Join. (24)
Rnd 5: Ch 1, [sc 3, inc] 6 times. Join. (30) The eye should measure 2.5 in (6.4 cm) across.
Fasten off and leave a long cream tail for sewing.
Push a safety eye post through the center ring. Place the eye on the head panel, centered 1.75 in (4.4 cm) above the straight edge, with the inner edges of the two eyes almost touching. Push the post through the head panel and snap the washer on behind it. Sew the outer edge of each eye down.
Beak (Mustard)
Turn at the end of each row.
Row 1: Ch 2, sc in the 2nd ch from hook. (1)
Row 2: Ch 1, turn, 3 sc in the st. (3)
Row 3: Ch 1, turn, sc 3. (3)
Row 4: Ch 1, turn, inc, sc 1, inc. (5)
Row 5: Ch 1, turn, sc 5. (5)
Fasten off and leave a tail. The triangle is 1.3 in (3.3 cm) wide and 1.25 in (3.2 cm) tall. Sew it between the eyes with the point down and the tip 0.5 in (1.3 cm) above the head’s straight edge.
Wing Bases (Taupe, Make 2)
Join each round. The ch 1 does not count as a stitch.
Ch 10.
Rnd 1: Sc in the 2nd ch from hook, sc 7, 3 sc in the last ch. Working along the other side, sc 7, then 2 sc in the last ch. Join. (22)
Rnds 2–6: Ch 1. Work [sc X, inc] once, sc 8, [sc X, inc] 3 times, sc 8, [sc X, inc] twice, where X is the round number minus 2. Join.
Counts: Rnd 2: 28, Rnd 3: 34, Rnd 4: 40, Rnd 5: 46, Rnd 6: 52.
Fasten off. Each wing base is 3 x 5.1 in (7.6 x 13.0 cm).
Scales (Taupe, Make 18)
Rnd 1: MR, ch 3 (counts as a dc), 11 dc in the ring. Pull the ring snug but leave a small center hole. Join to the top of the ch-3. (12) The scale is 1 in (2.5 cm) across.
Rnd 2: Ch 1, [sc, inc] 6 times. Join. (18)
Fasten off and leave a tail. Each scale is 1.5 in (3.8 cm) across.
Layering: Each wing uses 9 scales in 5 rows, from the bottom up: 1, 2, 2, 2, 2.
- Sew the single scale first, with its lower edge at the narrow bottom tip of the wing.
- Place each row of 2 scales side by side across the 3 in (7.6 cm) width. Start each row 0.9 in (2.3 cm) higher than the row below, so it covers the top of that row.
- Tack only the upper half of each scale so the lower curve stays loose and layered.
The top row should end level with the top of the wing base.
Feet (Dark Brown, Make 2)
MR, ch 2, [cl in the ring, ch 1] twice, cl in the ring, ch 2, sl st in the ring. Pull the ring tight so the 3 clusters fan out as toes. Fasten off.
Each foot is about 1.25 in (3.2 cm) wide and 0.75 in (1.9 cm) tall.
Scarf (Burgundy)
Band: Ch 39.
- Row 1: Sc in the 2nd ch from hook and in each ch across. (38)
- Rows 2–5: Ch 1, turn, sc BLO across. (38)
The band is 10.1 x 1.25 in (25.7 x 3.2 cm). Fasten off.
Tail: Ch 7.
- Row 1: Sc in the 2nd ch from hook and across. (6)
- Rows 2–16: Ch 1, turn, sc BLO across. (6)
The tail is 1.6 x 4 in (4.1 x 10.2 cm).
Fringe: Cut 12 burgundy strands, each 4 in (10.2 cm) long. Fold 2 strands together and attach them with a lark’s head knot in each of the 6 sts of Row 16. Trim the fringe to 1.5 in (3.8 cm).
Border
The border is body Rnds 13–15 in taupe. Rnd 15 also joins the head to the body.
Border gauge: 4 rounds per inch. The 3 rounds add 0.75 in (1.9 cm) on every side.
Counts below are listed as straight side / top end / straight side / bottom end. An oval has no corners, so the side counts are just the straight stitches.
Rnd 13: Repeat the body formula with X = 11. 9 / 39 / 9 / 39 = 96
Rnd 14: X = 12. 9 / 42 / 9 / 42 = 102
The body now measures 7 x 9.4 in (17.8 x 23.9 cm).
Join the head: Lay the head panel RS up over the top end of the body. Its curved edge sits on the top end, and its straight-edge corners meet the body exactly where the straight sides begin. The head’s Row 14 has 42 sts, the same as the body’s top end, so you pair the stitches one to one.
Rnd 15: X = 13. Along the top end, insert the hook through each head st and the body st under it together, and work every sc through both layers. 9 / 45 / 9 / 45 = 108
Fasten off.
Ears: With RS facing, count the 45 top-end sts of Rnd 15 from the right. Join taupe in st 9.
- Row 1: Sc in sts 9–13. (5)
- Row 2: Ch 1, turn, sc2tog, sc 1, sc2tog. (3)
- Row 3: Ch 1, turn, sc3tog. (1)
Fasten off. Repeat over sts 33–37. Each ear is 0.75 in (1.9 cm) tall.
Why the math works:
- A flat sc circle grows by 6 sts per round. Each oval end is half of that circle, so it grows by 3 sts per round.
- The straight sides do not curve, so they stay at 9 sts.
- The head grows by 3 sts per row as well. After 14 rows it has the same 42 sts as the body end, so the two layers line up one to one.
- Final width: 15 rounds x 0.5 in = 7.5 in (19.1 cm).
- Final length: 7.5 in + 9 straight sts (2.4 in / 6.1 cm) = 9.9 in (25.1 cm).
Attach the appliqués:
- Wings: Place one wing on each side with its top at the head seam, 3.75 in (9.5 cm) below the top edge. Let it overlap the body by 1.5 in (3.8 cm). Whipstitch it down along the overlap.
- Scarf band: Center the band over the seam, on top of the wing tops. Wrap the ends to the back and tack them down.
- Tail: Gather the top of the tail slightly, tuck it under the band just right of center, and tack it so it hangs over the belly.
- Feet: Sew the feet to the back of the body. Center each one 1 in (2.5 cm) from the centerline, with the toes showing 0.5 in (1.3 cm) below the bottom edge.
- Ear tufts: Lark’s-head 3 cream strands, each 3 in (7.6 cm) long, through each ear tip. Trim to 0.75 in (1.9 cm) and separate the plies.
- Cord: Twist 2 tan strands, each 36 in (91.4 cm) long, into a cord about 12 in (30.5 cm) long. Sew the ends to the back of the head, 1.5 in (3.8 cm) below the top and 2 in (5.1 cm) apart.
Final Blocking
- Lightly spritz the body and wings with water. Keep moisture and heat away from the safety eyes.
- Pin the body to 7.5 x 9.9 in (19.1 x 25.1 cm) on a blocking mat.
- Ease the oval ends into smooth curves.
- Press the scales flat with your fingers so they lie layered. Do not stretch them.
- Let everything dry completely before you hang the owl.
Final Quality-Control Checklist
- The body is 7.5 x 9.9 in (19.1 x 25.1 cm), and Rnd 15 has 108 sts.
- The head layer lies flat with no bunching along the joined edge.
- The eyes are level and the washers are secure.
- The beak is centered with its point down.
- Each wing has 9 scales in rows of 1, 2, 2, 2, 2.
- The scarf band hides the head seam.
- The fringe is even at 1.5 in (3.8 cm).
- The feet are symmetrical.
- The cord is secure and the owl hangs straight.
Troubleshooting
- The oval ends look pointed: Use the optional staggered increases on even-numbered rounds.
- The body ruffles: Your tension is loose. Go down a hook size.
- The body cups: Your tension is tight. Go up a hook size.
- The head shifts during Rnd 15: Pin the head to the body first and pair one head st with one body st.
- The scales curl: Spritz them and press them flat.
- The scarf band flares: Keep the BLO stitches snug and the same height.
- The owl tilts when hung: Move the cord ends until they are level.
Care
Spot clean with cool water and mild soap, then dry flat. Do not machine wash or iron, because the safety eyes and layered scales can be damaged.
Final Notes
The measurements build on each other:
- The test piece at Rnd 4 is 2 x 4.4 in (5.1 x 11.2 cm).
- The cream body at Rnd 12 is 6 x 8.4 in (15.2 x 21.3 cm).
- Rnd 14 is 7 x 9.4 in (17.8 x 23.9 cm), which matches the 7 in (17.8 cm) head.
- The joined Rnd 15 is 7.5 x 9.9 in (19.1 x 25.1 cm).
- With the wings, the owl is 10.5 in (26.7 cm) wide.
If your gauge is right at the first checkpoint, every piece will fit.
Happy crocheting!