

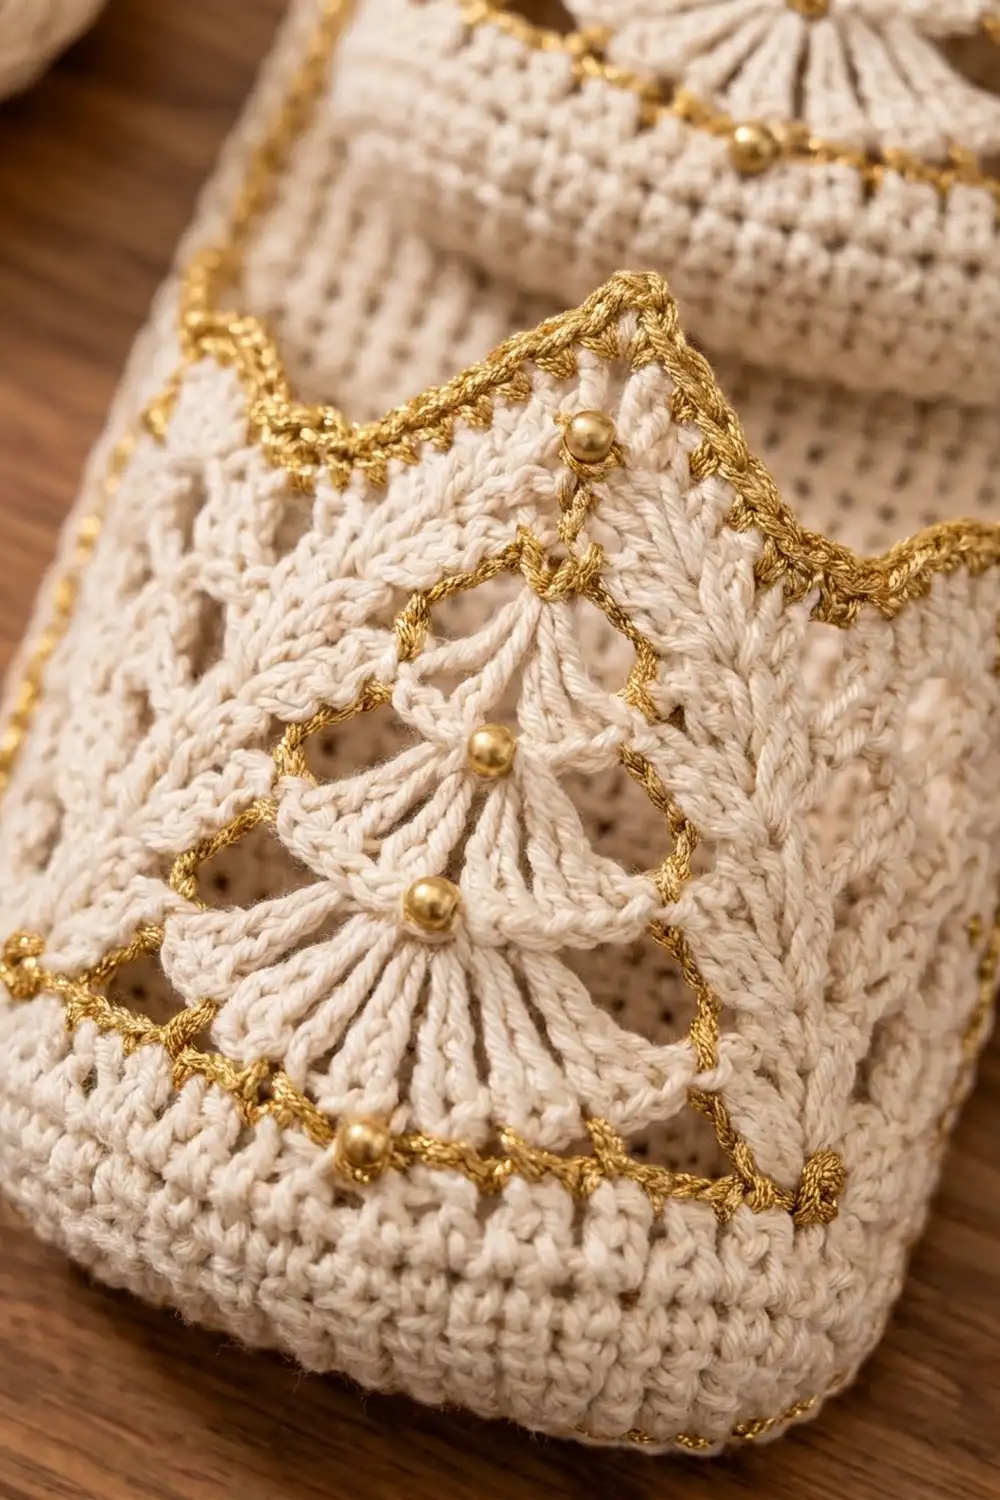
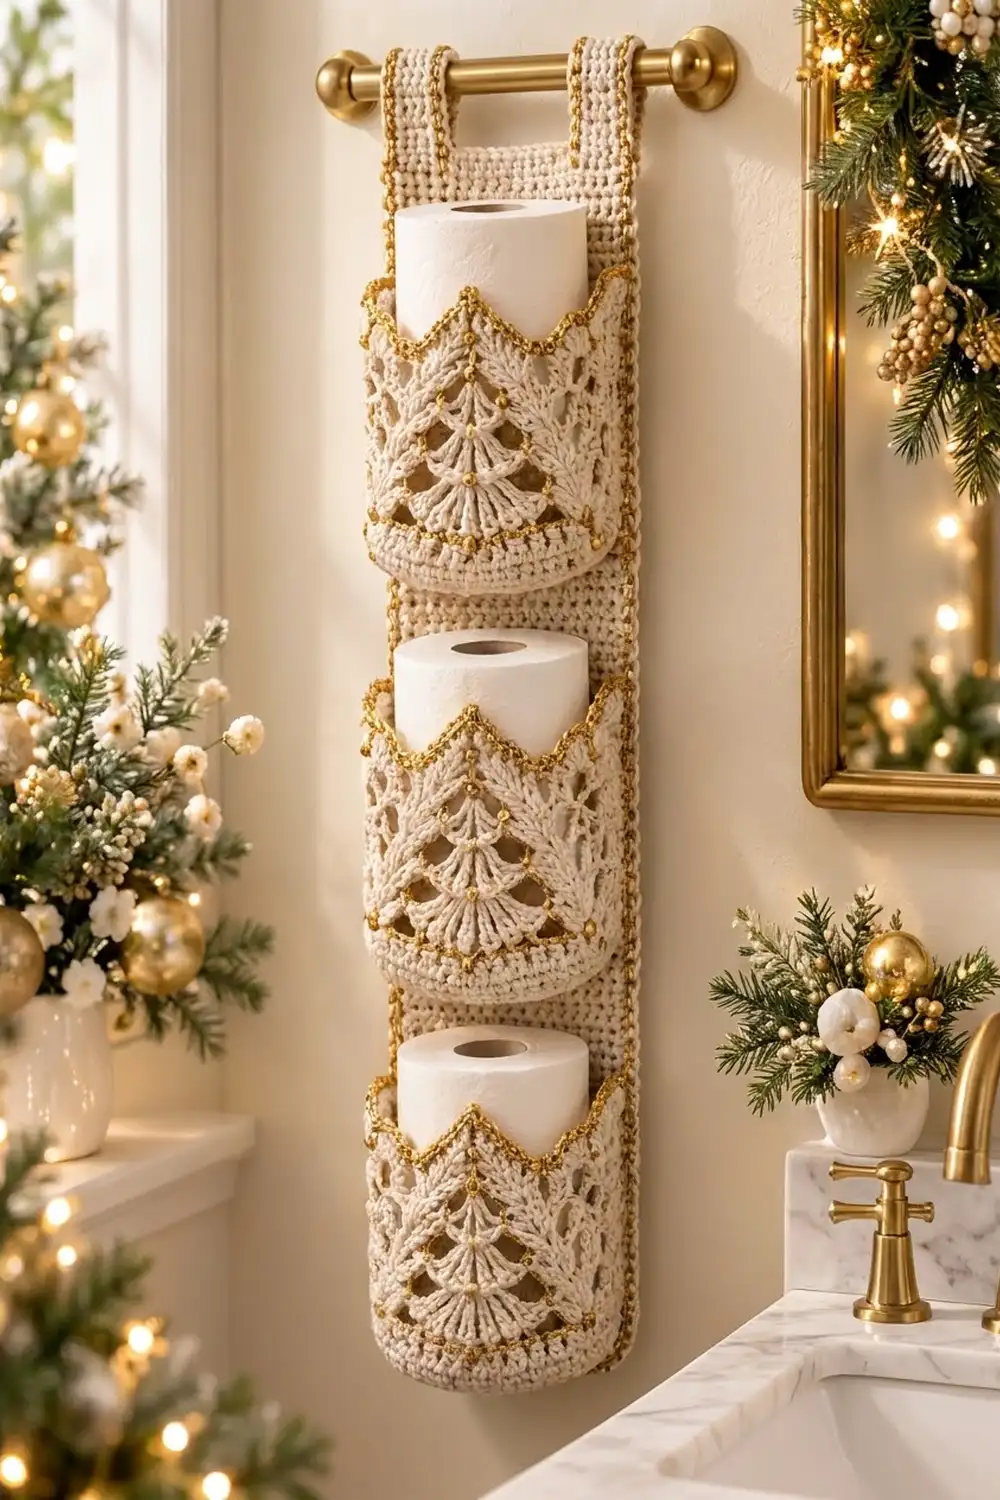
This hanging holder stores three spare rolls in lacy cups that look like little golden crowns. Each pocket has an openwork pine tree made of stacked shell fans. Gold dots sit in the fans, and the top edge rises in gold-trimmed points.
The palette is soft cream with metallic gold accents. It suits a holiday bathroom, but it also works all year in a neutral space. The style is classic and a little vintage, and the back panel is plain so the pockets stand out.
The pattern uses US crochet terms. The finished holder measures 6.5 in (16.5 cm) wide and 27 in (68.6 cm) long, not counting the hanging loops. Each pocket is about 4.75 in (12.1 cm) across and 4.25 in (10.8 cm) tall at the points.
You’ll crochet the back panel in rows, then make three pockets in the round from a flat circle base. You sew the pockets to the panel, add a two-round border, and finish with two straps that loop over a towel bar.
Finished Size and Construction
- Finished size: 6.5 in x 27 in (16.5 cm x 68.6 cm), plus straps
- Skill level: Intermediate
- Terminology: US
- Yarn weight: Worsted (#4) cotton; metallic gold of similar weight
- Hook: 5.0 mm (H-8)
- Number of pieces: 4 (1 back panel, 3 pockets)
- Layout: 1 column of 3 pockets on one panel
- Pocket size: 4.75 in (12.1 cm) diameter; 4.25 in (10.8 cm) tall at the points, 3.5 in (8.9 cm) at the dips
- Panel size before border: 5.5 in x 26 in (14.0 cm x 66.0 cm)
- Border depth: 0.25 in (0.6 cm) per side
Materials
Use a smooth, firm cotton or cotton blend so the pockets hold their shape. For gold, use a worsted metallic yarn. If yours is finer, hold two strands together.
- Cream (Color A): 200 g / 380 m (416 yd)
- Gold (Color B): 30 g / 65 m (71 yd)
Quantities include about a 20% margin.
Tools:
– 5.0 mm (H-8) crochet hook
– Tapestry needle
– 4 locking stitch markers
– Rust-proof pins
– Measuring tape
– Blocking mat and spray bottle
Abbreviations (US Terms)
- ch – chain
- sl st – slip stitch
- sc – single crochet
- hdc – half double crochet
- dc – double crochet
- tr – treble crochet
- BLO – back loop only
- sk – skip
- sp – space
- st(s) – stitch(es)
- RS – right side
Special stitches:
- Shell: (2 dc, ch 1, 2 dc) all in the same st. In this pattern a shell counts as 5 sts: 4 dc plus the ch-1 sp.
- Fan unit (uses 6 sts, makes 6 sts): sk 2 sts, shell in next st, sk 2 sts, dc in next st.
- Point unit (uses 10 sts): sc in next st, hdc in next st, dc in next st, tr in next st, (tr, ch 2, tr) in next st, tr in next st, dc in next st, hdc in next st, sc in next st, sl st in next st. It makes 11 sts and 1 ch-2 sp.
In the lace rounds, a ch-1 sp counts as 1 st, and working “dc in next st” into a ch-1 sp is correct.
Gauge and Checkpoints
Gauge: 16 sc and 18 rows = 4 in (10.2 cm) in sc rows.
Make one pocket first. It’s the best gauge test because it checks both your sc and dc tension.
Checkpoints:
– Pocket after Rnd 10: flat circle 4.75 in (12.1 cm) across
– Pocket after Rnd 13: circumference 15 in (38.1 cm)
– Lace band (Rnds 14–18): 2.5 in (6.4 cm) tall
– Panel width: 5.5 in (14.0 cm) across 22 sts
– Panel after 18 rows: 4 in (10.2 cm) tall
If your piece is too big, go down one hook size. If it’s too small, go up one size. A standard roll is about 4.5 in (11.4 cm) across, so the pocket circle needs to measure at least that much.
Back Panel
With A, ch 23.
Row 1 (RS): Sc in 2nd ch from hook and in each ch across, turn. (22 sc)
Rows 2–117: Ch 1 (doesn’t count as a st), sc in each st across, turn. (22 sc)
The panel should measure 5.5 in x 26 in (14.0 cm x 66.0 cm). Don’t fasten off. Set the working loop aside on a marker for the border.
The pocket is worked in joined rounds. Join each round with a sl st to the first st. At the start of each round, ch 1 for sc rounds or ch 2 for dc rounds. The starting chain doesn’t count as a st, and you work the first st into the same st as the join.
Base
With A, make a magic ring.
Rnd 1: 6 sc in ring. (6)
Rnd 2: 2 sc in each st. (12)
Rnd 3: [Sc in next st, 2 sc in next st] 6 times. (18)
Rnd 4: [Sc in next 2 sts, 2 sc in next st] 6 times. (24)
Rnd 5: [Sc in next 3 sts, 2 sc in next st] 6 times. (30)
Rnd 6: [Sc in next 4 sts, 2 sc in next st] 6 times. (36)
Rnd 7: [Sc in next 5 sts, 2 sc in next st] 6 times. (42)
Rnd 8: [Sc in next 6 sts, 2 sc in next st] 6 times. (48)
Rnd 9: [Sc in next 7 sts, 2 sc in next st] 6 times. (54)
Rnd 10: [Sc in next 8 sts, 2 sc in next st] 6 times. (60)
Checkpoint: the circle is 4.75 in (12.1 cm) across and lies flat.
Lower Band
Rnd 11: Sc BLO in each st. (60) This leaves a ridge where the base turns up into the sides.
Rnd 12: Sc in each st. (60) Fasten off A.
Rnd 13: Join B, sc in each st. (60) Fasten off B.
Checkpoint: the band is 0.75 in (1.9 cm) tall, and the circumference is 15 in (38.1 cm).
Mark the first st of Rnd 13 as st 1. Sts 1–30 are the front, and sts 31–60 are the back. The joins fall at the left side of the pocket.
Pine Tree Lace
Join A in st 1 for every lace round.
Rnd 14 (5 fans): Ch 2, work 5 fan units over the front, then dc in each of the 30 back sts. (60)
Rnd 15 (4 fans): Ch 2, dc in next 3 sts, 4 fan units, dc in next 3 sts, dc in each of the 30 back sts. (60)
Each new shell lands on the single dc between two shells of the round below. That offset narrows the tree.
Rnd 16 (3 fans): Ch 2, dc in next 6 sts, 3 fan units, dc in next 6 sts, dc in each of the 30 back sts. (60)
Rnd 17 (2 fans): Ch 2, dc in next 9 sts, 2 fan units, dc in next 9 sts, dc in each of the 30 back sts. (60)
Rnd 18 (1 fan): Ch 2, dc in next 12 sts, 1 fan unit, dc in next 12 sts, dc in each of the 30 back sts. (60)
Count check for the front: 3+24+3, 6+18+6, 9+12+9 and 12+6+12 all equal 30.
Checkpoint: the lace band is 2.5 in (6.4 cm) tall. The tree’s top shell sits over front st 15.
Crown Points
Rnd 19: Ch 1, work 6 point units around the round. Join to the first sc. (66 sts + 6 ch-2 sps)
This is a conversion round. Each of the 60 sts gets 1 st (60), and each of the 6 tips gets 1 extra tr (+6), for 66 sts. The front tips land on sts 5, 15 and 25, so the center point sits right above the tree. Fasten off A.
Rnd 20: Join B in any valley sl st. Sc in each st around, working (sc, ch 2, sc) in each ch-2 tip sp. Join and fasten off. (78 sc + 6 ch-2 sps)
This is also a conversion round. The 66 sts each get 1 sc (66), and the 6 tips get 2 sc each (+12), for 78 sc.
Gold Dots
With a doubled strand of B, make a French knot in the ch-1 sp at the center of each shell. That’s 5 + 4 + 3 + 2 + 1 = 15 knots per pocket. Secure them on the inside.
Checkpoint: the pocket is 4.25 in (10.8 cm) tall at the points and 3.5 in (8.9 cm) at the dips.
Make All Pieces
- Back panel: 1, in A
- Pockets: 3, in A, with B for Rnd 13, Rnd 20 and the knots
Layout (measured from the panel’s bottom edge before the border; the finished measurement is in brackets):
+----------------------------+  top edge 26 in (66.0 cm) [27 in (68.6 cm)]
|   strap            strap   |
|                            |
|  [ Pocket 1 ]  base 18.5 in (47.0 cm) [19 in (48.3 cm)]
|                tips 22.75 in (57.8 cm) [23.25 in (59.1 cm)]
|                            |
|  [ Pocket 2 ]  base 9.5 in (24.1 cm) [10 in (25.4 cm)]
|                tips 13.75 in (34.9 cm) [14.25 in (36.2 cm)]
|                            |
|  [ Pocket 3 ]  base 0.5 in (1.3 cm) [1 in (2.5 cm)]
|                tips 4.75 in (12.1 cm) [5.25 in (13.3 cm)]
+----------------------------+  bottom edge 0 in
This leaves 4.75 in (12.1 cm) between the tips of one pocket and the base of the next, enough room to lift a roll in and out. Pocket 1’s tips sit 3.25 in (8.3 cm) below the top of the panel body.
Joining
Method: Whipstitch with A, working on the panel’s RS.
Attachment strip: Each pocket is sewn only along the center 10 back sts (sts 41–50). That strip is 2.5 in (6.4 cm) wide. The rest of the cup stays round so a roll can drop in.
Stitch-to-stitch logic:
1. Center the strip on the panel. The pocket’s 10 strip sts line up with panel sts 7–16, leaving 6 panel sts free on each side.
2. Pin the Rnd 11 ridge at the base height shown in the layout. Sew the 10 ridge sts to the panel, one panel st per ridge st.
3. Sew straight up the st 41 column and the st 50 column. The pocket’s 7 rounds (Rnds 12–18) measure 3.25 in (8.3 cm), which spans about 15 panel rows. Take one stitch in each panel row.
4. Tack the back center tip (above st 45) to the panel with 2–3 stitches.
Tension: Pull each stitch snug but not tight. The panel shouldn’t pucker behind the pocket.
Size checkpoint: The panel still measures 5.5 in (14.0 cm) wide behind every pocket, and each pocket opening stays at least 4.5 in (11.4 cm) across.
Border
Border gauge: Along the long sides, work 1 sc per row-end. That gives 4.5 sc per in (2.54 cm), matching the row gauge. Along the short sides, 1 sc per st gives 4 sc per in. Keep your tension slightly firm along the long sides.
Rnd 1 (A): Pick up the panel’s working loop. Ch 1 for the corner sp, then work down the long side with 117 sc, 1 in each row-end. Ch 1. Work 22 sc across the free loops of the foundation ch. Ch 1. Work 117 sc up the other long side. Ch 1. Work 22 sc across Row 117. Join with a sl st to the first sc. Fasten off.
Counts for Rnd 1: long sides 117 each, short sides 22 each, for 278 sc + 4 corner ch-1 sps.
Rnd 2 (B): Join B in any corner sp. Sc in each sc, working (sc, ch 1, sc) in each corner sp. Join and fasten off.
Counts for Rnd 2, each including its 2 corner sc: long sides 119 each, short sides 24 each. The total is 2 x 119 + 2 x 24 = 286 sc + 4 ch-1 sps.
Why the math works: Each corner sp adds 1 sc to each side next to it, so every side grows by exactly 2. 117 + 2 = 119 and 22 + 2 = 24. Overall, 278 + 8 = 286. Two sc rounds add 0.25 in (0.6 cm) per side, so the panel grows from 5.5 x 26 in to 6 x 26.5 in. After blocking it relaxes to 6.5 in x 27 in (16.5 cm x 68.6 cm), because the corner chains spread the border at each corner.
Straps (make 2): Hold the panel with RS facing and the top edge up.
Row 1: Join A in the first of the 24 top-side sc. Sc in the first 6 sts, turn. (6)
Rows 2–18: Ch 1, sc in each st, turn. (6) Fasten off.
Make the second strap over the last 6 top sc. The 12 sts in the middle stay free. Each strap is 1.5 in (3.8 cm) wide and 4 in (10.2 cm) long.
If you like, work a gold sl st along each strap edge.
Fold each strap to the back over your towel bar. Sew its last row across the back of the panel 1 in (2.5 cm) below the top edge. For a fixed bar, slide the holder on from the open end, or sew snaps to the straps instead.
Final Blocking
- Lightly mist the whole holder until it’s damp, not soaked.
- Pin the panel flat to 6.5 in x 27 in (16.5 cm x 68.6 cm). Keep the long sides straight.
- Stuff each pocket with a roll wrapped in a plastic bag to shape the cup.
- Pin each crown point upward so the tips are sharp.
- Open each shell slightly with your fingers so the tree lace shows.
- Let it dry completely, at least 24 hours.
Final Quality-Control Checklist
- The panel measures 6.5 in x 27 in (16.5 cm x 68.6 cm)
- The long border sides have 119 sc each and the short sides 24 each
- Each pocket has 60 sts in Rnds 10–18
- Each tree has 5, 4, 3, 2 and 1 shells, centered on front st 15
- Each pocket has 6 points with 78 gold sc
- Each pocket has 15 gold knots
- The pockets are centered over panel sts 7–16, with bases at the layout heights
- Both straps are 1.5 in (3.8 cm) wide and sewn level
- All yarn ends are woven in on the back
Troubleshooting
The base curls up like a bowl. Your tension is tight or you missed increases. Recount Rnds 7–10, or go up a hook size.
The base ruffles. You have too many sts. Each base round should be exactly 6 sts more than the one before.
The tree leans to one side. Rnd 14 didn’t start at st 1. Re-mark st 1 and redo the round.
The roll won’t fit. The circle is under 4.5 in (11.4 cm). Remake the pocket one hook size larger.
The long border ruffles. Work Rnd 1 tighter, or use a hook one size smaller for the border only.
The points are floppy. Block them with pins, and work the tr sts snugly.
The gold yarn splits. Use a blunt needle for the knots, and slow down when you crochet with it.
Care
Hand wash in cool water with mild soap, press out the water in a towel, and lay flat to dry, reshaping the pockets. Don’t put it in the dryer, because heat can dull metallic yarn.
Final Notes
The whole measurement chain links together. Gauge is 16 sc and 18 rows to 4 in (10.2 cm). That gives a 22-st panel 5.5 in (14.0 cm) wide and a 117-row panel 26 in (66.0 cm) long. Each 60-st pocket circle measures 4.75 in (12.1 cm) across. The border adds exactly 2 sts per side, giving 119 and 24, and the blocked holder measures 6.5 in x 27 in (16.5 cm x 68.6 cm). If each checkpoint matches, your three golden pine pockets will hold their rolls neatly.
Happy crocheting!