

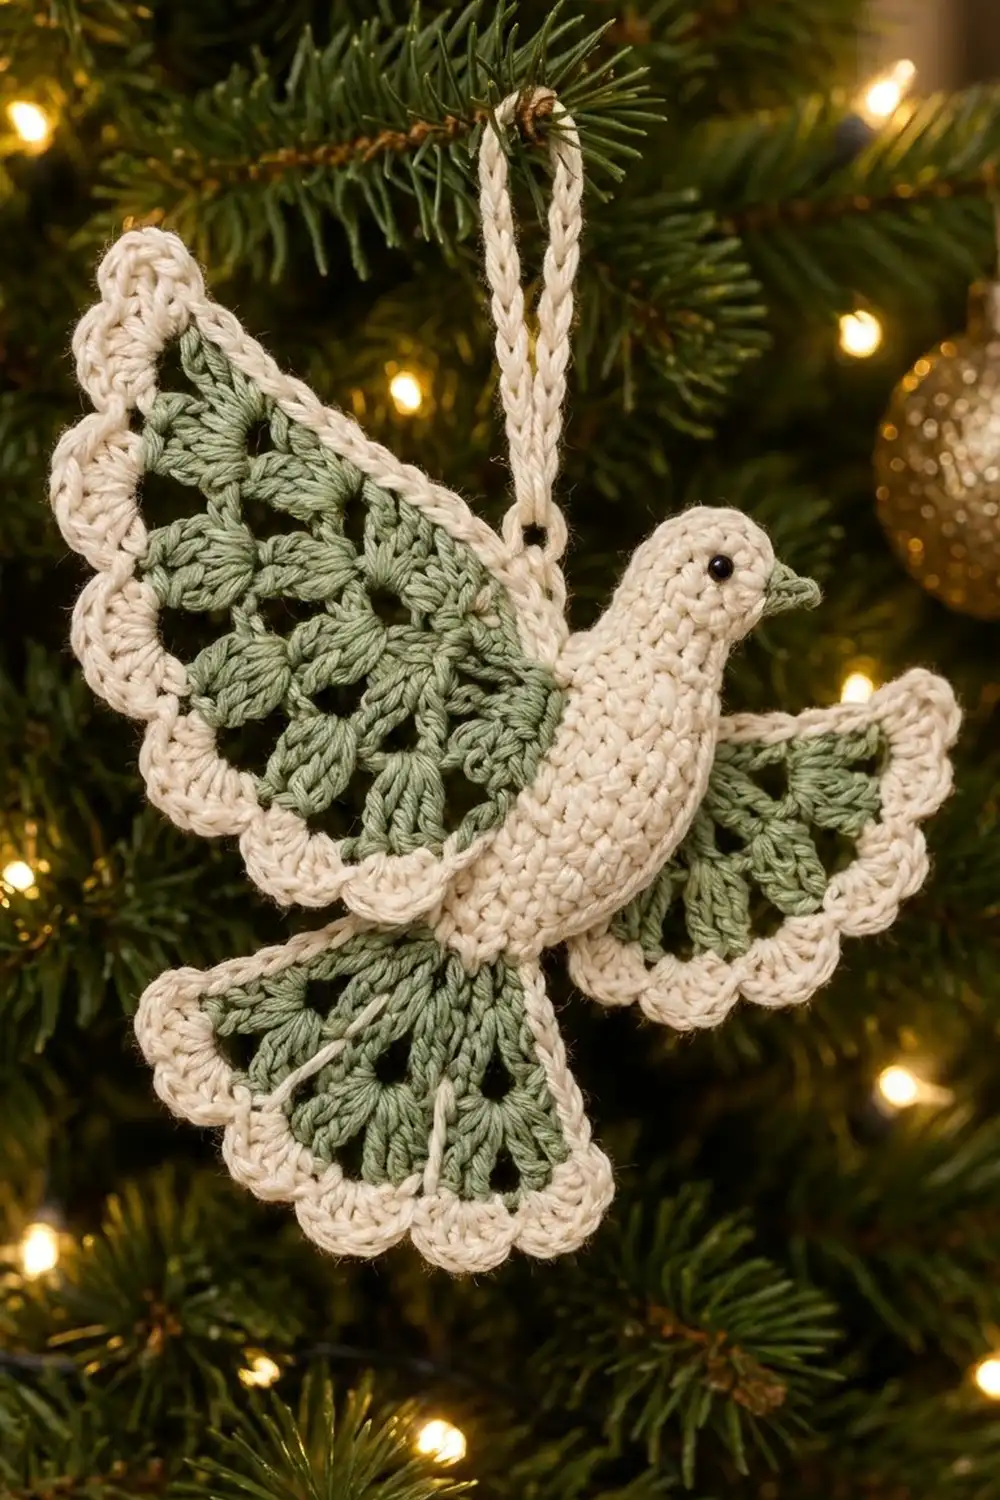
This dove ornament has a soft, plump cream body and three open fan pieces: a large back wing, a smaller front wing and a spread tail. Each fan is worked in sage green with leaf-like cluster spokes and finished with a cream scalloped edge. A tiny sage beak, black bead eyes and a cream hanging loop complete the bird.
The colors are quiet and wintry. Cream and sage suit a natural-style tree, and the lights glow through the openwork fans. It looks like vintage lace, but every part is a simple shape.
The pattern uses US crochet terms. The finished ornament is about 5 in (12.7 cm) wide by 5.5 in (14.0 cm) tall, plus a hanging loop of about 2 in (5.1 cm).
First you make a small, lightly stuffed body in continuous rounds. Then you work three fans in rows from a tiny ring and edge each fan with two cream rounds. Last, you layer the fans behind the body and sew everything in place.
Finished Size and Construction
- Finished size: about 5 in (12.7 cm) wide x 5.5 in (14.0 cm) tall, plus a 2 in (5.1 cm) loop
- Skill level: Intermediate
- Terminology: US crochet terms
- Yarn weight: Sport weight (#2 fine) cotton
- Hook: 2.5 mm
- Number of pieces: 1 ornament assembled from 6 parts: body, back wing, front wing, tail, beak, hanging loop
- Layout: three fans layered behind one body (back wing up-left, front wing right, tail down)
- Piece sizes: body 3 in (7.6 cm) long; back wing and tail 2.25 in (5.7 cm) from base to scallop tip; front wing 2 in (5.1 cm)
- Size before border: back wing and tail 1.75 in (4.4 cm); front wing 1.5 in (3.8 cm)
- Border depth: 0.5 in (1.3 cm)
Materials
Choose a smooth, mercerized sport-weight cotton. It makes crisp clusters and scallops that hold their shape. Avoid fuzzy or stretchy yarns, because the lace will blur and the fans will droop.
- Cream: 15 g, about 47 m (body, fan borders, loop)
- Sage green: 10 g, about 31 m (fan centers, beak)
These amounts include extra for a test fan.
Tools:
- 2.5 mm crochet hook
- Tapestry needle
- Small amount of fiberfill
- 2 black 4 mm beads, or black embroidery floss
- Sewing needle and cream thread
- Stitch marker
- Rust-proof pins, blocking mat, spray bottle
Abbreviations (US Terms)
- ch – chain
- sl st – slip stitch
- sc – single crochet
- dc – double crochet
- inc – 2 sc in the same stitch
- dec – single crochet 2 together
- MR – magic ring
- sp(s) – space(s)
- st(s) – stitch(es)
- tch – turning chain
- cl – cluster
Special stitches:
- 3-dc cluster (cl): [Yarn over, insert hook in indicated st or sp, yarn over and pull up a loop, yarn over and pull through 2 loops] 3 times, yarn over and pull through all 4 loops on hook.
- Beginning cluster (beg-cl): Ch 2, then work the bracket above only 2 times in the same st and pull through all 3 loops. Counts as 1 cl.
Gauge and Checkpoints
Gauge: 12 sc and 13 rounds = 2 in (5.1 cm). Three rows of dc measure about 1 in (2.5 cm) tall.
Gauge controls how the fans and body fit together. Test it by making the back wing first, including its border. Then check:
- After fan Row 5: 1.75 in (4.4 cm) from base ring to outer edge
- After Border Rnd 2: 2.25 in (5.7 cm) from base to scallop tip
- Body after Rnd 6: head about 1 in (2.5 cm) across
- Finished body: 3 in (7.6 cm) long
If your wing is too big, go down to a 2.25 mm hook. If it is too small, go up to 2.75 mm. If the fan cups instead of lying flat, loosen your chains rather than changing hooks.

Body (Cream)
Work the body in continuous rounds, from the front of the head toward the tail end. Mark the first st of each round.
Rnd 1: 6 sc in MR. (6 sts)
Rnd 2: Inc in each st around. (12 sts)
Rnd 3: [Sc in next st, inc] 6 times. (18 sts)
Rnds 4–6: Sc in each st around. (18 sts)
Rnd 7: [Sc in next 4 sts, dec] 3 times. (15 sts) This small dip forms the neck.
Rnd 8: [Sc in next 4 sts, inc] 3 times. (18 sts)
Rnd 9: [Sc in next 2 sts, inc] 6 times. (24 sts)
Rnds 10–14: Sc in each st around. (24 sts) This is the breast.
Rnd 15: [Sc in next 2 sts, dec] 6 times. (18 sts)
Rnd 16: Sc in each st around. (18 sts)
Rnd 17: [Sc in next st, dec] 6 times. (12 sts)
Stuff lightly. The body should feel soft and slightly flat, not firm.
Rnd 18: Sc in each st around. (12 sts)
Rnd 19: Dec 6 times. (6 sts)
Fasten off, leaving a 6 in (15.2 cm) tail. Close the opening and weave in. Press the body gently so it sits flat against the fans, and bend it into a soft curve with the head tilted up.
Fans (Sage Green)
All three fans use the same rows. R is the number of sections in the fan. S is the number of row-ends along each straight side, which you’ll use in the border.
- Back wing: R = 7, S = 9 (work all rows)
- Tail: R = 6, S = 9 (work all rows)
- Front wing: R = 5, S = 7 (skip Row 2)
Row 1: Ch 4, sl st in first ch to form a ring. Ch 3 (counts as dc), R dc in ring. Turn. (R + 1 dc: 8 / 7 / 6)
Row 2 (back wing and tail only): Ch 5 (counts as dc and ch 2), [dc in next dc, ch 2] R − 1 times, dc in top of tch. Turn. (R + 1 dc and R ch-2 sps: 8 dc and 7 sps / 7 dc and 6 sps)
For the front wing, skip Row 2 and work Row 3 into the dc of Row 1.
Row 3: Beg-cl in first dc, [ch 3, cl in next dc] R times, working the last cl in the top of the tch. Turn. (R + 1 cl and R ch-3 sps: 8 / 7 / 6 cl) These clusters form the leaf-like spokes.
Row 4: Ch 1, sc in top of first cl, [ch 5, sc in top of next cl] R times. Turn. (R + 1 sc and R ch-5 arches: 8 / 7 / 6 sc)
Row 5: Ch 3 (counts as dc), [(cl, ch 3, cl) in next ch-5 arch, dc in next sc] R times. (R + 1 dc, 2R cl, R ch-3 sps)
- Back wing: 8 dc, 14 cl, 7 ch-3 sps
- Tail: 7 dc, 12 cl, 6 ch-3 sps
- Front wing: 6 dc, 10 cl, 5 ch-3 sps
Fasten off and weave in. Checkpoint: the back wing and tail measure 1.75 in (4.4 cm) from ring to outer edge. The front wing measures 1.5 in (3.8 cm).
Beak (Sage Green)
Rnd 1: 4 sc in MR. (4 sts)
Rnd 2: [Sc in next st, inc] 2 times. (6 sts)
Fasten off, leaving a tail for sewing. The beak is a tiny cone about 0.25 in (0.6 cm) long.
Hanging Loop (Cream)
Ch 30. Sl st in 2nd ch from hook and in each ch across. (29 sl sts) Fasten off, leaving both tails. Folded in half, the cord makes a 2 in (5.1 cm) loop.
Make All Pieces
For one ornament:
- Cream: 1 body, 1 hanging loop, borders on all 3 fans
- Green: 1 back wing, 1 front wing, 1 tail, 1 beak
- Black: 1 bead eye on each side of the head
Layout, seen from the front (body on top, fans underneath):
 [BACK WING]   (loop)
  up-left       [HEAD]> beak
        \      /
         [BODY]--[FRONT WING] right
           |
         [TAIL] down
Joining
Before you assemble, finish the Border (next section) on all three fans and block them.
Method: Whipstitch from the back of the ornament with cream thread so the stitches stay hidden.
- Lay the body down with the head up and to the right. The body is the top layer, and all three fans sit behind it.
- Slide the back wing under the upper back so that its base and the lowest 1 in (2.5 cm) of each straight side are hidden. The scallops face up and to the left.
- Slide the front wing under the breast, just below the neck. The scallops face right and slightly down.
- Slide the tail under the lower end of the body, scallops facing down.
- Pin and check the overall size: 5 in (12.7 cm) wide and 5.5 in (14.0 cm) tall.
Stitch-to-stitch logic: Along each hidden fan base, pass the needle through one border sc and then through one sc on the back of the body. Matching one fan stitch to one body stitch keeps the joins flat.
Tension: Pull snug, but stop before the body dimples. If the work puckers, you are pulling too hard.
Sew the beak to the center of the magic ring, slightly low. On each side of the head, sew one black bead or make a floss French knot on Rnd 3, about 3 sts back from the beak. Fold the loop in half and sew both ends to the back of the body where the back wing meets the shoulder.
Size checkpoint: 5 in (12.7 cm) wide by 5.5 in (14.0 cm) tall, with the 2 in (5.1 cm) loop above.
Border (Cream)
Border gauge: 6 sc = 1 in (2.5 cm) along the edge, the same as the body gauge. Each round has 6R + 2S + 6 sts.
Rnd 1: Join cream with sc at the base ring. Work S sc evenly up the first straight side. Work 3 sc in the end dc of Row 5 (corner). Along the curved edge, [sc in next cl, 3 sc in next ch-3 sp, sc in next cl, sc in next dc] R − 1 times, then sc in next cl, 3 sc in next ch-3 sp, sc in next cl. Work 3 sc in the last dc (corner). Work S sc evenly down the second side. Sl st to first sc.
- Back wing: 1 base + 9 side + 3 corner + 41 curved + 3 corner + 9 side = 66 sc
- Tail: 1 + 9 + 3 + 35 + 3 + 9 = 60 sc
- Front wing: 1 + 7 + 3 + 29 + 3 + 7 = 50 sc
The curved edge between the corners has 6R − 1 sts. Call the first corner’s 3 sts a, b and c, and the second corner’s 3 sts d, e and f.
Rnd 2: Ch 1, sc in same st as join, sc in next S sts, sc in a, b and c. Skip 2 sts, 5 dc in next st, skip 2 sts, sc in next st. Work the instructions from * to * R times in all; the last sc lands in d. Sc in e and f, sc in next S sts. Sl st to first sc. Fasten off.
- Back wing: 1 + 9 + 3 + 42 (7 scallops) + 2 + 9 = 66 sts
- Tail: 1 + 9 + 3 + 36 (6 scallops) + 2 + 9 = 60 sts
- Front wing: 1 + 7 + 3 + 30 (5 scallops) + 2 + 7 = 50 sts
Why the math works: In Rnd 1, each fan section gives exactly 6 border sts (cl, 3 sc in the space, cl, dc), and each scallop uses exactly 6 sts. From c to d there are 6R + 1 sts: one anchor sc plus R scallops. Each 5-dc group lands in the middle sc of a ch-3 space, and each anchor sc sits over a dc spoke. That puts one scallop at the top of each section.
Checkpoint: the back wing and tail measure 2.25 in (5.7 cm) from base to scallop tip. The front wing measures 2 in (5.1 cm).
Final Blocking
- Pin each bordered fan face up on the mat, starting at the base point.
- Open the fan so the straight sides are straight and the green rows lie flat.
- Pin each scallop tip, easing it into a round arch.
- Check the base-to-tip measurements against the checkpoints.
- Mist until damp, not soaked.
- Let dry completely, at least 6 hours.
- After assembly, lightly mist the body and reshape its curve by hand. Never pin through the stuffed body.
Final Quality-Control Checklist
- Body is 3 in (7.6 cm) long, lightly stuffed and slightly flattened.
- Back wing has 7 scallops, tail has 6 and front wing has 5.
- Each scallop is centered over a green section.
- Border corners are neat and even.
- No fan base shows from the front.
- Beak is centered, with one eye on each side.
- The loop is secure and the dove hangs level.
- Overall size is 5 in (12.7 cm) by 5.5 in (14.0 cm).
- All ends are woven in.
Troubleshooting
Fan cups: Your chains are too tight. Rework Row 4 with looser ch-5 arches.
Fan ruffles: Your chains are too loose. Tighten them or use a smaller hook.
Scallops drift off the sections: Recount Border Rnd 1. Each section needs exactly 6 sts, and the curved edge must total 6R − 1.
Stuffing shows through: Use less fiberfill, or use a smaller hook for the body.
Body won’t sit flat: Remove a little stuffing and press it flatter before sewing.
Ornament tilts: Move the loop toward the heavier side.
Care
Hand wash in cool water with mild soap, roll in a towel and dry flat. Reshape the scallops while damp.
Final Notes
The measurement chain is short:
- Gauge: 12 sc and 13 rounds = 2 in (5.1 cm).
- Back wing: 1.75 in (4.4 cm) after Row 5 and 2.25 in (5.7 cm) after the border.
- Body: 3 in (7.6 cm) long.
When every part hits its checkpoint, the finished dove measures 5 in (12.7 cm) by 5.5 in (14.0 cm) and is ready for the tree.
Happy crocheting!