

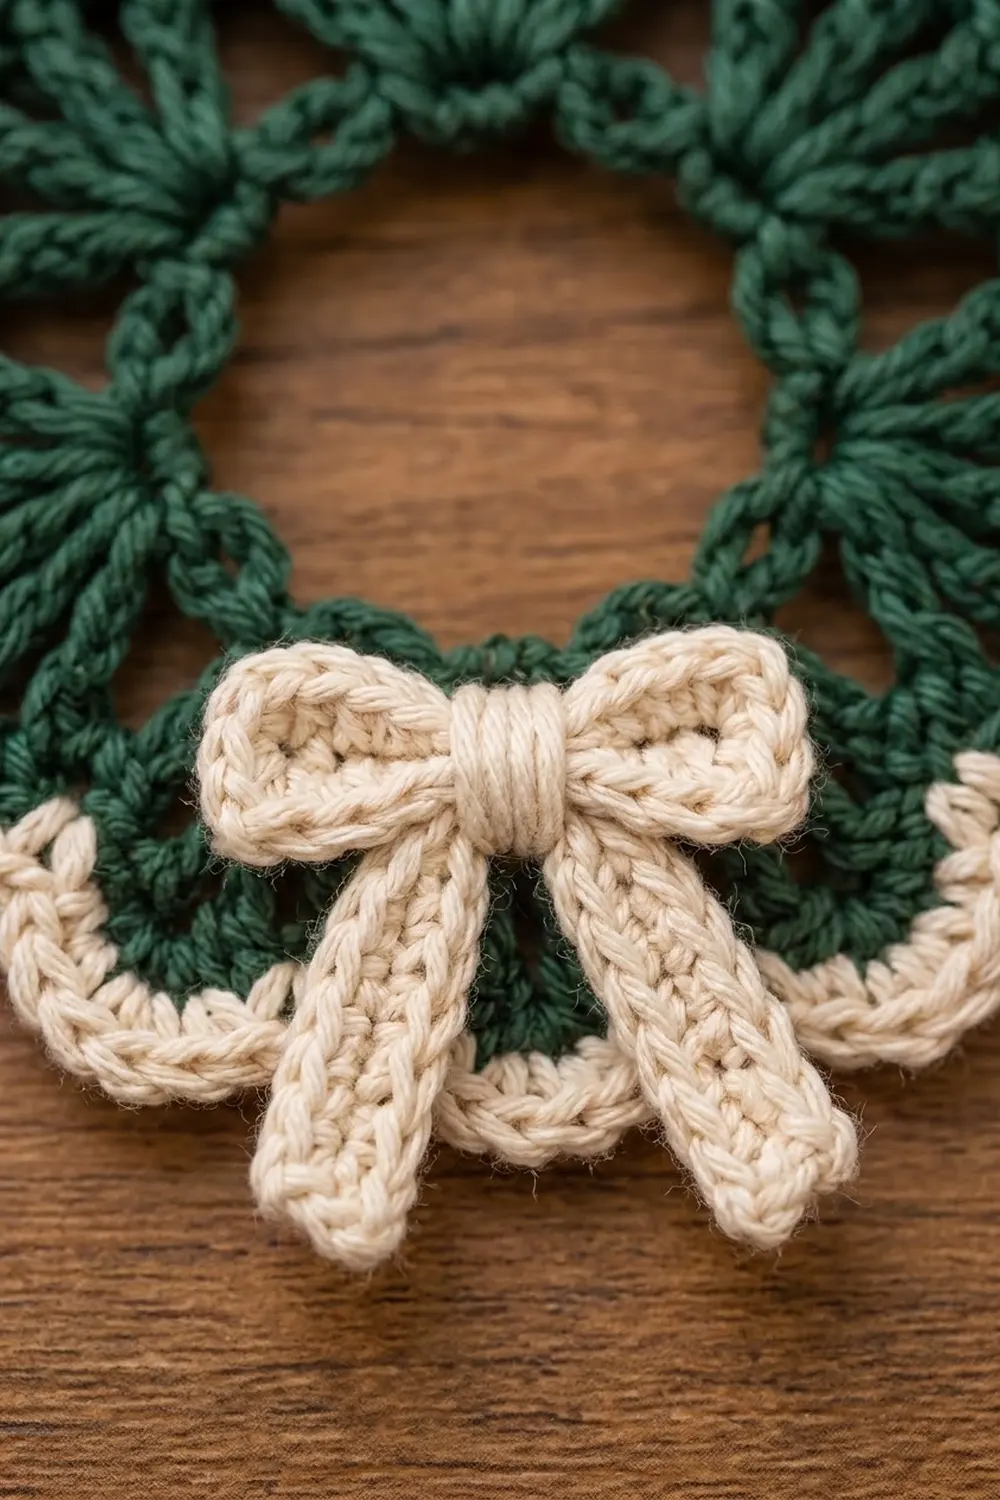
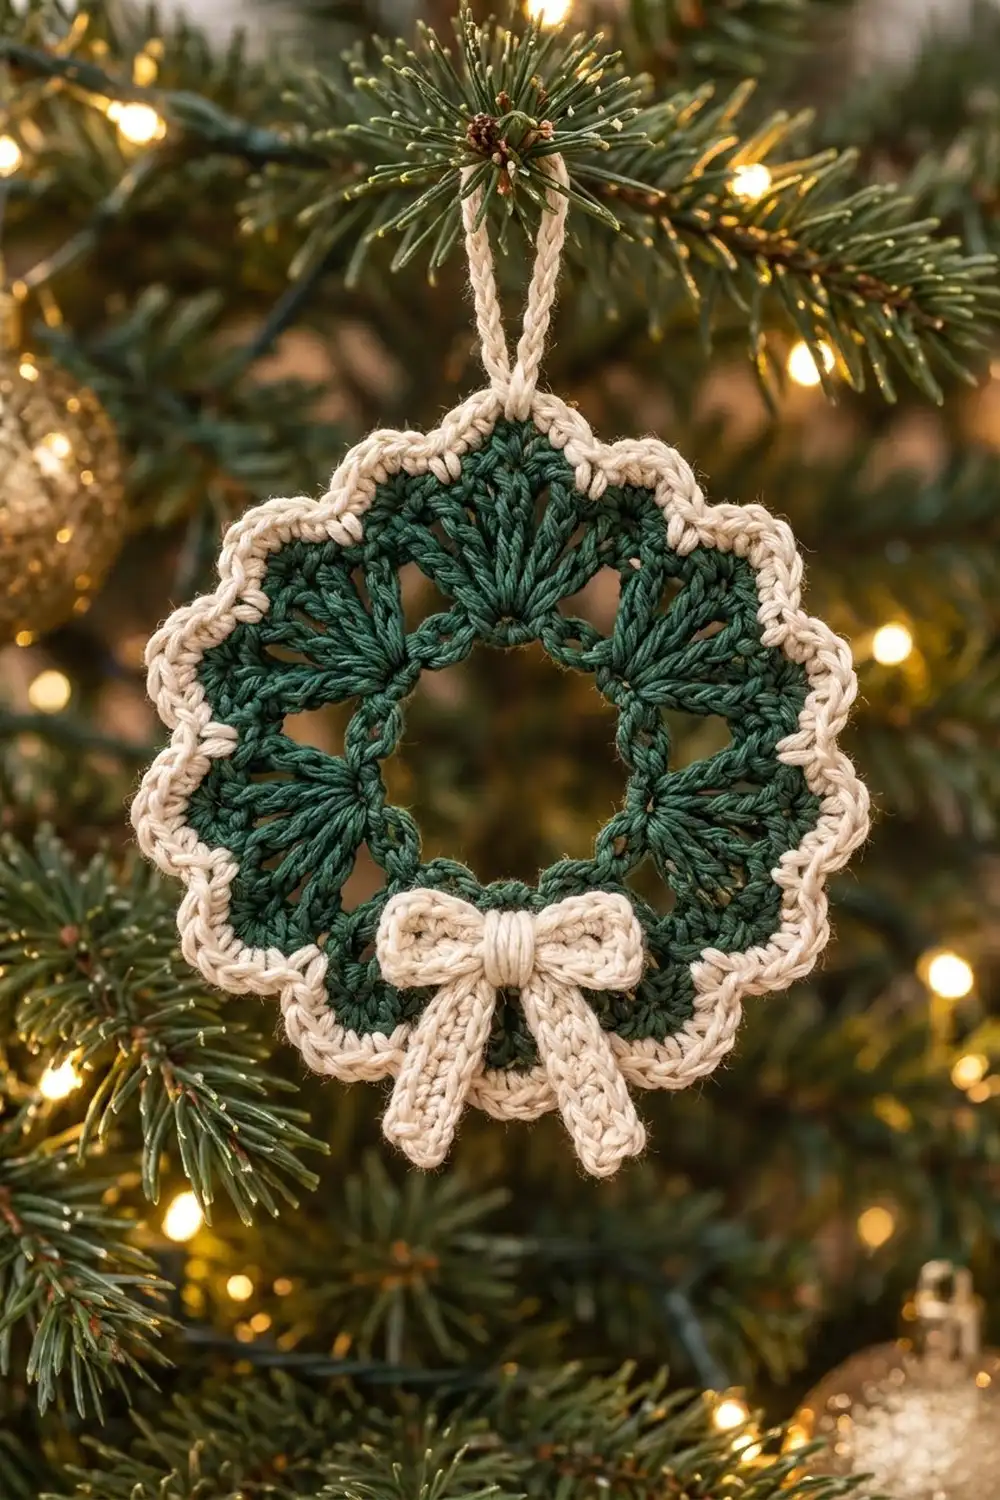
This little wreath ornament is a ring of forest-green fans with a scalloped cream edge and a cream bow at the bottom. It looks lacy, but each round is short and simple, and the whole piece takes about an evening to make.
The color scheme is classic: deep evergreen for the body and soft cream for the edging, bow and hanging loop. Cotton yarn gives clear stitch definition, so the fans look crisp on the tree.
The pattern uses US crochet terms. The finished ornament measures about 4.5 in (11.4 cm) across from scallop tip to scallop tip, and the center opening is about 1.25 in (3.2 cm) wide.
You’ll crochet the green wreath in the round, starting from a chain ring. You then add two rounds of cream edging, crochet a two-part bow and sew it on, and finish with a hanging loop.
Finished Size and Construction
- Finished size: 4.5 in (11.4 cm) across, tip to tip
- Skill level: Easy to intermediate
- Terminology: US crochet terms
- Yarn weight: DK / light (#3) cotton or cotton blend
- Hook: 3.5 mm (E/4)
- Number of pieces: 1 wreath body, plus a bow appliqué made of 2 small parts (bow loops and tails)
- Layout: One motif; no joining needed
- Size before border: 3.75 in (9.5 cm) across after Round 4
- Border depth: 0.375 in (1.0 cm) on each side (2 rounds of sc)
- Bow width: about 1.75 in (4.4 cm)
Materials
Yarn: Use a smooth DK cotton or cotton blend at about 120 m per 50 g. Mercerized cotton shows the fans best. Avoid fuzzy yarns, because they blur the open gaps between fans.
- Color A – Forest Green: 8 g (about 20 m)
- Color B – Cream: 6 g (about 15 m)
Tools:
- 3.5 mm (E/4) crochet hook
- Tapestry needle
- Scissors
- Stitch marker
- Rust-proof pins and a foam blocking mat
- Spray bottle of water
- Ruler or tape measure
Both yarn amounts include about a 25% margin for your gauge swatch, weaving in ends and the wrapping at the bow’s center.
Abbreviations (US Terms)
- ch – chain
- sl st – slip stitch
- sc – single crochet
- dc – double crochet
- tr – treble crochet
- sk – skip
- sp(s) – space(s)
- st(s) – stitch(es)
- rep – repeat
- 3-sc tip – 3 sc worked into the same stitch, used to make a point at the top of each scallop
Special stitch – Fan: 9 tr worked into the same stitch. All 9 stitches start from one point and spread out into a half circle.
Gauge and Checkpoints
Flat gauge: 18 sc and 20 rows = 4 in (10.2 cm) in Color B. This gauge also sets the size of the bow.
The ornament is small, so make one full wreath first as your test piece and measure at each stage. Lay the piece flat without stretching it.
| After | Outer diameter |
|---|---|
| Round 1 | 1.75 in (4.4 cm) |
| Round 2 | 2.25 in (5.7 cm) |
| Round 3 | 3 in (7.6 cm) |
| Round 4 | 3.75 in (9.5 cm) |
| Round 6 (finished) | 4.5 in (11.4 cm) |
If it’s too big (more than 0.25 in / 0.6 cm over at Round 4): go down to a 3.25 mm hook, or tighten the chain ring.
If it’s too small (more than 0.25 in / 0.6 cm under): go up to a 3.75 mm hook.
If it’s cupping: your tr are too short; pull the first loop up a little taller. If it’s ruffling: your tension is too loose; check that you skipped 2 dc on each side of every fan.
Wreath Body (Color A)
Foundation: With Color A, ch 24. Join with a sl st to the first ch to form a ring, making sure the chain isn’t twisted.
Round 1: Ch 1. Work 1 sc in each ch around. Join with a sl st to the first sc. (24 sc)
Checkpoint: Outer diameter is 1.75 in (4.4 cm), and the center opening is about 1.25 in (3.2 cm).
Round 2: Ch 1. Sc in the same st as the join, ch 3, sk 2 sts. Sc in next st, ch 3, sk 2 sts. Rep from * 6 more times. Join with a sl st to the first sc. (8 sc and 8 ch-3 sps)
Each repeat uses 3 sts of Round 1, and 8 × 3 = 24, so the round ends exactly where it began.
Checkpoint: 2.25 in (5.7 cm).
Round 3: Sl st into the first ch-3 sp. Ch 3 (counts as dc), work 4 dc in the same sp, then ch 2. Work 5 dc in the next ch-3 sp, ch 2. Rep from * 6 more times. Join with a sl st to the top of the beginning ch-3. (40 dc in 8 groups of 5, and 8 ch-2 sps)
The ch-2 spaces become the small gaps that separate the fans.
Checkpoint: 3 in (7.6 cm).
Round 4 (fans): Sl st in the next 4 dc and into the next ch-2 sp. Ch 1, sc in the same sp. Sk 2 dc, work a Fan (9 tr) in the next dc, which is the center dc of the group. Sk 2 dc, sc in the next ch-2 sp. Rep from * 7 more times. On the last repeat, leave out the final sc and join with a sl st to the first sc instead. (8 fans: 72 tr + 8 sc = 80 sts)
Each fan is 9 tr plus 1 sc, and 8 × 10 = 80. The sc between fans form the dips, and the fans form the rounded scallops.
Checkpoint: 3.75 in (9.5 cm) tip to tip. Fasten off Color A and weave in the ends.
Border (Color B)
Border gauge: Each sc round adds about 0.1875 in (0.5 cm) on every side. Two rounds add 0.375 in (1.0 cm) per side, or 0.75 in (1.9 cm) to the total diameter. 3.75 + 0.75 = 4.5 in (11.4 cm).
Round 5 (conversion round): Join Color B with a standing sc in any valley sc of Round 4. Sc in the next 4 tr, work a 3-sc tip in the next tr (the 5th, center tr of the fan), then sc in the next 4 tr. Sc in the next sc, sc in the next 4 tr, 3-sc tip in the next tr, sc in the next 4 tr. Rep from * 6 more times. Join with a sl st to the first sc.
Count: 80 sts worked 1-per-stitch + 16 extra sts (2 extra at each of the 8 tips) = 96 sc. That’s 12 sts per scallop: 1 valley sc, 4 sc, 3 sc at the tip, then 4 sc.
Round 6 (trim round): Ch 1. Don’t work into the joining st, because it’s a valley st. Sc in the next 5 sts, work a 3-sc tip in the next st (the center st of the 3-sc tip below), then sc in the next 5 sts. Sk the next st (valley), sc in the next 5 sts, 3-sc tip in the next st, sc in the next 5 sts. Rep from * 6 more times. Join with a sl st to the first sc.
Count: 88 sts worked 1-per-stitch (96 minus the 8 skipped valleys) + 16 extra sts at the tips = 104 sc, or 13 per scallop.
Why the math works: Each of the 8 tips gets 2 extra stitches per round, which gives the edge room to spread over the wider fan. Each skipped valley stitch pulls the dip in, so the edge forms scallops and doesn’t ruffle. Increases happen only at the tips and decreases only at the valleys, so the wreath stays flat.
Fasten off and weave in the ends.
Hanging loop: Pick the scallop that will sit at the top; the scallop opposite it will hold the bow. Join Color B with a sl st in the center sc of that top scallop’s 3-sc tip. Ch 20, then sl st in the same st. Work 22 sc into the ch-20 loop, then sl st into the starting st. Fasten off.
The finished loop stands about 1.5 in (3.8 cm) tall and is firm enough to keep its shape.
Bow Appliqué (Color B)
Bow loops: Ch 17.
- Row 1: Sc in the 2nd ch from the hook and in each ch across. (16 sc)
- Rows 2–4: Ch 1, turn. Sc in each st across. (16 sc)
Fasten off and leave a 6 in (15.2 cm) tail. The strip measures about 3.5 in (8.9 cm) by 0.8 in (2.0 cm).
Fold both short ends to the center back so they overlap by about 0.125 in (0.3 cm), and stitch them down. This makes two loops, and the bow is now about 1.75 in (4.4 cm) wide.
Tails: Ch 15.
- Row 1: Sc in the 2nd ch from the hook and in each ch across. (14 sc)
- Row 2: Ch 1, turn. Sc in each st across. (14 sc)
Fasten off. The strip is about 3 in (7.6 cm) long. Fold it in half at an angle to make an upside-down V, with each tail about 1.5 in (3.8 cm) long.
Assembly: Stack the bow loops on top of the V-shaped tails. Cut 12 in (30.5 cm) of Color B and wrap it tightly around the center of both layers 10 times. This pinches the loops into a bow and makes the raised center band. Secure the end at the back.
Center the bow over the bottom scallop, overlapping Rounds 3 to 5. Sew it on through the back so no stitches show on the front.
Final Blocking
- Lightly mist the ornament until it’s damp but not soaked.
- Lay it face down on the blocking mat.
- Pin the center opening into a circle 1.25 in (3.2 cm) across.
- Pin each of the 8 scallop tips so the piece measures 4.5 in (11.4 cm) across, spacing them evenly.
- Push each valley gently toward the center so the dips are sharp.
- Let it dry completely, then unpin it.
- Turn it face up and fluff the bow loops with your fingers.
Final Quality-Control Checklist
- 8 equal fans, each with 9 tr
- Round 5 has 96 sc and Round 6 has 104 sc
- All 8 valleys dip evenly
- Measures 4.5 in (11.4 cm) across
- Center opening is round
- Bow is centered opposite the hanging loop
- No stitches show through on the front
- All ends are woven in securely
Troubleshooting
- Fans overlap: Your tr are too tall, or you didn’t skip 2 dc on each side of the fan. Re-count and try a smaller hook.
- Gaps between fans are too wide: Tighten the ch-2 spaces in Round 3.
- Border ruffles: You missed skipping a valley in Round 6. Count 13 sts per scallop.
- Border pulls in or cups: You missed a 3-sc tip. Count 12 sts per scallop in Round 5.
- Bow sags: Wrap the center more tightly and add a stitch at the back.
- Hanging loop is floppy: Add more sc into the loop until it’s firm.
Care
Hand wash in cool water and lay flat to dry, pinning to shape if needed. Store flat in tissue paper between seasons.
Final Notes
The measurements build step by step:
| Stage | Diameter |
|---|---|
| Round 1 | 1.75 in (4.4 cm) |
| Round 2 | 2.25 in (5.7 cm) |
| Round 3 | 3 in (7.6 cm) |
| Round 4 | 3.75 in (9.5 cm) |
| Round 6 | 4.5 in (11.4 cm) |
The stitch counts follow the same order: 24 sc, then 8 ch-3 spaces, 40 dc, 80 fan stitches, 96 sc and finally 104 sc. If each checkpoint matches, every ornament you make will come out the same size.
Happy crocheting!