

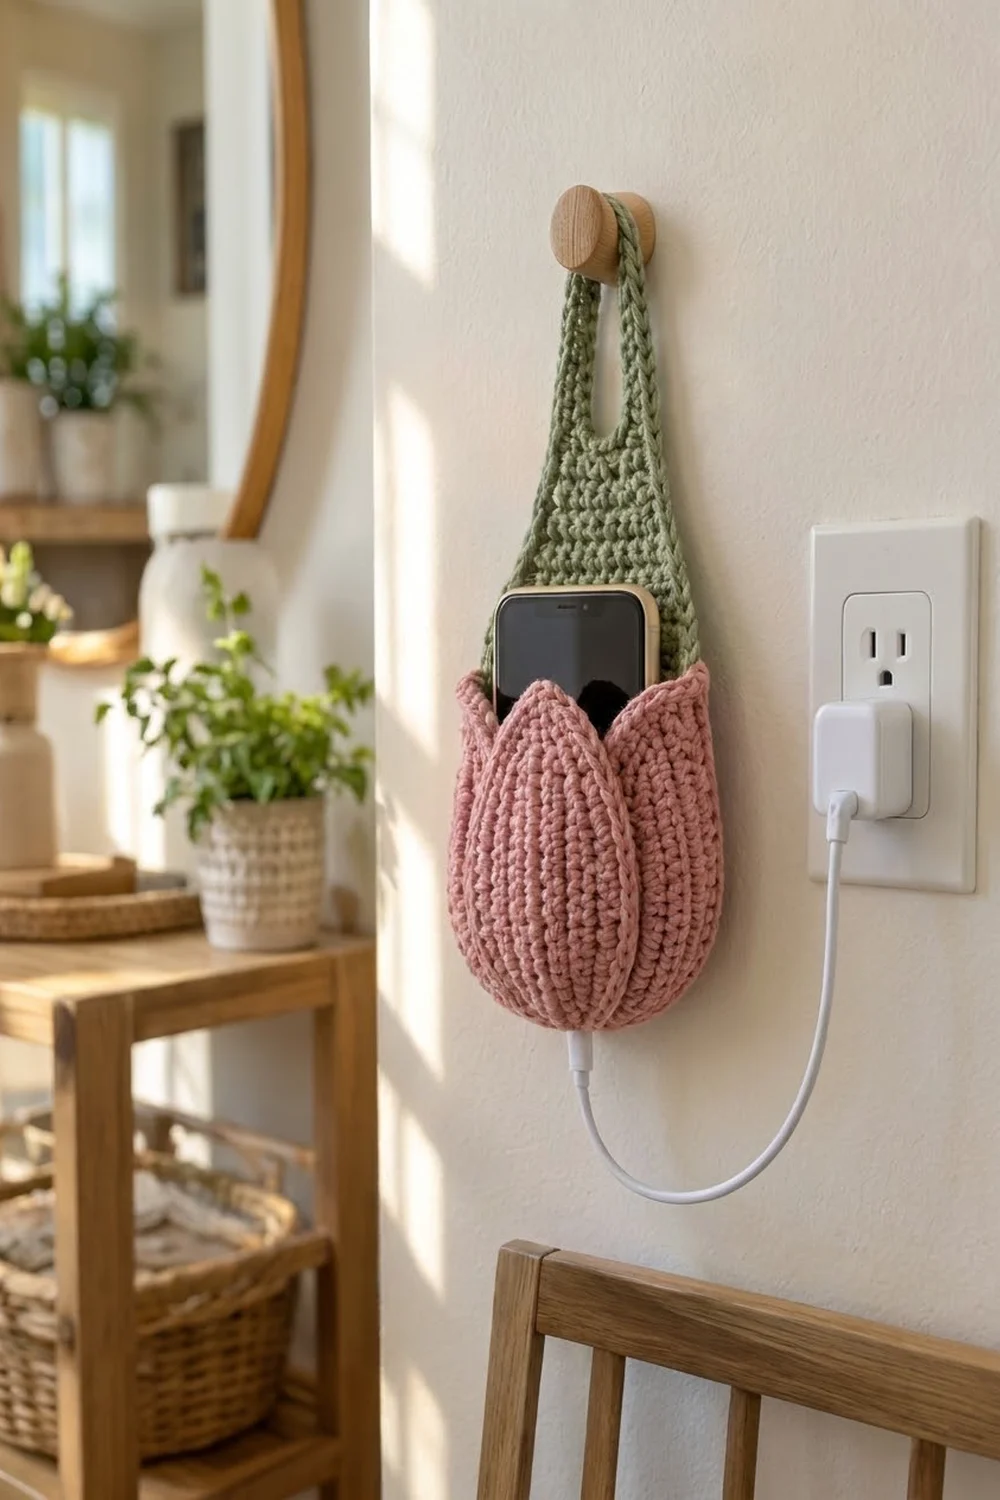
This tulip phone holder gives your phone a soft place to rest while it charges, right beside the outlet. A rounded dusty rose pocket is wrapped in five pointed petals, and a sage green back panel narrows into a strap with a keyhole slot. The slot slips over a wall peg or hook.
Each petal has ridge lines that follow its outline from base to tip, plus a raised rope edge made with reverse single crochet. The petals overlap in three layers, like a tulip that is just starting to open. A small opening at the bottom center lets the charging cable pass straight through.
This pattern uses US crochet terms. The finished holder is about 14.5 in (36.8 cm) tall and 6.75 in (17.1 cm) wide at the pocket.
The construction is simple. You crochet the pocket in the round from the bottom up. You make five petals in rounds around a short chain. You work the back panel flat in rows and then add a border. Finally, you sew the panel inside the back of the pocket and sew the petals on in layers.
Finished Size and Construction
- Finished size: 14.5 in (36.8 cm) tall × 6.75 in (17.1 cm) wide
- Skill level: Intermediate
- Terminology: US
- Yarn weight: Worsted (#4), cotton recommended
- Hook: US H-8 (5.0 mm)
- Number of pieces: 7 (1 pocket, 5 petals, 1 back panel)
- Layout: The panel sits inside the back of the pocket. The petals go around the outside: two at the back, two at the sides and one at the center front.
- Pocket size: 6.25 in (15.9 cm) tall × 6.75 in (17.1 cm) wide, measured flat
- Petal size: 5.5 in (14.0 cm) long × 3 in (7.6 cm) wide
- Panel size before border: 10.75 in (27.3 cm) long × 6 in (15.2 cm) wide at the bottom
- Border depth: 0.25 in (0.6 cm)
Materials
Use a smooth worsted-weight cotton or cotton blend. Cotton holds its shape under the weight of a phone and doesn’t stretch out on the peg. Acrylic works too, but the pocket will sag a little more. The amounts below assume a yarn of about 85 m per 50 g.
- Dusty rose (pocket and petals): 90 g, about 153 m (167 yd)
- Sage green (back panel and border): 35 g, about 60 m (66 yd)
Both quantities include a margin of about 15% for your gauge test and the sewing tails.
Tools:
– US H-8 (5.0 mm) crochet hook
– Tapestry needle
– 6 locking stitch markers
– Rust-proof pins
– Scissors
– Measuring tape
– Spray bottle and blocking mat
Abbreviations (US Terms)
- ch – chain
- sl st – slip stitch
- sc – single crochet
- inc – 2 sc in the same stitch
- sc2tog – single crochet 2 together
- BLO – back loop only
- rev sc – reverse single crochet
- st(s) – stitch(es)
- sp – space
- RS – right side
Special stitch – reverse single crochet (rev sc): Work from left to right (right-handed). Insert the hook into the next stitch to the right, yarn over, pull up a loop, yarn over and pull through both loops on the hook. This makes a twisted, rope-like edge.
Gauge and Checkpoints
Gauge: 16 sc and 18 rows (or rounds) = 4 in (10.2 cm)
Make one petal before anything else. It is small, uses every main technique and shows your gauge quickly.
- Petal after Rnd 6: 2.75 in (7.0 cm) wide × 5.25 in (13.3 cm) long
- Petal after Rnd 7: 3 in (7.6 cm) wide × 5.5 in (14.0 cm) long
- Pocket after Rnd 8: base diameter 4.25 in (10.8 cm)
- Pocket after Rnd 24: 6.75 in (17.1 cm) wide when flattened
- Panel after Row 12: 6 in (15.2 cm) wide × 2.75 in (7.0 cm) tall
- Panel after Row 48: 10.75 in (27.3 cm) long
If your pieces are too big: go down to a 4.5 mm hook.
If your pieces are too small: go up to a 5.5 mm hook.
Gauge matters most for the pocket. An undersized pocket won’t fit a large phone, and an oversized one will droop forward.

Petals (Make 5, Dusty Rose)
Each round runs along the foundation chain. That is what makes the ridge lines follow the petal outline. The tip gets a ch-2 point on every round, and the rounded base gains 3 stitches per round so it stays flat.
Every round from Rnd 2 on is worked in the same order:
1. Side A
2. Base
3. Side B
4. The tip (ch-2 sp)
5. Any remaining stitches after the tip
Ch 11.
Rnd 1: Sc in 2nd ch from hook and in the next 8 ch (side A, 9 sc). Work 3 sc in the last ch (base). Rotate the piece and work along the opposite side of the chain: sc in the next 9 ch (side B, 9 sc). The last of these goes into the same ch as the very first sc. Ch 2 (tip) and sl st to the first sc. (21 sc + tip ch-2 sp)
Rnds 2–6 are worked in BLO, except for stitches worked into the ch-2 sp. Start each round with ch 1 (it doesn’t count as a stitch) and make the first sc in the same st as the join.
Rnd 2:
– Side A: sc in next 9 sts
– Base: 2 sc in each of the next 3 sts (6)
– Side B: sc in next 9 sts
– Tip: (sc, ch 2, sc) in ch-2 sp
– Sl st to first sc.
(26 sc)
Rnd 3:
– Side A: sc in next 9 sts
– Base: (sc, inc) 3 times (9)
– Side B: sc in next 10 sts
– Tip: (sc, ch 2, sc) in ch-2 sp
– Sc in the 1 remaining st
– Sl st to first sc.
(31 sc)
Rnd 4:
– Side A: sc in next 9 sts
– Base: (sc 2, inc) 3 times (12)
– Side B: sc in next 11 sts
– Tip: (sc, ch 2, sc) in ch-2 sp
– Sc in the 2 remaining sts
– Sl st to first sc.
(36 sc)
Rnd 5:
– Side A: sc in next 9 sts
– Base: (sc 3, inc) 3 times (15)
– Side B: sc in next 12 sts
– Tip: (sc, ch 2, sc) in ch-2 sp
– Sc in the 3 remaining sts
– Sl st to first sc.
(41 sc)
Rnd 6:
– Side A: sc in next 9 sts
– Base: (sc 4, inc) 3 times (18)
– Side B: sc in next 13 sts
– Tip: (sc, ch 2, sc) in ch-2 sp
– Sc in the 4 remaining sts
– Sl st to first sc.
(46 sc)
Each round adds exactly 5 stitches: 3 at the base and 2 at the tip. Both long edges end up equal at 13 stitches: 9 on side A plus the 4 stitches after the tip, and 13 on side B.
Rnd 7 (rope edge): Ch 1. Working through both loops, rev sc in each of the 46 sts, and work 3 rev sc into the ch-2 sp at the tip. Sl st to the first st. (46 worked 1 per stitch + 3 in the tip sp = 49 rev sc)
Fasten off and leave an 18 in (45.7 cm) tail for sewing. Check the petal against the Rnd 7 checkpoint.
Pocket (Make 1, Dusty Rose)
Work in continuous rounds and place a marker in the first stitch of each round.
Cord opening: Ch 6 and sl st to the first ch to form a ring.
Rnd 1: Ch 1, then work 12 sc into the ring. (12)
Twelve sc around the chain ring leave an opening about 0.5 in (1.3 cm) wide, which is enough for a USB-C or Lightning plug. Test your plug now.
Rnd 2: (Sc 1, inc) 6 times. (18)
Rnd 3: (Sc 2, inc) 6 times. (24)
Rnd 4: (Sc 3, inc) 6 times. (30)
Rnd 5: (Sc 4, inc) 6 times. (36)
Rnd 6: (Sc 5, inc) 6 times. (42)
Rnd 7: (Sc 6, inc) 6 times. (48)
Rnd 8: (Sc 7, inc) 6 times. (54)
Checkpoint: The base should be 4.25 in (10.8 cm) across.
Rnds 9–24: Sc in each st around (16 rounds). (54)
Checkpoint: The pocket is 6.75 in (17.1 cm) wide when flattened.
Rnd 25: (Sc 7, sc2tog) 6 times. (48)
Rnds 26–27: Sc in each st around. (48)
Sl st in the next st and fasten off. The rim is 12 in (30.5 cm) around, which is 6 in (15.2 cm) when flattened. This slight inward curve gives the pocket its tulip-bowl shape.
Back Panel (Make 1, Sage Green)
Work in rows. Ch 1 at the start of each row doesn’t count as a stitch.
Ch 25.
Row 1: Sc in 2nd ch from hook and in each ch across. (24)
Rows 2–12: Ch 1, turn, sc across. (24)
Checkpoint: 6 in (15.2 cm) wide × 2.75 in (7.0 cm) tall.
Row 13: Ch 1, turn, sc2tog, sc to the last 2 sts, sc2tog. (22)
Row 14: Ch 1, turn, sc across. (22)
Rows 15–26: Repeat Rows 13–14 six more times. Row 26 has (10) sts and is 2.5 in (6.4 cm) wide.
Rows 27–32: Ch 1, turn, sc across. (10)
Keyhole, side A:
– Row 33: Ch 1, turn, sc in the first 4 sts and leave the rest unworked. (4)
– Rows 34–42: Ch 1, turn, sc across. (4)
– Fasten off.
Keyhole, side B: Skip the 2 center sts of Row 32. Join yarn with a sc in the last st of Row 32 (the outer edge), then sc in the next 3 sts. This is Row 33. (4)
– Rows 34–42: Ch 1, turn, sc across. (4)
– Don’t fasten off. You are now at the outer edge of side B.
Row 43: Ch 1, turn, sc in 4 sts of side B, ch 2, then sc in 4 sts of side A. (8 sc + 2 ch)
Row 44: Ch 1, turn, sc in 4 sts, sc in each of the 2 ch, sc in 4 sts. (10)
Rows 45–46: Ch 1, turn, sc across. (10)
Row 47: Ch 1, turn, sc2tog, sc 6, sc2tog. (8)
Row 48: Ch 1, turn, sc2tog, sc 4, sc2tog. (6)
Don’t fasten off. The slot is 0.5 in (1.3 cm) wide × 2.25 in (5.7 cm) long.
Checkpoint: The panel is 10.75 in (27.3 cm) long.
Make All Pieces
- Dusty rose: 1 pocket, 5 petals
- Sage green: 1 back panel
Layout (front view):
            [ keyhole top ]
            [    strap    ]
          [  back panel   ]
 [BL]  [SL]   [ CENTER ]   [SR]  [BR]
          [    pocket     ]
              (cord hole)
BL/BR are the back petals, SL/SR are the side petals and CENTER is the front petal. The center petal sits on top of the side petals, and the side petals sit on top of the back petals.
Border (Back Panel)
Border gauge: 4 sc per 1 in (2.5 cm), the same as the panel gauge.
Sc rows are shorter than sc stitches are wide (18 rows vs. 16 sts per 4 in / 10.2 cm). That’s why you skip a few row ends on the straight sections, so the edges don’t ruffle.
On the tapered section, the slanted edge is longer than the straight rows. Rows 13–26 rise 3.1 in and move inward 1.75 in (4.4 cm), which makes a slanted edge of about 3.5 in (8.9 cm). At 4 sts per inch that fits 14 sc, so you work exactly 1 sc per row end there.
In the counts below, the per-side numbers do NOT include the corner extras. The corners are listed separately.
Rnd 1: Ch 1, turn. Work in this order:
- Top (Row 48): 2 sc in the first st, sc 4, 2 sc in the last st. This is 6 sts worked 1 per stitch, plus 2 corner extras.
- First long side (45 sc):
- Rows 48–47: 2 sc, 1 in each row end
- Rows 46–27: 18 sc (skip the row ends of Rows 41 and 31)
- Rows 26–13: 14 sc, 1 in each row end
- Rows 12–1: 11 sc (skip the row end of Row 6)
- Bottom: 2 sc in the first foundation ch, sc 22, 2 sc in the last ch. This is 24 sts worked 1 per stitch, plus 2 corner extras.
- Second long side: 45 sc, mirroring the first side.
- Sl st to the first sc.
(6 + 45 + 24 + 45 = 120 sts worked 1 per stitch or row end, plus 4 corner extras = 124 sc)
Rnd 2: Sl st loosely in each st around. (124 sl st)
Fasten off.
Slot edging: Join green at the bottom of the slot.
– Sc in each of the 2 skipped sts of Row 32.
– Work 9 sc up the inner edge (10 row ends, skip 1).
– Work 2 sc around the ch-2 of Row 43.
– Work 9 sc down the other inner edge.
– Sl st to the first sc. (22 sc)
Fasten off.
After the border, the panel is 6.5 in (16.5 cm) wide at the bottom and 11.25 in (28.6 cm) long.
Joining
Method: Whipstitch with a tapestry needle and matching yarn. Work through the outer loops only so the seams lie flat.
1. Panel to pocket. Lay the pocket flat and mark the 27 back-half sts on Rnd 13, which is 3 in (7.6 cm) below the rim.
– The panel’s bottom edge has 26 sts (24 plus 2 corner extras). Sew 1 panel stitch to 1 pocket stitch, leaving the last marked stitch unused.
– Sew the panel’s side edges up the inside wall to the rim.
– Whipstitch the panel to the 24 back-half rim sts, 1 to 1. At rim height, the panel is 22 sts plus 2 border sts, which equals 24.
2. Petal placement. On Rnd 20, mark the center front st, then 11 sts to each side of it (side petals) and 22 sts to each side of it (back petals). That spaces the petals 2.75 in (7.0 cm) apart. The petals are 3 in (7.6 cm) wide, so neighbors overlap by 0.25 in (0.6 cm).
3. Petal sewing. Pin each petal so its centerline lines up with its marker and its base sits at Rnd 6. Sew them in this order:
1. The two back petals
2. The two side petals
3. The center front petal
Whipstitch around the base and up each side. Leave the top 2 in (5.1 cm) of each side free so the tips stand slightly away from the pocket, about 1 in (2.5 cm) above the rim.
Tension: Keep the stitches snug but not tight. Pulling too hard will pucker the pocket.
Size checkpoint: The total height is 14.5 in (36.8 cm).
Final Blocking
- Mist the whole holder until it is damp.
- Stuff the pocket with a towel to round out the bowl.
- Shape the petal tips so they curve outward slightly.
- Pin the panel flat and square on the mat, keeping the strap straight.
- Open the slot to 0.5 in (1.3 cm) wide with a pencil.
- Let it dry completely, then remove the towel.
Final Quality-Control Checklist
- The petals measure 3 in × 5.5 in (7.6 × 14.0 cm), and all five match.
- The pocket measures 6.25 in × 6.75 in (15.9 × 17.1 cm).
- The cord opening fits your plug.
- The border has 124 sts, and the slot edging has 22 sts.
- The panel seams are secure along the bottom, the sides and the rim.
- The petal tips are free and even.
- The total height is 14.5 in (36.8 cm).
- All yarn ends are woven in.
Troubleshooting
- Petal cups or ruffles: Your base increases are off. Recount: the base should have 18 sts on Rnd 6.
- Petal tip is blunt: Make sure you work (sc, ch 2, sc) into the ch-2 sp on every round.
- Border waves: Check that you skipped the listed row ends.
- Pocket leans forward: Add more stitches along the rim seam, or tack the pocket to the panel at the side edges.
- Cord hole is too tight: Restart the pocket with a ch-7 ring.
Care
Hand wash in cool water, press out the extra water and dry flat, stuffed with a towel. Don’t hang it on the peg until it is completely dry.
Final Notes
All the measurements build on one gauge: 16 sc per 4 in (10.2 cm).
– Each petal is 3 in × 5.5 in (7.6 × 14.0 cm).
– The pocket is 6.75 in (17.1 cm) wide.
– The panel is 10.75 in (27.3 cm) long before the border and 11.25 in (28.6 cm) after.
– Sewn together, the holder is 14.5 in (36.8 cm) tall.
If you check your gauge on the first petal, everything else follows. Happy crocheting!