

This lacy butterfly ornament has four open-window wings, each framed by a fan of tall stitches and a delicate beaded edge. A raised, padded body and two antennae with bobble tips give it a sculpted, vintage-lace look. It works well on a tree, in a window, or as a gift-wrap topper.
The sample is made in a single cream/ecru mercerized cotton thread. The sheen of the cotton shows off the radiating spokes and the corded outlines around each wing opening. Because there is only one color, the stitch texture does all the work, so even tension matters.
The pattern uses US crochet terms. The finished butterfly measures 5 in (12.7 cm) wide by 4 in (10.2 cm) tall, not counting the antennae.
The construction is simple to follow:
– The wing frame is worked first. It is a small center ring with four chain loops, packed with single crochet.
– Each wing gets a row of fan spokes.
– Two edging rows finish each wing.
– A small padded body is crocheted separately and sewn over the center.
– The antennae and a hanging loop are worked directly off the head.
Finished Size and Construction
- Finished size: 5 in (12.7 cm) wide x 4 in (10.2 cm) tall, without the antennae
- Skill level: Intermediate
- Terminology: US crochet terms
- Yarn weight: Size 3 mercerized cotton crochet thread (lace/light fingering)
- Hook: 2.25 mm (US B-1)
- Number of pieces: 1 finished ornament (a wing frame plus a sewn-on body)
- Layout: Single butterfly motif with four wings around a central body
- Size before edging: 4.5 in (11.4 cm) wide x 3.5 in (8.9 cm) tall
- Edging depth: 0.25 in (0.6 cm) on every outer edge
- Body: 2 in (5.1 cm) long x 0.5 in (1.3 cm) wide
- Antennae: about 1.25 in (3.2 cm) each
Materials
Choose a tightly twisted mercerized cotton. Its crisp stitch definition keeps the spokes straight and helps the ornament hold its shape after starching. Avoid fuzzy or very soft yarns, because the open windows will lose their outline.
Yarn:
– Cream/ecru, size 3 cotton thread: 12 g, about 50 m (55 yd)
This quantity includes a margin of roughly 25% for swatching and the hanging loop.
Tools:
– 2.25 mm (US B-1) crochet hook
– Tapestry needle
– Scissors
– 2 stitch markers
– Small amount of matching thread scraps for stuffing the body
– Rust-proof pins and a foam blocking board
– Spray starch or a fabric stiffener
Abbreviations (US Terms)
- ch – chain
- sl st – slip stitch
- sc – single crochet
- dc – double crochet
- tr – treble crochet
- sc2tog – single crochet 2 together
- sk – skip
- sp – space
- FLO – front loop only
- st(s) – stitch(es)
Special stitch – 5-dc bobble:
1. Yarn over, insert the hook into the stitch, yarn over and pull up a loop, yarn over and pull through 2 loops.
2. Repeat from * 4 more times in the same stitch. You now have 6 loops on the hook.
3. Yarn over and pull through all 6 loops.
Gauge and Checkpoints
Gauge: 7 sc and 8 sc rounds = 1 in (2.5 cm), worked with the 2.25 mm hook.
Test the body first. It is small, quick, and uses straight sc rounds, so it makes a reliable gauge swatch. It should measure 2 in (5.1 cm) long.
Checkpoints:
1. After Wing Frame Round 2: Each upper wing loop is about 1.5 in (3.8 cm) long and each lower wing loop is about 1.25 in (3.2 cm) long.
2. After the fan spokes (Row 3 on all wings): The ornament spans 4.5 in (11.4 cm) wide x 3.5 in (8.9 cm) tall. Upper tr spokes are about 0.5 in (1.3 cm) tall, and lower dc spokes are about 0.4 in (1.0 cm) tall.
3. After the edging: The ornament measures 5 in (12.7 cm) x 4 in (10.2 cm).
If your piece is too big: Go down one hook size, to 2.0 mm, and check that your chain loops aren’t loose.
If your piece is too small: Go up to a 2.5 mm hook.
If only the wings ruffle, see Troubleshooting before changing hooks.
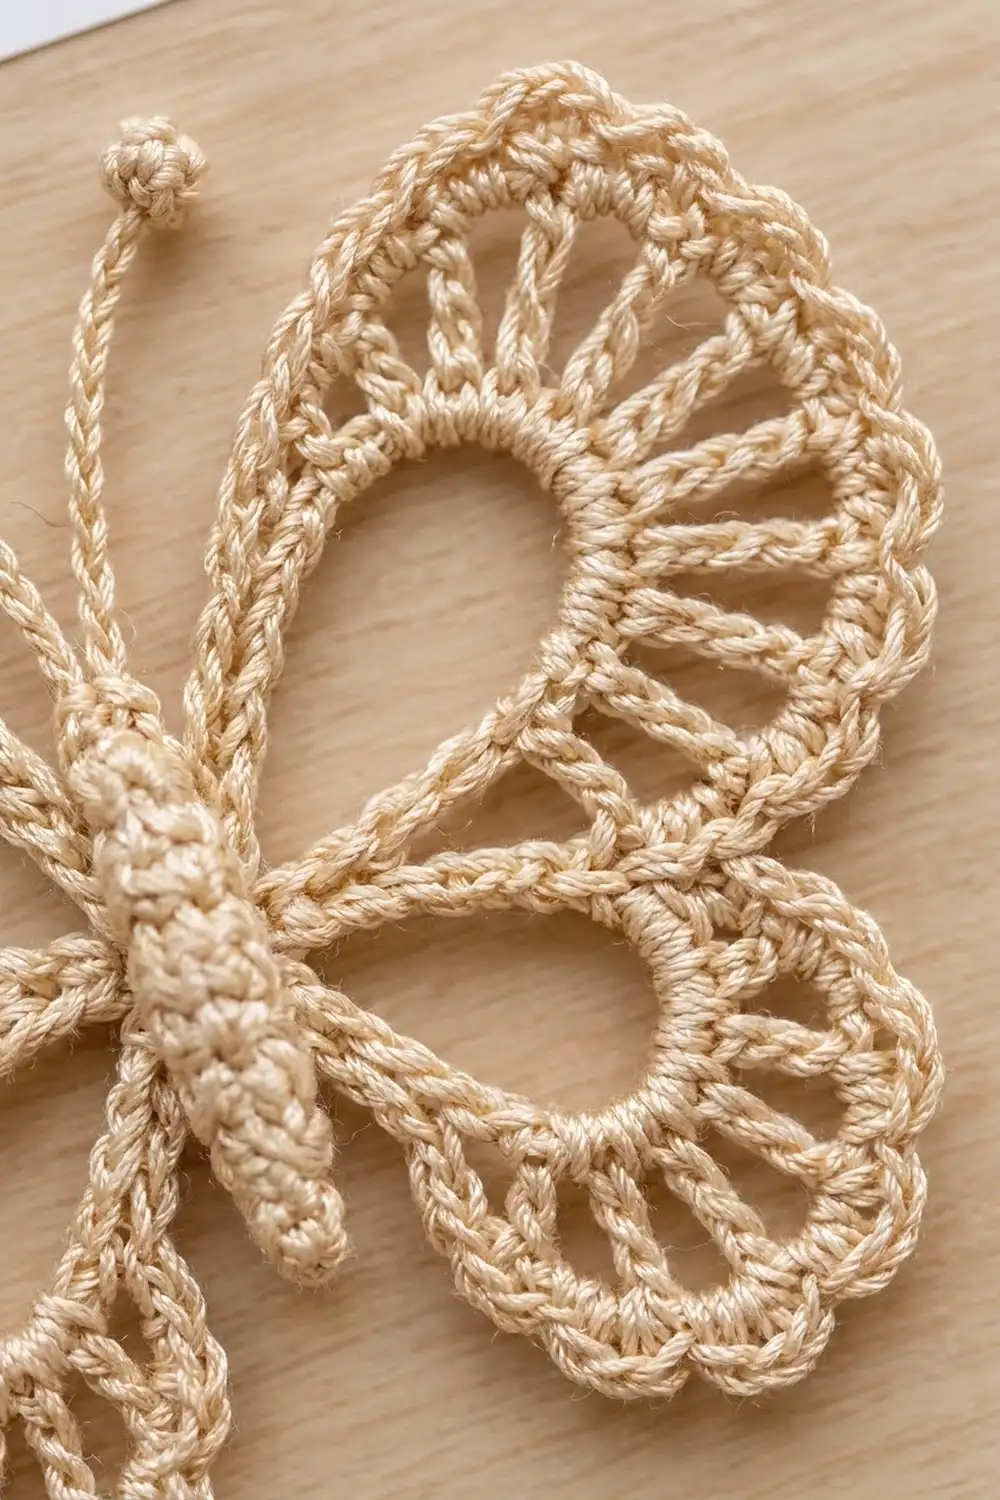
Wing Frame
The frame makes the four teardrop windows. Each window is a chain loop packed with sc, which gives the firm corded outline.
Round 1: Ch 6 and sl st to the first ch to form a ring. Then make the four wing loops in this order:
1. Upper right: ch 26, sl st in the ring.
2. Lower right: ch 20, sl st in the ring.
3. Lower left: ch 20, sl st in the ring.
4. Upper left: ch 26, sl st in the ring.
You now have 4 chain loops: two ch-26 and two ch-20.
Round 2: Work into each loop, working over the chain into the loop space:
1. Work 34 sc in the upper right ch-26 loop, then sl st in the ring.
2. Work 26 sc in the lower right ch-20 loop, then sl st in the ring.
3. Work 26 sc in the lower left ch-20 loop, then sl st in the ring.
4. Work 34 sc in the upper left ch-26 loop, then sl st in the ring.
Fasten off.
Count: 120 sc total (34 + 26 + 26 + 34) plus 4 sl sts.
Slide the sc evenly around each loop so the stitches sit snugly without bunching. Shape each loop into a teardrop, with the narrow end at the ring. Check Checkpoint 1.
Fan Spokes (Row 3)
Each wing’s fan and edging are worked in rows, one wing at a time. The spokes run across the outer part of the loop, and the sc nearest the body stay unused. Number the sc in each loop starting at the ring, moving clockwise for the right wings and counterclockwise for the left wings. This keeps the wings mirror images of each other.
Upper wings (make 2):
Row 3: Join the thread with a sl st in the 5th sc of the loop. This leaves sc 1–4 unused.
1. Ch 4 (counts as the first tr).
2. Ch 2, sk 1 sc, tr in the next sc. Repeat from * 12 more times.
You have worked across sc 5–31. Sc 32–34 stay unused (3 sc).
Count: 14 tr (including the turning ch) and 13 ch-2 sps. Check: 4 unused + 27 worked + 3 unused = 34 sc.
Lower wings (make 2):
Row 3: Join the thread with a sl st in the 4th sc of the loop. This leaves sc 1–3 unused.
1. Ch 3 (counts as the first dc).
2. Ch 2, sk 1 sc, dc in the next sc. Repeat from * 8 more times.
You have worked across sc 4–22. Sc 23–26 stay unused (4 sc).
Count: 10 dc (including the turning ch) and 9 ch-2 sps. Check: 3 + 19 + 4 = 26 sc.
Don’t fasten off yet. Go straight on to the edging rows below for that wing, then fasten off. Check Checkpoint 2 once all four wings have Row 3.
Body
Work in continuous spiral rounds and mark the first stitch of each round.
- Rnd 1: 6 sc in a magic ring. (6 sc)
- Rnd 2: Sc in the next st, 2 sc in the next st. Repeat 3 times. (9 sc)
- Rnds 3–4: Sc in each st around. (9 sc each round – head)
- Rnd 5: Sc in the next st, sc2tog. Repeat 3 times. (6 sc – neck)
- Rnd 6: Sc in the next st, 2 sc in the next st. Repeat 3 times. (9 sc)
- Rnds 7–8: Sc in each st around. (9 sc each round)
- Rnd 9: Sc in FLO in each st around. (9 sc – segment ridge)
- Rnds 10–11: Sc in each st around. (9 sc each round)
- Rnd 12: Sc in FLO in each st around. (9 sc – segment ridge)
- Rnds 13–14: Sc in each st around. (9 sc each round)
- Rnd 15: Sc in the next st, sc2tog. Repeat 3 times. (6 sc)
Stuff the body lightly with thread scraps.
- Rnd 16: Sc2tog 3 times. (3 sc)
Fasten off, leaving a 12 in (30.5 cm) tail. Weave the tail through the last 3 sts and pull it closed. The body has 16 rounds at 8 rounds per inch, so it should measure 2 in (5.1 cm).
Antennae: Join the thread with a sl st in one Rnd 2 stitch on the top of the head.
1. Ch 14.
2. Work a 5-dc bobble in the 4th ch from the hook.
3. Sl st in each of the remaining 10 ch.
4. Sl st into the head.
Count check: 3 skipped ch + 1 ch for the bobble + 10 sl st = 14 ch.
Move 2 sts over on the head and repeat steps 1–4 for the second antenna. Fasten off.
Hanging loop: Join the thread on the head between the antennae.
1. Ch 60.
2. Sl st in the same st.
3. Fasten off.
The loop is about 6 in (15.2 cm) of chain, so it hangs about 3 in (7.6 cm) when folded.
Attach the body:
1. Lay the body down the center so it covers the ring and all the joining tails.
2. Place the head just above the upper wing loops.
3. Whipstitch the body to the ring and the sl st joins on the underside, using the 12 in (30.5 cm) tail.
Border: Scalloped Wing Edging (Rows 4–5)
Border gauge: 7 sc = 1 in (2.5 cm) along the curve.
Each wing gets 2 sc in every ch-2 space. Two sc per space keeps the edge flat over the widening fan; three per space would make it ruffle.
Upper wings:
Row 4: Ch 1 and turn.
1. Sc in the first tr.
2. 2 sc in the next ch-2 sp, sc in the next tr. Repeat from * 13 times. Work the last sc into the top of the turning ch-4.
Count: 40 sc (1 + 13 x 3).
Row 5: Ch 1 and turn.
1. Sc in the first sc.
2. Ch 2, sk 1 sc, sc in each of the next 2 sc. Repeat from * 13 times.
Count: 27 sc and 13 ch-2 bumps. Fasten off.
Lower wings:
Row 4: Ch 1 and turn.
1. Sc in the first dc.
2. 2 sc in the next ch-2 sp, sc in the next dc. Repeat from * 9 times. Work the last sc into the top of the turning ch-3.
Count: 28 sc (1 + 9 x 3).
Row 5: Ch 1 and turn.
1. Sc in the first sc.
2. Ch 2, sk 1 sc, sc in each of the next 2 sc. Repeat from * 9 times.
Count: 19 sc and 9 ch-2 bumps. Fasten off.
Why the math works: In Row 5, each repeat uses exactly 3 sc (skip 1, work 2), plus the single starting sc.
– Upper wings: 1 + 13 x 3 = 40, which is exactly the Row 4 count.
– Lower wings: 1 + 9 x 3 = 28, which is exactly the Row 4 count.
The repeats also line up with the spokes, so each ch-2 bump sits over one Row 3 gap. That gives the evenly beaded edge.
The two edging rows add 0.25 in (0.6 cm) all around. That takes the piece from 4.5 in (11.4 cm) to 5 in (12.7 cm) wide, and from 3.5 in (8.9 cm) to 4 in (10.2 cm) tall.
Weave in all wing ends toward the center, where the body hides them.
Final Blocking
- Wet the butterfly in cool water, press out the excess in a towel, and lay it face up on the foam board.
- Pin the center under the body first, then pin each wing tip so the wingspan is 5 in (12.7 cm) and the height is 4 in (10.2 cm).
- Open each teardrop window and pin it from the inside so the corded sc outline is smooth.
- Straighten each spoke so it radiates evenly from the window.
- Pin each ch-2 bump on the edging outward into a small point.
- Spray generously with starch and let it dry completely, at least 12 hours.
- Unpin it, shape the antennae so they curve outward slightly, and press the bobble tips round.
Final Quality-Control Checklist
- The wingspan measures 5 in (12.7 cm) and the height measures 4 in (10.2 cm).
- Both upper wings have 14 tr spokes and 13 edging bumps.
- Both lower wings have 10 dc spokes and 9 edging bumps.
- The left and right wings are mirror images.
- The windows are open teardrops with no twisted chain.
- The body is 2 in (5.1 cm) long, is centered, and covers the ring.
- Both antennae are the same length, and the bobbles are fully closed.
- The hanging loop is secure, and no ends show from the front.
Troubleshooting
- The wing edge ruffles: You probably worked 3 sc in the spaces. Rework Row 4 with exactly 2 sc per ch-2 sp.
- The wing edge cups or pulls in: Your Row 4 tension is tight. Loosen it, or use a hook 0.25 mm larger for Rows 4–5 only.
- The window is twisted: The chain loop twisted before Round 2. Untwist it and rework it, keeping the front of the chain facing up.
- The spokes lean to one side: You skipped unevenly. Re-count, making sure there is 1 skipped sc between every spoke.
- The body is lumpy: It is overstuffed. Remove some of the scraps before Rnd 16.
- The bobble is flat: Pull up taller loops and close all 6 loops firmly.
Care
Hand wash in cool water with mild soap, then reshape and re-starch it if needed. Store it flat or hanging, away from crushing weight.

Final Notes
Measure at every stage:
1. The body should be 2 in (5.1 cm) at 8 rounds per inch.
2. The wing loops should be 1.5 in (3.8 cm) and 1.25 in (3.2 cm).
3. The fan spokes bring the piece to 4.5 in x 3.5 in (11.4 cm x 8.9 cm).
4. The 0.25 in (0.6 cm) edging finishes the butterfly at 5 in x 4 in (12.7 cm x 10.2 cm).
If every checkpoint matches, the ornament will block crisp and symmetrical.
Happy crocheting!