

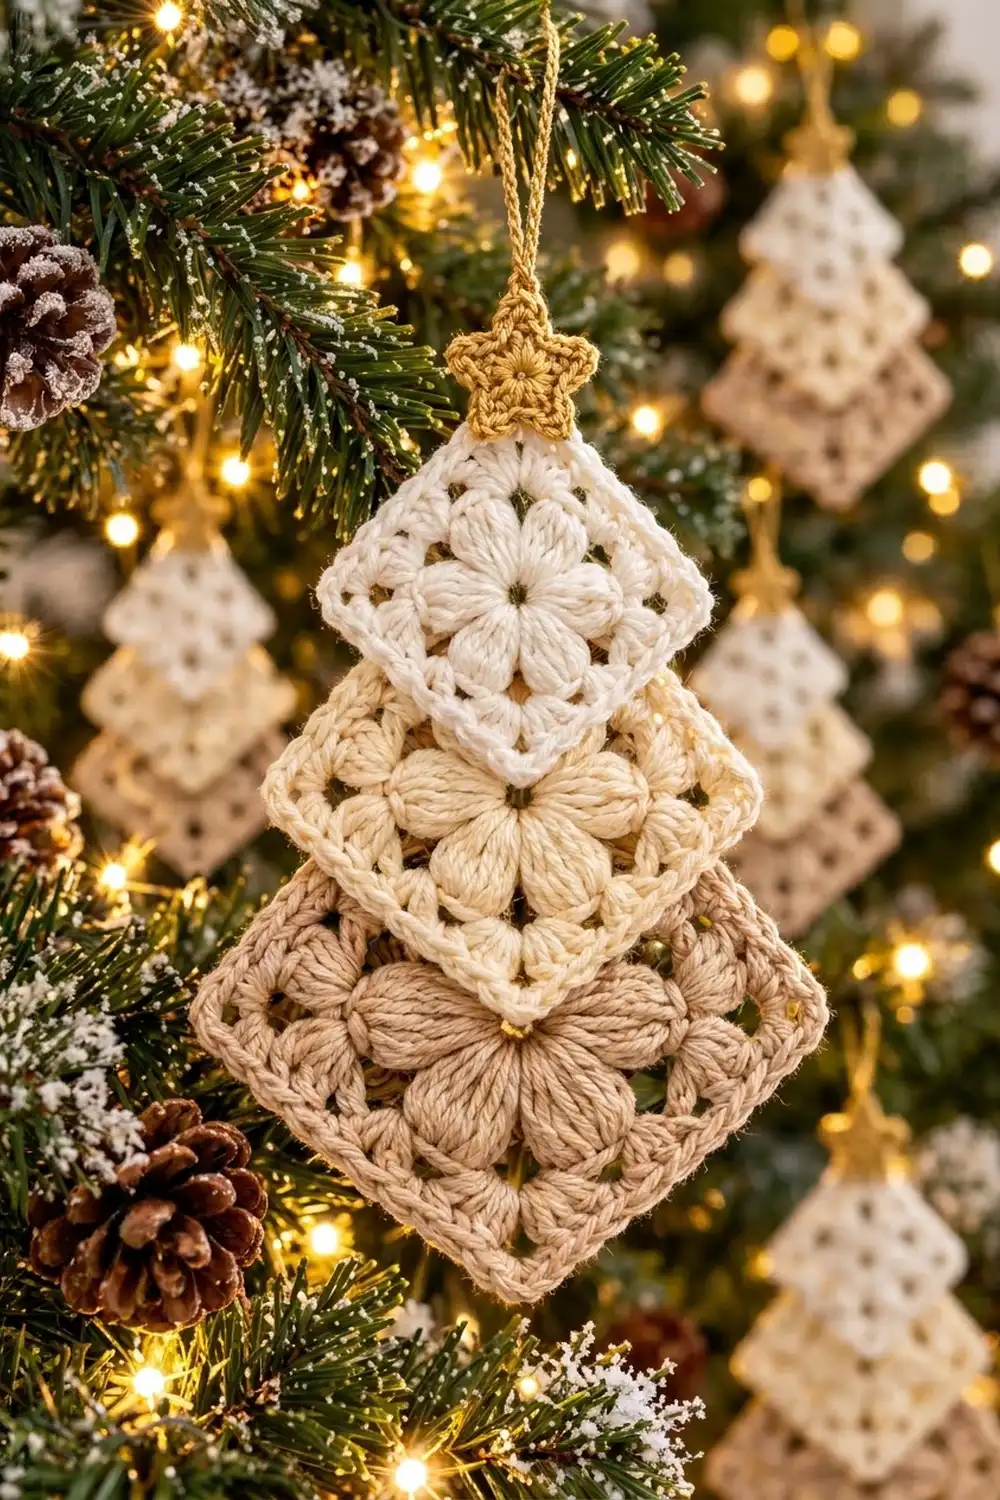
This little tree ornament is three puff-flower granny squares in three sizes, turned on point and stacked so they overlap like the tiers of a tree. A small gold star sits on the top point, and a gold chain loop lets it hang from a branch.
The colors run from light to dark down the tree: soft white at the top, warm cream in the middle, and sandy tan at the base. The gold star and loop add a bit of shine. Each square has an eight-petal puff flower, a double crochet round with small open eyelets, and a neat single crochet edge. It suits a neutral or Scandinavian-style holiday tree.
This pattern uses US crochet terms. The tree body measures 5.7 in (14.5 cm) wide and 9.3 in (23.6 cm) tall. With the star it is about 10 in (25.4 cm) tall, and the hanging loop adds 2 in (5.1 cm).
All three squares start with the same two rounds. Each larger square just gets one more round of double crochet. After that, you make a star and a chain loop, stack the squares, sew the overlaps, and stitch the star over the top point.
Finished Size and Construction
- Finished size: 5.7 in (14.5 cm) wide x 9.3 in (23.6 cm) tall (tree body only)
- Skill level: Easy to intermediate
- Terminology: US crochet terms
- Yarn weight: DK (weight 3)
- Hook: 4.0 mm (G-6)
- Number of pieces: 5 (3 squares, 1 star, 1 hanging loop)
- Layout: 3 squares on point in one vertical column, with the smallest on top
- Square sizes (side length):
- Small: 2.5 in (6.4 cm)
- Medium: 3.25 in (8.3 cm)
- Large: 4 in (10.2 cm)
- Square diagonals:
- Small: 3.5 in (8.9 cm)
- Medium: 4.6 in (11.7 cm)
- Large: 5.7 in (14.5 cm)
- Size before edging:
- Small: 2 in (5.1 cm)
- Medium: 2.75 in (7.0 cm)
- Large: 3.5 in (8.9 cm)
- Edging depth: 0.25 in (0.6 cm) per edge, from one round of single crochet
Materials
Use a smooth DK cotton or cotton-acrylic blend so the puffs stay clear. The amounts below assume about 230 m per 100 g.
- Color A, white: 6 g / 14 m (small square)
- Color B, cream: 9 g / 21 m (medium square)
- Color C, tan: 14 g / 32 m (large square)
- Color D, gold: 4 g / 9 m (star and loop)
Tools:
- 4.0 mm (G-6) hook
- Tapestry needle
- Scissors
- Stitch marker
- Rust-proof pins and a blocking mat
- Ruler
These quantities include a margin of about 25% for testing, tails, and sewing.
Abbreviations (US Terms)
- ch – chain
- sl st – slip stitch
- sc – single crochet
- hdc – half double crochet
- dc – double crochet
- sp(s) – space(s)
- MR – magic ring
- puff – puff stitch
Puff stitch:
1. (Yarn over, insert the hook into the ring or space, yarn over, and pull up a loop to 1/2 in / 1.3 cm) 4 times. You now have 9 loops on the hook.
2. Yarn over and pull through all 9 loops.
3. Ch 1 to lock the puff. This locking ch-1 is not counted as a stitch.
Gauge and Checkpoints
The tiers only look right if each square grows at the expected rate. Make the small white square first and measure it before you start the others.
Checkpoints:
- After Round 1: the puff flower is 1.25 in (3.2 cm) across.
- After Round 2: the square is 2 in (5.1 cm) per side.
- Each additional dc round: adds 0.75 in (1.9 cm) to the side length.
- The sc edging round: adds 0.5 in (1.3 cm) to the side length.
Too big: Switch to a 3.75 mm hook and pull the puff loops up shorter.
Too small: Switch to a 4.5 mm hook.
A difference of up to 1/8 in (0.3 cm) is fine, as long as you make all three squares with the same hook.
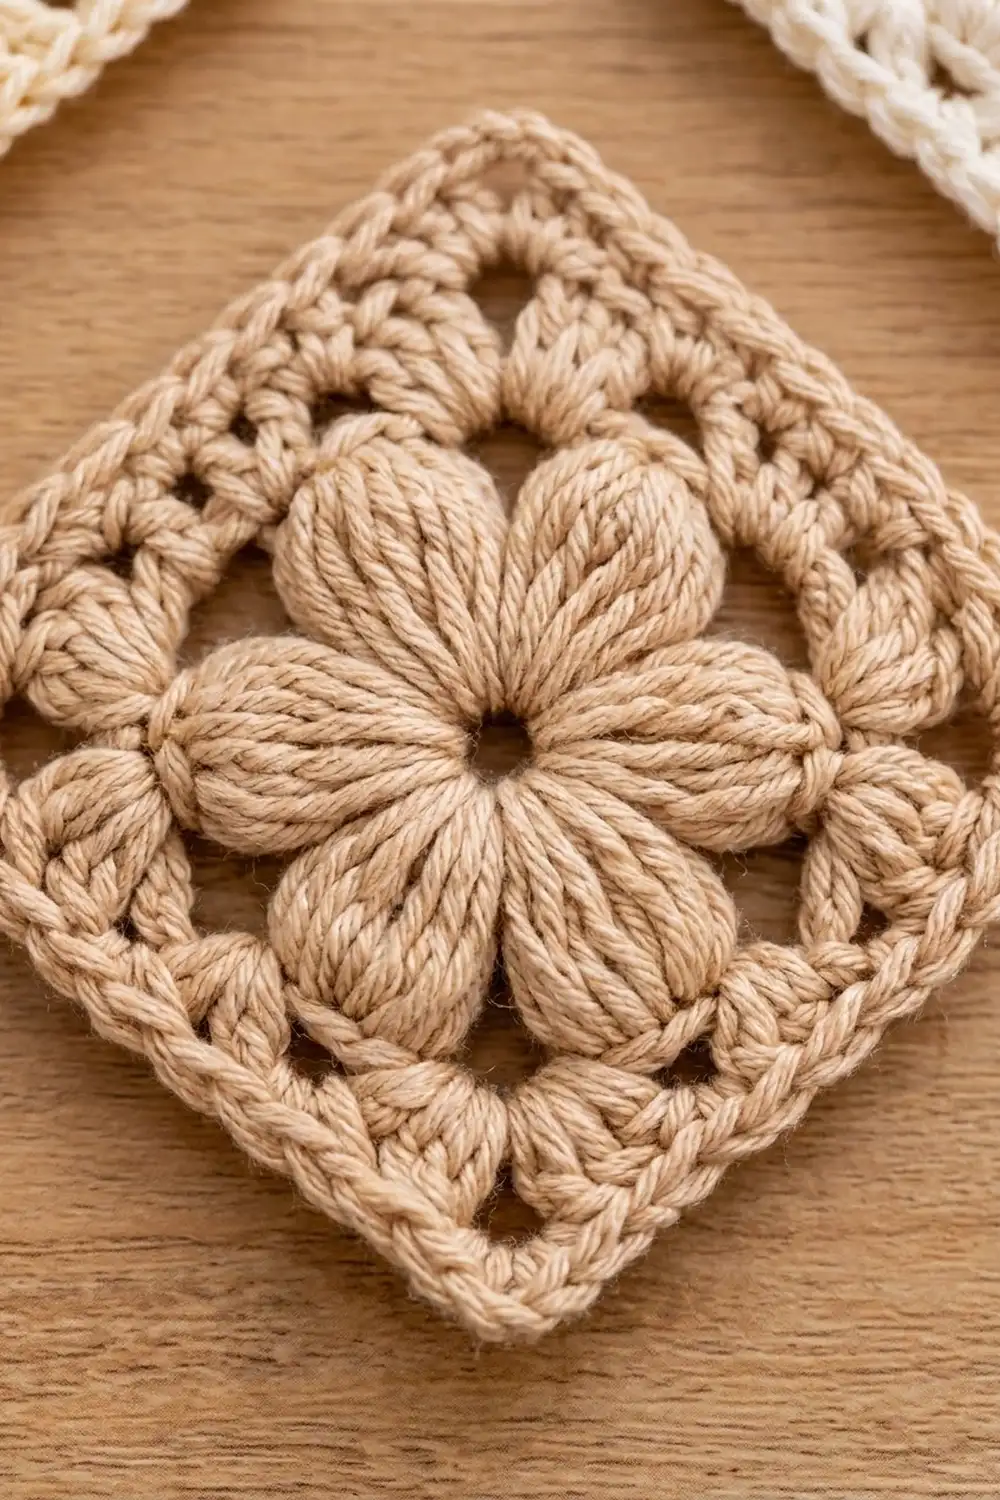
Rounds 1–2: Base Motif (All Squares)
Work these rounds in each square’s own color. Do not turn.
Round 1:
1. Make a MR. Ch 2 (does not count as a stitch).
2. Puff in the ring, ch 2.
3. Puff in the ring, ch 2. Repeat from * 6 more times.
4. Pull the ring closed and sl st to the top of the first puff.
Count: 8 puffs, 8 ch-2 sps.
The eight puffs are the flower petals. Make sure they are evenly spaced around a small center hole.
Round 2 (squaring round):
1. Sl st into the next ch-2 sp. Ch 3 (counts as dc).
2. In the same sp, work (dc, ch 3, 2 dc). This is the first corner.
3. Ch 1, work 3 dc in the next ch-2 sp, ch 1.
4. In the next ch-2 sp, work (2 dc, ch 3, 2 dc). Ch 1, work 3 dc in the next ch-2 sp, ch 1. Repeat from * 2 more times.
5. Sl st to the top of the beginning ch-3.
Count: 28 dc (4 corners x 4 dc, plus 4 sides x 3 dc), 4 ch-3 corner sps, and 8 ch-1 sps.
Between corner spaces, each side now has 2 dc, a ch-1 sp, 3 dc, a ch-1 sp, and 2 dc. That makes 9 working positions per side (7 dc + 2 ch-1 sps). The ch-1 gaps and corner spaces form the open eyelets.
Checkpoint: 2 in (5.1 cm) per side.
Small Square (Color A)
Work Rounds 1–2 in Color A. Then work the Round 3 edging in the Border section.
Medium Square (Color B)
Work Rounds 1–2 in Color B, then work Round 3.
Round 3 (dc round):
1. Sl st in the next dc and into the corner ch-3 sp. Ch 3 (counts as dc).
2. In the same sp, work (dc, ch 2, 2 dc).
3. Dc in each of the next 9 positions (1 dc in each dc and 1 dc in each ch-1 sp). In the corner sp, work (2 dc, ch 2, 2 dc). Repeat from * 2 more times.
4. Dc in each of the last 9 positions. Sl st to the top of the beginning ch-3.
Count per side: 9 dc worked one per position, plus 4 dc added at the corners (2 at each end), for 13 dc. Round total: 52 dc and 4 ch-2 corner sps.
Checkpoint: 2.75 in (7.0 cm) per side.
Next, work the Round 4 edging in the Border section.
Large Square (Color C)
Work Rounds 1–2 in Color C. Work Round 3 exactly as for the medium square (13 dc per side, 52 dc total). Then work Round 4.
Round 4 (dc round):
1. Sl st in the next dc and into the corner ch-2 sp. Ch 3 (counts as dc).
2. In the same sp, work (dc, ch 2, 2 dc).
3. Dc in each of the next 13 dc. In the corner sp, work (2 dc, ch 2, 2 dc). Repeat from * 2 more times.
4. Dc in each of the last 13 dc. Sl st to the top of the beginning ch-3.
Count per side: 13 dc worked one per stitch, plus 4 dc added at the corners, for 17 dc. Round total: 68 dc and 4 ch-2 corner sps.
Checkpoint: 3.5 in (8.9 cm) per side.
Next, work the Round 5 edging in the Border section.
Star (Color D)
Round 1: Make a MR. Ch 1, then work 10 sc in the ring. Pull the ring closed and sl st to the first sc. Count: 10 sc.
Round 2 (points):
1. Ch 4. Sl st in the 2nd ch from the hook, sc in the next ch, hdc in the next ch.
2. Skip the next sc and sl st in the following sc.
3. Repeat steps 1–2 four more times.
Count: 5 points.
The star should be about 1.5 in (3.8 cm) from point to point. Fasten off and leave a 12 in (30.5 cm) tail.
Hanging Loop (Color D)
Leave a 6 in (15.2 cm) tail. Ch 20, about 4 in (10.2 cm). Fasten off and leave another 6 in (15.2 cm) tail. Folded in half, the chain makes a 2 in (5.1 cm) loop.
Make All Pieces
- Color A: 1 small square (Rounds 1–2 + edging)
- Color B: 1 medium square (Rounds 1–3 + edging)
- Color C: 1 large square (Rounds 1–4 + edging)
- Color D: 1 star and 1 hanging loop
Layout (top to bottom, all centered on one vertical line):
Row 1:   [ Star - D ] + loop behind
Row 2:   [ Small - A ]
Row 3:   [ Medium - B ]
Row 4:   [ Large - C ]
Joining
The squares are layered and sewn where they overlap. There is no outer border around the finished tree.
Step 1 – Align.
1. Lay the large square on point.
2. Place the medium square on top so its bottom point sits 2.5 in (6.4 cm) below the large square’s top point.
3. Line up the vertical center lines of both squares.
Step 2 – Sew the medium square (stitch-to-stitch).
– The overlapped area is a diamond with a 2.5 in (6.4 cm) diagonal, so each overlapped edge is about 1.75 in (4.4 cm) long.
– That covers 8 sc on each lower edge of the medium square, plus its bottom ch-2 corner.
– Using the Color B tail, whipstitch through the back loops of those 17 positions (8 + 8 + 1). Catch one strand of the large square under each stitch.
Step 3 – Sew the small square.
– Place the small square so its bottom point sits 2 in (5.1 cm) below the medium square’s top point.
– Each overlapped edge is about 1.4 in (3.6 cm), which covers 6 sc on each side plus the corner.
– Whipstitch those 13 positions (6 + 6 + 1) using the Color A tail.
Tension: Sew loosely so the upper square lies flat and the square below doesn’t ripple. If you pull the corner tight, the point will curl under.
Size checkpoint: The tree body should measure 5.7 in (14.5 cm) wide and 9.3 in (23.6 cm) tall. That is the three diagonals (3.5 + 4.6 + 5.7 in) minus the two overlaps (2 + 2.5 in).
Finishing:
1. Center the star over the top point of the small square. Whipstitch around the star’s Round 1 using its tail. The star points rise about 0.75 in (1.9 cm) above the tree.
2. Bring the two loop tails to the back of the top point and knot them securely behind the star.
3. Weave in all ends.
Border: Single Crochet Edging (Each Square)
Each square’s final round is a sc edging. Work it before you join the squares.
Border gauge: about 9 sc per 2 in (5.1 cm). The corner ch-2 spaces add a little extra length at each corner.
Small square – Round 3:
1. Sl st in the next dc and into the corner ch-3 sp. Ch 1.
2. In the corner sp, work (sc, ch 2, sc). Sc in each of the next 9 positions. Repeat from * 3 more times.
3. Sl st to the first sc.
Count per side: 1 corner sc + 9 + 1 corner sc = 11 sc. Round total: 44 sc and 4 ch-2 sps.
Medium square – Round 4: Work the same way as the small square, but sc in each of the 13 dc along each side.
Count per side: 1 + 13 + 1 = 15 sc. Round total: 60 sc.
Large square – Round 5: Work the same way, with sc in each of the 17 dc along each side.
Count per side: 1 + 17 + 1 = 19 sc. Round total: 76 sc.
Fasten off. Leave a 12 in (30.5 cm) tail on the small and medium squares for sewing.
Why the math works:
– Each per-side count already includes its 2 corner sc, so 4 x 11 = 44, 4 x 15 = 60, and 4 x 19 = 76. Nothing is counted twice.
– Each dc round adds 4 stitches per side, and the edging adds 2 more.
– That gives side counts of 11, 15, and 19, and side lengths of 2.5, 3.25, and 4 in (6.4, 8.3, and 10.2 cm).
Final Blocking
- Lightly mist each square with water.
- Pin each square to its side length: 2.5 in (6.4 cm), 3.25 in (8.3 cm), and 4 in (10.2 cm).
- Put one pin in each corner ch-2 space to sharpen the points.
- Press the puffs gently with your fingertips so the petals sit evenly.
- Pin the star points out to 1.5 in (3.8 cm) across.
- Let everything dry completely before unpinning. Block before joining, or spray-block the finished tree.
Final Quality-Control Checklist
- [ ] Each flower has 8 evenly spaced puffs.
- [ ] Each square has the right sc per side: 11 (small), 15 (medium), and 19 (large).
- [ ] Squares measure 2.5 in (6.4 cm), 3.25 in (8.3 cm), and 4 in (10.2 cm) per side.
- [ ] The vertical center lines of all three squares line up.
- [ ] The overlaps are 2 in (5.1 cm) and 2.5 in (6.4 cm), and the seams don’t show from the front.
- [ ] The tree body is 5.7 in (14.5 cm) x 9.3 in (23.6 cm).
- [ ] The star is centered and the loop is secure.
- [ ] All ends are woven in on the back.
Troubleshooting
Puffs look flat or uneven: Pull every loop up to the same height before you close the puff.
The center cups: Loosen the ch-2 spaces in Round 1.
The edges ruffle: Check each corner. It should have exactly 2 dc, ch, 2 dc.
One side is longer than the others: Recount Round 2. Each side should have 9 positions.
The tiers sit crooked: Unpick the seam, line up the center lines, re-pin, and sew again.
The star curls: Block it flat, or work its Round 1 a little looser.
Care
Hand wash in cool water. Reshape the points and lay flat to dry. Store the ornament flat so the tiers don’t bend.
Final Notes
Every size in this tree builds on the one before it:
– Round 2 measures 2 in (5.1 cm).
– Each dc round adds 0.75 in (1.9 cm), and the edging adds 0.5 in (1.3 cm).
– That makes squares of 2.5, 3.25, and 4 in (6.4, 8.3, and 10.2 cm) per side.
– On point, their diagonals are 3.5, 4.6, and 5.7 in (8.9, 11.7, and 14.5 cm).
– With overlaps of 2 in (5.1 cm) and 2.5 in (6.4 cm), the tree body is 9.3 in (23.6 cm) tall.
If the small square measures correctly, the rest should come out right too.
Happy crocheting!