

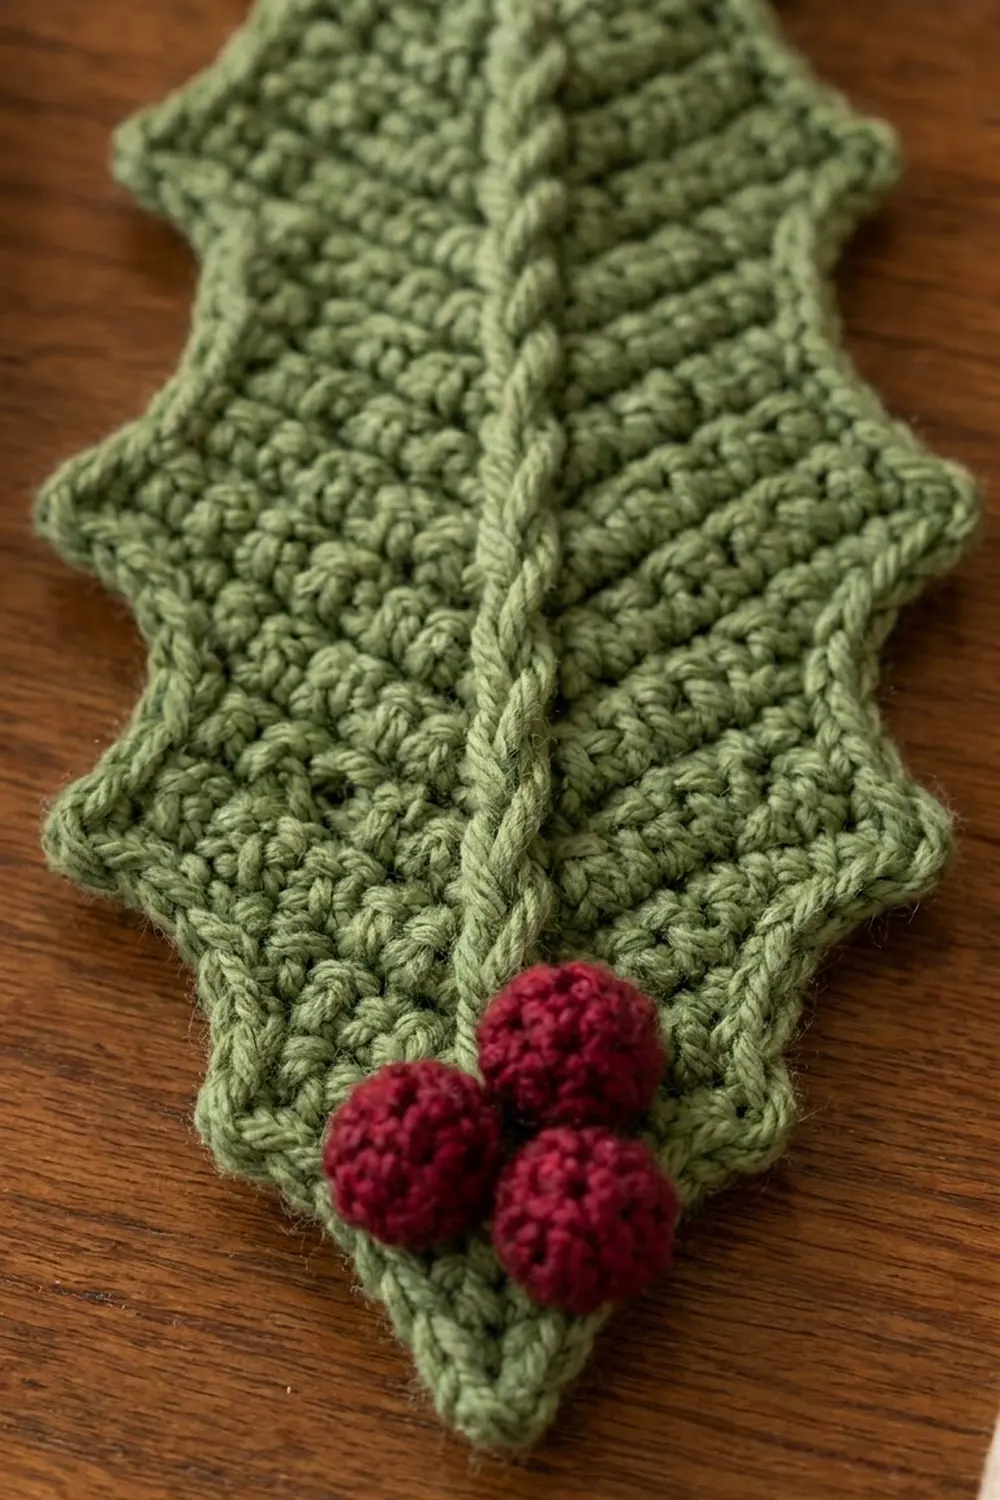
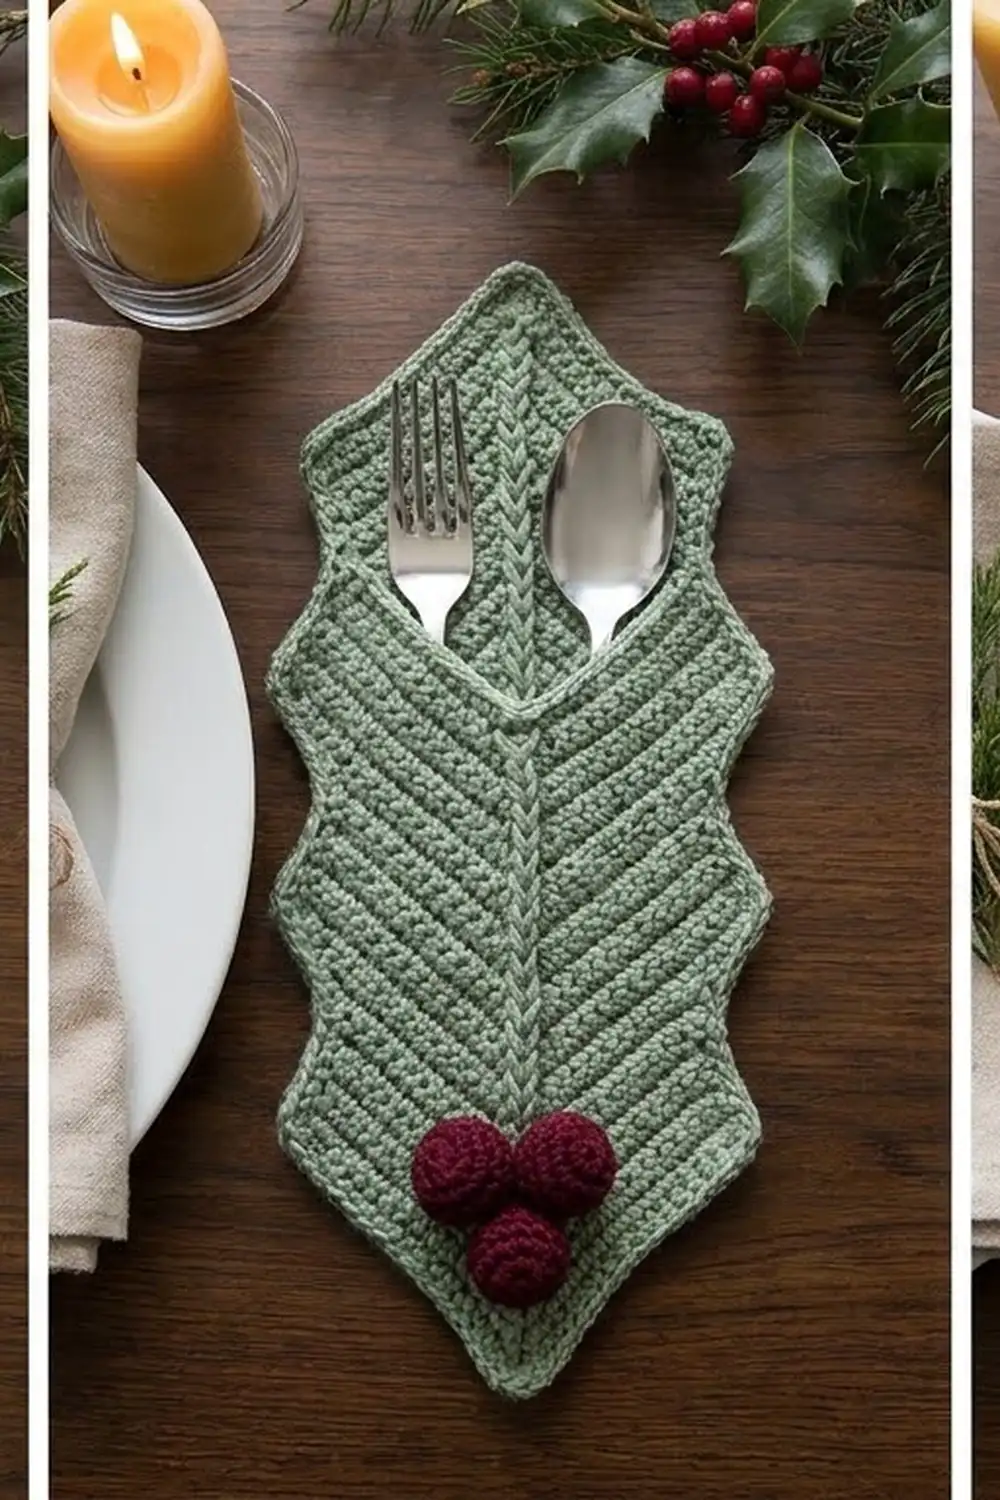
This holly-leaf cutlery holder turns a plain fork and spoon into a small table decoration. It is a pointed leaf pocket in sage green, with a raised braided vein up the front and three plump burgundy berries clustered near the tip.
The look is cozy and classic. The single crochet fabric is dense, so the leaf holds its shape on the table, and the stitches angle away from the center like the veins of a real leaf. A row of rounded holly points runs all the way around the edge.
This pattern uses US crochet terms. The finished holder measures about 8 in (20.3 cm) long and 4 in (10.2 cm) wide at the points.
You make two leaf panels in joined rounds, add the surface-crochet vein to the front, then join the panels with the holly-point edging. The edging leaves the top open as a pocket. Last, you make three berries and sew them to the front.
Finished Size and Construction
- Finished size: about 8 in (20.3 cm) long x 4 in (10.2 cm) wide at the points
- Skill level: Easy-Intermediate
- Terminology: US crochet terms
- Yarn weight: Medium / Worsted (#4)
- Hook: 4.0 mm (G-6) for the leaf; 3.5 mm (E-4) for the berries
- Number of pieces: 5 (1 front panel, 1 back panel, 3 berries)
- Layout: front panel stacked on back panel, wrong sides together; berries on the front
- Panel size before border: about 7 1/4 in (18.4 cm) x 3 in (7.6 cm)
- Border depth: about 1/2 in (1.3 cm) at the side points, 3/8 in (1.0 cm) at the tips
Materials
Choose a smooth cotton or cotton-blend worsted yarn. Cotton gives crisp points and holds up to washing after meals. Avoid fuzzy yarn, which blurs the vein and the berry texture.
- Color A, sage green: 20 g / 36 m (39 yd)
- Color B, burgundy: 3 g / 6 m (7 yd)
Quantities are for one holder and include a margin for your swatch and tails.
Tools:
- 4.0 mm (G-6) and 3.5 mm (E-4) crochet hooks
- Tapestry needle
- 2 locking stitch markers
- A small pinch of fiberfill or burgundy yarn scraps for stuffing
- Scissors, tape measure, pins, and a blocking surface
Abbreviations (US Terms)
- ch – chain
- sl st – slip stitch
- sc – single crochet
- hdc – half double crochet
- dc – double crochet
- sc2tog – single crochet 2 together
- sc3tog – single crochet 3 together
- MR – magic ring
- st(s) – stitch(es)
- RS / WS – right side / wrong side
Special stitches:
- Picot: ch 3, sl st in 3rd ch from hook.
- Holly repeat (worked over 7 sts): sc in next st, hdc in next st, dc in next st, (dc, picot, dc) in next st, dc in next st, hdc in next st, sc in next st. This makes 8 sts plus 1 picot.
- Tip group (worked in 1 st): (hdc, dc, picot, dc, hdc) in the same st. This makes 4 sts plus 1 picot.
- Left shoulder (worked over 6 sts): sc in next st, hdc in next st, dc in next st, (dc, picot, dc) in next st, hdc in next st, sc in next st. This makes 7 sts plus 1 picot.
- Right shoulder (worked over 6 sts): sc in next st, hdc in next st, (dc, picot, dc) in next st, dc in next st, hdc in next st, sc in next st. This makes 7 sts plus 1 picot.
Gauge and Checkpoints
Gauge: 16 sc and 18 rounds = 4 in (10.2 cm) with the 4.0 mm hook.
Make the back panel first and use it as your gauge test. Measure it flat without stretching.
- After Round 1: about 5 1/4 in (13.3 cm) long x 1/2 in (1.3 cm) wide
- After Round 3: about 6 in (15.2 cm) long x 1 1/2 in (3.8 cm) wide
- After Round 6: about 7 1/4 in (18.4 cm) long x 3 in (7.6 cm) wide
If the panel is more than 1/4 in (0.6 cm) too large, go down a hook size. If it is too small, go up a hook size. If the ends ruffle, your tension at the tips is loose, so tighten the 3-sc groups. If the panel cups, loosen up slightly.
Leaf Panels (Make 2)
Use Color A and the 4.0 mm hook. Both panels are worked the same way for Rounds 1–6.
Each round has four sections, always in this order: End 1 (bottom), Side A, End 2 (top), Side B. The sides stay at 18 sts every round. All increases happen in the two end sections, which keeps the tips pointed.
Do not turn. Join each round with a sl st to the first sc. The ch 1 at the start of each round does not count as a stitch.
Foundation: Ch 21.
Round 1: 3 sc in 2nd ch from hook (End 1), sc in next 18 ch (Side A), 3 sc in last ch (End 2). Rotate and work along the other side of the foundation chain: sc in next 18 ch (Side B). Join. (42 sts: 3 + 18 + 3 + 18)
Place a marker in the center sc of each 3-sc group. These are the tip stitches. Each round, move the markers up into the new tip stitch, which is always the center sc of the new 3-sc group.
Round 2: Ch 1. End 1: 2 sc in next st, 3 sc in tip st, sc in next st (6 sts). Side A: sc in next 18 sts. End 2: work as End 1 (6 sts). Side B: sc in next 18 sts. Join. (48 sts: 6 + 18 + 6 + 18)
Round 3: Ch 1. End 1: sc in next 3 sts, 3 sc in tip st, 2 sc in next st, sc in next st (9 sts). Side A: sc in next 18 sts. End 2: work as End 1 (9 sts). Side B: sc in next 18 sts. Join. (54 sts: 9 + 18 + 9 + 18)
Round 4: Ch 1. End 1: sc in next 3 sts, 2 sc in next st, 3 sc in tip st, sc in next 4 sts (12 sts). Side A: sc in next 18 sts. End 2: work as End 1 (12 sts). Side B: sc in next 18 sts. Join. (60 sts: 12 + 18 + 12 + 18)
Round 5: Ch 1. End 1: sc in next 6 sts, 3 sc in tip st, 2 sc in next st, sc in next 4 sts (15 sts). Side A: sc in next 18 sts. End 2: work as End 1 (15 sts). Side B: sc in next 18 sts. Join. (66 sts: 15 + 18 + 15 + 18)
Round 6: Ch 1. End 1: sc in next 6 sts, 2 sc in next st, 3 sc in tip st, sc in next 7 sts (18 sts). Side A: sc in next 18 sts. End 2: work as End 1 (18 sts). Side B: sc in next 18 sts. Join. (72 sts: 18 + 18 + 18 + 18)
The 2-sc increase switches between before and after the tip each round. This keeps each tip centered instead of drifting to one side.
Fasten off with a 6 in (15.2 cm) tail and weave it in.
Stitch numbering for later: Count Round 6 from its first st. The bottom tip is st 10 and the top tip is st 46. Each side has 35 sts between the tips: sts 11–45 on one side, and sts 47–72 plus 1–9 on the other.
Choose the neater panel as the front. Mark its RS.
Braided Vein (Front Panel Only)
Use Color A and the 4.0 mm hook. Hold the yarn on the WS and work surface slip stitches on the RS.
Pass 1 (up): Insert the hook at the bottom tip (st 10 of Round 6) and pull up a loop. Work surface sl sts up the center line: 1 across each round of End 1 (6 sts), 1 in each foundation chain along the center (20 sts), and 1 across each round of End 2 (6 sts), ending at the top tip (st 46). (32 sl sts)
Pass 2 (down): Ch 1. Work back down, making 1 sl st under the back loop of each Pass 1 sl st. (32 sl sts)
Pass 2 sits on top of Pass 1 and leans to one side, which gives the raised, rope-like braid. Keep both passes loose so the panel stays flat. Fasten off and weave in the tails on the WS.
Berries (Make 3)
Use Color B and the 3.5 mm hook. Work in continuous rounds and mark the first st of each round.
Round 1: 6 sc in MR. (6 sts)
Round 2: 2 sc in each st around. (12 sts)
Round 3: Sc in each st around. (12 sts)
Round 4: Sc2tog 6 times. (6 sts)
Stuff firmly with a pinch of fiberfill or burgundy scraps. Fasten off with a 10 in (25.4 cm) tail. Thread the tail through the front loops of the last 6 sts and pull closed. Each berry is about 3/4 in (1.9 cm) across.
Make All Pieces
- Color A: 2 leaf panels (1 front with vein, 1 back)
- Color B: 3 berries
Stacking layout (front view):
        [back tip]
    /\  ^      ^  /\      <- front shoulders and V opening
   | front panel   |
   |   (vein)      |      back panel directly behind
   |     |         |
   |   (B) (B)     |
   |    (B)        |      <- berries above bottom tip
    \     |       /
     \____v______/
       bottom tip
Joining
The holly-point edging joins the two panels. You work it through both layers along the sides and bottom, and through the front panel only across the top.
Stitch-to-stitch logic: Both panels have exactly 72 sts in Round 6. Hold them WS together with the front panel facing you. Line up the bottom tips (st 10) and the top tips (st 46). Every front st now sits directly over its matching back st, so each joined stitch is worked into 1 front st and 1 back st. No extra stitches are added at any seam.
Pin the panels at both tips and at the midpoint of each side.
Tension: Each time, insert the hook under both loops of the front st and both loops of the back st. Work at your normal tension. A tight join pulls the sides into a curve, and a loose join lets the layers gap.
Size checkpoint: Before you start, the stacked panels should still measure about 7 1/4 in (18.4 cm) x 3 in (7.6 cm), with the edges lined up all the way around.
Border: Holly-Point Edging
Border gauge: One holly repeat covers 7 Round 6 sts, about 1 3/4 in (4.4 cm) of edge, and rises about 1/2 in (1.3 cm) at its point.
Part A: Joining Round
Use Color A and the 4.0 mm hook.
Insert the hook through st 10 of both panels and pull up a loop.
- Bottom tip: Tip group in st 10, through both layers. (1 st used)
- Side A: Work 4 holly repeats through both layers, over sts 11–38. (28 sts used)
- Top opening, front panel only: Left shoulder over sts 39–44, sc3tog over sts 45, 46, and 47, right shoulder over sts 48–53. (15 sts used)
- Side B: Work 4 holly repeats through both layers, over sts 54–72 and 1–9. (28 sts used)
- Join with a sl st to the first hdc of the tip group.
Count per side: Side A uses 28 joined sts, the top uses 15 front sts, Side B uses 28 joined sts, and the bottom tip uses 1. That is 1 + 28 + 15 + 28 = 72 sts.
Stitches made: tip group 4 + holly repeats 8 x 8 = 64 + shoulders 7 + 7 = 14 + sc3tog 1. (83 sts and 11 picots)
The sc3tog sits between the last sc of each shoulder, so the front dips into a shallow V right where the vein ends. Work the stitches firmly where you switch between both layers and the front only. Fasten off.
Part B: Back Top
Back panel sts 39–53 are still unworked. Turn the holder so the back faces you, and join Color A in back st 39.
Work 1 holly repeat over sts 39–45, a tip group in st 46, then 1 holly repeat over sts 47–53. (20 sts and 3 picots: 8 + 4 + 8)
Fasten off.
Why the Math Works
Each panel edge has 72 sts: 2 tips plus 2 sides of 35 sts. Each 35-st side is exactly 5 holly repeats of 7 sts, so the back panel gets 5 points per side plus both tips. On the front, the top 15 sts (two 7-st repeats plus the tip) are reworked as 6 + 3 + 6. The front keeps a point at each shoulder but swaps the top tip for the V, and the sts still line up exactly with the back.
Final Blocking
- Weave in all ends. Use the tails at the opening corners to add 2 extra reinforcing stitches.
- Mist the holder lightly until it is damp, not soaked.
- Lay it flat, front up, on a blocking mat.
- Pin the bottom tip and the back top tip so the leaf measures 8 in (20.3 cm) long.
- Pin each side point outward so the width at the points is 4 in (10.2 cm).
- Keep pins out of the vein, and don’t flatten the pocket opening shut.
- Let it dry completely, then unpin.
- Sew on the berries (see below).
Berry placement: Center the cluster on the vein. Sew two berries side by side about 1 in (2.5 cm) above the bottom tip, then sew the third just above and between them to form a small triangle. Sew through the front panel only so the pocket stays open inside. Hide the tails between the layers.
Final Quality-Control Checklist
- Both panels had 72 sts after Round 6.
- Tips are centered and pointed, not drifting to one side.
- The vein runs straight from the bottom tip to the V.
- Each side has 5 points, and the back top shows a full tip point.
- The front top shows a clear V between two shoulder points.
- The opening fits a fork and spoon without stretching.
- Berries are firm, round, and sewn through the front only.
- Finished size is about 8 in (20.3 cm) x 4 in (10.2 cm).
Troubleshooting
The tips curl forward. Your 3-sc groups are too tight. Work them looser, or pin the tips flat when blocking.
The panels don’t line up when stacked. Recount Round 6 on both panels. Each needs 72 sts, with the tips at st 10 and st 46.
The vein puckers the panel. Your surface slip stitches are too tight. Pull them out and redo them with a 4.5 mm (7) hook.
The points look flat. Make sure each picot is ch 3, and pull the dc stitches up to full height.
The cutlery won’t fit. Your gauge is too tight. Use a larger hook so the panels match the checkpoints.
Stuffing shows through the berries. Use burgundy yarn scraps instead of fiberfill.
Care
Hand wash in cool water with mild soap, press out the water in a towel, and dry flat. Reshape the points while the holder is damp.
Final Notes
Here is the measurement chain. Each panel grows to 72 sts and about 7 1/4 in (18.4 cm) x 3 in (7.6 cm) by Round 6. The two panels match stitch for stitch, so they join cleanly. The holly-point edging then adds about 1/2 in (1.3 cm) of points, for a finished leaf of about 8 in (20.3 cm) x 4 in (10.2 cm). Check your gauge on the back panel and every later step falls into place. Make one for each place setting.
Happy crocheting!