

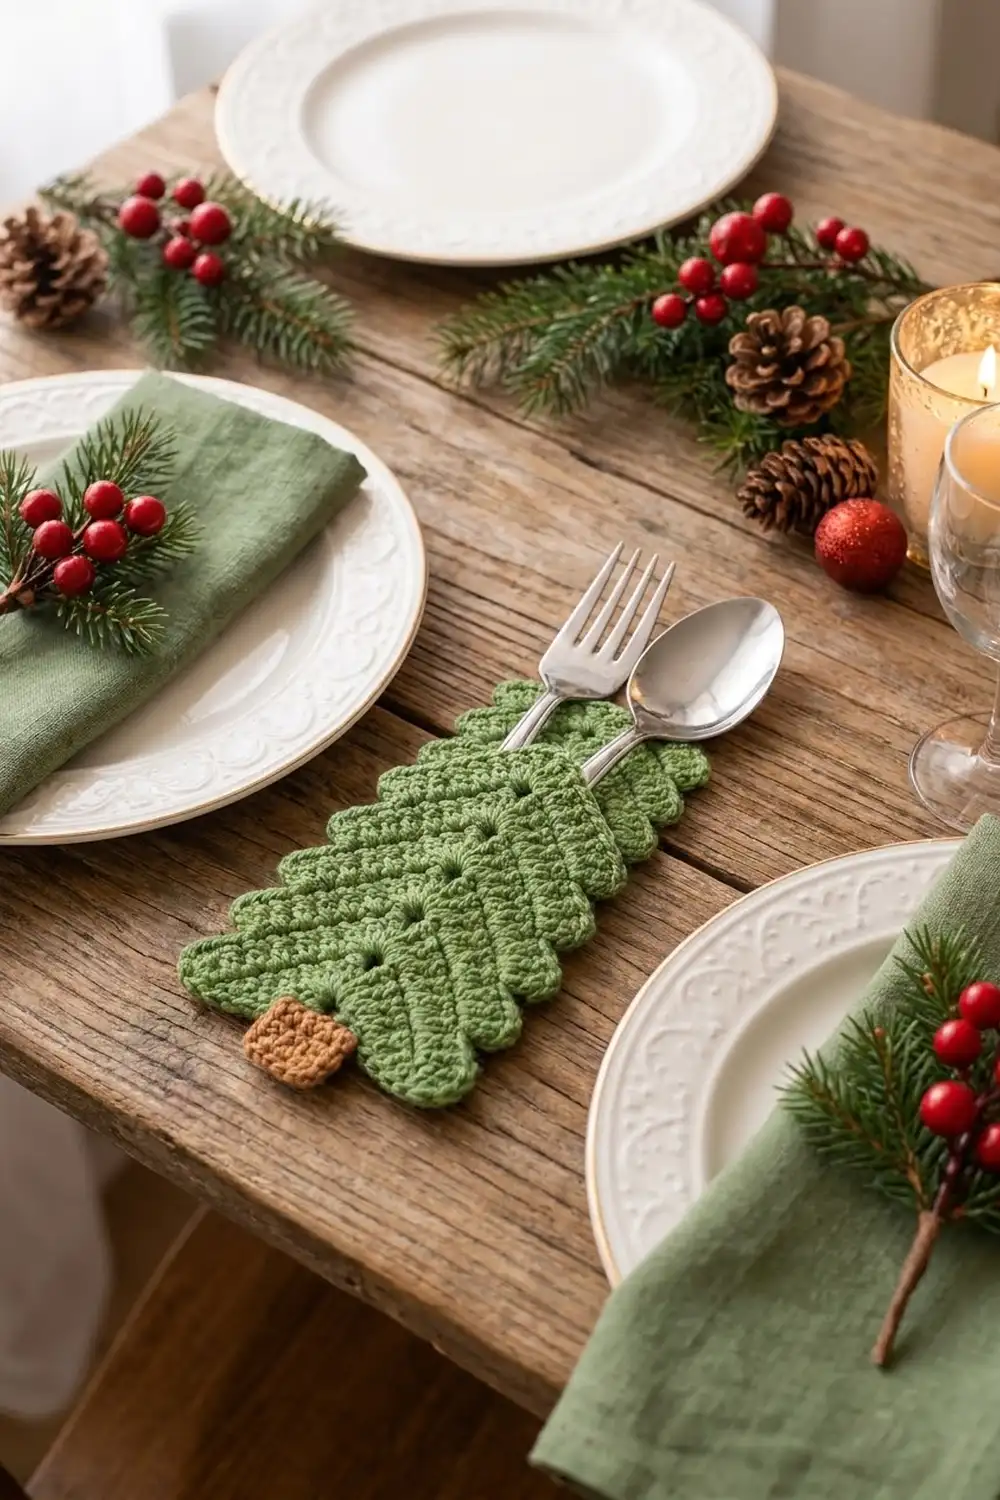
This little tree is a holiday cutlery holder that sits flat beside each plate. A full-height back tree and a shorter front tree are joined along the sides and bottom, which makes a pocket for a fork and spoon. A small brown trunk is sewn on at the base.
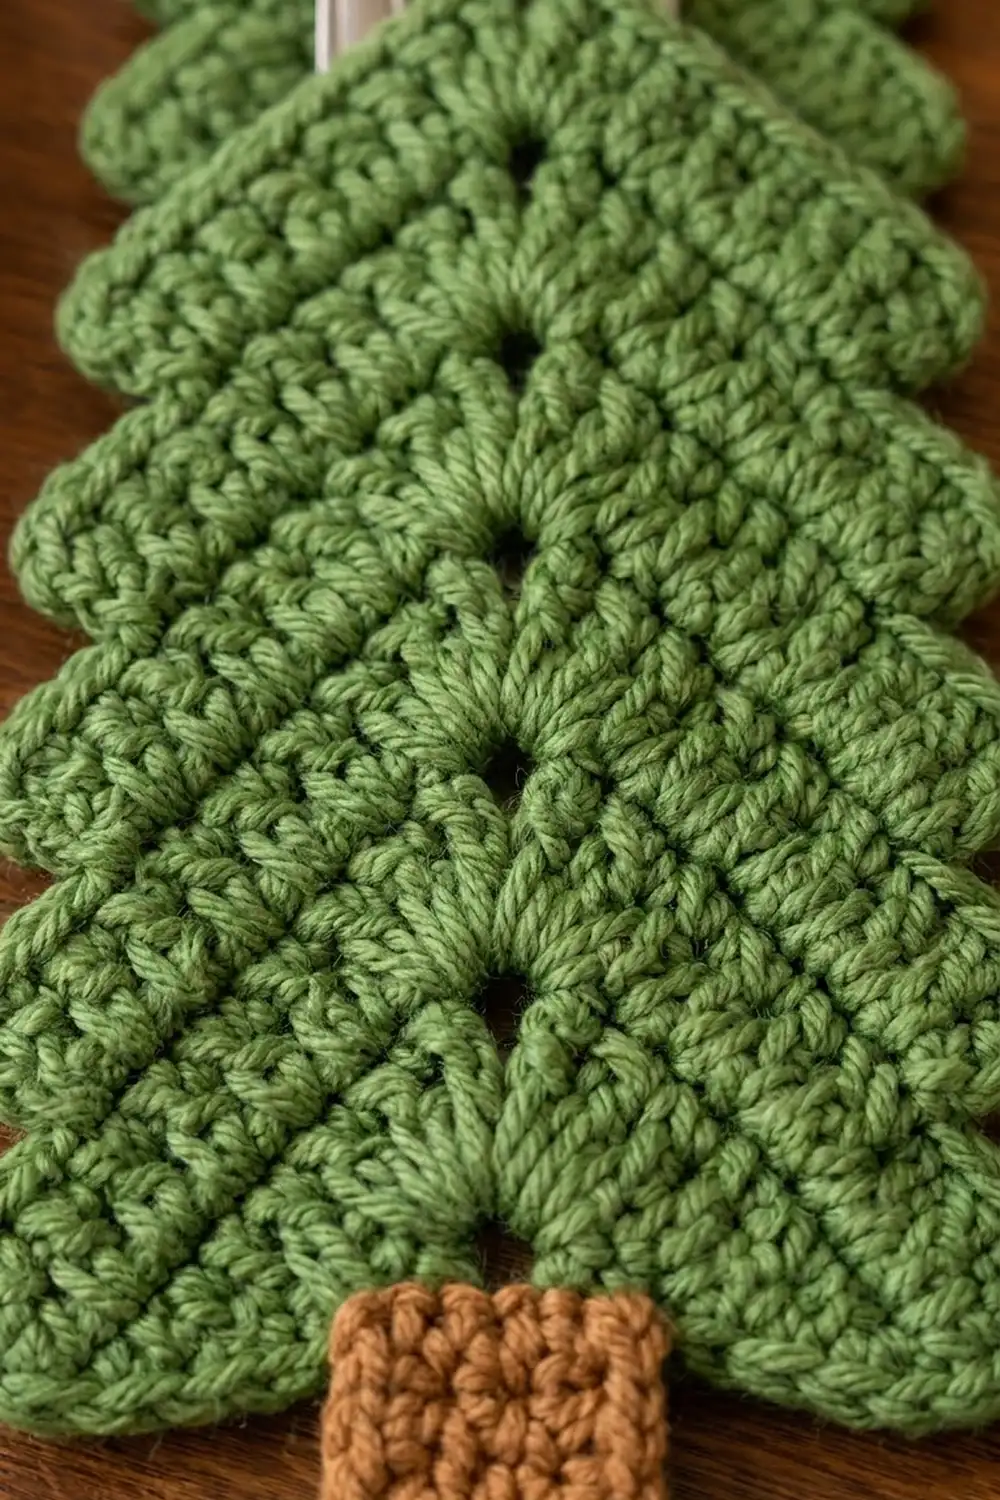
The look comes from tiers of chevron single crochet. Each tier rises to a peak at the center, with a small eyelet along the center line, and its outer corners flare into soft pointed tips. Each new tier steps in slightly, so the silhouette stacks up into a classic tree that ends in a point. The sample is sage green with a brown trunk, and it works just as well in cream-white or red.
This pattern uses US crochet terms. The finished holder measures 4.5 in (11.4 cm) wide by 7 in (17.8 cm) tall, or 7.75 in (19.7 cm) tall including the trunk.
Construction overview: Both tree panels are worked from the bottom up in rows. The back has 7 tiers and the front has the same first 5 tiers. You work one edging row across the front’s top edge. Then a single edging round joins the front to the back and outlines the whole tree. Last, you crochet the trunk and sew it on.
Finished Size and Construction
- Finished size: 4.5 in (11.4 cm) wide × 7 in (17.8 cm) tall; 7.75 in (19.7 cm) tall with the trunk
- Skill level: Easy / advanced beginner
- Terminology: US
- Yarn weight: Worsted (#4), cotton recommended
- Hook: 4.0 mm (G-6)
- Number of pieces: 3 (back panel, front panel, trunk), joined into one holder
- Layout: Front panel laid over the lower part of the back panel, aligned at the bottom
- Back panel before edging: 4.25 in (10.8 cm) × 6.75 in (17.1 cm)
- Front panel before edging: 4.25 in (10.8 cm) × 4.75 in (12.1 cm)
- Trunk: 1.25 in (3.2 cm) × 1.1 in (2.8 cm)
- Edging depth: about 1/8 in (0.3 cm) per edge
Materials
Yarn: Choose a smooth worsted-weight cotton or cotton blend. Cotton holds the chevron ridges crisply, survives washing, and won’t shed onto table linens.
- Green (main color): 30 g, about 55 m
- Brown (trunk): 5 g, about 9 m
These quantities include a margin of about 15 percent for your gauge swatch and weaving in ends.
Tools:
- 4.0 mm (G-6) crochet hook
- Tapestry needle
- 2 locking stitch markers
- Scissors
- Measuring tape
- Blocking mat and rust-proof pins
- Spray bottle
Abbreviations (US Terms)
- ch – chain
- sp – space
- sc – single crochet
- sc2tog – single crochet 2 together: (insert hook in next st, yarn over, pull up a loop) twice, yarn over, pull through all 3 loops
- sk – skip
- sl st – slip stitch
- st(s) – stitch(es)
- RS – right side
- ( ) – work everything inside the parentheses into the same stitch or space
Special technique: chevron row. Every tier row decreases 1 stitch at each end and adds 2 stitches at the center. The total stays the same, but the stitches are pushed upward at the center, which forms the peak and makes the outer corners point down into tips.
Half-count (h): Each tier has a half-count, h. This is the number of sc on each side of the center space, counting the sc worked into that space. A tier’s total is always 2 × h.
Gauge and Checkpoints
Gauge: 16 sc × 18 rows = 4 in (10.2 cm) in plain rows of sc.
Make the front panel first. It is the smaller piece and works as your test piece, because its 5 tiers are exactly the same as the first 5 tiers of the back.
Checkpoints:
- After Tier 1: the tier is about 4.25 in (10.8 cm) wide from tip to tip and about 0.9 in (2.3 cm) tall at the center.
- After Tier 5 (front panel done): about 4.25 in (10.8 cm) × 4.75 in (12.1 cm).
- After Tier 7 (back panel done): about 4.25 in (10.8 cm) × 6.75 in (17.1 cm).
- After joining and edging: 4.5 in (11.4 cm) × 7 in (17.8 cm).
If your piece is too big, go down to a 3.75 mm hook. If it is too small, go up to a 4.5 mm hook. A difference of 0.25 in (0.6 cm) is fine, because the front and back are worked at the same gauge and will still line up.
Back Panel
Use green. The back panel has 7 tiers of 4 rows each, for 28 rows in total. Turn at the end of every row, and remember that the ch 1 at the start of a row never counts as a stitch.
Tier 1 (h = 9)
Foundation: Ch 18.
Row 1 (RS): Sc in the 2nd ch from the hook and in each of the next 7 ch, (sc, ch 2, sc) in the next ch, then sc in each of the last 8 ch. Turn.
Count: 18 sc (9 on each side) plus 1 ch-2 sp.
The ch-2 sp is the tier’s eyelet.
Rows 2–4: Ch 1, sc2tog, sc in each of the next 7 sts, (sc, ch 1, sc) in the center sp, sc in each of the next 7 sts, sc2tog. Turn.
Count: 18 sc plus 1 ch-1 sp.
Check the math: On each side, the sc2tog makes 1 stitch, plus 7 sc, plus 1 sc in the center sp, for 9 stitches. That equals h, so the count stays at 18.
Tier Transition Row (Row 1 of Tiers 2–7)
Each new tier steps in by 1 stitch on each side and starts with a fresh ch-2 eyelet.
Transition row: Ch 1, sk the first st, sc2tog over the next 2 sts, sc in each of the next (h − 2) sts, (sc, ch 2, sc) in the center sp, sc in each st until 3 sts remain, sc2tog, then leave the last st unworked. Turn.
Here h is the half-count of the new tier. The two skipped end stitches become the small step on each side.
Rows 2–4 of each tier: Ch 1, sc2tog, sc in each of the next (h − 2) sts, (sc, ch 1, sc) in the center sp, sc in each of the next (h − 2) sts, sc2tog. Turn.
Tier Counts
| Tier | h | “next (h − 2)” | Count per row |
|---|---|---|---|
| 1 | 9 | 7 | 18 sc |
| 2 | 8 | 6 | 16 sc |
| 3 | 7 | 5 | 14 sc |
| 4 | 6 | 4 | 12 sc |
| 5 | 5 | 3 | 10 sc |
| 6 | 4 | 2 | 8 sc |
| 7 | 3 | 1 | 6 sc |
Check the transition math: Going from h = 9 to h = 8, each side of the transition row has 1 skipped stitch, 1 sc2tog made from 2 stitches, 6 sc, and 1 sc in the sp. That gives 1 + 6 + 1 = 8 new stitches, built on the 9 old ones. The same logic holds for every tier.
After Row 4 of Tier 7, fasten off. The top of Tier 7 forms the tree’s peak, with a ch-1 sp at the tip.
Checkpoint: The back panel should measure about 4.25 in (10.8 cm) × 6.75 in (17.1 cm), with 7 eyelets running up the center.
Front Panel
Use green. Work Tiers 1–5 exactly as for the back panel: 20 rows, ending with 10 sc plus a center ch-1 sp. Do not fasten off.
Top edging row (RS): Ch 1, turn. Sc in each of the first 5 sts, (sc, ch 1, sc) in the center ch-1 sp, then sc in each of the last 5 sts. Fasten off.
Count: 12 sc plus 1 ch-1 sp, worked as 10 stitches one-for-one plus 2 sc added at the peak.
This row firms up the pocket opening.
Checkpoint: About 4.25 in (10.8 cm) wide and 5 in (12.7 cm) tall at the peak. Lay it on the back panel. Its tiers should match the back’s Tiers 1–5 row for row.
Trunk
Use brown.
Foundation: Ch 6.
Row 1: Sc in the 2nd ch from the hook and in each ch across. Turn. (5 sc)
Rows 2–5: Ch 1, sc in each st across. Turn. (5 sc)
Fasten off and leave a 10 in (25.4 cm) tail for sewing.
Checkpoint: 1.25 in (3.2 cm) wide × 1.1 in (2.8 cm) tall.
Joining and Border
The border is one round of sc. It joins the front to the back along the bottom and sides, then continues around the back’s top tiers alone.
Border gauge: Work 1 sc in each row end and 1 sc in each stitch. Single crochet is 4.5 rows per inch and 4 stitches per inch, so this ratio sits flat without ruffling or cupping.
Setup: Place the back panel RS up. Lay the front panel on top, also RS up, with the bottom edges and tier tips lined up. Put locking markers at the front’s two top corners.
Joining round: With RS facing, join green at the bottom-right tip of Tier 1, inserting the hook through both layers. Work up the right side, inserting through both layers wherever the front panel is there.
Right side, Tiers 1–5 (both layers), for each tier:
(Sc, ch 1, sc) in the Row 1 end to make the tip, sc in each of the next 3 row ends, then sc in the step stitch.
At the Tier 5 step, the hook goes through the back’s skipped stitch and the end sc of the front’s top edging row.
Per tier: 6 sc plus 1 ch-1 sp. Tiers 1–5: 30 sc.
Right side, Tier 6 (back only): Work the same way. (6 sc plus 1 ch-1 sp)
Right side, Tier 7 (back only): (Sc, ch 1, sc) in the Row 1 end, then sc in each of the next 3 row ends. (5 sc)
Top: Sc in each of the 3 sts of the right half, (sc, ch 1, sc) in the peak ch-1 sp, then sc in each of the 3 sts of the left half.
Left side: Mirror the right side, working downward. For Tier 7, sc in each of 3 row ends, then (sc, ch 1, sc) in the Row 1 end. For Tiers 6 through 1, sc in the step stitch, sc in each of 3 row ends, then (sc, ch 1, sc) in the Row 1 end. Go through both layers again from the Tier 5 step down.
Bottom (both layers): Sc in each of the 17 foundation chains that hold Row 1 stitches. Sl st to the first sc and fasten off.
Counts per side:
- Right side: 30 (Tiers 1–5) + 6 (Tier 6) + 5 (Tier 7) + 3 (top half) + 1 (peak sc) = 45 sc
- Left side: 45 sc
- Bottom: 17 sc
- Total: 107 sc plus 15 ch-1 sps (14 at the tips and 1 at the peak)
Why the math works: The front’s tiers are the same as the back’s Tiers 1–5, so the row ends match one-to-one and no stitches are added at the seam. In total, 77 sc go through both layers (30 + 30 + 17) and 30 sc go through the back only.
Tension advice: Keep each sc the same height as a normal stitch. If you pull it tight through two layers, the sides will draw in and the tips won’t flare.
Checkpoint: 4.5 in (11.4 cm) × 7 in (17.8 cm). The pocket opening should be 2 in (5.1 cm) below the back’s peak.
Attach the trunk: Center the trunk at the bottom so its top 0.35 in (0.9 cm) overlaps the front panel and 0.75 in (1.9 cm) hangs below the edging. Whipstitch the top and both sides through all layers in the overlap area. Weave in all ends.
Final Blocking
- Mist the holder lightly with water until it is damp but not wet.
- Pin it flat, RS up, on the mat, to 4.5 in (11.4 cm) × 7 in (17.8 cm).
- Pin each of the 14 tier tips outward and slightly down so they point.
- Pin the peak up to a sharp point.
- Line up the eyelets in a straight vertical row.
- Leave it to dry completely, at least 6 hours.
- Unpin it and slide a fork in to check that the pocket opens easily.
Final Quality-Control Checklist
- [ ] The back has 7 tiers and the front has 5, each with a center eyelet
- [ ] Each tier is 4 rows tall, with matching stitch counts on both sides
- [ ] The edging round has 107 sc and 15 ch-1 sps
- [ ] The front is joined on both sides and along the bottom only
- [ ] The pocket opening is clean, with the front’s peak centered
- [ ] The finished holder is 4.5 in (11.4 cm) × 7 in (17.8 cm)
- [ ] The trunk is centered and sewn securely
- [ ] All ends are woven in invisibly
Troubleshooting
The tips curl under. Your center increases are too tight. Make sure the eyelet is ch 2 and each later row has ch 1, then re-block.
One side of a tier is longer. You’ve miscounted (h − 2). Count each side back to the center sp.
The front and back tiers don’t line up. The two panels are at different tension. Re-block both, or remake the front to match.
The edging ripples. Work exactly 1 sc per row end and skip none of the tip increases.
The edging cups. Loosen your tension through the double layers.
The pocket is too tight for the cutlery. Work the joining sc a little looser, or block the front panel slightly wider.
Care
Hand wash in cool water with mild soap and press out the water in a towel. Reshape the tips and dry flat.
Final Notes
Here is the measurement chain. Gauge is 16 sc × 18 rows = 4 in (10.2 cm), each tier is 4 rows tall, and each tier steps in by 1 stitch per side, from 18 sc down to 6 sc. That makes a back panel of 4.25 in (10.8 cm) × 6.75 in (17.1 cm). The front’s top edging row brings it to 5 in (12.7 cm) tall. One 107-sc edging round joins the panels and finishes the holder at 4.5 in (11.4 cm) × 7 in (17.8 cm), or 7.75 in (19.7 cm) with the trunk. Make one for each place setting, in green, cream-white or red.
Happy crocheting!