

The Frosted Lace Tree is a small, flat Christmas ornament made from three lacy fan-shaped tiers stacked into a classic tree shape. Each tier is an open mesh of double-crochet spokes. Each curved hem has a crisp cream scallop edge that looks like a dusting of snow.
The colors are quiet and wintry: a soft dusty blue for the mesh and a warm cream for the scallops and hanging loop. The style is light and vintage, closer to a doily than a chunky toy, so it suits both rustic and glittery trees.
This pattern uses US crochet terms. The finished ornament measures 4 in (10.2 cm) tall and 4 in (10.2 cm) wide, plus a 2 in (5.1 cm) hanging loop.
Construction is simple. You work three flat blue fans in short turned rows from a small ring and sew them together on a shared center line. Then you add a two-row cream scallop edging to each tier’s lower edge and finish with a chain loop at the top.
Finished Size and Construction
- Finished size: 4 in (10.2 cm) tall × 4 in (10.2 cm) wide, plus 2 in (5.1 cm) loop
- Skill level: Easy to intermediate
- Terminology: US crochet terms
- Yarn weight: Sport-weight cotton (#2)
- Hook: 2.5 mm (US B/1 or C/2)
- Number of pieces: 3 tiers (small, medium, large)
- Layout: Tiers stacked vertically on one center line, each overlapping the one below
- Piece sizes (blue, before edging): Small 2 in (5.1 cm) wide × 1.25 in (3.2 cm) tall; Medium 2.75 in (7.0 cm) wide × 1.625 in (4.1 cm) tall; Large 3.5 in (8.9 cm) wide × 2 in (5.1 cm) tall
- Size before border: 3.6 in (9.1 cm) tall × 3.5 in (8.9 cm) wide
- Border depth: 0.4 in (1.0 cm) along each tier’s curved edge
Materials
Choose a smooth, mercerized sport-weight cotton, about 165 m per 50 g. Cotton holds the open mesh crisply and blocks flat, which matters for a lace ornament. Avoid fuzzy or very stretchy yarns, because the holes will blur and the tiers will droop.
- Color A, dusty blue: 8 g (26 m) per ornament
- Color B, cream: 5 g (17 m) per ornament
These quantities include a margin of about 25 percent for swatching and tails. One 50 g ball of each color makes six ornaments.
Tools:
– 2.5 mm crochet hook
– Tapestry needle
– Scissors
– Rustproof pins and a foam blocking mat
– Spray bottle with water
– Ruler or tape measure
– Optional: spray starch for extra stiffness
Abbreviations (US Terms)
- ch – chain
- sl st – slip stitch
- sc – single crochet
- dc – double crochet
- sp – space
- tch – turning chain
- st(s) – stitch(es)
- RS – right side
- rep – repeat
Special stitches:
– V-st: (dc, ch 2, dc) in the same stitch. In Row 2 only, the V-st uses ch 1 instead: (dc, ch 1, dc).
– Shell: 5 dc in the same stitch.
Gauge and Checkpoints
Gauge is measured on the small tier. Make it first, block it lightly, and measure it before you start the other two tiers.
Base gauge: The ring is about 1/8 in (0.3 cm) across, and each dc row adds about 3/8 in (1.0 cm) of depth.
Checkpoints:
– After Row 3 (small tier): 2 in (5.1 cm) wide from corner to corner, 1.25 in (3.2 cm) tall from the top of the ring to the center of the lower edge.
– After Row 4 (medium tier): 2.75 in (7.0 cm) wide, 1.625 in (4.1 cm) tall.
– After Row 5 (large tier): 3.5 in (8.9 cm) wide, 2 in (5.1 cm) tall.
If your small tier is more than 1/4 in (0.6 cm) too wide, go down a hook size. If it is too small, go up a hook size. If the width is right but the fan cups or ruffles, check that each ch-2 is truly 2 chains. Extra chains cause ruffling and missing chains cause cupping.
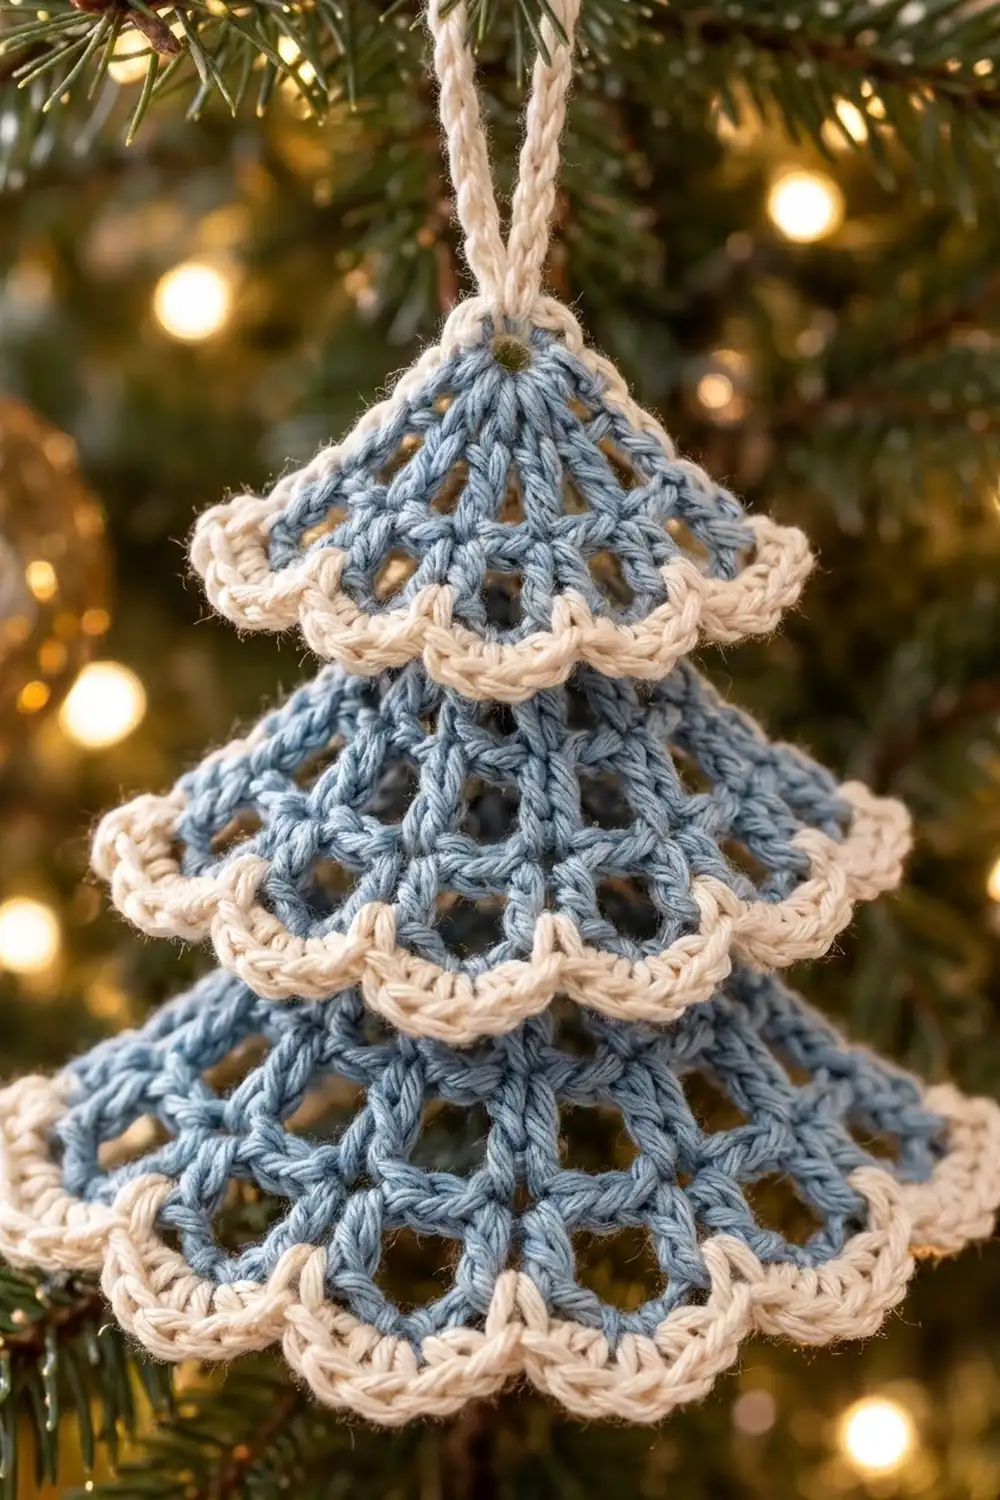
Tier Pattern (Make in Color A)
All three tiers start the same way. The small tier stops after Row 3, the medium tier after Row 4, and the large tier after Row 5. Turn at the end of every row. The turning chain always counts as the first dc.
Foundation: With A, ch 4, sl st in first ch to form a ring.
Row 1: Ch 4 (counts as dc + ch 1), [dc, ch 1] 3 times in ring, dc in ring. Turn.
(5 dc, 4 ch-1 sp)
Row 2 (growth): Ch 4 (counts as dc + ch 1), dc in first dc; [ch 1, (dc, ch 1, dc) in next dc] 4 times, working the last V-st in 3rd ch of tch. Turn.
(10 dc, 9 ch-1 sp)
Every dc of Row 1 now holds two dc, which opens the fan.
Row 3 (mesh): Ch 5 (counts as dc + ch 2), dc in next dc; [ch 2, dc in next dc] 8 times, working the last dc in 3rd ch of tch. Turn.
(10 dc, 9 ch-2 sp)
The longer chains widen the fan without adding spokes, which creates the open diamond look.
Small tier: Fasten off after Row 3, leaving a 6 in (15.2 cm) tail. Check: 2 in (5.1 cm) wide × 1.25 in (3.2 cm) tall.
Row 4 (growth, medium and large tiers): Ch 5 (counts as dc + ch 2), dc in first dc; [ch 2, dc in next dc] 2 times; ch 2, V-st in next dc; [ch 2, dc in next dc] 2 times; ch 2, V-st in next dc; [ch 2, dc in next dc] 2 times; ch 2, V-st in 3rd ch of tch. Turn.
(14 dc, 13 ch-2 sp)
Increases fall on dc 1, 4, 7 and 10 of Row 3, which keeps the fan symmetrical.
Medium tier: Fasten off after Row 4, leaving a 6 in (15.2 cm) tail. Check: 2.75 in (7.0 cm) wide × 1.625 in (4.1 cm) tall.
Row 5 (growth, large tier only): Ch 5 (counts as dc + ch 2), dc in first dc; [ch 2, dc in next dc] 3 times; ch 2, V-st in next dc; [ch 2, dc in next dc] 4 times; ch 2, V-st in next dc; [ch 2, dc in next dc] 3 times; ch 2, V-st in 3rd ch of tch.
(18 dc, 17 ch-2 sp)
Increases fall on dc 1, 5, 10 and 14 of Row 4, again mirrored around the center.
Large tier: Fasten off after Row 5, leaving a 6 in (15.2 cm) tail. Check: 3.5 in (8.9 cm) wide × 2 in (5.1 cm) tall.
Weave in the ring tails now. Keep the long final tails on the medium and large tiers for sewing.
Make All Pieces
For one ornament, make:
- Small tier: 1 in A (Rows 1–3)
- Medium tier: 1 in A (Rows 1–4)
- Large tier: 1 in A (Rows 1–5)
All three pieces use Color A only. Color B is added in the border.
Layout (front view, points on one center line):
        [ SMALL  ]        top point = 0 in
      [  MEDIUM   ]       point 0.75 in (1.9 cm) below top
    [    LARGE      ]     point 1.6 in (4.1 cm) below top
Joining
To join the tiers, sew each lower tier’s ring to the back of the tier above, along the center line. Lay all three pieces wrong side up and find the center of each. On every tier, the center is the middle dc of Row 1 (dc 3 of 5).
Step 1: Place the medium tier behind the small tier so its ring sits behind the center of the small tier’s Row 2, 0.75 in (1.9 cm) below the small tier’s point. Line up the middle dc of Row 1 on both pieces.
Step 2: With the medium tier’s tail, whipstitch its ring to the small tier’s Row 1 center dc and Row 2 center sp, taking 4 to 5 small stitches. Stitch only through blue strands so nothing shows from the front.
Step 3: Place the large tier behind the medium tier so its ring sits behind the medium tier’s Row 2 center. That is 0.85 in (2.2 cm) below the medium point and 1.6 in (4.1 cm) below the top point. Sew it the same way with the large tier’s tail.
Tension: Sew snugly but don’t pull. Tight stitches pucker the center spoke and tilt the tiers forward.
Size checkpoint: The assembled tree should measure 3.6 in (9.1 cm) from the top point to the center of the large tier’s lower edge, and 3.5 in (8.9 cm) across the large tier. The lower edge of each tier must hang free below the tier above it.
Border (Cream Scallop Edging)
Work the edging separately on the curved lower edge of each tier, after joining. Because each lower edge hangs free, you can fold the tier above out of the way while you work. Edging the assembled tree also lets you see every scallop in its final position.
Border gauge: 3 sc fill each ch-2 sp plus its neighboring dc post. The two edging rows together add 0.4 in (1.0 cm) of depth and about 1/4 in (0.6 cm) at each corner.
Edging Row 1 (conversion): With RS facing, join B with sc in the first dc of the tier’s last row, 3 sc in each ch-2 sp across, sc in last dc. Ch 1, turn. The count is (2 corner dc × 1 sc) + (spaces × 3 sc):
– Small tier: 2 + (9 × 3) = 29 sc
– Medium tier: 2 + (13 × 3) = 41 sc
– Large tier: 2 + (17 × 3) = 53 sc
Skip the inner dc tops, because 3 sc per space already covers the width of the chain plus one dc.
Edging Row 2 (scallops): Sc in first sc, skip 1 sc, shell in next sc, skip 1 sc, sc in next sc; rep from * across. Fasten off.
– Small tier: 7 shells, 8 sc (43 sts)
– Medium tier: 10 shells, 11 sc (61 sts)
– Large tier: 13 shells*, 14 sc (79 sts)
Why the math works: Each scallop repeat uses 4 sc, plus 1 starting sc, so Row 1 needs a multiple of 4 plus 1. The space counts 9, 13 and 17 are each a multiple of 4 plus 1. Multiplying by 3 and adding 2 keeps that pattern, so Row 1 gives 29, 41 and 53. Every tier therefore begins and ends with a sc at its corners, with no half-repeats.
Hanging loop: Join B with a sl st into the small tier’s ring. Ch 30, then sl st into the ring again from front to back. Fasten off and weave the tail through the loop chains. The loop hangs about 2 in (5.1 cm).
Weave in all ends along blue spokes on the back.
Final Blocking
- Lightly mist the ornament, or dip it in cool water and press out the excess in a towel.
- Lay it face up on the blocking mat.
- Pin the top point, then pin the large tier’s corners 4 in (10.2 cm) apart.
- Pin the medium tier’s corners 3.25 in (8.3 cm) apart and the small tier’s 2.5 in (6.4 cm) apart, centered.
- Pin the tip of every scallop so the curve is smooth and each shell fans open.
- Open each mesh hole gently with a fingertip.
- Check: 4 in (10.2 cm) from the top point to the lowest scallop tip.
- Add spray starch if you want a stiffer ornament, then let it dry completely before unpinning.
Final Quality-Control Checklist
- Small, medium and large tiers have 10, 14 and 18 dc in their last rows.
- Edging Row 1 counts are 29, 41 and 53 sc.
- Scallop counts are 7, 10 and 13, with a sc at both corners.
- All three points sit on one straight center line.
- No seam stitches show on the front.
- Each scallop hem lies over the tier below without flipping up.
- Finished size is 4 in × 4 in (10.2 cm × 10.2 cm), plus a 2 in (5.1 cm) loop.
- All ends are woven in and trimmed.
Troubleshooting
Fan ruffles: Your chains are loose or too long. Recount the ch-2 spaces or go down a hook size.
Fan cups: Increases may be missing. Recount the dc after each growth row.
Tier is lopsided: The increases are off center. Check the V-st positions against the row instructions.
Scallops don’t come out even: Recount Edging Row 1. It must be 29, 41 or 53 sc.
Tiers tilt forward: The seam is too tight. Remove it and sew it again more loosely.
Ornament doesn’t hang straight: The loop is off center. Re-anchor it in the middle of the ring.
Care
Hand wash in cool water with mild soap, roll in a towel, and dry flat, re-pinning if needed. Store flat in tissue paper between seasons.

Final Notes
The measurements build on each other in a short, easy-to-check chain. A 1/8 in (0.3 cm) ring plus rows of 3/8 in (1.0 cm) gives tiers 1.25 in (3.2 cm), 1.625 in (4.1 cm) and 2 in (5.1 cm) tall. Stacking them at 0.75 in (1.9 cm) and 1.6 in (4.1 cm) gives a 3.6 in (9.1 cm) tree. The 0.4 in (1.0 cm) scallop edging brings it to 4 in × 4 in (10.2 cm × 10.2 cm). Check each tier against its numbers and the finished ornament will match.
Happy crocheting!