

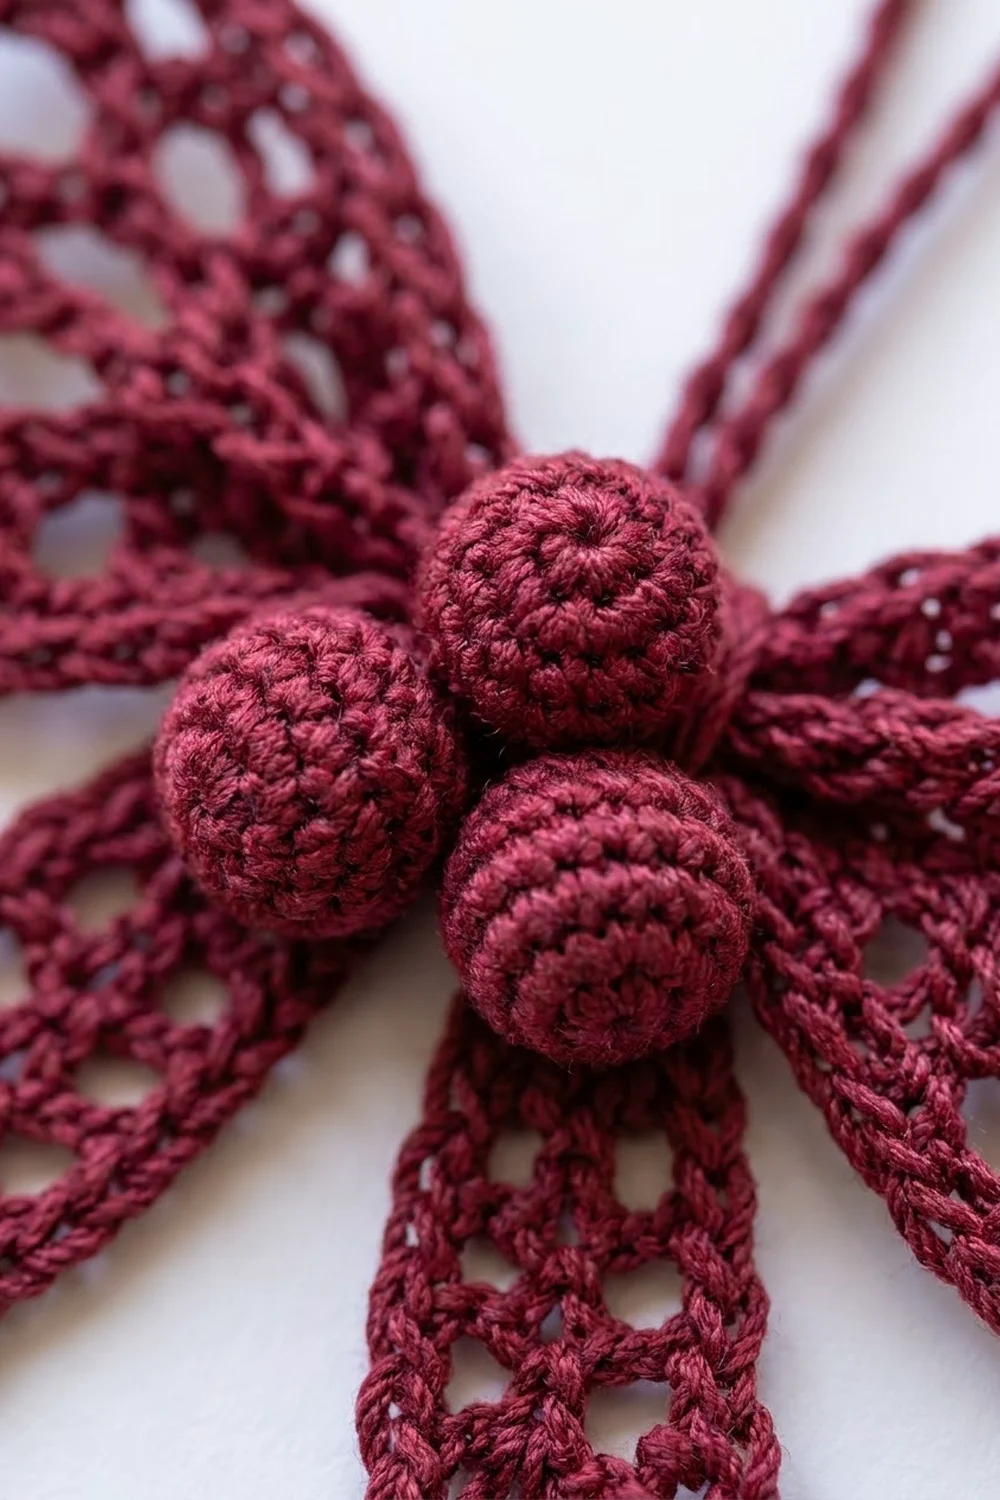
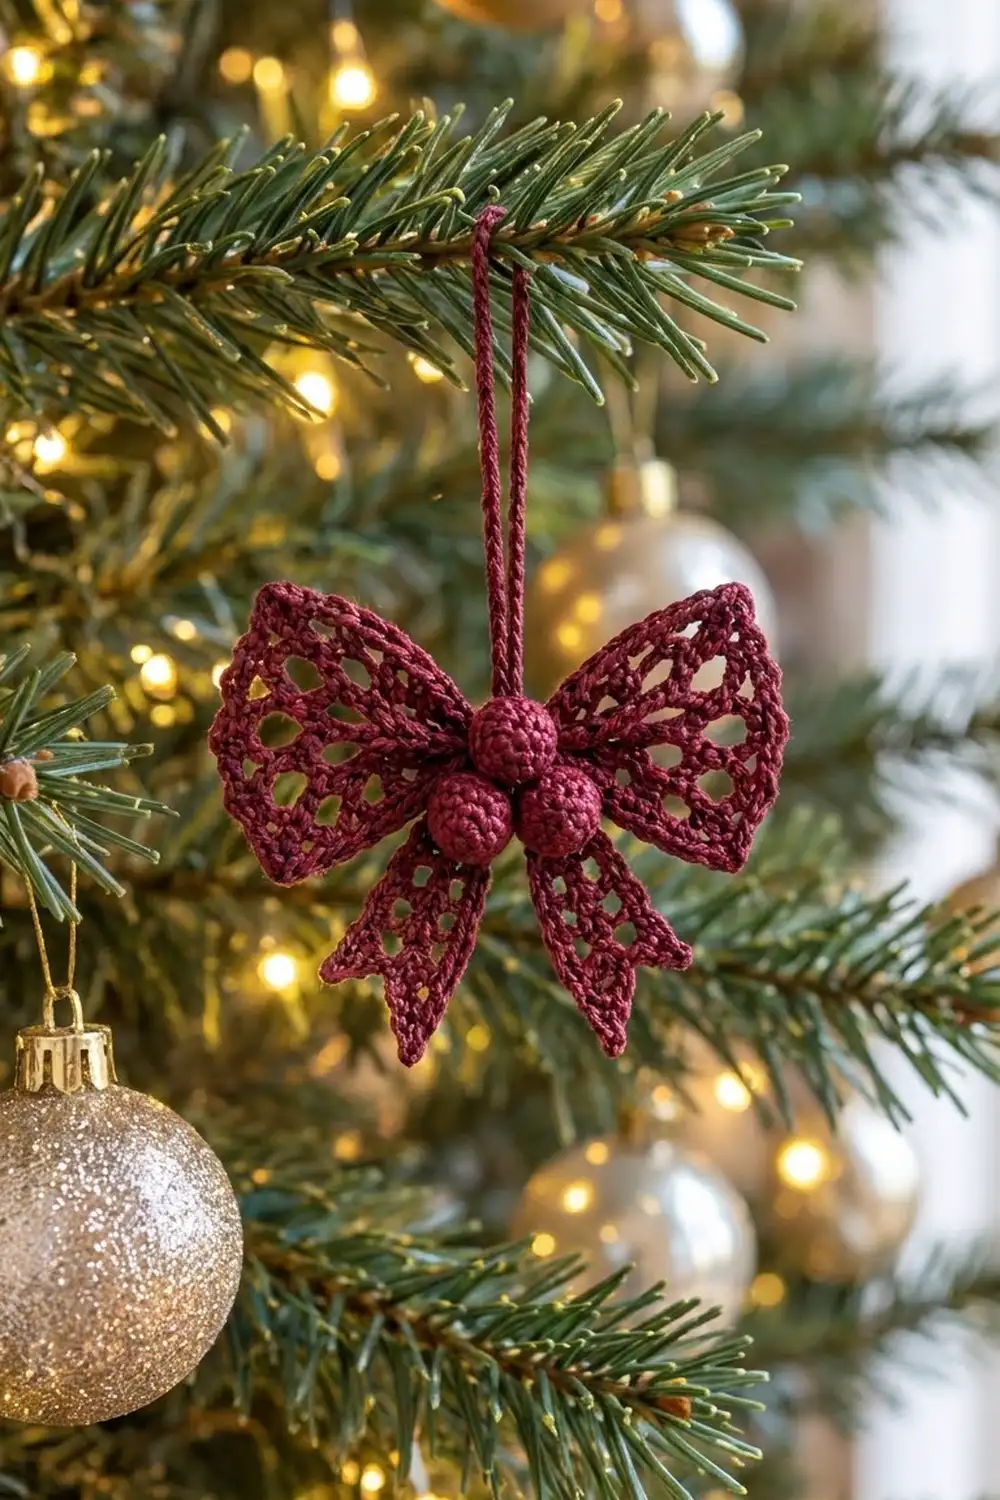
This little lace bow is a classic holiday ornament. Two open-mesh wings flare out from a wrapped center, two notched tails hang below, and three round berries sit together at the middle. A slim slip-stitch cord loop lets it hang straight on a branch.
The sample uses one deep cranberry wine thread. Mercerized cotton shows the lace clearly, and the single crochet outlines keep every edge crisp. The bow has a traditional, slightly vintage look.
The pattern uses US crochet terms. The finished bow measures about 3.5 in (8.9 cm) wide and 3 in (7.6 cm) tall, plus a 2 in (5.1 cm) hanging loop.
You’ll crochet nine small components, outline the wings and tails in single crochet, then sew everything together. The wings are worked in rows from the point outward, the tails from the top down, and the berries in the round.
Finished Size and Construction
- Finished size: 3.5 in (8.9 cm) wide x 3 in (7.6 cm) tall, plus a 2 in (5.1 cm) loop
- Skill level: Intermediate (fine thread, small parts)
- Terminology: US crochet terms
- Yarn weight: Size 10 crochet thread (Lace, weight 0)
- Hook: 1.75 mm steel hook
- Number of pieces: 1 ornament made from 9 components: 2 wings, 2 tails, 1 center band, 3 berries, 1 hanging loop
- Layout: wings left and right, band in the center, berries over the band, tails below, loop on top
- Wing size before border: 1.25 in (3.2 cm) from point to outer edge x 1.75 in (4.4 cm) across
- Wing size after border: 1.5 in (3.8 cm) x 2 in (5.1 cm)
- Tail size before border: 0.75 in (1.9 cm) wide x 1.5 in (3.8 cm) long
- Tail size after border: 1 in (2.5 cm) x 1.75 in (4.4 cm)
- Border depth: about 0.125 in (0.3 cm) on every edge
Materials
Thread: Use size 10 mercerized cotton crochet thread in a deep cranberry, wine or burgundy. It blocks crisply and keeps the lace open.
- Burgundy (only color): 6 g / 32 m (35 yd) per ornament
Tools:
- 1.75 mm steel crochet hook
- Fine tapestry needle that fits size 10 thread
- Small sharp scissors
- Stitch marker
- Blocking mat, rustproof pins and a spray bottle
- Optional: liquid starch or fabric stiffener
The thread quantity includes about 20 percent extra for a test piece, sewing tails and the hanging loop.
Abbreviations (US Terms)
- ch – chain
- sl st – slip stitch
- sc – single crochet
- hdc – half double crochet
- dc – double crochet
- sc2tog – single crochet 2 together (decrease)
- inc – 2 sc in the same stitch
- sp(s) – space(s)
- tch – turning chain
- MR – magic ring
- RS – right side
Turning chains: “Ch 5 (counts as dc + ch 2)” means the first 3 chains act as a dc and the last 2 make a ch-2 space. On the next row, work into the 3rd ch of that turning chain.
Gauge and Checkpoints
Gauge: 10 sc = 1 in (2.5 cm); 4 rows of dc = 1 in (2.5 cm); 11 rows of sc = 1 in (2.5 cm).
Make one wing first. It’s the best test piece. Check it at these points:
- After Row 1 of the wing: the fan is about 0.25 in (0.6 cm) tall.
- After Row 5 of the wing: 1.25 in (3.2 cm) from the point to the outer edge, and 1.75 in (4.4 cm) across the widest part.
- After the wing border: 1.5 in (3.8 cm) x 2 in (5.1 cm).
- After Rnd 4 of a berry: a cup about 0.5 in (1.3 cm) across.
If your wing is too big, switch to a 1.5 mm hook or work your chains more tightly. If it’s too small, switch to a 2.0 mm hook. Use the same hook for every component so the parts stay in proportion.
Wings (Make 2)
Each wing is worked in rows, starting at the narrow point that will sit under the center band.
Row 1 (RS): Ch 4. Work 4 dc in the 4th ch from the hook (the skipped ch-3 counts as a dc). (5 dc) Turn.
Row 2: Ch 5 (counts as dc + ch 2). Skip the first dc, dc in next dc, [ch 2, dc in next dc] 2 times, ch 2, dc in top of tch. (5 dc, 4 ch-2 sps) Turn.
Row 3 (fan growth row): Ch 5 (counts as dc + ch 2). Dc in next ch-2 sp, ch 2, dc in next dc, [ch 2, dc in next ch-2 sp, ch 2, dc in next dc] 2 times, ch 2, dc in last ch-2 sp, ch 2, dc in 3rd ch of tch. (9 dc, 8 ch-2 sps) Turn.
Row 4: Ch 5 (counts as dc + ch 2). Skip the first ch-2 sp, dc in next dc, [ch 2, dc in next dc] 6 times, ch 2, dc in 3rd ch of tch. (9 dc, 8 ch-2 sps) Turn.
Row 5: Repeat Row 4. (9 dc, 8 ch-2 sps)
Don’t fasten off. Go straight to the Wing Border (Rnd 6) in the Border section. With the border done, the wing measures 1.5 in (3.8 cm) x 2 in (5.1 cm).
Tails (Make 2)
Each tail is worked from the top down. Solid rows alternate with mesh rows, and the last row shapes the V-notch.
Foundation: Ch 9.
Row 1 (RS): Dc in the 4th ch from the hook and in each ch across (the skipped ch-3 counts as a dc). (7 dc) Turn.
Row 2 (mesh): Ch 4 (counts as dc + ch 1), skip next dc, dc in next dc, ch 1, skip next dc, dc in next dc, ch 1, skip next dc, dc in top of tch. (4 dc, 3 ch-1 sps = 7 sts) Turn.
Row 3 (solid): Ch 3 (counts as dc), [dc in next ch-1 sp, dc in next dc] 3 times, working the last dc into the 3rd ch of the tch. (7 dc) Turn.
Row 4: Repeat Row 2. (7 sts)
Row 5: Repeat Row 3. (7 dc)
Row 6 (notch row): Ch 3 (counts as dc), dc in next dc, hdc in next dc, sl st in center dc, hdc in next dc, dc in next dc, dc in top of tch. (7 sts: 4 dc, 2 hdc, 1 sl st)
The stitches get shorter toward the center, which forms the V. Before the border, the tail measures 0.75 in (1.9 cm) wide x 1.5 in (3.8 cm) long. Don’t fasten off. Go to the Tail Border (Rnd 7).
Center Band (Make 1)
Foundation: Ch 5.
Row 1: Sc in the 2nd ch from the hook and in each ch across. (4 sc) Ch 1, turn.
Rows 2–12: Sc in each sc across. (4 sc) Ch 1, turn.
The band measures 0.4 in (1.0 cm) x 1.1 in (2.8 cm). Fasten off, leaving an 8 in (20.3 cm) tail for sewing.
Berries (Make 3)
Work in continuous rounds. Mark the first stitch of each round.
Rnd 1: 6 sc in MR. (6 sc)
Rnd 2: Inc in each st around. (12 sc)
Rnd 3: [Sc in next st, inc] 6 times. (18 sc)
Rnd 4: Sc in each st around. (18 sc)
Rnd 5: [Sc in next st, sc2tog] 6 times. (12 sc)
Stuff the berry firmly with scraps of the same burgundy thread so no other color shows through.
Rnd 6: Sc2tog 6 times. (6 sc)
Fasten off, leaving a 6 in (15.2 cm) tail. Weave the tail through the front loops of the last 6 stitches, pull it closed, and keep the tail for sewing. Each berry is about 0.5 in (1.3 cm) across.
Hanging Loop (Make 1)
Ch 50. Sl st in the back bump of the 2nd ch from the hook and in each ch across. (49 sl st)
This makes a firm, rounded cord about 4.5 in (11.4 cm) long. Fasten off, leaving a 6 in (15.2 cm) tail.
Make All Pieces
Every component uses the one color.
- Burgundy: 2 wings, 2 tails, 1 center band, 3 berries, 1 hanging loop (9 components)
Layout, seen from the front:
              [ Hanging loop ]
                     |
 [ Wing L ]  >  [ Center band ]  <  [ Wing R ]
                  ( Berry )
             ( Berry ) ( Berry )
           [ Tail L ]   [ Tail R ]
            /                \
Each wing’s point faces the center. The tails angle outward about 20 degrees from vertical, with the V-notches pointing down.
Joining (Assembly)
Sew the parts together with whipstitch, using the thread tails. Match the layers one stitch to one stitch so nothing puckers.
- Wings: With the RS facing you, place the two wing points edge to edge. Sew the 3 tip stitches of one wing to the 3 tip stitches of the other.
- Pinch: Gather the center seam into small vertical pleats until the joined area is about 0.4 in (1.0 cm) tall. Wrap thread tightly around the pinch 3 times and secure it at the back.
- Tails: Place the top edges of both tails behind the pinch, angled outward. Sew the 5 middle sc of each tail’s top edge to the back of the pinch, stitch to stitch.
- Band: Wrap the band around the pinch from front to back so it covers the tops of the tails. Sew the short ends together at the back (Row 1 to Row 12), matching all 4 stitches.
- Berries: Sew one berry to the top of the band. Sew the other two side by side just below it, so the three form a triangle over the front of the band.
- Loop: Fold the cord in half and overlap the two ends by 0.5 in (1.3 cm). Sew the ends to the back of the band so the loop stands about 2 in (5.1 cm) above the bow.
Tension: Pull each whipstitch snug, but not so tight that the wing edges curl. The sc outline should stay flat.
Size checkpoint: The assembled bow should measure 3.5 in (8.9 cm) across the wings and 3 in (7.6 cm) from the top of the wings to the tail points.
Border
Each wing and each tail gets its own sc outline before assembly. This outline is the firm ridge that frames the lace.
Border gauge: 10 sc = 1 in (2.5 cm). Work 2 sc per dc row end, 2 sc per ch-2 space and 3 sc at each corner.
Wing Border
Rnd 6: Ch 1, turn. Working across Row 5: 3 sc in the first dc (corner), [2 sc in next ch-2 sp, sc in next dc] 7 times, 2 sc in next ch-2 sp, 3 sc in 3rd ch of tch (corner). Then continue down the side, around the point and up the other side as follows:
- Outer edge: 3 + (7 x 3) + 2 + 3 = 29 sc
- Side: 2 sc in each row end of Rows 4, 3, 2 and 1 = 8 sc
- Point: 1 sc in the foundation ch = 1 sc
- Other side: 2 sc in each row end of Rows 1, 2, 3 and 4 = 8 sc
Join with a sl st to the first sc. (46 sc total) Fasten off, leaving an 8 in (20.3 cm) tail.
Tail Border
Rnd 7: Ch 1, turn. Working across Row 6: 3 sc in the first dc (corner), sc in next dc, sc in next hdc, sl st in center sl st, sc in next hdc, sc in next dc, 3 sc in top of tch (corner). Then continue around the tail as follows:
- Notched edge: 3 + 1 + 1 + 1 + 1 + 1 + 3 = 11 sts (10 sc + 1 sl st)
- Side: 2 sc in each row end of Rows 5–1 = 10 sc
- Top edge (into the foundation ch): 3 sc in first ch, sc in next 5 ch, 3 sc in last ch = 11 sc
- Other side: 2 sc in each row end of Rows 1–5 = 10 sc
Join with a sl st to the first sc. (42 sts: 41 sc + 1 sl st) Fasten off, leaving an 8 in (20.3 cm) tail.
Why the math works: A dc row is about as tall as 2 sc are wide, so 2 sc per row end keep the sides flat. A ch-2 space spans 2 stitches, so 2 sc fill it without stretching. The 3 sc at each corner add the 2 extra stitches needed to turn the corner. Each edge stitch is worked once, so the border adds an even 0.125 in (0.3 cm) all around.
Final Blocking
- Spray the assembled bow lightly until it’s damp, not soaked, and lay it face up on the mat.
- Open each wing into a smooth fan and pin the 3 sc at each outer corner. Pin so the wings measure 3.5 in (8.9 cm) from tip to tip.
- Pin the tails at a slight outward angle, with one pin in each fishtail point.
- Nudge each mesh hole open with a pin.
- For a stiffer ornament, brush on a thin layer of starch and re-pin.
- Let it dry completely, then remove the pins.
Final Quality-Control Checklist
- Each wing has 9 dc and 8 ch-2 sps in Row 5, and 46 sc in its border.
- Each tail has 7 sts per row and 42 sts in its border.
- Both wings measure 1.5 in (3.8 cm) x 2 in (5.1 cm).
- Both tails measure 1 in (2.5 cm) x 1.75 in (4.4 cm).
- All three berries are firm and about 0.5 in (1.3 cm) across.
- The band hides the pinch and the tops of the tails.
- The loop is centered and stands 2 in (5.1 cm) tall.
- All ends are woven in at the back.
Troubleshooting
- The wing cups or ruffles: Your chains are too loose. Tighten the ch-2s or go down a hook size.
- The wing curls inward: The border is too tight. Redo it with slightly looser sc in the ch-2 spaces.
- The tail notch looks flat: Check that the center stitch is a sl st in both Row 6 and the border.
- Stuffing shows through a berry: Add more stuffing, or make the berries with a 1.5 mm hook.
- The bow tilts when hung: Re-sew the loop exactly at the center back of the band.
Care
Spot clean with cool water and mild soap, then reshape and dry flat. Store the bow flat in tissue paper so the wings keep their shape.
Final Notes
Here’s how the measurements build. At a gauge of 10 sc per 1 in (2.5 cm), each wing measures 1.25 in (3.2 cm) by 1.75 in (4.4 cm), and its border brings it to 1.5 in (3.8 cm) by 2 in (5.1 cm). Each tail grows from 0.75 in (1.9 cm) by 1.5 in (3.8 cm) to 1 in (2.5 cm) by 1.75 in (4.4 cm). The assembled ornament measures 3.5 in (8.9 cm) by 3 in (7.6 cm), plus a 2 in (5.1 cm) loop.
Happy crocheting!