

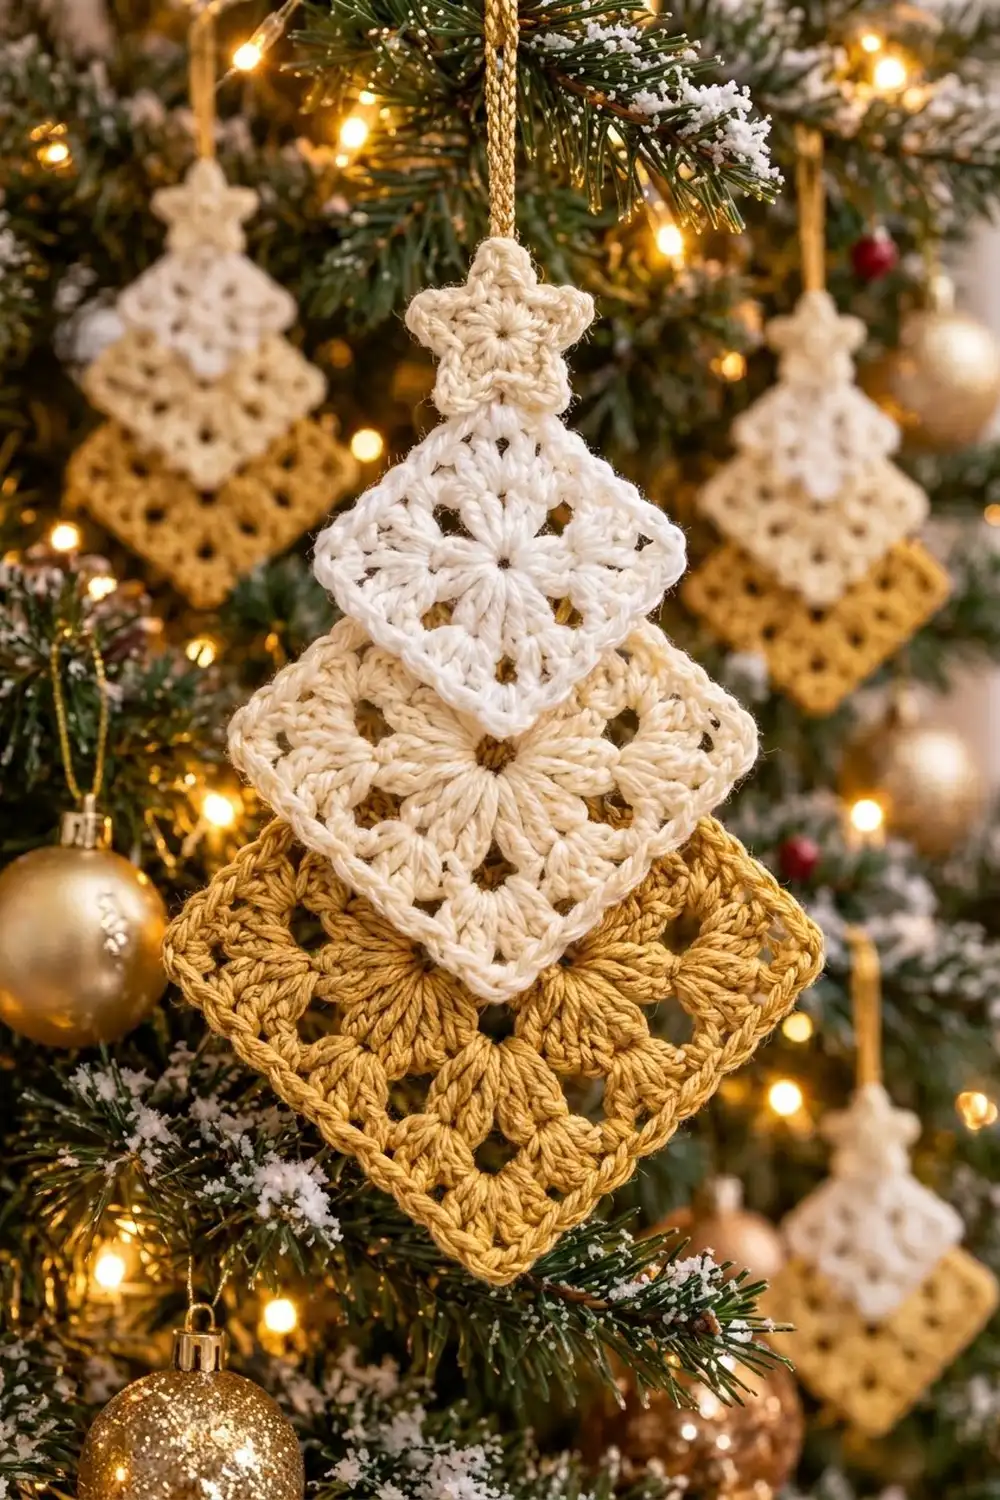
The Golden Tier ornament is a modern little Christmas tree built from three granny squares turned on point. A small white diamond sits at the top, a cream diamond in the middle, and a larger mustard-gold diamond forms the base. A cream star tops the tree, and a gold cord loop lets it hang from a branch.
The palette is soft and warm: white, ivory, and gold read as snow, candlelight, and tinsel. Every square starts with the same flower center of eight cluster petals, so the three tiers look like one design while still growing from top to bottom.
This pattern uses US crochet terms. The finished ornament measures about 5.7 in (14.5 cm) wide and 11.3 in (28.7 cm) tall from the bottom tip to the top of the star, not counting the 2.5 in (6.4 cm) hanging loop.
Construction is simple. You crochet three squares in the round, each finished with a single crochet edge, then crochet a tiny star and a slip-stitch cord. You stack the squares with even overlaps, tack them together with a yarn needle, and add the star and loop at the top.
Finished Size and Construction
- Finished size: 5.7 in (14.5 cm) wide x 11.3 in (28.7 cm) tall, plus a 2.5 in (6.4 cm) loop
- Skill level: Easy / advanced beginner
- Terminology: US crochet terms
- Yarn weight: DK (light worsted, #3), cotton or cotton blend
- Hook: 3.5 mm (E-4)
- Number of pieces: 5 (3 squares, 1 star, 1 loop)
- Layout: 3 squares stacked vertically on point, top to bottom small, medium, large
- Piece sizes (with edge): small 2.5 in (6.4 cm), medium 3.25 in (8.3 cm), large 4 in (10.2 cm) per side
- Size before edge round: small 2.25 in (5.7 cm), medium 3 in (7.6 cm), large 3.75 in (9.5 cm)
- Edge depth: about 0.125 in (0.3 cm) per side, adding 0.25 in (0.6 cm) to each square’s total width
Materials
Choose a smooth, mercerized DK cotton. It shows the cluster petals clearly and blocks crisply, so the diamonds keep sharp points when they hang. Wool blends work too, but they come out softer and a little larger.
- Color A – Bright White: 5 g, about 11 m (12 yd), for the small square
- Color B – Cream / Ivory: 8 g, about 18 m (20 yd), for the medium square and star
- Color C – Mustard Gold: 12 g, about 26 m (28 yd), for the large square and loop
These amounts include a safety margin of about 30 percent for your gauge swatch and weaving in ends.
Tools:
– 3.5 mm (E-4) crochet hook
– Yarn needle
– Scissors
– Stitch marker
– Rust-proof pins and a blocking mat or folded towel
– Spray bottle with water
– Ruler or tape measure
Abbreviations (US Terms)
- ch – chain
- sl st – slip stitch
- sc – single crochet
- hdc – half double crochet
- dc – double crochet
- sp – space
- st(s) – stitch(es)
- MR – magic ring
- beg – beginning
Special stitches:
- Beg cluster (beg cl): Ch 3, then (yarn over, insert hook into the ring, pull up a loop, yarn over, pull through 2 loops) 2 times, yarn over, pull through all 3 loops on hook.
- Cluster (cl): (Yarn over, insert hook into the ring, pull up a loop, yarn over, pull through 2 loops) 3 times, yarn over, pull through all 4 loops on hook.
- Granny group: 3 dc worked into the same space.
Gauge and Checkpoints
Make the small square first and treat it as your gauge swatch. Measure after a light steam or a mist of water, laid flat without stretching.
- After Round 2: 2.25 in (5.7 cm) per side, 36 dc
- After Round 3: 3 in (7.6 cm) per side, 48 dc
- After Round 4: 3.75 in (9.5 cm) per side, 60 dc
- Edge gauge: about 4.3 sc per inch (1.7 sc per cm), so 11 sc covers 2.5 in (6.4 cm)
Each granny round adds about 0.75 in (1.9 cm) to the width of the square, which is 0.375 in on each edge.
Too big? Go down to a 3.25 mm hook, or check that your chains are not loose. Too small? Go up to a 3.75 mm hook. Being a little off is fine as long as all three squares use the same hook, because the overlaps are measured relative to each square.
Square Center (All Three Squares)
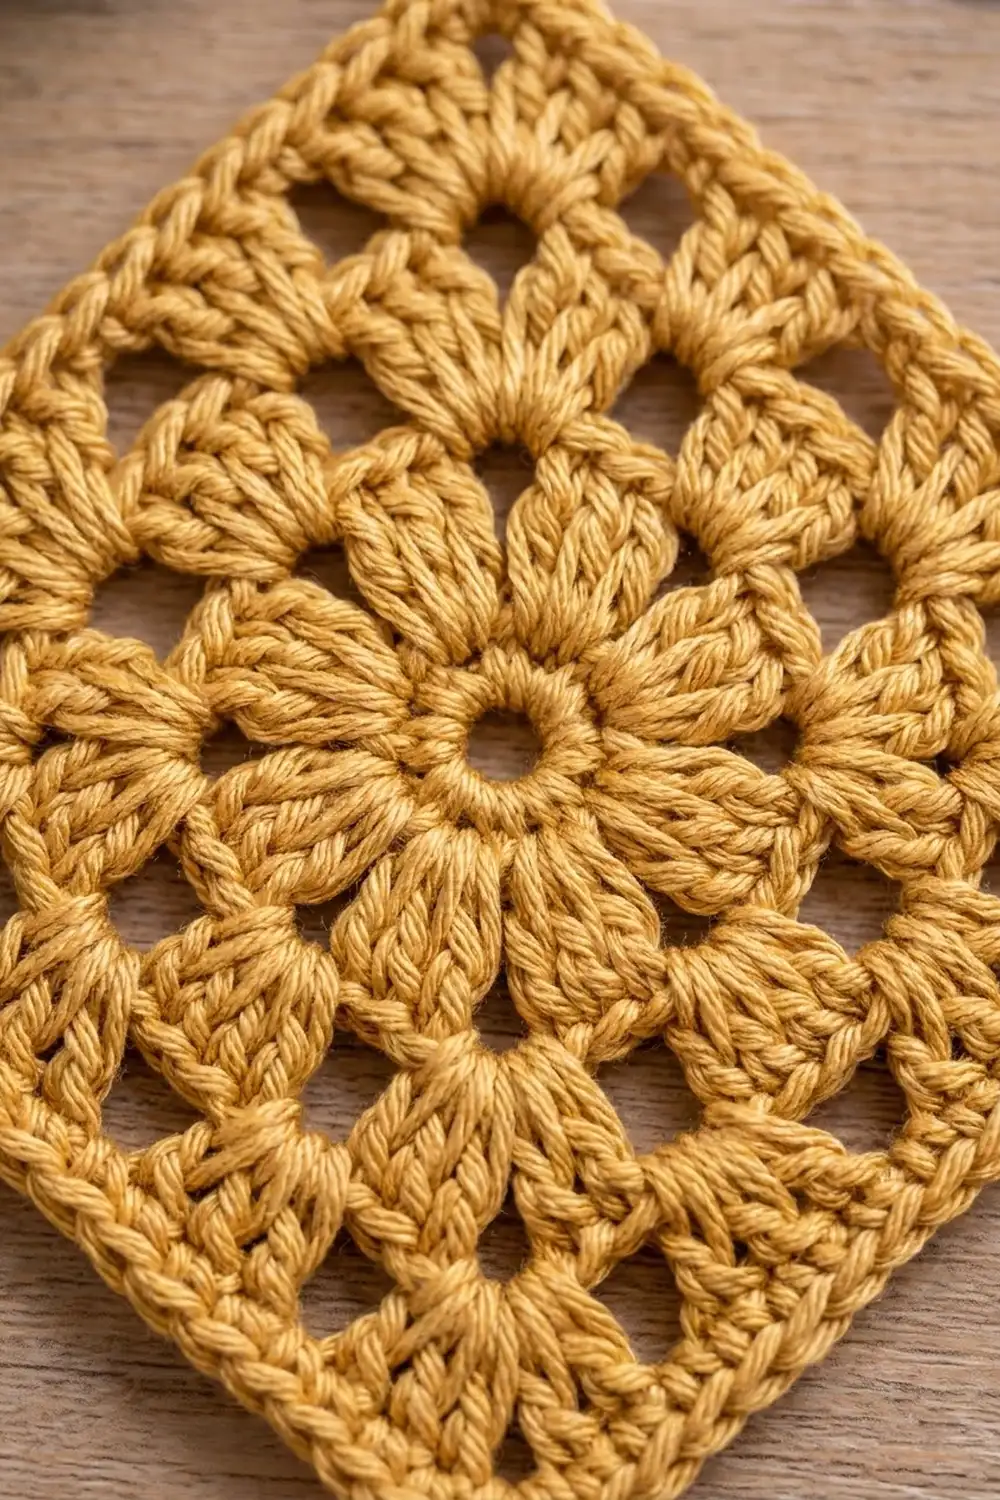
Work Rounds 1 and 2 the same way for every square. Use Color A for the small square, Color B for the medium square, and Color C for the large square.
Round 1 (flower center): Make a MR. Work a beg cl in the ring, ch 3, cl in ring, ch 3; repeat from * 6 more times. Join with a sl st to the top of the beg cl. Pull the ring snug but leave a small center hole.
Count: 8 clusters, 8 ch-3 sp.
Round 2 (squaring round): Sl st into the next ch-3 sp. Ch 3 (counts as dc), (2 dc, ch 2, 3 dc) in the same sp for the first corner. Work 3 dc in the next ch-3 sp. (3 dc, ch 2, 3 dc) in the next ch-3 sp, 3 dc in the next ch-3 sp; repeat from * 2 more times. Join with a sl st to the top of the beg ch-3.
Count: 36 dc total (12 granny groups), 4 ch-2 corners, 9 dc per side.
The petals now sit in a ring, and the groups worked between corners leave the small gaps you see around the flower in the photo.
Checkpoint: 2.25 in (5.7 cm) per side.
Small Square (Color A – White)
Work Rounds 1–2 above. Do not fasten off. Go straight to the edge round in the Border section (small square). That square becomes the top tier.
Medium Square (Color B – Cream)
Work Rounds 1–2, then:
Round 3 (granny round): Sl st in the next 2 dc and into the corner ch-2 sp. Ch 3 (counts as dc), (2 dc, ch 2, 3 dc) in the same sp. [3 dc in the next gap between granny groups] 2 times, (3 dc, ch 2, 3 dc) in the next corner sp; repeat from * 2 more times, then [3 dc in the next gap] 2 times. Join with a sl st to the top of the beg ch-3.
Count: 48 dc total (16 granny groups), 4 ch-2 corners, 12 dc per side.
Checkpoint: 3 in (7.6 cm) per side. Now work the medium square edge round in the Border section.
Large Square (Color C – Gold)
Work Rounds 1–3 as for the medium square, then:
Round 4 (granny round): Sl st in the next 2 dc and into the corner ch-2 sp. Ch 3, (2 dc, ch 2, 3 dc) in the same sp. [3 dc in the next gap] 3 times, (3 dc, ch 2, 3 dc) in the next corner sp; repeat from * 2 more times, then [3 dc in the next gap] 3 times. Join.
Count: 60 dc total (20 granny groups), 4 ch-2 corners, 15 dc per side.
Checkpoint: 3.75 in (9.5 cm) per side. Now work the large square edge round in the Border section.
Star Topper (Color B – Cream)
Round 1: Make a MR, ch 1, work 10 sc in the ring. Join with a sl st to the first sc.
Count: 10 sc.
Round 2 (points): Ch 4, sl st in the 2nd ch from the hook, sc in the next ch, hdc in the next ch, skip the next sc of Round 1, sl st in the following sc; repeat from * 4 more times. The last sl st lands in the joining st.
Count: 5 points, each using 2 sc of Round 1 (5 x 2 = 10).
Fasten off, leaving a 10 in (25.4 cm) tail for sewing. The star measures about 1.25 in (3.2 cm) from point to point.
Hanging Loop (Color C – Gold)
Ch 31. Sl st in the back bump of the 2nd ch from the hook and in each ch across.
Count: 30 sl st.
The cord is about 5 in (12.7 cm) long. Fold it in half to make a 2.5 in (6.4 cm) loop. Fasten off, leaving an 8 in (20.3 cm) tail. Working into the back bumps gives the cord its twisted, rope-like look.
Make All Pieces
- Color A: 1 small square
- Color B: 1 medium square, 1 star
- Color C: 1 large square, 1 loop
Layout (front view, top to bottom):
        [ loop  C ]
        [ star  B ]
       <  small A  >
      <  medium B   >
     <   large C     >
Each diamond sits on the same vertical center line. Upper pieces lie in front of lower pieces.
Joining
Method: Overlap stacking, tacked with a yarn needle and matching yarn from the front piece’s edge round.
Placement: Lay the large square flat on point. Put the medium square on top, centered, so its bottom corner sits 1.75 in (4.4 cm) below the large square’s top corner. Pin it in place. Place the small square on the medium square the same way: its bottom tip 1.75 in (4.4 cm) below the medium square’s top corner.
Stitch-to-stitch logic: Because both diamonds share a center line, the front square’s two lower edges cross the back square’s two upper edges about 1.2 in (3.0 cm) up from the front square’s tip. At this edge gauge, that is 5 sc. On each lower edge of the front square, tack the corner ch-2 sp and then the first 5 sc going up on each side. Go through the back loop of each front sc and catch only the front layer of fabric on the back square underneath. That is 1 corner and 10 sc tacked per overlap, and it is the same for both joins because the overlap is the same.
Tension: Pull each tack just snug enough to close the gap. Pulling harder will pucker the back square or curl the front tip. Check the back now and then: the stitches should be small and should not show through to the front.
Star and loop: Sew the star centered over the small square’s top corner so the corner tucks 0.25 in (0.6 cm) under the star’s lowest two points. Slide both loop ends behind the star, sew them to the star and to the small square’s top corner, then weave in the ends.
Size checkpoint: The stacked squares measure 3.5 + 4.6 + 5.7 = 13.8 in, minus two overlaps of 1.75 in, so 10.3 in (26.2 cm). The star adds 1 in (2.5 cm), for 11.3 in (28.7 cm) in total. The width is set by the large square’s diagonal, 5.7 in (14.5 cm).
Border
Each square gets its own sc edge round before stacking. The assembled tree is not bordered as a whole, because the stepped outline is part of the design.
Border gauge: about 4.3 sc per inch (1.7 sc per cm).
Small square edge (after Round 2): Sl st in the next 2 dc and into the corner sp. Ch 1, (sc, ch 2, sc) in the corner sp, sc in each dc to the next corner, (sc, ch 2, sc) in the corner sp, sc in each dc to the next corner; repeat around. Join with a sl st to the first sc.
Count: 36 sc (one per dc) + 8 corner sc = 44 sc; 11 sc per side including its 2 corner sc; 4 ch-2 corners.
Medium square edge (after Round 3): Work the same way.
Count: 48 sc (one per dc) + 8 corner sc = 56 sc; 14 sc per side; 4 ch-2 corners.
Large square edge (after Round 4): Work the same way.
Count: 60 sc (one per dc) + 8 corner sc = 68 sc; 17 sc per side; 4 ch-2 corners.
Why the math works: Each side has a dc count of 9, 12, or 15 from the granny rounds. The edge round adds one sc at each end, at the corners, giving 11, 14, or 17. At 4.3 sc per inch, those counts come to 2.5 in, 3.25 in, and 4 in (6.4, 8.3, and 10.2 cm), which matches each square’s measured size. The ch-2 corners stop the points from cupping, so the diamonds stay sharp. Fasten off each square and weave in the ends before joining.
Final Blocking
- Before joining, mist each square lightly with water until it is damp, not soaked.
- Pin each square on point on the mat to its target size: 2.5 in, 3.25 in, and 4 in (6.4, 8.3, and 10.2 cm) per side.
- Put a pin in each ch-2 corner to sharpen the points. Pin each star point too.
- Gently open up the eight petals and the gaps between granny groups with your fingertips.
- Leave everything to dry completely, usually 4–6 hours.
- After joining, press the assembled tree lightly under a cloth with a warm iron, without gliding, to flatten the overlaps.
Final Quality-Control Checklist
- Small, medium, and large squares measure 2.5 in, 3.25 in, and 4 in (6.4, 8.3, and 10.2 cm) per side.
- Edge counts are 44, 56, and 68 sc, with 4 ch-2 corners each.
- All three diamonds line up on one vertical center line.
- Both overlaps measure 1.75 in (4.4 cm).
- Tacking does not show from the front.
- The star is centered and the loop is firmly attached behind it.
- Total height is about 11.3 in (28.7 cm) and width about 5.7 in (14.5 cm).
- All ends are woven in and trimmed.
Troubleshooting
Round 1 is ruffled or cupped: Your ch-3 spaces may be too long. Try ch 2, or tighten the cluster tops.
Center hole is too big: Pull the magic ring tighter before joining, and weave the tail around the ring once more.
Square edges bow outward: Check that each side has exactly 9, 12, or 15 dc before the edge round. Extra groups make the sides wavy.
Corners are rounded: Make sure you work (sc, ch 2, sc) in each corner, and pin the corners firmly while blocking.
Tree leans to one side: Re-pin all three pieces along a ruler laid on the center line before tacking.
Star points flop: Tighten your hdc, or sew each lower point to the small square with one tiny stitch.
Ornament twists when hanging: Sew the loop ends a little apart, about 0.5 in (1.3 cm), behind the star.
Care
Hand wash in cool water with mild soap, press out the water in a towel, and dry flat while reshaping the points. Store it flat in tissue paper so the star stays crisp.
Final Notes
The measurement chain is short and easy to check. The flower center gives 36 dc and 2.25 in (5.7 cm). Each granny round adds 3 dc per side and 0.75 in (1.9 cm). The sc edge adds 2 corner stitches per side and 0.25 in (0.6 cm), so the squares finish at 2.5 in, 3.25 in, and 4 in (6.4, 8.3, and 10.2 cm). Stacked with two 1.75 in (4.4 cm) overlaps and topped with the star, they make a tree 11.3 in (28.7 cm) tall and 5.7 in (14.5 cm) wide. Make a whole set in the same three colors for a cohesive tree, or try silver and white for a frosty version.
Happy crocheting!