

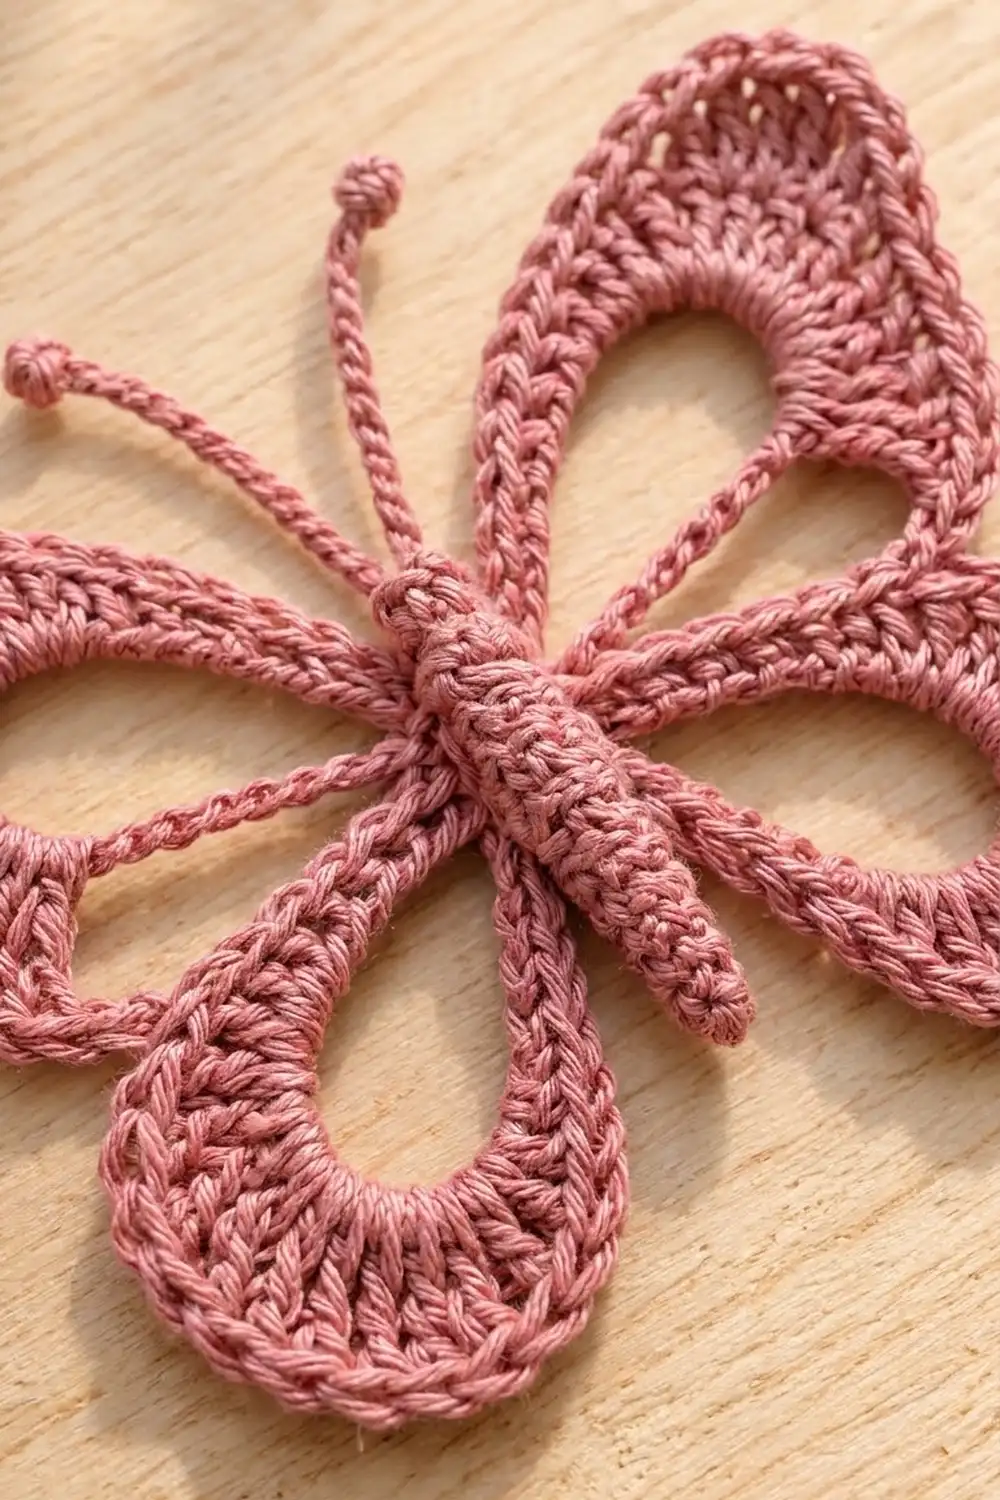
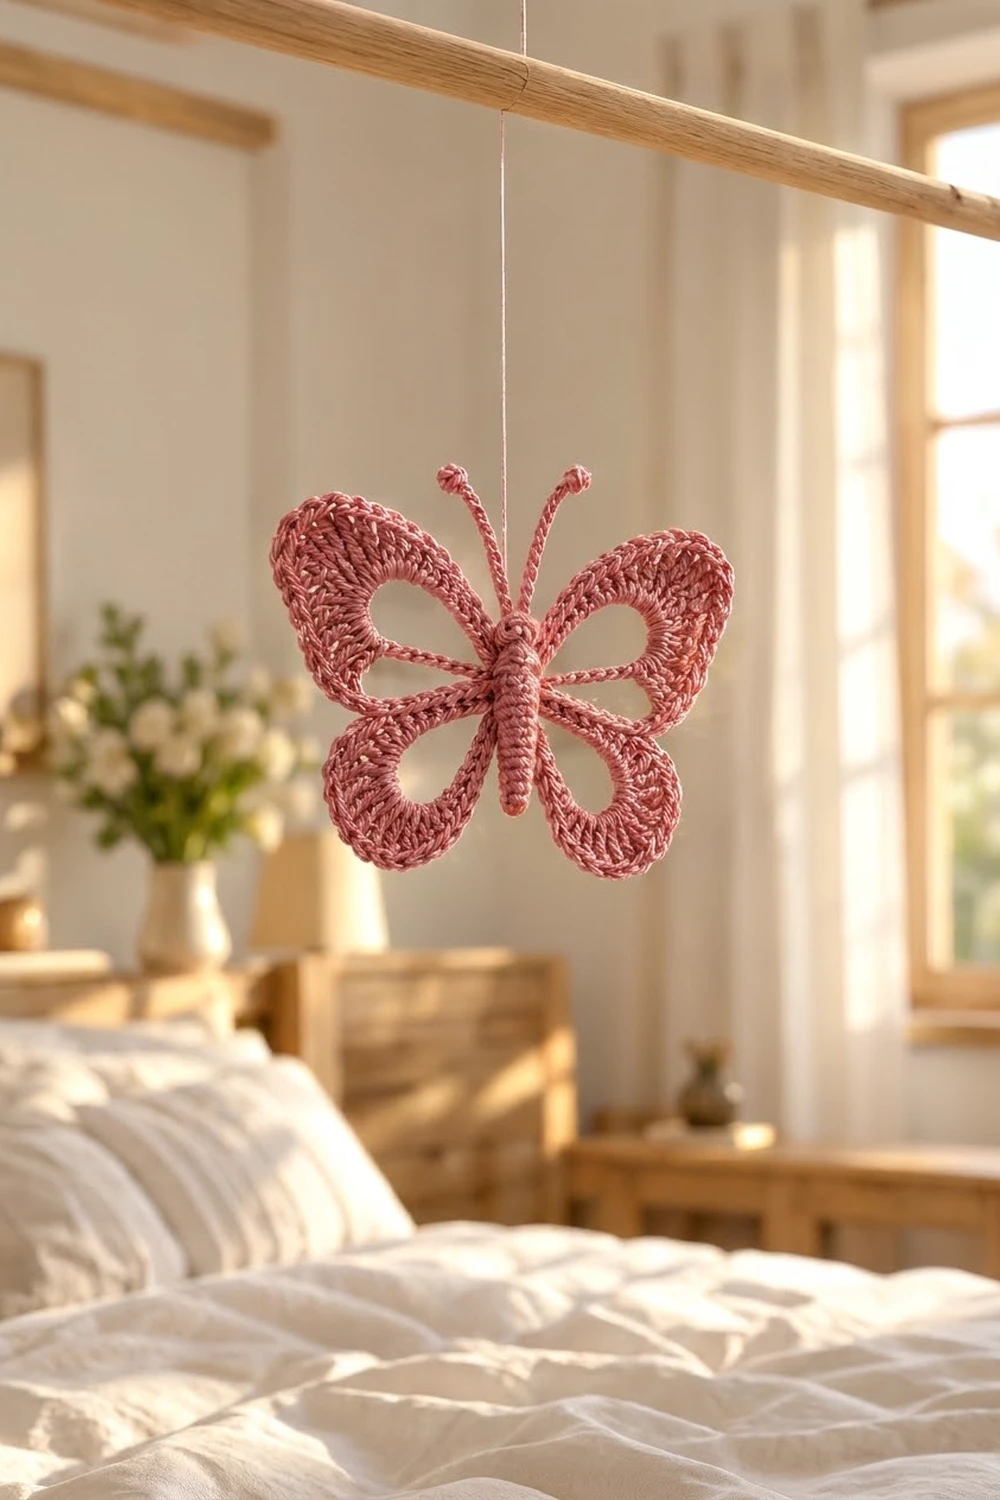
The Rosewing Lace Butterfly is a light, open motif with four airy wings and a sculpted center body. Each wing starts as a simple loop of chain. A band of stitches that grows taller toward the outer edge turns that loop into a wing, and the chain left on the inside frames a clean teardrop-shaped hole.
The sample is worked in one dusty rose cotton thread, which shows off the rope-textured rim and the ridged body. The style is part lace and part appliqué. It is delicate enough to hang as an ornament and sturdy enough to sew onto a bag, a cardigan, or a gift wrap.
This pattern uses US crochet terms throughout. The finished butterfly measures 4.5 in (11.4 cm) wide and 3.75 in (9.5 cm) tall without the antennae, or about 4.75 in (12.1 cm) tall including them.
Construction is simple:
- Wing unit: A small center ring holds four chain loops. A shaped band of stitches is worked along each loop, then one round of reverse single crochet (rev sc) runs around everything.
- Body: A small padded tube is worked in a spiral. The antennae are chained straight off the head, and the body is sewn over the center ring.
Finished Size and Construction
- Finished size: 4.5 in (11.4 cm) wide × 3.75 in (9.5 cm) tall; 4.75 in (12.1 cm) tall with antennae
- Skill level: Intermediate (chain counting, graduated stitch heights, reverse single crochet)
- Terminology: US crochet terms
- Yarn weight: Size 3 cotton crochet thread (light fingering)
- Hook: 2.25 mm (US B-1)
- Number of pieces: 1 finished motif, made from 2 components (wing unit, and body with antennae) that are sewn together
- Layout: Single motif with four wings: two upper wings and two smaller lower wings around one center
- Wing unit size before border: 4.25 in (10.8 cm) wide × 3.5 in (8.9 cm) tall
- Border depth: About 1/8 in (0.3 cm) on every outer edge
- Body size: 1.9 in (4.8 cm) long × 0.3 in (0.8 cm) wide
Materials
Yarn: Use a firm, mercerized cotton thread in size 3. Mercerized cotton holds the wing shape, shows the stitch definition clearly, and blocks crisp. Avoid fuzzy or very stretchy fibers, because the open chain loops will sag.
- Dusty rose: about 8 g / 25 m (27 yd) for one butterfly
This quantity includes a margin of about 25% for your gauge swatch, the stuffing scraps, and weaving in the ends. One butterfly actually uses about 6 g.
Tools:
- 2.25 mm (US B-1) crochet hook
- Tapestry needle with a small eye
- Sharp scissors
- 2 locking stitch markers
- Rustproof pins and a foam blocking mat
- Spray starch or a starch-and-water mix (optional, for stiffer wings)
- Ruler or tape measure marked in inches and cm
Abbreviations (US Terms)
- ch – chain
- sl st – slip stitch
- sc – single crochet
- hdc – half double crochet
- dc – double crochet
- tr – treble crochet
- sc2tog – single crochet 2 together
- rev sc – reverse single crochet (crab stitch)
- st(s) – stitch(es)
- rnd(s) – round(s)
- sk – skip
Special stitches
Reverse single crochet (rev sc): With the right side facing, work from left to right (right-handed). Insert the hook into the next stitch to the right, yarn over, pull up a loop, yarn over, and pull through both loops. Each rev sc twists into a small rope bead, which is what makes the raised rim.
4-dc bobble: Yarn over, insert the hook into the stitch, and pull up a loop. Yarn over and pull through 2 loops. Repeat this 3 more times in the same stitch (5 loops on the hook). Yarn over and pull through all 5 loops.
Gauge and Checkpoints
Gauge: 18 sc = 2 in (5.1 cm), and 10 ch = about 1 in (2.5 cm), with a 2.25 mm hook.
Gauge matters here because the wing size depends entirely on chain length and stitch height. Test one wing first:
- Ch 4 and sl st to form a ring.
- Make one upper wing loop (ch 30, sl st in ring).
- Work the upper wing band from Rnd 2.
Check these measurements as you go:
- After Rnd 1: The center ring is about 0.25 in (0.6 cm) across. Each upper loop, laid flat as a teardrop, is about 1.5 in (3.8 cm) long.
- After Rnd 2: Each upper wing reaches 2 in (5.1 cm) from the ring center to the outer tip. The whole wing unit is 4.25 in (10.8 cm) wide.
- After Rnd 3: The wing unit is 4.5 in (11.4 cm) wide and 3.75 in (9.5 cm) tall.
- Body: 1.9 in (4.8 cm) long.
If your wing is too big (more than 1/4 in [0.6 cm] over), go down to a 2.0 mm hook, or tighten your chains. Loose chains are the most common cause.
If your wing is too small, go up to a 2.5 mm hook.
Don’t change the chain counts. They control how the stitches are spread along the band.
Wing Unit
The wing unit is worked as one continuous piece with the right side facing. Leave a 6 in (15.2 cm) tail at the start.
Rnd 1 (chain loops):
- Ch 4 and sl st into the first ch to form the center ring.
- Upper right wing: Ch 30, sl st into the ring.
- Lower right wing: Ch 22, sl st into the ring.
- Lower left wing: Ch 22, sl st into the ring.
- Upper left wing: Ch 30, sl st into the ring.
Check that you have 4 loops: 30 + 22 + 22 + 30 = 104 ch, plus the 4-ch ring.
Lay the loops flat with no twists before you go on. The upper loops point up and out, and the lower loops point down and out.
Rnd 2 (graduated wing bands): Work into the back bump of each chain so the front of the chain stays smooth as the inner frame of the opening. The short stitches sit next to the body and the tall stitches sit at the outer edge.
Upper right wing (30 ch):
- Ch 1. Sc in each of the first 4 ch (4 sts).
- Hdc in each of the next 3 ch (3 sts).
- Dc in each of the next 3 ch (3 sts).
- 2 dc in each of the next 2 ch (4 sts).
- 2 tr in each of the next 6 ch (12 sts).
- 2 dc in each of the next 2 ch (4 sts).
- Dc in each of the next 3 ch (3 sts).
- Hdc in each of the next 3 ch (3 sts).
- Sc in each of the last 4 ch (4 sts).
- Sl st into the ring.
This uses 30 chains (4+3+3+2+6+2+3+3+4) and makes 40 sts.
Lower right wing (22 ch):
- Ch 1. Sc in each of the first 3 ch (3 sts).
- Hdc in each of the next 3 ch (3 sts).
- Dc in each of the next 2 ch (2 sts).
- 2 dc in each of the next 6 ch (12 sts).
- Dc in each of the next 2 ch (2 sts).
- Hdc in each of the next 3 ch (3 sts).
- Sc in each of the last 3 ch (3 sts).
- Sl st into the ring.
This uses 22 chains (3+3+2+6+2+3+3) and makes 28 sts.
Lower left wing: Work the same as the lower right wing (28 sts), then sl st into the ring.
Upper left wing: Work the same as the upper right wing (40 sts), then sl st into the ring.
Rnd 2 total: 40 + 28 + 28 + 40 = 136 sts.
In each band, the doubled stitches fan out at the outer tip. This bends each loop into its finished shape and leaves a teardrop opening about 0.75 in (1.9 cm) across in the upper wings and 0.5 in (1.3 cm) across in the lower wings.
Checkpoint: Measure the width now, with the work pressed flat. It should be 4.25 in (10.8 cm) wide × 3.5 in (8.9 cm) tall. This is your size before the border.
Don’t fasten off. The border (Rnd 3) comes next.
Body with Antennae
The body is worked in a continuous spiral. Place a marker in the first stitch of each round and move it up as you go.
Head and neck:
- Rnd 1: Work 6 sc into a magic ring and pull it tight (6 sts).
- Rnd 2: (Sc in next st, 2 sc in next st) 3 times (9 sts).
- Rnds 3–4: Sc in each st around (9 sts).
- Rnd 5: (Sc in next st, sc2tog) 3 times (6 sts). This decrease makes the neck.
Thorax and abdomen:
- Rnd 6: (Sc in next st, 2 sc in next st) 3 times (9 sts).
- Rnds 7–14: Sc in each st around (9 sts). Each round makes one visible ridge.
- Before closing, stuff the body lightly with thread scraps. Push the scraps in with the back of the hook. The body should feel firm but should not stretch the stitches.
- Rnd 15: (Sc in next st, sc2tog) 3 times (6 sts).
- Rnds 16–18: Sc in each st around (6 sts). This makes the tapered tail.
- Rnd 19: Sc2tog 3 times (3 sts).
Fasten off, leaving a 12 in (30.5 cm) tail for sewing. Weave the tail through the last 3 sts and pull them closed.
Body checkpoint: 19 rounds at about 10 rounds per inch = 1.9 in (4.8 cm) long and 0.3 in (0.8 cm) wide.
Antennae (make 2): Join the thread with a sl st at the top of the head, slightly to one side of center.
- Ch 15.
- Work a 4-dc bobble in the 3rd ch from the hook. The 2 skipped chains curl over the top and make the round knob.
- Sl st in each of the remaining 12 ch (12 sl sts). The slip stitches stiffen the antenna.
- Sl st into the head.
Fasten off. Work the second antenna in the same way, 2 sts away on the other side of the head center.
Each antenna is about 1 in (2.5 cm) long.
Border
The border is Rnd 3 of the wing unit: one round of reverse single crochet that rolls into a raised rope rim. You worked Rnd 2 traveling around the ring. Rev sc naturally travels back the other way, so Rnd 3 visits the wings in reverse order: upper left, lower left, lower right, upper right.
Border gauge: About 9 rev sc = 1 in (2.5 cm). This matches the sc gauge, so the rim lies flat on the straight parts of each wing.
Rnd 3 (rope rim):
- Ch 1. Do not turn.
Upper left wing (40 sts):
- Rev sc in each of the first 14 sts (the sc, hdc, and dc stitches) (14 sts).
- Over the 12 tr: (rev sc in each of the next 2 sts, 2 rev sc in the next st) 4 times (16 sts).
- Rev sc in each of the last 14 sts (14 sts).
- Sl st into the ring.
This makes 44 sts.
Lower left wing (28 sts):
- Rev sc in each of the first 8 sts (8 sts).
- Over the 12 doubled dc: (rev sc in each of the next 2 sts, 2 rev sc in the next st) 4 times (16 sts).
- Rev sc in each of the last 8 sts (8 sts).
- Sl st into the ring.
This makes 32 sts.
Lower right wing: Work the same as the lower left wing (32 sts), then sl st into the ring.
Upper right wing: Work the same as the upper left wing (44 sts), then sl st into the ring.
Fasten off.
Rnd 3 total: 44 + 32 + 32 + 44 = 152 sts.
As a conversion check, Rnd 3 equals 136 sts worked one-for-one, plus 4 extra sts on each of the 4 wings: 136 + 16 = 152.
Why the math works:
- Straight sections: Along the sc, hdc, and dc stretches, the band edge is about the same length as the chain underneath it. One rev sc per stitch keeps it flat.
- Fanned tip sections: At the outer tip, the 12 tall stitches spread out. The top edge there is about one-third longer than the base. Adding 1 extra rev sc for every 3 sts (4 extra per wing) matches that extra length, so the tip neither cups nor ruffles.
The rim adds about 1/8 in (0.3 cm) on every outer edge. This brings the wing unit from 4.25 in (10.8 cm) to 4.5 in (11.4 cm) wide, and from 3.5 in (8.9 cm) to 3.75 in (9.5 cm) tall.
Assembly:
- Lay the body down the center so it covers the ring. The head should sit just above the meeting point of the upper wings, and the tail should run down between the lower wings.
- With the long body tail, whipstitch the underside of the body through the ring and through the first chain at the base of each loop.
- Weave in all ends inside the body.
Final Blocking
- Wet the butterfly in cool water, then press it gently in a towel. Don’t wring it.
- Pin the wing unit to the blocking mat at 4.5 in (11.4 cm) wide and 3.75 in (9.5 cm) tall. Use your ruler.
- Pin the outer tip of each wing first, then pin along each rim every 1/4 in (0.6 cm) so the curves come out smooth.
- Open each teardrop opening by placing a pin inside it, pulling the inner chain frame into a smooth curve.
- Shape the antennae into gentle outward curves and pin the knobs in place.
- If you want a crisper motif for hanging, mist it with starch.
- Let it dry completely, at least 8 hours, before you unpin it.
Final Quality-Control Checklist
- [ ] Rnd 1 has 4 untwisted loops: 30, 22, 22, and 30 ch.
- [ ] Rnd 2 has 40, 28, 28, and 40 sts (136 total).
- [ ] Rnd 3 has 44, 32, 32, and 44 sts (152 total).
- [ ] Both upper wings match in size, and both lower wings match.
- [ ] The teardrop openings are clean and framed by smooth chain.
- [ ] The body is 1.9 in (4.8 cm) long, firm, and evenly ridged.
- [ ] The antennae are even, about 1 in (2.5 cm) each, with round knobs.
- [ ] The body covers the center ring completely.
- [ ] The finished motif is 4.5 in (11.4 cm) × 3.75 in (9.5 cm).
- [ ] All ends are woven in invisibly.
Troubleshooting
Wing tips are cupping:
– Your tr may be too tight, or you skipped the increases in Rnd 3. Check that each wing’s tip has 16 rev sc, then block firmly.
Wing tips are ruffling:
– Your tension at the tip is too loose. Work the tr more snugly, or use (rev sc in each of the next 3 sts, 2 rev sc in the next st) 3 times over the 12 tip sts. That gives 15 sts instead of 16. Note that this changes the wing total.
Loops are twisted:
– Check before Rnd 2. Undo back to the twisted loop and re-chain it. A twist can’t be blocked out.
Openings close up:
– You worked over the chain instead of into it. Work into each chain’s back bump so the chain frame stays in place.
Body is lumpy:
– Use less stuffing, and spread the scraps evenly before Rnd 15.
Antennae are floppy:
– Make the sl sts back down the chain tighter, or stiffen the antennae with starch.
Wings are uneven:
– Recount Rnd 2. One missing tr on one side is enough to make that wing visibly smaller.
Care
Hand wash in cool water with mild soap, press out the water in a towel, and dry flat, pinned to shape. Re-starch after washing if you use the butterfly as a hanging ornament.
Final Notes
The size of this butterfly depends on a short chain of measurements:
- Get gauge: 18 sc = 2 in (5.1 cm).
- Rnd 1 builds four loops from 104 chains.
- Rnd 2 turns them into 136 stitches across a wing unit 4.25 in (10.8 cm) wide.
- The rope rim adds 16 stitches and 1/8 in (0.3 cm) per edge, for a final size of 4.5 in (11.4 cm) × 3.75 in (9.5 cm).
- The 1.9 in (4.8 cm) body and 1 in (2.5 cm) antennae finish the shape.
Check each number as you go, and your Rosewing butterfly will come out light, even, and ready to hang or stitch on.
Happy crocheting!