

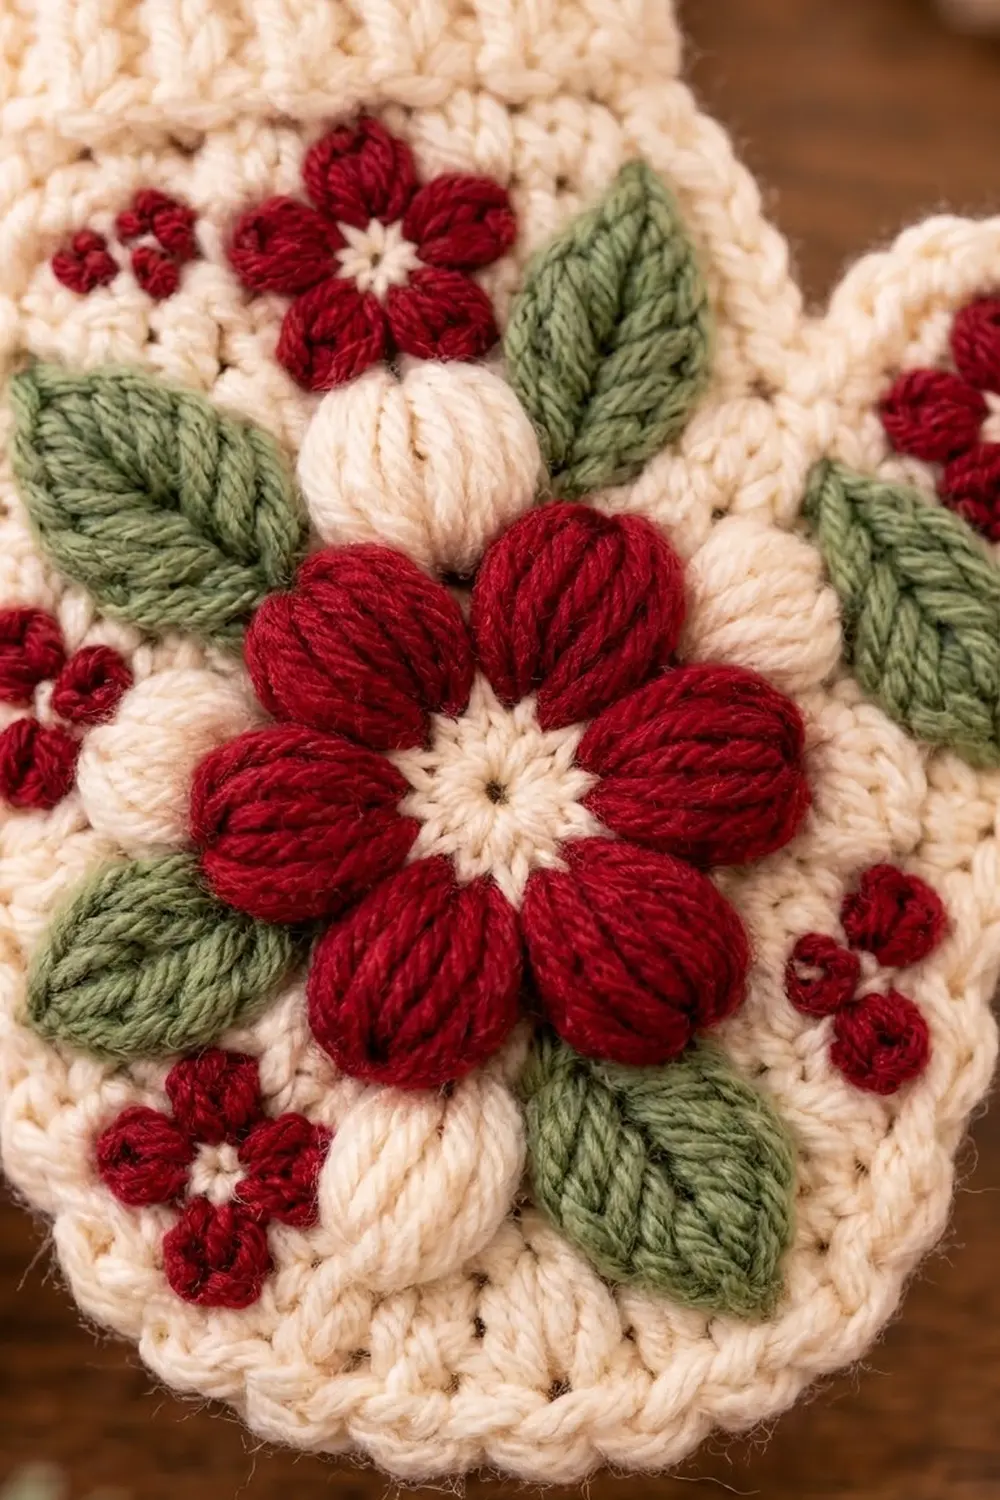
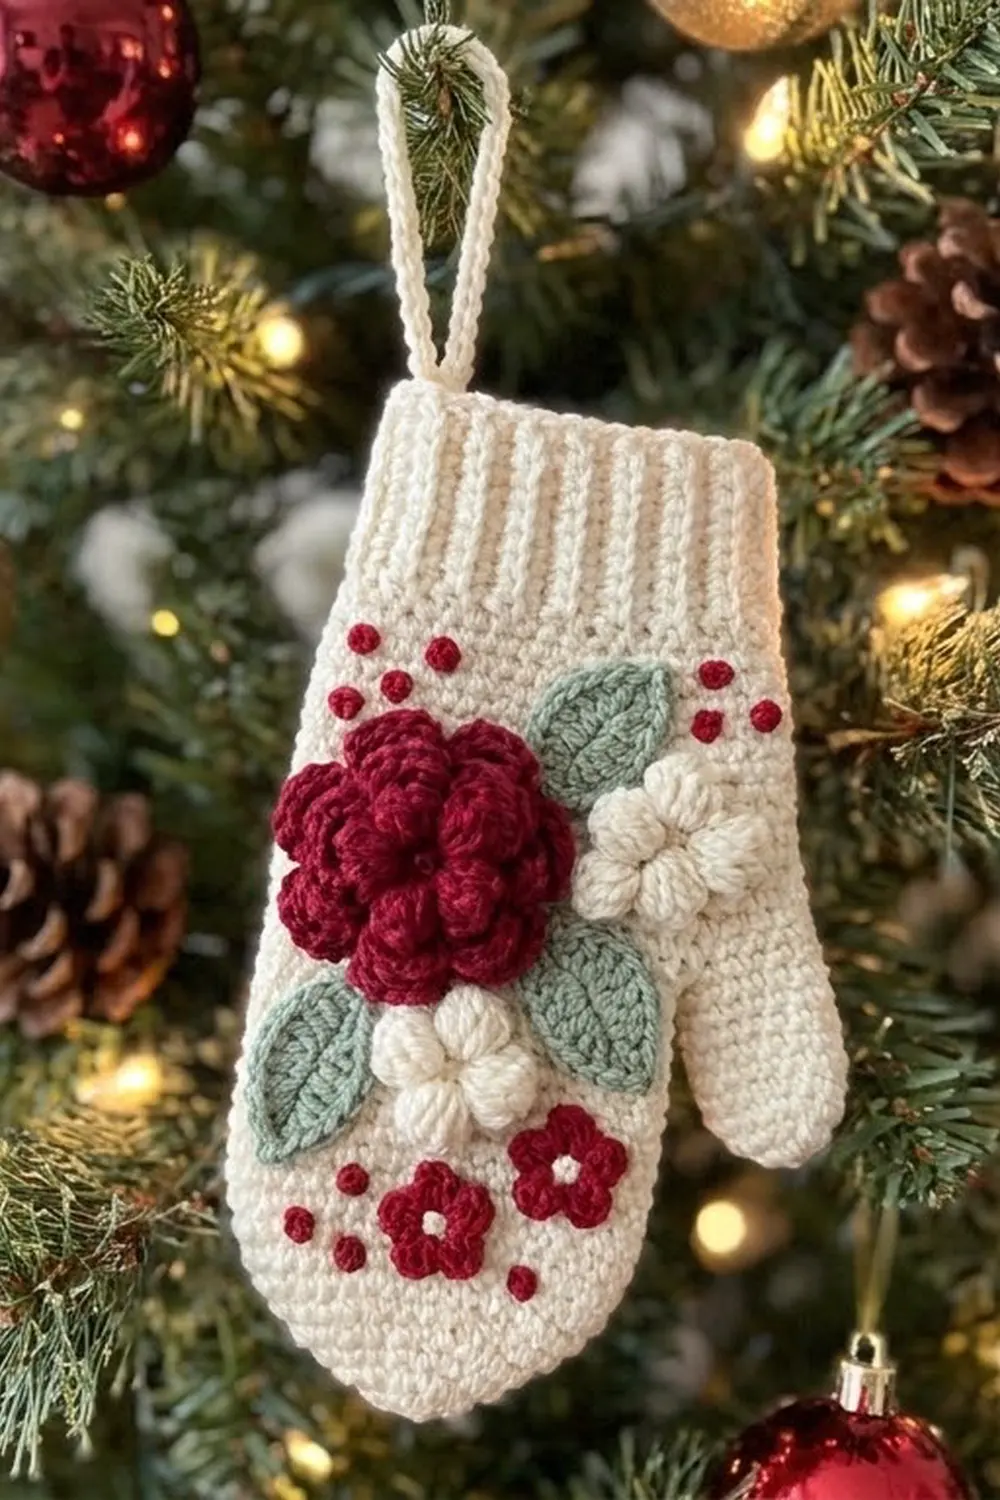
This little mitten ornament is a cozy mix of Nordic and cottage style. The cream mitten body is a clean, flat backdrop for a bold deep-red puff flower, sage-green leaves, soft cream puff clusters, and small red flowers and dots scattered around the edges. A ribbed cuff and a sturdy chain loop make it ready for the tree.
The palette is simple: cream, deep red, and sage green. The texture comes from the puff stitches, the ribbed cuff, and the layered appliqués.
All instructions use US crochet terms. The finished ornament measures about 4 in (10.2 cm) wide across the thumb and 5 in (12.7 cm) tall, not counting the hanging loop.
Here is how it comes together. You work the mitten body flat in rows of single crochet, from the fingertip up, and split off a small thumb near the top. Then you crochet a short ribbed cuff sideways and sew it to the top edge. One border round and the hanging loop finish the outline. Last, you sew on the appliqués and add a few French knots.
Finished Size and Construction
- Finished size: 4 in (10.2 cm) wide x 5 in (12.7 cm) tall, plus a loop about 1.25 in (3.2 cm) tall
- Skill level: Easy intermediate
- Terminology: US crochet terms
- Yarn weight: DK (weight 3)
- Hook: 3.5 mm (E-4)
- Number of pieces: 1 finished ornament (body, cuff, and appliqués all sewn into one piece)
- Layout: Single flat mitten, thumb on the right, cuff at the top
- Body size: 3.6 in (9.1 cm) wide x 3.6 in (9.1 cm) tall
- Size before border: 3.6 in (9.1 cm) wide x 4.6 in (11.7 cm) tall, with the cuff added
- Border depth: 1 round of sc, about 0.2 in (0.5 cm) on each edge
Materials
Use a smooth DK yarn. Cotton or a cotton blend gives crisp puff stitches and a flat ornament, and acrylic works too. Avoid fuzzy yarns, because they hide the puff texture.
- Cream: 10 g / 23 m (body, cuff, border, loop, puff clusters, flower center)
- Deep red: 4 g / 9 m (large flower, mini flowers, French knots)
- Sage green: 3 g / 7 m (leaves)
These quantities include a small safety margin.
Tools:
– 3.5 mm (E-4) crochet hook
– Tapestry needle
– 2 stitch markers
– Rust-proof pins
– Blocking mat or folded towel
– Spray bottle
– Scissors
Abbreviations (US Terms)
- ch – chain
- sl st – slip stitch
- sc – single crochet
- hdc – half double crochet
- dc – double crochet
- sc2tog – single crochet 2 together
- BLO – back loop only
- mr – magic ring
- st(s) – stitch(es)
- RS – right side
Special stitch: puff st. [Yarn over, insert hook in the indicated st or space, yarn over, and pull up a loop to about 0.25 in (0.6 cm)] 4 times. You now have 9 loops on the hook. Yarn over and pull through all 9 loops.
Gauge and Checkpoints
Gauge: 20 sc x 22 rows = 4 in (10.2 cm) in sc rows. That works out to 5 sc and 5.5 rows per inch.
Make the mitten body first and check it as you go. The whole design depends on these numbers.
- After Row 4: 13 sts, 2.6 in (6.6 cm) wide
- After Row 11: 2.0 in (5.1 cm) tall
- After Row 16: 18 sts, 3.6 in (9.1 cm) wide, 2.9 in (7.4 cm) tall
- After Row 20: 3.6 in (9.1 cm) tall
- Cuff: 1.0 in (2.5 cm) deep x 2.4 in (6.1 cm) long, stretching easily to 2.6 in (6.6 cm)
If your piece is too big, go down to a 3.25 mm hook. If it is too small, go up to a 3.75 mm hook. A difference of 0.2 in (0.5 cm) is fine. More than that means your appliqués will look crowded or lost on the palm.
Mitten Body
Use cream. Ch 1 at the start of a row does not count as a stitch.
Row 1: Ch 8. Sc in the 2nd ch from hook and in each ch across. (7 sts)
Row 2: Ch 1, turn. 2 sc in the first st, sc in the next 5 sts, 2 sc in the last st. (9 sts)
Row 3: Ch 1, turn. 2 sc in the first st, sc in the next 7 sts, 2 sc in the last st. (11 sts)
Row 4: Ch 1, turn. 2 sc in the first st, sc in the next 9 sts, 2 sc in the last st. (13 sts)
These four rows shape the rounded fingertip.
Rows 5–11: Ch 1, turn. Sc in each st across. (13 sts per row)
Thumb-side increases. From here you increase on one edge only. Place a marker on that edge after Row 12 and call it the thumb edge.
Row 12: Ch 1, turn. Sc in the next 12 sts, 2 sc in the last st. (14 sts)
Row 13: Ch 1, turn. 2 sc in the first st, sc in the next 13 sts. (15 sts)
Row 14: Ch 1, turn. Sc in the next 14 sts, 2 sc in the last st. (16 sts)
Row 15: Ch 1, turn. 2 sc in the first st, sc in the next 15 sts. (17 sts)
Row 16: Ch 1, turn. Sc in the next 17 sts, 2 sc in the last st. (18 sts)
Row 16 ends at the thumb edge. Check the width now: 3.6 in (9.1 cm).
Thumb
Row 17: Ch 1, turn. Sc in the first 5 sts only. Leave the remaining 13 sts unworked. (5 sts)
Row 18: Ch 1, turn. Sc in each st. (5 sts)
Row 19: Ch 1, turn. Sc2tog, sc in the next st, sc2tog. (3 sts)
Fasten off and weave in the tail.
Palm Top
Row 17: Join cream in the first unworked st of Row 16, right next to the thumb. Ch 1 and sc in the same st and the next 12 sts. (13 sts)
Rows 18–20: Ch 1, turn. Sc in each st. (13 sts per row)
Fasten off. The body should now measure 3.6 in (9.1 cm) tall.
Lay the piece with the thumb on the right and the cuff end at the top. This is your RS. Sc fabric looks nearly the same on both sides, so either face works as long as you stay consistent.
Ribbed Cuff
Use cream. The cuff is worked sideways, so the BLO ridges stand vertically, like real knit ribbing.
Row 1: Ch 6. Sc in the 2nd ch from hook and in each ch across. (5 sts)
Rows 2–13: Ch 1, turn. Sc BLO in each st. (5 sts per row)
You now have 13 rows, which make about 6 vertical ribs. Fasten off and leave a 12 in (30.5 cm) tail.
Attach the cuff. Butt one long row-end edge of the cuff against the 13 sts of Row 20, with the ribs vertical. Whipstitch the edges together with the tail, matching 1 cuff row end to 1 palm st, for 13 matched pairs. Keep the seam flat and snug. The cuff stretches slightly to match the 2.6 in (6.6 cm) palm.
The piece now measures 4.6 in (11.7 cm) tall.
Border and Hanging Loop
Border gauge: 1 sc per sc stitch or sc row end. At this gauge an sc row is about as tall as an sc is wide (5.5 rows vs. 5 sts per inch), so 1 sc per row end lies flat without ruffling or pulling.
Each segment below lists every stitch made along that edge, including its corner stitches.
Border Round: With the RS facing, join cream at the top-right corner of the cuff. Ch 1, then work:
- Cuff top (13 row ends): Sc in each of the first 6 row ends. In the 7th row end work (sc, ch 14, sl st in the sc just made). Sc in each of the last 6 row ends. That is 13 sc, plus the loop chain.
- Cuff left side (5 sts): 3 sc in the first st for the corner, then sc in the next 4 sts. (7 sc)
- Palm left edge (row ends of Rows 20–5): 1 sc in each. (16 sc)
- Left fingertip curve (row ends of Rows 4–1): 1 sc in each. (4 sc)
- Bottom (7 foundation ch): 2 sc in the first, sc in the next 5, 2 sc in the last. (9 sc)
- Right fingertip curve (row ends of Rows 1–4): 1 sc in each. (4 sc)
- Right edge (row ends of Rows 5–11): 1 sc in each. (7 sc)
- Thumb outer edge (row ends of Rows 12–19): 1 sc in each. (8 sc)
- Thumb tip (3 sts of Row 19): 2 sc in the first, sc in the next, 2 sc in the last. (5 sc)
- Thumb inner edge: Sc in the row ends of thumb Rows 19 and 18. Then sc2tog over the thumb’s Row 17 row end and the palm’s Row 17 row end. (3 sts)
- Palm right edge (row ends of Rows 18–20): 1 sc in each. (3 sc)
- Cuff right side (5 sts): Sc in the next 4 sts, then 3 sc in the last st for the corner. (7 sc)
Sl st in the first sc to join.
Total: 13 + 7 + 16 + 4 + 9 + 4 + 7 + 8 + 5 + 3 + 3 + 7 = 86 sts. The loop chain is not counted.
Thicken the loop: Work 20 sc into the ch-14 loop. Sl st into the base sc, then fasten off.
Why the math works: Each 3-sc corner adds 2 stitches so the border can turn 90 degrees. The 2-sc increases at the fingertip and thumb tip ease the edge around the curves. The sc2tog at the thumb crotch keeps the inside corner from gapping. The finished size is 4.0 in (10.2 cm) x 5.0 in (12.7 cm).
Large Puff Flower
Rnd 1 (cream): Mr, ch 1, 12 sc in the ring. Pull the ring tight and sl st in the first sc. Fasten off. (12 sts)
Rnd 2 (deep red): Join red in any sc. [Puff st, ch 1, puff st] in the next st, sl st in the next st. Repeat from * to * 5 more times. (12 puff sts making 6 petals, plus 6 ch-1 and 6 sl sts)
Fasten off and leave a 10 in (25.4 cm) tail. The flower measures about 1.5 in (3.8 cm) across. Push each petal pair gently so it bulges forward.
Cream Puff Clusters (make 2)
Mr, ch 1, then work 5 puff sts in the ring. Sl st in the top of the first puff and pull the ring closed.
Fasten off and leave an 8 in (20.3 cm) tail. Each cluster is about 0.6 in (1.5 cm) across.
Leaves (make 4)
Use sage green.
Ch 7. Working into the chain, starting in the 2nd ch from hook: sc, hdc, dc, dc, hdc, sc. (6 sts)
Ch 2 for the tip.
Working along the other side of the foundation chain: sc, hdc, dc, dc, hdc, sc. Sl st in the end ch. (12 sts, plus the ch-2 tip)
Fasten off and leave an 8 in (20.3 cm) tail. Each leaf is about 1.1 in (2.8 cm) long and 0.5 in (1.3 cm) wide. The foundation chain between the two halves forms the center vein.
Mini Flowers (make 3)
Use deep red. Mr, then ch 2, dc in the ring, ch 2, sl st in the ring. Repeat from * to * 4 more times. Pull the ring tight. (5 petals)
Fasten off and leave an 8 in (20.3 cm) tail. Each flower is about 0.6 in (1.5 cm) across. Add one small cream French knot at the center.
Assembly and Embroidery
- Center the large flower on the palm, about 1.6 in (4.1 cm) above the fingertip edge. Pin it and sew around Rnd 1 and the base of each petal. Leave the puffs free.
- Pin one cream puff cluster directly above the flower and one directly below it. Sew around their edges.
- Arrange the 4 leaves diagonally, two angling up and out from the flower’s upper sides and two angling down and out from its lower sides. Sew along each center vein and around the leaf tip.
- Sew one mini flower at top center just under the cuff, one on the thumb, and one at lower left.
- With red, work 3 clusters of 3 French knots: one at upper left, one beside the flower on the left, and one at lower right.
- Weave all tails in on the back, under the appliqué stitching.
Final Blocking
- Lay the ornament RS up on a blocking mat.
- Pin the outline to 4.0 in (10.2 cm) x 5.0 in (12.7 cm). Place pins at the cuff corners, thumb tip, and fingertip curve.
- Mist lightly with water. Do not press or steam the puffs.
- Use your fingers to straighten the cuff ribs and plump the petals.
- Let it dry completely, about 6 hours, before unpinning.
Final Quality-Control Checklist
- Body rows: 7, 9, 11, 13 for the fingertip, then 13 through Row 11, then 14 to 18 for the thumb increases
- Thumb: 5, 5, 3 sts
- Palm top: 4 rows of 13 sts
- Cuff: 13 rows of 5 sts, ribs vertical
- Border total: 86 sts
- Size: 4.0 in (10.2 cm) x 5.0 in (12.7 cm)
- Loop holds firm when tugged
- Large flower has 6 petals and 12 puffs
- 2 cream puff clusters, 4 leaves, 3 mini flowers, 3 knot clusters
- No tails visible on either side
Troubleshooting
- Fingertip looks pointed: Check that Rows 2–4 increase at both ends. The 2-sc bottom corners in the border also round it out.
- Thumb edge ruffles: Your increases may be on alternating sides. Always increase at the marked thumb edge.
- Gap at the thumb crotch: Make sure the sc2tog joins the two Row 17 row ends.
- Cuff narrower than palm: BLO rows can be tight. Stretch the cuff while you seam it, or add a 14th row.
- Puffs look flat: Pull up the loops longer, to about 0.25 in (0.6 cm), and don’t press during blocking.
- Border waves: Your border tension is loose. Redo it with a 3.25 mm hook.
Care
Spot clean with cool water and mild soap, then lay flat to dry. Store the ornament flat so the puffs keep their shape.
Final Notes
The measurement chain is short and reliable. You have 13 sts at 2.6 in (6.6 cm) for the palm and 18 sts at 3.6 in (9.1 cm) across the thumb. The body is 20 rows at 3.6 in (9.1 cm), and the cuff adds 1.0 in (2.5 cm) for 4.6 in (11.7 cm) before the border. The 86-st border then brings the ornament to 4.0 in (10.2 cm) x 5.0 in (12.7 cm). Check each stage, and your appliqués will sit just right on the palm.
Happy crocheting!