

The Ivory Bloom Bedspread is a lace-like coverlet made from soft cream flowers. Each flower has six rounded petals, a small open center with six spokes, and a raised, rope-like edge that outlines every petal.
The look is calm and textured rather than busy. Columns of double crochet fan out across each petal, so the petals look like ribbed shells. The open gaps between the joined flowers let the bed linen show through. The coverlet uses one color: a warm cream or ivory.
This pattern uses US crochet terms. The finished coverlet measures about 68.25 x 90 in (173.4 x 228.6 cm). Each flower measures 6.5 in (16.5 cm) from one petal tip to the opposite tip.
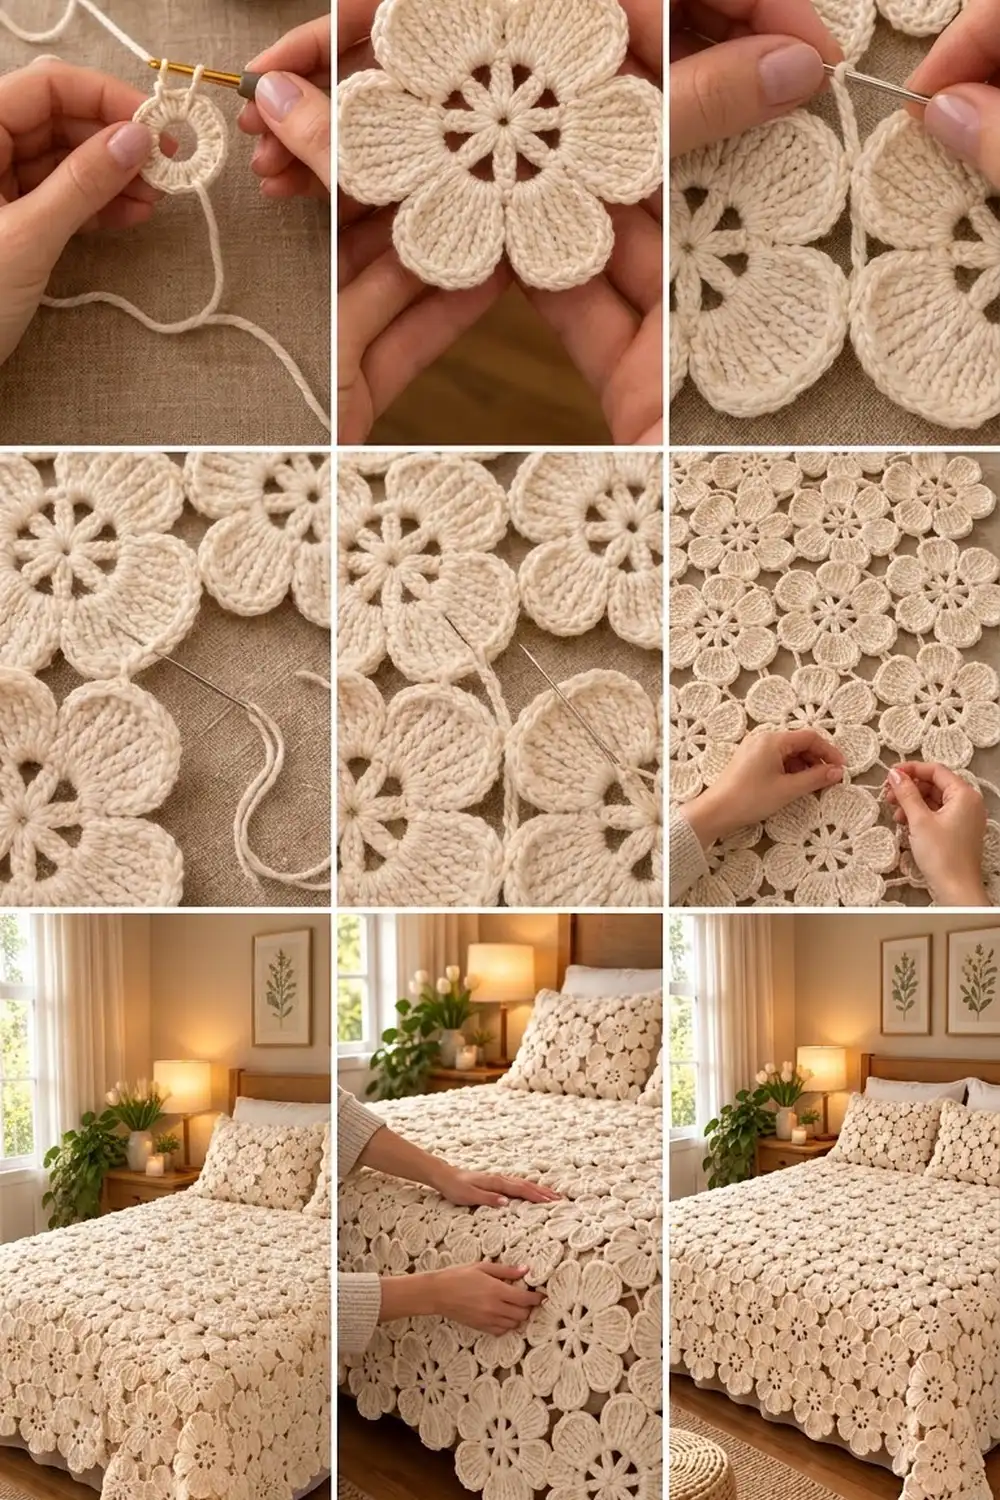
The construction is easy to follow. You crochet 160 identical flowers in the round and sew their petal tips together in offset rows. Then one slip-stitch edge-stay round goes around the outside to keep the scalloped edge from stretching.
Finished Size and Construction
- Finished size: about 68.25 x 90 in (173.4 x 228.6 cm)
- Skill level: Intermediate
- Terminology: US crochet terms
- Yarn weight: Worsted (#4)
- Hook: 5.0 mm (H-8)
- Number of pieces: 160 flower motifs
- Layout: 16 rows of 10 flowers; every other row is shifted half a flower to the right
- Piece size: 6.5 in (16.5 cm) from petal tip to petal tip; about 6 in (15.2 cm) across the other direction
- Size before border: about 68.25 x 90 in (173.4 x 228.6 cm)
- Border depth: 0 in (0 cm); the edge-stay round adds no width
Materials
Choose a smooth worsted cotton or cotton blend with good stitch definition. Plied yarns show the crab-stitch edge best. Avoid fuzzy yarns, which hide the petal ribbing and the open center.
- Cream (one color): 3,000 g / 5,490 m (30 balls of 100 g / 200 yd / 183 m)
One flower uses about 16 g / 30 m. These quantities include a margin of about 10% to cover gauge differences, sewing yarn, and the border.
Tools:
– 5.0 mm (H-8) crochet hook
– Tapestry needle
– Stitch markers
– Scissors
– Measuring tape
– Blocking mats and rust-proof pins
– Spray bottle
Abbreviations (US Terms)
- ch – chain
- sl st – slip stitch
- sc – single crochet
- hdc – half double crochet
- dc – double crochet
- tr – treble crochet
- sk – skip
- sp – space
- st(s) – stitch(es)
- rev sc – reverse single crochet (crab stitch)
- MR – magic ring
Special stitch: rev sc (crab stitch). Work from left to right if you are right-handed. Insert the hook into the next stitch to the right, yarn over, and pull up a loop. Yarn over again and pull through both loops. This makes the twisted, rope-like outline on each petal.
Gauge and Checkpoints
Gauge is measured on a finished flower, not on a swatch. Make one flower first and check it at each stage below. Lay it flat without stretching and measure across the widest point.
- After Round 1: 1 in (2.5 cm)
- After Round 2: 2.5 in (6.4 cm)
- After Round 3: 3.5 in (8.9 cm)
- After Round 4: 4.5 in (11.4 cm)
- After Round 5: 5.5 in (14.0 cm)
- After Round 6: 6.25 in (15.9 cm)
- After Round 7: 6.5 in (16.5 cm) from petal tip to petal tip
For reference, 14 dc and 8 rows measure 4 in (10.2 cm) with this yarn and hook.
Too big? Go down 0.5 mm in hook size. Too small? Go up 0.5 mm. Being off by just 0.25 in (0.6 cm) per flower adds up to 2.5 in (6.4 cm) across one row of 10, so this check matters.
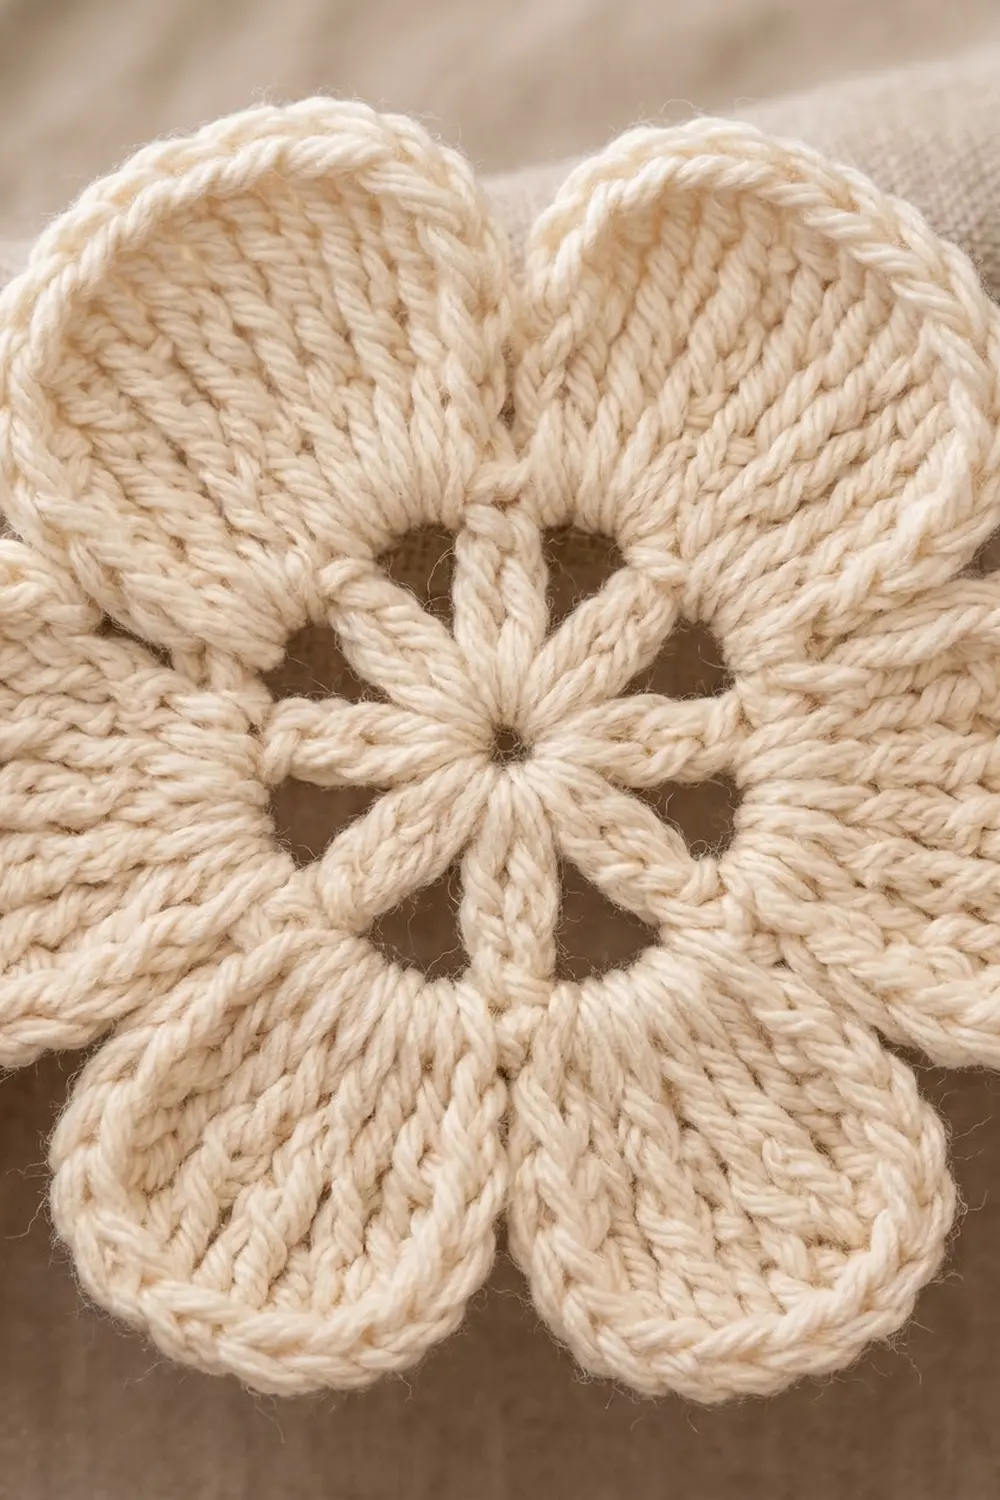
Flower Motif (make 160)
Join every round with a sl st and work with the right side facing. Do not turn.
Round 1: MR, ch 1, 12 sc in ring. Sl st to first sc. Pull the ring closed. (12 sc)
Round 2: Ch 4 (counts as tr), ch 3, sk next sc, tr in next sc, ch 3, sk next sc; rep from * 4 more times. Sl st to top of beginning ch-4. (6 tr, 6 ch-3 sps)*
The 6 tr are the spokes of the center. The ch-3 spaces become the 6 open windows.
Round 3: Sl st into first ch-3 sp, ch 3 (counts as dc), 4 dc in same sp, ch 1, 5 dc in next ch-3 sp, ch 1; rep from * 4 more times. Sl st to top of beginning ch-3. (30 dc, 6 ch-1 sps)*
Work these dc around the chains, not into them, so the windows stay open below each group. Each group of 5 dc is the base of one petal.
Round 4: Ch 3 (counts as dc), dc in same st, 2 dc in each of next 4 dc, ch 1, sk ch-1 sp, 2 dc in each of next 5 dc, ch 1, sk ch-1 sp; rep from * 4 more times. Sl st to top of beginning ch-3. (60 dc: 10 per petal, 6 ch-1 sps)*
Round 5: Ch 3 (counts as dc), 2 dc in next dc, dc in next dc, 2 dc in next dc; rep from * 3 more times, sc in ch-1 sp, [dc in next dc, 2 dc in next dc] 5 times, sc in next ch-1 sp; rep from ** 4 more times. Sl st to top of beginning ch-3. (96 sts: 15 dc per petal = 90 dc, plus 6 sc)*
The sc in each ch-1 space pinches the petals apart and makes the deep valleys between them.
Round 6 (petal shaping): Ch 2 (does not count), hdc in each of next 2 dc, dc in each of next 2 dc, 2 dc in each of next 7 dc, dc in each of next 2 dc, hdc in each of next 2 dc, sl st in next sc; rep from * 5 more times. (132 petal sts: 22 per petal, plus 6 valley sl sts)*
Check the math for one petal. You work into 15 stitches: 2 + 2 + 7 + 2 + 2. You make 22 stitches: 2 + 2 + 14 + 2 + 2. The 7 increases at the top round off the petal, and the hdc at each side keep its base low.
Round 7 (crab-stitch edge): Ch 1. Working left to right, rev sc in each of the 22 petal sts, and work 1 rev sc in each valley sl st, all the way around. Sl st to first rev sc. (138 rev sc: 22 per petal + 1 per valley)
Fasten off and leave a 6 in (15.2 cm) tail. Weave in the starting tail. You can use the end tail for joining.
Petal stitch map (used for joining and the border): Number each petal’s 22 rev sc from 1 to 22 in working order. Stitches 10–13 are the 4 tip stitches. Stitches 1–9 and 14–22 are the two 9-stitch half edges.
Make All Pieces
Make 160 flowers, all in Cream.
- Cream flowers: 160 (16 rows x 10 flowers)
Lay the flowers out before joining. Place each flower with two petals pointing left and right (W and E). The other four petals point up-left (NW), up-right (NE), down-left (SW), and down-right (SE).
Row 1:   O O O O O O O O O O
Row 2:    O O O O O O O O O O
Row 3:   O O O O O O O O O O
Row 4:    O O O O O O O O O O
  ... continue alternating ...
Row 15:  O O O O O O O O O O
Row 16:   O O O O O O O O O O
Odd rows line up on the left. Even rows shift right by half a flower, 3.25 in (8.3 cm). In this honeycomb layout, each petal tip meets exactly one neighbor’s tip.
Joining
Method: Hold the flowers right side up and whipstitch the petal tips together with a tapestry needle and matching yarn.
Stitch-to-stitch logic: Lay two facing petals tip to tip. Match tip stitches 10–13 of one petal to tip stitches 13–10 of the other. Whipstitch through both loops of all 4 pairs, then go through the first pair once more to lock the join. Fasten off and weave in. No stitches are added or skipped, and each join uses exactly 4 stitches on each petal.
Join order:
1. Join Row 1 side by side, sewing the E petal of each flower to the W petal of the next. (9 joins)
2. Add Row 2. Sew each Row 2 flower’s NW and NE petals to the SE and SW petals of the Row 1 flowers above it. Then join the Row 2 flowers to each other, E to W.
3. Continue row by row through Row 16.
That gives 144 side joins (16 rows x 9) and 285 joins between rows (15 row gaps x 19), for 429 joins in total.
Tension: Pull each whipstitch just snug enough that the tips touch without overlapping. If it’s too tight the petals pucker; if it’s too loose the gap sags.
Size checkpoint: Row 1 should measure 65 in (165.1 cm) from end tip to end tip. After Row 2 is added, the width becomes 68.25 in (173.4 cm). Row centers are 5.6 in (14.2 cm) apart, so 4 rows measure about 22.8 in (57.9 cm) tall.
Border (Edge-Stay Round)
The scalloped flower edge is the finished edge. The border is a single round of slip stitches that holds this edge at its true length so it can’t stretch or ruffle.
Border gauge: Work exactly 1 sl st into each exposed rev sc, and keep the stitches loose. The edge should lie just as flat after this round as it did before.
Counting exposed stitches: You only work the stitches on the outside edge of the coverlet. Never work the joined tip stitches (10–13). A half edge is 9 sts, a full free petal is 22 sts, and a valley is 1 st.
Exposed stitches per flower:
– Top or bottom edge flower (2 free petals): 9 + 1 + 22 + 1 + 22 + 1 + 9 = 65 sts
– Side or end flower with 3 free petals: 9 + 1 + 22 + 1 + 22 + 1 + 22 + 1 + 9 = 88 sts
– Side flower with 1 free petal: 9 + 1 + 22 + 1 + 9 = 42 sts
– Corner flower with 4 free petals: 9 + 1 + 22 + 1 + 22 + 1 + 22 + 1 + 22 + 1 + 9 = 111 sts
Round 1: With the right side facing, join Cream with a sl st in any exposed st. Sl st loosely in each exposed st around. When you reach a joined tip, skip over it and go straight to the first exposed st of the next flower. Join with a sl st to the first sl st and fasten off. Total: 3,258 sl sts, made up as follows:
– Top (Row 1): 8 flowers x 65 + top-left corner flower 111 + top-right end flower 88 = 719
– Right side (Rows 2–15): 7 even-row flowers x 88 + 7 odd-row flowers x 42 = 910
– Bottom (Row 16): 8 flowers x 65 + bottom-left end flower 88 + bottom-right corner flower 111 = 719
– Left side (Rows 2–15): 7 even-row flowers x 42 + 7 odd-row flowers x 88 = 910
Why the math works: Every stitch is worked 1-for-1 into an existing stitch, with no increases or decreases. The side totals are just the flower counts added together (719 + 910 + 719 + 910 = 3,258). The edge therefore keeps exactly the length the flowers already have. Slip stitches add no height, so the coverlet stays 68.25 x 90 in (173.4 x 228.6 cm).
Final Blocking
- Lay the coverlet flat on mats or a clean carpet covered with towels, right side up.
- Mist it evenly until the yarn is damp but not dripping.
- Pin the four corners first so the piece measures 68.25 x 90 in (173.4 x 228.6 cm).
- Pin the tip of each outer petal so the scallops spread evenly.
- Gently open the center windows and smooth the petals with your fingertips.
- Let it dry completely, usually 24 hours, before you unpin it.
- If you don’t have space, block one section at a time and let each section dry before moving on.
Final Quality-Control Checklist
- Every flower measures 6.5 in (16.5 cm) from tip to tip.
- Every flower has 6 spokes, 6 open windows, and 6 petals of 22 rev sc each.
- All 429 joins use 4 tip stitches on each side and lie flat.
- Even rows are offset by 3.25 in (8.3 cm).
- The border has 719 / 910 / 719 / 910 sl sts per side.
- The finished size is about 68.25 x 90 in (173.4 x 228.6 cm).
- All ends are woven in securely.
Troubleshooting
The petals cup or curl. Round 6 is too tight. Go up 0.5 mm in hook size for Rounds 6–7 only.
The petals ruffle. Count the Round 6 increases. There should be exactly 7 per petal.
The center windows close up. In Round 3, work the dc around the ch-3, not into the chain stitches.
The crab stitch looks flat. Work it more loosely and twist the hook slightly as you pull through.
The joins pucker. Loosen your whipstitch and keep it to the 4 tip stitches only.
The edge ripples after the border. Your slip stitches are too loose or you worked into joined stitches. Pull it out and redo it with exactly 1 sl st per exposed st.
The rows don’t line up. Check that every even row is shifted the same way, to the right.
Care
Hand wash or machine wash gently in cool water, then dry flat and reshape the petals while damp. Don’t hang it to dry, because the open lace can stretch.
Final Notes
The measurements build on each other. A flower checked round by round finishes at 6.5 in (16.5 cm). Ten joined flowers measure 65 in (165.1 cm), and the offset row brings the width to 68.25 in (173.4 cm). Sixteen rows spaced 5.6 in (14.2 cm) apart give about 90 in (228.6 cm). The 1-to-1 edge-stay round of 3,258 sl sts holds that size without changing it. Check early, and the rest follows.
Happy crocheting!