

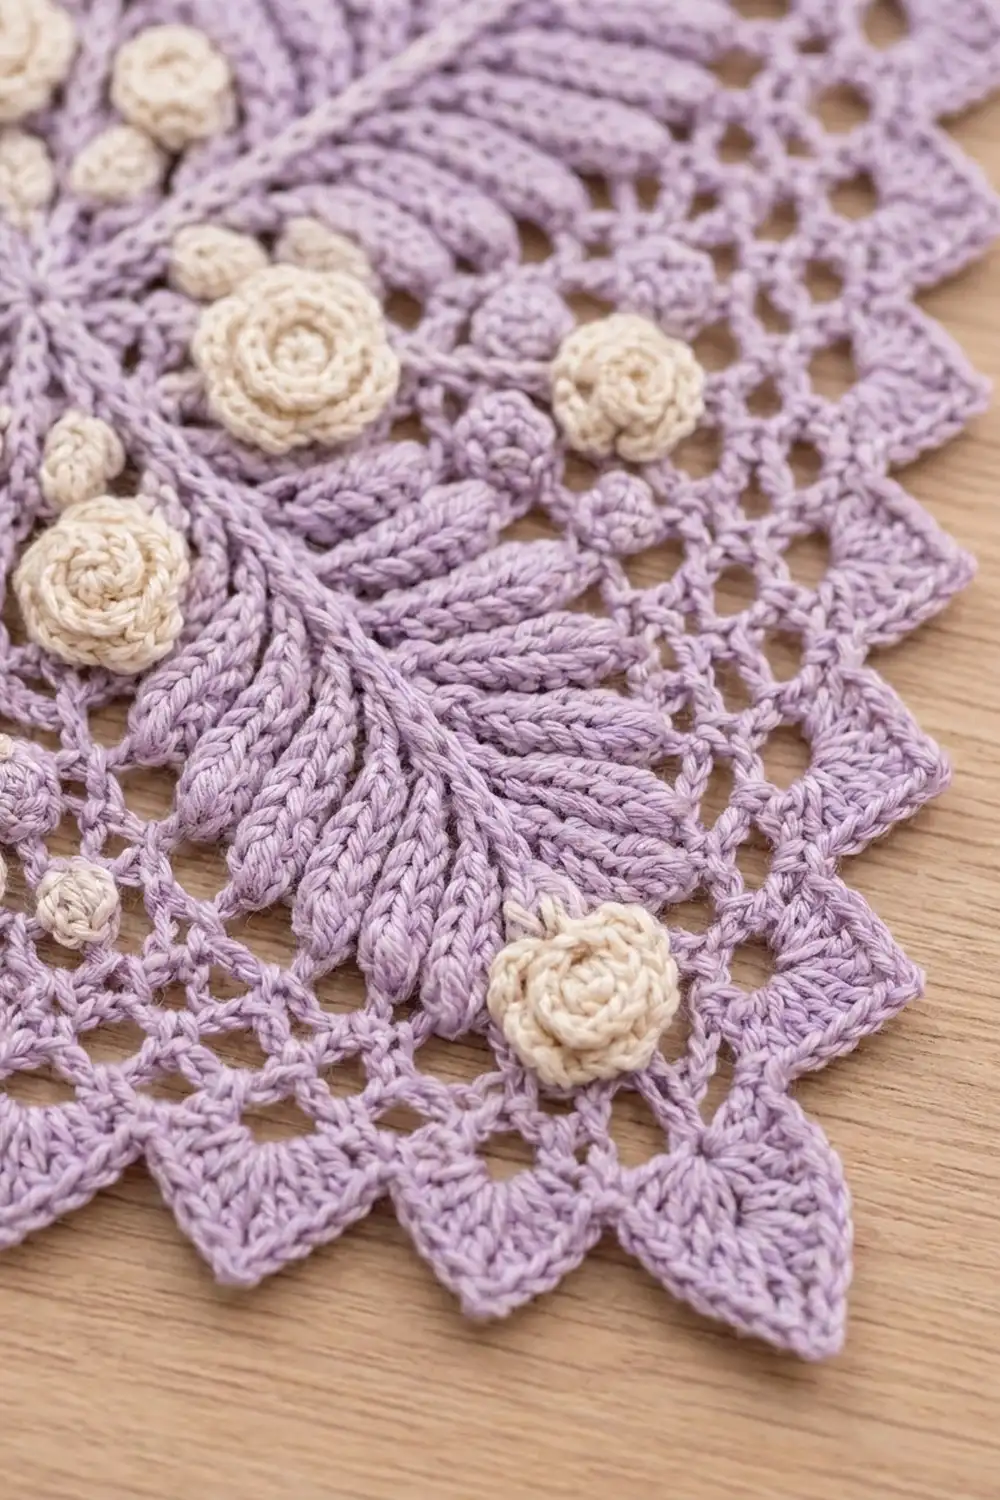
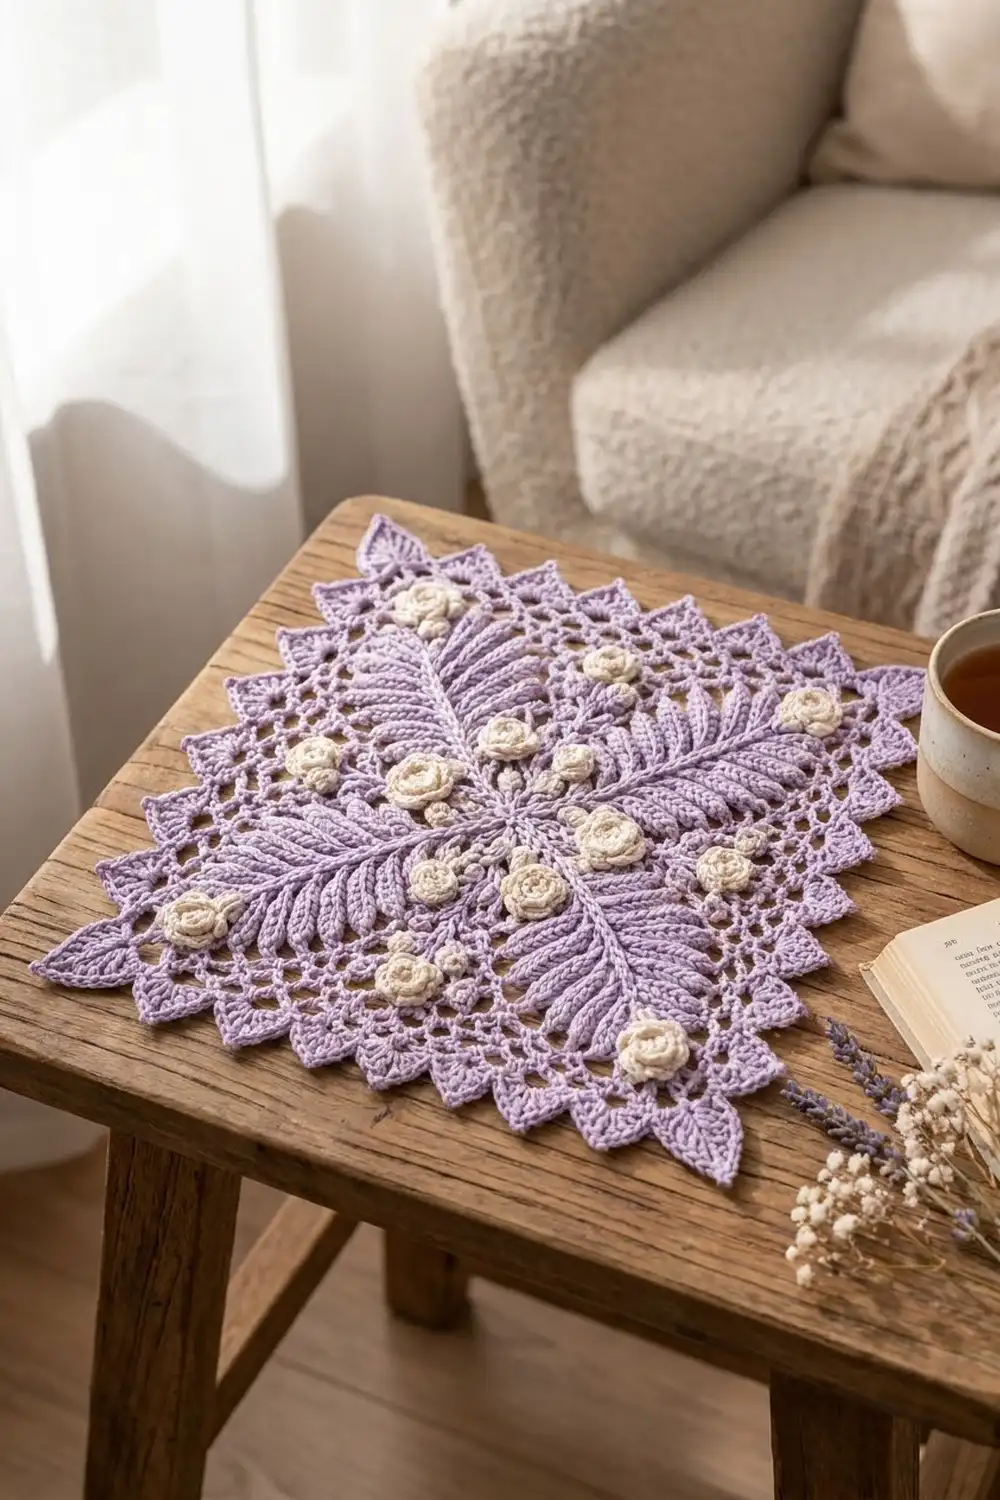
The Lilac Fern Garden Lace Square is one openwork square with a raised floral design on top. Four textured fern leaves run from the center out toward the corners. Small cream rolled roses and a few lavender buds sit between them, and a sawtooth edge of pointed triangles goes all the way around.
The palette is soft and romantic: lavender thread for the net base, leaves, border, and buds, with cream for the roses. The style borrows from Irish-lace appliqué, but the construction is simplified so you can follow it round by round. The pattern uses US crochet terms throughout.
The finished square measures 9 in (22.9 cm) per side after blocking. You crochet a chain-loop net square in rounds and finish it with a solid double crochet frame. Then you make the leaves and roses separately, sew them on, and work a two-round pointed border. You only make one square, so nothing is joined.
Finished Size and Construction
- Finished size: 9 in x 9 in (22.9 cm x 22.9 cm), blocked
- Skill level: Intermediate
- Terminology: US crochet terms
- Yarn weight: Super fine / fingering (#1) cotton
- Hook: 2.5 mm
- Number of pieces: 1 finished square (1 base plus 25 sewn-on appliqués)
- Layout: Single square, not joined to other pieces
- Piece size before border: 8 in (20.3 cm) per side after Rnd 14
- Border depth: 0.5 in (1.3 cm) per side (Rnds 15–16)
Materials
Use a smooth mercerized cotton in fingering weight, about 170 m per 50 g. It shows the leaf texture well and blocks crisply.
- Lavender: 50 g / 170 m (base, border, 4 leaves, 4 buds)
- Cream: 10 g / 35 m (17 roses)
Both amounts include a margin of roughly 15% for swatching and sewing tails.
Tools:
– 2.5 mm crochet hook
– Tapestry needle with a sharp point
– 4 locking stitch markers
– Rust-proof pins and a blocking board
– Ruler or tape measure
– Spray bottle or steam iron
Abbreviations (US Terms)
- ch: chain
- sl st: slip stitch
- sc: single crochet
- hdc: half double crochet
- dc: double crochet
- tr: treble crochet
- sp: space
- st(s): stitch(es)
- rnd: round
Special stitches
- Standing sc: With a slip knot on your hook, insert the hook into the stitch, yarn over, pull up a loop, yarn over, and draw through both loops.
- Surface sl st: Hold the yarn under the work. Insert the hook from the front, pull a loop to the front and through the loop on the hook. Repeat to make a raised chain line.
- Rolled rose: A strip of hdc ruffles that you roll into a spiral and stitch together at the base (full instructions below).
Gauge and Checkpoints
Gauge: 26 dc = 4 in (10.2 cm). Rnds 1–4 of the base measure 2.5 in (6.4 cm) from one straight side to the opposite side.
Before you commit to the whole square, work Rnds 1–4 and one small rose as a test. Always measure from side to side, not corner to corner, with the piece lying flat and unstretched.
Checkpoints:
– After Rnd 4: 2.5 in (6.4 cm)
– After Rnd 8: about 4.7 in (11.9 cm)
– After Rnd 13: about 7.45 in (18.9 cm)
– After Rnd 14: 8 in (20.3 cm)
– After Rnd 15: 8.25 in (21.0 cm)
– After Rnd 16 and blocking: 9 in (22.9 cm)
Each net round adds about 0.55 in (1.4 cm) to the width.
If your square is too big, go down to a 2.25 mm hook. If it is too small, go up to a 2.75 mm hook. Watch your chain tension too: loose ch-5 loops make the net grow too fast.
Base Square
Use lavender. Each new round has one more side loop per side than the round before.
Rnd 1: Make a magic ring. Ch 1, then work 8 sc in the ring. Pull the ring closed and sl st to the first sc. (8 sc)
Rnd 2: Ch 1, sc in the same st, ch 5, sc in next sc, ch 5; repeat from * 6 more times. Sl st to the first sc. (8 sc, 8 ch-5 loops)
Starting with the second loop, mark every other loop as a corner loop. That gives you 4 corner loops and 4 side loops (1 side loop per side).
Rnd 3: Sl st in the first 3 ch of the next loop, which is a side loop. Ch 1, sc in the same loop, ch 5, (sc, ch 5, sc) in corner loop, ch 5, sc in next side loop, ch 5; repeat from * 2 more times, then (sc, ch 5, sc) in the last corner loop, ch 5. Sl st to the first sc. (12 sc, 12 loops: 4 corner loops plus 2 side loops per side)
Move the markers up to the new corner loops.
Rnds 4–13: Sl st in the first 3 ch of the next loop. Ch 1, then sc in the same loop. Continue around: work (ch 5, sc) into each side loop, and (ch 5, sc, ch 5, sc) into each corner loop. Finish with ch 5 and sl st to the first sc. Move the markers up each round.
In Rnd n, there are n − 1 side loops per side, and both the sc total and the loop total are 4n.
- Rnd 4: 16 loops (3 side loops per side)
- Rnd 8: 32 loops (7 side loops per side)
- Rnd 13: 52 loops (12 side loops per side)
Every round begins in a side loop, so a corner never falls on the join.
Rnd 14 (conversion round): Sl st in the first 3 ch of the next loop. Ch 3 (counts as dc), then 3 dc in the same loop. Work 4 dc in each side loop and (2 dc, ch 2, 2 dc) in each corner loop. Sl st to the top of the ch-3.
Count for Rnd 14: each side has (12 side loops x 4 dc) + (2 dc at each end from the corners) = 52 dc. The total is 208 dc plus 4 corner ch-2 sps. The 52 dc per side over 8 in (20.3 cm) matches the 26 dc = 4 in gauge.
The square should measure 8 in (20.3 cm) per side. Fasten off and weave in the ends.
Fern Leaves (Make 4)
Use lavender. Each leaf has a 26-stitch spine with 10 leaflets on each side. The leaflets get bigger toward the base, and there is a small point at the tip.
Leaflet sizes:
– Small leaflet (SL): Ch 5, sc in 2nd ch from hook, hdc in next ch, dc in next ch, hdc in next ch, sl st in the same spine st. (4 sts)
– Medium leaflet (ML): Ch 7, sc in 2nd ch from hook, hdc in next ch, dc in next 2 ch, hdc in next ch, sc in next ch, sl st in the same spine st. (6 sts)
– Large leaflet (LL): Ch 9, sc in 2nd ch from hook, hdc in next ch, dc in next 4 ch, hdc in next ch, sc in next ch, sl st in the same spine st. (8 sts)
Foundation: Ch 27. Number the spine chs 1–26 starting at the hook end: the 2nd ch from the hook is st 1, the tip.
Side A: Sl st in st 1. Sl st in each of the next 2 sts, then work a leaflet. Repeat from * 9 more times, so you have leaflets at sts 3, 5, 7, and so on up to 21. Make the first 3 leaflets SL, the next 4 ML, and the last 3 LL. Sl st in sts 22–26 to make the stem (5 sts).
Side B: Ch 1 and rotate to work into the free loops of the foundation chain. Sl st in sts 26–22 (5 sts). Sl st in the next st, make a leaflet, sl st in the next st. Repeat from * 9 more times, so you have leaflets at sts 21, 19, and so on down to 3. Make these 3 LL, then 4 ML, then 3 SL, so they mirror Side A.
Tip: Work (sl st, ch 3, sl st) in st 1.
Count: 20 leaflets plus 1 tip point. Each side uses all 26 spine sts: 1 tip st, 20 sts for the leaflets, and 5 stem sts.
Vein: With the right side facing, work surface sl sts along the center of the spine from the tip to the stem. Fasten off and leave a 12 in (30.5 cm) tail for sewing.
Checkpoint: Each leaf should be about 3.5 in (8.9 cm) long and 2.25 in (5.7 cm) wide at its widest point.
Roses and Buds
Rolled rose: Ch the number given. Row 1: 2 hdc in the 3rd ch from hook (the skipped chs count as 1 hdc), then 3 hdc in each ch to the end. Fasten off and leave a 10 in (25.4 cm) tail. The strip will twist into a ruffle. Roll it tightly from the starting end, then stitch through all the layers at the base.
- Large rose (make 1, cream): Ch 20. Count: 3 + (17 x 3) = 54 hdc. Diameter 1 in (2.5 cm).
- Medium rose (make 8, cream): Ch 16. Count: 3 + (13 x 3) = 42 hdc. Diameter 0.75 in (1.9 cm).
- Small rose (make 8, cream): Ch 12. Count: 3 + (9 x 3) = 30 hdc. Diameter 0.5 in (1.3 cm).
- Bud (make 4, lavender): Same as the small rose.
Placing and Sewing the Appliqués
Pin the base flat at 8 in (20.3 cm). Use pins to mark the two diagonals and the two center axes (top to bottom and left to right).
- Leaves: Place one leaf on each diagonal with the stem 0.5 in (1.3 cm) from the center and the tip pointing toward a corner, about 4 in (10.2 cm) from the center. Backstitch the spine down, then tack each leaflet tip.
- Large rose: Sew it in the center so it covers the four stems.
- Inner medium roses (4): Place one on each axis, 1.25 in (3.2 cm) from the center, tucked into the V between two leaves.
- Buds (4): Place one on each axis, 2.25 in (5.7 cm) from the center.
- Outer medium roses (4): Place one on each axis, 3.25 in (8.3 cm) from the center.
- Small roses (8): Place two beside each leaf tip, about 0.5 in (1.3 cm) to either side.
Sew each rose through its base only, so the petals stay puffy. Weave each tail into the back of its own appliqué.
Border
Border gauge: 54 sc per side over 8.25 in (21.0 cm), with 13 side points per side, each about 0.6 in (1.5 cm) wide.
Rnd 15 (conversion round): Join lavender with a standing sc in the first dc after any corner ch-2 sp. Sc in each dc around, and work (sc, ch 2, sc) in each corner ch-2 sp. Sl st to the first sc.
Count for Rnd 15: each side has (52 sc, 1 in each dc) + (2 extra sc from the corners) = 54 sc. The total is 216 sc plus 4 corner ch-2 sps. Number the sts on each side 1–54. St 1 is the sc just after a corner ch-2 sp, and st 54 is the sc just before the next one. The square should now measure 8.25 in (21.0 cm). Fasten off.
Rnd 16 (points): Join with a standing sc in st 1 of any side.
- Side point (13 per side): Ch 5, sc in 2nd ch from hook, hdc in next ch, dc in next ch, tr in next ch, skip the next 3 sc, sc in the next sc. Repeat from * 12 more times. The anchoring sc lands in sts 5, 9, 13, and so on up to st 53.
- Sc in st 54.
- Corner point: In the corner ch-2 sp, work (sc, ch 5, sc in 2nd ch from hook, hdc in next ch, dc in next ch, tr in next ch, sc).
- Sc in st 1 of the next side and continue with the side points. At the end of the round, sl st to the first sc and fasten off.
Why the math works: On each side you start at st 1, and each of the 13 points uses 4 sts (3 skipped plus 1 anchor). 1 + (13 x 4) = 53, and st 54 takes the closing sc, so the side uses exactly 54 sts. The 4 corner points sit in the ch-2 sps, which gives 56 points in all. The points add 0.375 in (1.0 cm) per side, so the total border depth is 0.5 in (1.3 cm) and the square measures 8 + (2 x 0.5) = 9 in (22.9 cm).
Final Blocking
- Soak the square in cool water for 10 minutes. Press out the water in a towel without wringing.
- Pin it face up to a 9 in (22.9 cm) square marked on your blocking board. Start with the 4 corners.
- Pin the middle point of each side, then pin out every remaining point so they all stand straight out.
- Use your fingertips to open up the net loops evenly.
- Gently shape the leaflets and roses. Don’t flatten them.
- Let the square dry completely, at least 12 hours.
- If you prefer steam, hold the iron 1 in (2.5 cm) above the back of the piece. Never press directly on the roses.
Final Quality-Control Checklist
- The square measures 9 in (22.9 cm) on all four sides.
- Rnd 14 has 52 dc per side, and Rnd 15 has 54 sc per side.
- There are 13 side points per side plus 4 corner points.
- All 4 leaves are the same size and centered on the diagonals.
- All 17 cream roses and 4 lavender buds are sewn down firmly.
- All ends are woven in invisibly.
Troubleshooting
- The net ruffles: Your chains are too loose. Use a smaller hook or chain more tightly.
- The net cups: Your chains are too tight. Loosen your chain tension or go up a hook size.
- The wrong count on Rnd 14: Recount the side loops in Rnd 13. There should be 12 per side.
- Points lean unevenly: Make sure you skip exactly 3 sc between anchors, then block each point straight.
- The leaf curls: Steam-block the leaf on its own before sewing it on.
- The roses unroll: Add two more stitches through the base.
Care
Hand wash in cool water with a mild soap, then dry flat and re-pin the points if needed. Do not tumble dry, and do not iron the roses.
Final Notes
Each stage depends on the measurement before it. Rnds 1–4 should measure 2.5 in (6.4 cm), and each net round adds about 0.55 in (1.4 cm). Rnd 14 should measure 8 in (20.3 cm) with 52 dc per side. Rnd 15 brings it to 8.25 in (21.0 cm) with 54 sc per side, and the points bring the blocked square to 9 in (22.9 cm). If you check each number as you go, the leaves and roses will fit and the border will lie flat.
Happy crocheting!