

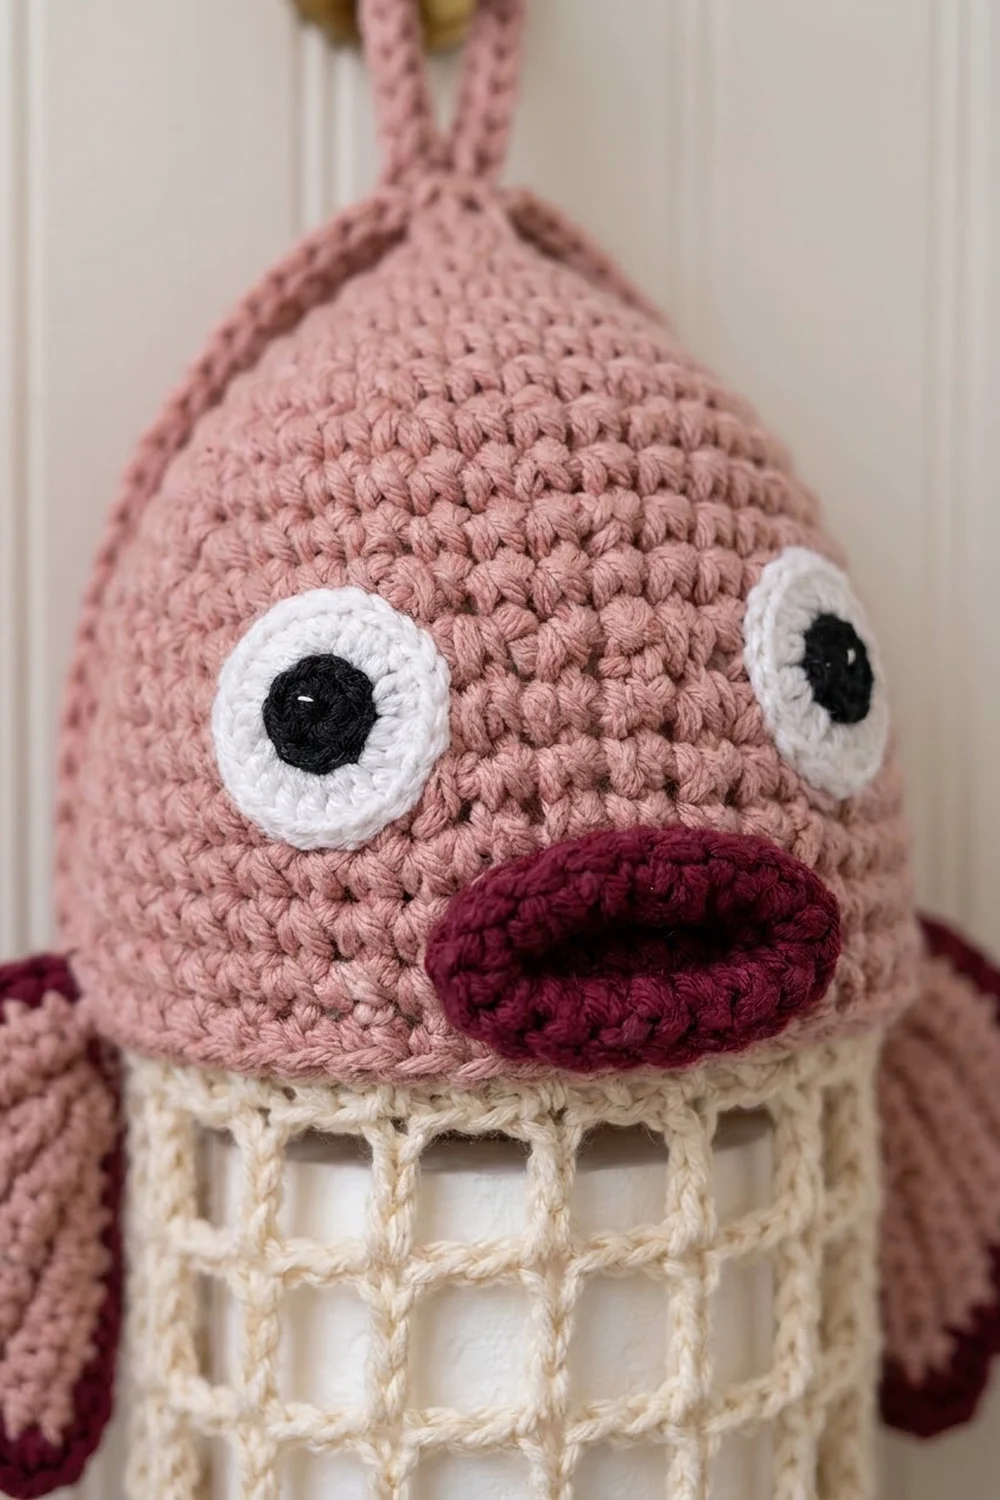
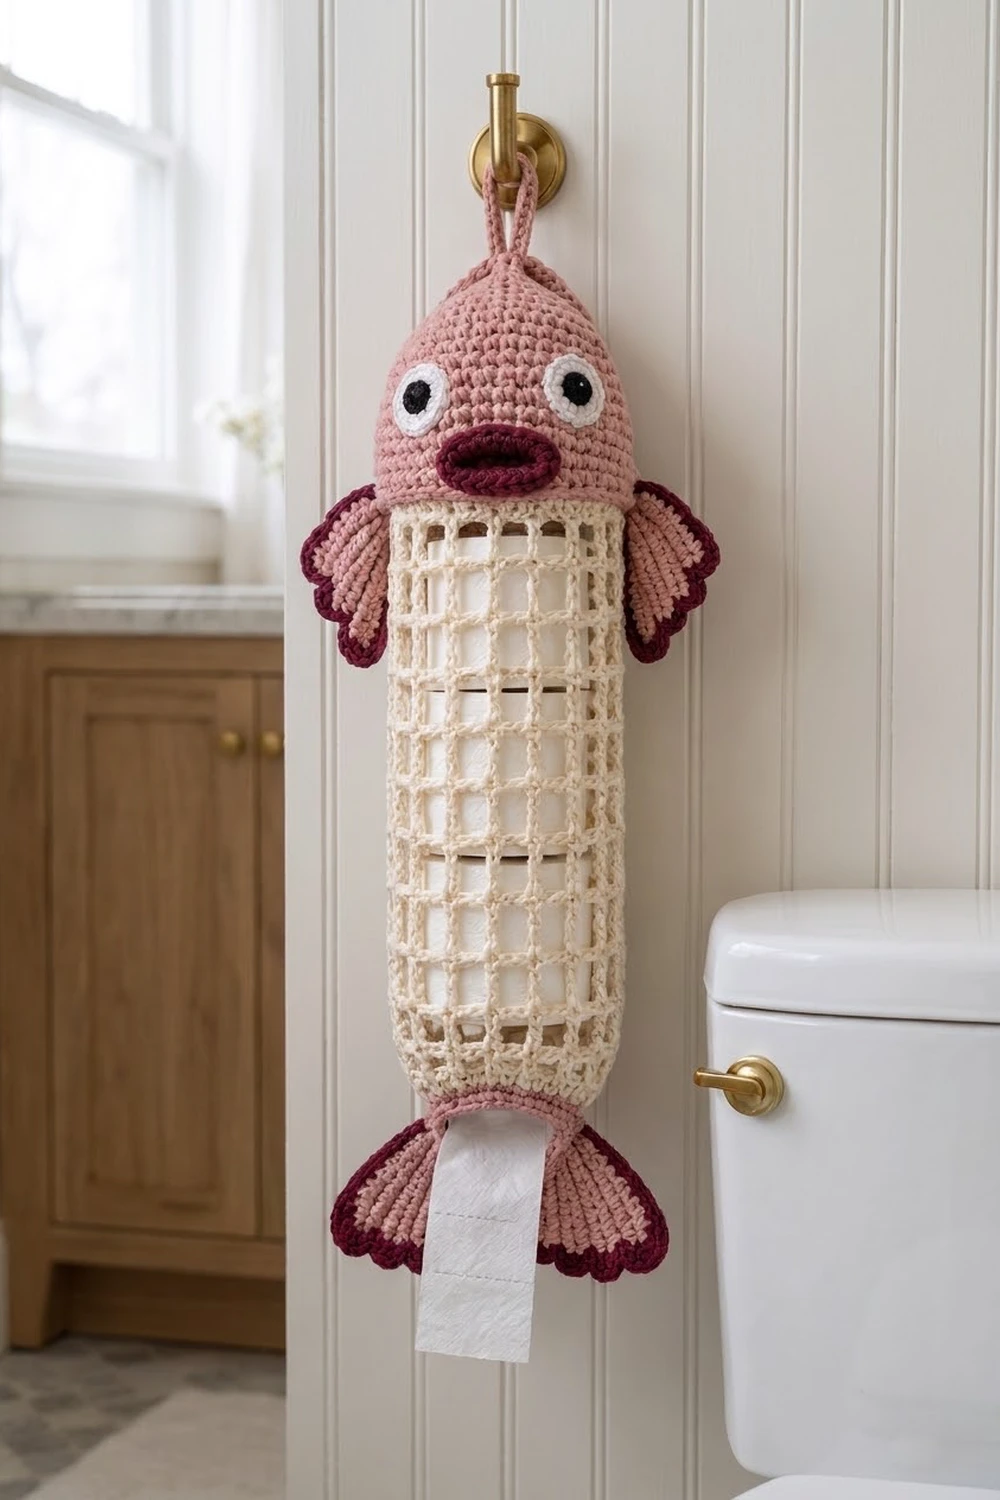
This cheerful fish turns spare toilet paper into bathroom decor. A dusty-pink head with wide eyes and puffy burgundy lips sits on top of a cream filet-mesh body. Two little side fins stick out from the shoulders, and two scalloped tail fins frame a small opening at the bottom where the next roll can feed out.
The colors are soft rose, cream and deep burgundy, with white and black for the eyes. The open mesh lets the rolls show through, so the holder is useful and also looks good on the wall. The pattern uses US crochet terms throughout.
The finished holder is about 27.5 in (69.9 cm) long, including the hanging loop and tail, and about 5 in (12.7 cm) across. It holds three standard rolls.
Construction is simple. You crochet the head from the top down in single crochet spirals, then switch straight to cream and work the mesh body down from the head’s last round. The body ends with a short single-crochet cone that forms the opening. The fins, eyes and lips are made separately and sewn on.
Finished Size and Construction
- Finished size: 27.5 in (69.9 cm) long × about 5 in (12.7 cm) in diameter
- Skill level: Easy-intermediate
- Terminology: US crochet terms
- Yarn weight: Worsted (#4), cotton or cotton blend
- Hook: 5.0 mm (H-8)
- Number of pieces: 8 (1 head-and-body, 2 side fins, 2 tail fins, 2 eyes, 1 lips)
- Layout: Head on top, mesh body in the middle, cone and tail fins at the bottom, side fins at the shoulders
- Head: 5 in (12.7 cm) tall, 16 in (40.6 cm) around
- Mesh body: 16 in (40.6 cm) long, 8 in (20.3 cm) wide when laid flat
- Size before edging: side fins 1.75 in (4.4 cm) radius; tail fins 2.25 in (5.7 cm) radius
- Edging depth: 0.5 in (1.3 cm) burgundy scallops on every fin
Materials
Choose a smooth worsted-weight cotton. It shows the stitches clearly, holds its shape under the weight of the rolls and copes with bathroom humidity. Acrylic also works, but the mesh will stretch more. The amounts below are based on yarn with about 1.9 m per gram (roughly 190 m per 100 g).
- Cream: 100 g, about 190 m (mesh body and cone)
- Dusty rose: 75 g, about 143 m (head, loop and all four fins)
- Burgundy: 20 g, about 38 m (fin scallops and lips)
- White: 5 g, about 10 m (eyes)
- Black: 3 g, about 6 m (pupils)
Tools:
- 5.0 mm (H-8) crochet hook
- Tapestry needle
- 6 stitch markers
- Scissors
- Tape measure
- Pins for blocking and positioning
- Blocking mat and spray bottle
All quantities include a margin of about 10 percent for your swatch and any small tension differences.
Abbreviations (US Terms)
- ch: chain
- sl st: slip stitch
- sc: single crochet
- dc: double crochet
- sc2tog: single crochet 2 together
- MR: magic ring
- sk: skip
- st(s): stitch(es)
- sp: space
- Rnd: round
Special stitch – Scallop: sk 1 st, 5 dc in the next st, sk 1 st, sc in the next st. Each scallop uses exactly 4 stitches of the row below.
Gauge and Checkpoints
- Single crochet gauge: 15 sc × 16 rows = 4 in (10.2 cm)
- Mesh gauge: 5 meshes × 5 rounds = 4 in (10.2 cm), so each mesh square is 0.8 in (2.0 cm)
The two gauges are designed to match. One mesh uses 3 stitches, and 3 sc also measure 0.8 in (2.0 cm). That means 60 head stitches turn into exactly 20 meshes with no gathering or flaring.
Make the head first and treat it as your test piece. Measure it at these points:
- After Rnd 10: the flat circle should be about 5 in (12.7 cm) across.
- After Rnd 20: the head should be 5 in (12.7 cm) tall and 16 in (40.6 cm) around.
- After body Rnd 5: the mesh should be 4 in (10.2 cm) long.
- After body Rnd 20: the mesh should be 16 in (40.6 cm) long.
If your head measures more than 16.5 in (41.9 cm) around, switch to a 4.5 mm hook. If it measures less than 15.5 in (39.4 cm), switch to a 5.5 mm hook. Since rolls are about 4.25 in (10.8 cm) wide, a tube that’s too small won’t fit them.
Head
Work in continuous spirals and move a marker up to the first stitch of each round. Use dusty rose.
- Rnd 1: 6 sc in MR. (6)
- Rnd 2: 2 sc in each st around. (12)
- Rnd 3: (sc 1, 2 sc in next) 6 times. (18)
- Rnd 4: (sc 2, 2 sc in next) 6 times. (24)
- Rnd 5: (sc 3, 2 sc in next) 6 times. (30)
- Rnd 6: (sc 4, 2 sc in next) 6 times. (36)
- Rnd 7: (sc 5, 2 sc in next) 6 times. (42)
- Rnd 8: (sc 6, 2 sc in next) 6 times. (48)
- Rnd 9: (sc 7, 2 sc in next) 6 times. (54)
- Rnd 10: (sc 8, 2 sc in next) 6 times. (60)
Checkpoint: the circle is 5 in (12.7 cm) across.
- Rnds 11–20: sc in each st around. (60)
At the end of Rnd 20, sl st in the next st and fasten off the rose yarn. The head is now a dome 5 in (12.7 cm) tall. Place a marker in the sl st and call this the center back.
Hanging Loop
Join rose at the center of the MR. Ch 16 and sl st back into the same spot. Then work 22 sc over the chain loop and sl st to close. The loop is 2 in (5.1 cm) long. Weave the ends firmly into the inside of the head, because this point carries the full weight of the filled holder.
Mesh Body
Use cream and work downward from the last round of the head, with the right side facing.
- Rnd 1: Join cream at the center-back st. Ch 5 (counts as dc + ch 2), sk 2 sts, dc in next st, ch 2, sk 2 sts; repeat from * 19 more times. Sl st to the 3rd ch of the beginning ch-5. (20 dc and 20 ch-2 sps = 20 meshes; 60 sts used)
- Rnds 2–20: Ch 5 (counts as dc + ch 2), dc in next dc, ch 2; repeat from * around. Sl st to the 3rd ch of the beginning ch-5. (20 meshes)
Each dc sits directly on top of the dc below it, which creates the straight vertical bars of the grid.
Checkpoint: the mesh is 16 in (40.6 cm) long and 8 in (20.3 cm) wide when laid flat.
Bottom Cone
Keep using cream and work in spirals again.
- Rnd 21 (conversion round): Ch 1, sc in each dc and 2 sc in each ch-2 sp around. (20 + 40 = 60)
- Rnd 22: (sc 3, sc2tog) 12 times. (48)
- Rnd 23: (sc 2, sc2tog) 12 times. (36)
- Rnd 24: sc in each st around. (36)
- Rnd 25: (sc 4, sc2tog) 6 times. (30)
- Rnds 26–27: sc in each st around. (30)
Sl st in the next st and fasten off. The cone is 1.75 in (4.4 cm) deep. The opening is 8 in (20.3 cm) around, or about 2.5 in (6.4 cm) across. That’s wide enough for the paper to pass through, but too narrow for a roll to drop out.
Side Fins (Make 2)
Use dusty rose and work flat in rows. Do not join the rows into rounds.
- Row 1: MR, ch 3 (counts as dc), 6 dc in the ring. Pull the ring closed until the work forms a half circle. Turn. (7)
- Row 2: Ch 3 (counts as dc), dc in the same st, 2 dc in each of the remaining 6 sts. Turn. (14)
- Row 3: Ch 3 (counts as dc), 2 dc in next st, dc in next st, 2 dc in next st; repeat from * 6 times. (21)
Fasten off. The fan has a 1.75 in (4.4 cm) radius and is 3.5 in (8.9 cm) wide across its straight edge.
Tail Fins (Make 2)
Work Rows 1–3 the same as the side fins, then turn and continue.
- Row 4: Ch 3 (counts as dc), dc in next st, 2 dc in next st; repeat from * 8 times, dc in each of the last 4 sts. (1 + 24 + 4 = 29)
Fasten off. The fan has a 2.25 in (5.7 cm) radius and is 4.5 in (11.4 cm) wide.
Eyes (Make 2)
- Rnd 1: With black, 6 sc in MR. Change to white in the last st. (6)
- Rnd 2: With white, 2 sc in each st around. (12)
Sl st to join and fasten off, leaving a 10 in (25.4 cm) tail for sewing. Each eye is 1 in (2.5 cm) across.
Lips
Use burgundy.
- Ch 5.
- Rnd 1: sc in the 2nd ch from the hook, sc in the next 2 ch, 3 sc in the last ch. Rotate and work along the other side of the chain: sc in the next 2 ch, 2 sc in the last ch. (1 + 2 + 3 + 2 + 2 = 10)
- Rnd 2: sc in the next 3 sts, 2 sc in each of the next 3 sts, sc in the next 2 sts, 2 sc in each of the last 2 sts. (3 + 6 + 2 + 4 = 15)
Sl st and fasten off, leaving a 12 in (30.5 cm) tail. The lips form an oval 1.75 in × 1 in (4.4 × 2.5 cm).
Make All Pieces
| Piece | Qty | Color |
|---|---|---|
| Head + mesh body + cone | 1 | Rose, then cream |
| Side fins | 2 | Rose + burgundy |
| Tail fins | 2 | Rose + burgundy |
| Eyes | 2 | Black + white |
| Lips | 1 | Burgundy |
Front-view placement guide:
          [loop]
        /  HEAD  \
       | (o)  (o) |      eyes: Rnds 13–15
        \  <lips> /      lips: Rnds 17–19
  [fin]=|  MESH  |=[fin] side fins: mesh Rnd 2
        |  MESH  |
        |  MESH  |
         \ cone /
       [tail][tail]      tail fins: Rnd 27
Joining and Assembly
Lay the holder flat with the center-back marker directly at the back. Count 30 stitches around from the marker to find the center front.
Eyes: Center each eye on head Rnd 14. Leave 8 sc between the eyes, so each one sits 4 sts to either side of the center front. Sew around the outer edge with whipstitch through the back loops of the eye’s last round, about one stitch for every eye stitch.
Lips: Center the lips on Rnds 17–19, directly below the eyes. Pinch the oval along its long center line and sew it on along that line only, so the top and bottom halves stay puffy. Then backstitch once more along the same line so it reads as a mouth.
Side fins: Mark the two side points of mesh Rnd 2. They sit 15 sts from the center front on each side. Fold the straight edge of each fin in half at the ring. Sew 1 in (2.5 cm) of the straight edge on either side of the ring firmly to the vertical bar, so the fan sticks out sideways.
Tail fins: Flatten the cone so that the opening forms two layers, front and back. Sew the ring point of each tail fin to Rnd 27 at the left and right folds of the opening, with the fans pointing down and slightly out. Leave the front and back of the opening free.
Tension: Sew snugly, but don’t pull so tight that the head puckers. Each sewing stitch should go through one full stitch of the body. Make several passes on every fin, because people will grab them.
Checkpoint: from the loop to the tail tips, the holder measures 27.5 in (69.9 cm). That’s 2 in loop + 5 in head + 16 in mesh + 1.75 in cone + 2.75 in tail.
Border: Fin Scallop Edging
Border gauge: each scallop uses 4 stitches and is about 0.75 in (1.9 cm) wide and 0.5 in (1.3 cm) deep.
Edge each fin before sewing it to the body. Work only along the curved last row, with the right side facing.
Side fins: Join burgundy in the first st of Row 3. Sc in the same st, then work the scallop 5 times. You end with a sc in the last st. (1 + 5 × 4 = 21 sts used; 5 scallops)
Tail fins: Join burgundy in the first st of Row 4. Sc in the same st, then work the scallop 7 times. (1 + 7 × 4 = 29 sts used; 7 scallops)
Fasten off and weave in the ends.
Why the math works: a scallop row always needs a multiple of 4 stitches plus 1 for the opening sc. That’s why the fin rows end on 21 and 29 stitches, which both fit the 4n + 1 rule exactly. The edging starts and ends with a sc anchored in a corner stitch, so the two corners match. The straight edges get no edging, because they are sewn to the body.
Final Blocking
- Fill the holder with three rolls so the mesh stretches to its working shape.
- Hang it, or lay it flat on a blocking mat.
- Mist the mesh lightly and straighten the vertical bars with your fingers until every square measures 0.8 in (2.0 cm).
- Pin each fin flat and spread the scallops evenly.
- Mist the fins and let them dry completely, which takes about 6 hours.
- Shape the head dome by hand and remove the rolls once everything is dry.
Final Quality-Control Checklist
- Head: 60 sts, 5 in (12.7 cm) tall, 16 in (40.6 cm) around
- Mesh: 20 meshes per round, 20 rounds, vertical bars straight
- Cone: ends on 30 sts, opening about 2.5 in (6.4 cm) across
- Side fins: 21 sts, 5 scallops each
- Tail fins: 29 sts, 7 scallops each
- Eyes level and symmetrical, lips centered
- Loop secure and tested with three rolls
- All ends woven in
Troubleshooting
The mesh spirals or slants: You are working into the ch-2 space instead of into the dc. Always work the dc into the top of the dc below it.
The head ruffles: Your tension is loose. Go down a hook size and repeat the swatch.
The fins cup: Your dc is tight. Use a hook 0.5 mm larger for the fins only.
The fins ruffle: Your dc is loose. Use a hook 0.5 mm smaller.
The scallops don’t fit: Recount the last fin row. It must be 21 or 29 stitches.
The rolls won’t slide in: The tube is too small. Remake it with a larger hook, or block the mesh wider.
The holder stretches too long: You are using acrylic or loose dc. Change to cotton or tighten your tension.
Care
Hand wash in cool water with mild soap, gently press out the water and dry flat with the fins shaped. Avoid the dryer, because heat can stretch the mesh.
Final Notes
The measurement chain runs like this:
- The 15-sc gauge gives you a 60-stitch head that is 16 in (40.6 cm) around.
- The 60 stitches divide into exactly 20 meshes of 0.8 in (2.0 cm).
- Twenty mesh rounds make a 16 in (40.6 cm) body.
- The cone narrows from 60 to 30 stitches.
- The fins end on 21 and 29 stitches, which fit the scallop edging exactly.
Check each stage against the measurement before moving on, and your fish will hang straight and hold its rolls neatly.
Happy crocheting!