

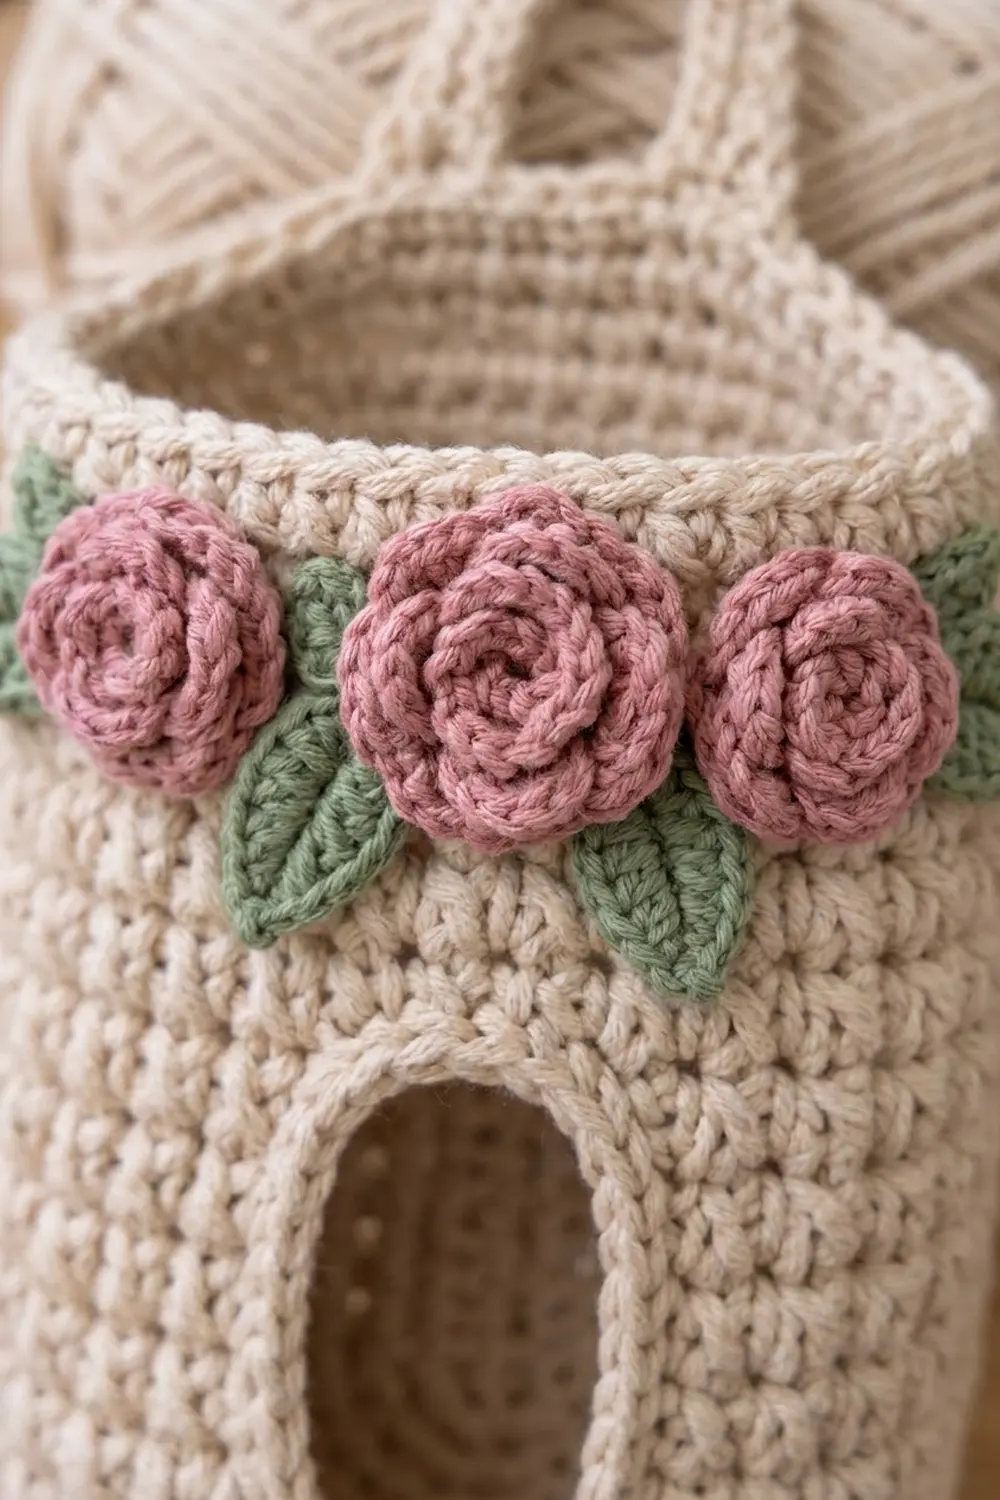
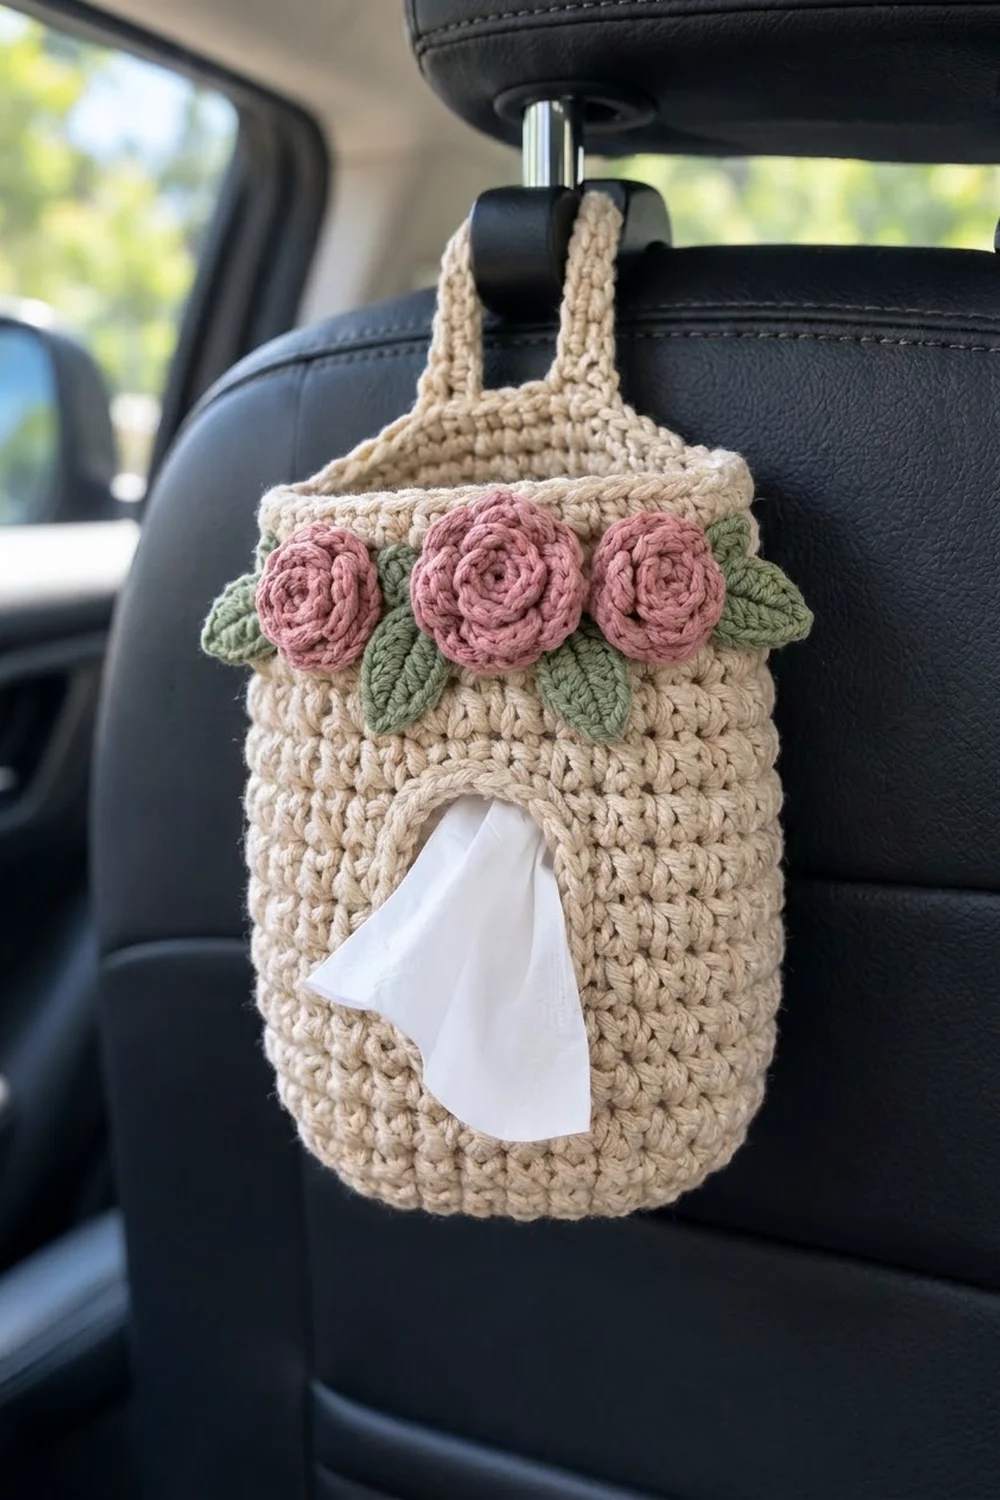
This little holder hangs from your car headrest and keeps a pack of tissues within reach. Its soft oatmeal body is worked in tight single crochet. Three dusty-rose roses and six sage-green leaves sit across the top like a small garland.
The look is cottage-style and practical. The dense stitches hold their shape, the rolled rim keeps the top neat, and an edged oval slot lets you pull out one tissue at a time. The pattern uses US crochet terms throughout.
The finished body measures about 7 in (17.8 cm) wide, 8.75 in (22.2 cm) tall and 2.75 in (7.0 cm) deep. The strap loop adds about 3.5 in (8.9 cm), so the total hanging height is about 12.25 in (31.1 cm).
Construction is simple. You make an oval base, turn up the sides with a back-loop round, and work straight rounds with a chain-space slot partway up. Then you add a rolled rim, trim the slot, and sew on the strap, roses and leaves.
Finished Size and Construction
- Finished size: 7 in (17.8 cm) wide x 8.75 in (22.2 cm) tall x 2.75 in (7.0 cm) deep; about 12.25 in (31.1 cm) tall including the strap
- Skill level: Easy+ (advanced beginner)
- Terminology: US
- Yarn weight: worsted (#4), cotton or cotton blend
- Hook: 5.0 mm (H-8) for the body and strap; 4.0 mm (G-6) for the roses and leaves
- Number of pieces: 1 body, 1 strap, 3 roses, 6 leaves, assembled into one item
- Layout: a single piece with appliqués; no motifs are joined
- Base size: 5.5 x 2.75 in (14.0 x 7.0 cm)
- Body size before rim: 8.25 in (21.0 cm) tall
- Rim depth: 0.5 in (1.3 cm), from 2 rounds
Materials
Cotton is the best choice here. It holds its shape, doesn’t fuzz in a warm car, and survives washing. Pick a smooth, tightly plied yarn so the single crochet texture looks crisp. The numbers below assume about 190 m per 100 g.
- Color A, oatmeal/beige (body, strap): 85 g / 162 m
- Color B, dusty rose (roses): 15 g / 29 m
- Color C, sage green (leaves): 10 g / 19 m
All quantities include a margin of about 25% for gauge swatches and differences between yarns.
Tools:
– 5.0 mm (H-8) and 4.0 mm (G-6) crochet hooks
– 4 locking stitch markers
– Tapestry needle
– Scissors
– Measuring tape
– Straight pins
– A small travel tissue pack or a folded towel, for shaping
Abbreviations (US Terms)
- ch: chain
- sc: single crochet
- hdc: half double crochet
- dc: double crochet
- sl st: slip stitch
- st(s): stitch(es)
- sk: skip
- BLO: back loop only
- rnd: round
- inc: 2 sc in the same st
- rev sc (reverse single crochet / crab stitch): working from left to right (right-handed), insert the hook into the next st to the right, yarn over, pull up a loop, then yarn over and pull through both loops. This makes a twisted, corded edge.
Gauge and Checkpoints
Gauge: 14 sc and 16 rnds = 4 in (10.2 cm) in sc worked in joined rounds with the 5.0 mm hook. That is 3.5 sts and 4 rnds per inch.
Treat the base as your swatch. Work Rnds 1–5, then measure before you go on.
Checkpoints:
– After Rnd 5: the base measures 5.5 x 2.75 in (14.0 x 7.0 cm) and lies flat.
– After Rnd 6: the circumference is about 14.3 in (36.3 cm).
– After Rnd 19: the sides are 3.5 in (8.9 cm) tall, measured from the base ridge.
– After Rnd 30: the sides are 6.25 in (15.9 cm) tall.
– After Rnd 38: the sides are 8.25 in (21.0 cm) tall.
– After Rnd 40: the sides are 8.75 in (22.2 cm) tall.
If your base is too big, drop down half a hook size. If it’s too small, go up half a size. Don’t change any stitch counts. For a dense, wind-proof fabric, it’s better to be slightly small than loose.
Body
The body is worked in joined rounds. Start each round with ch 1, which does not count as a stitch, and sc into the same st. Finish each round with a sl st to the first sc. Use the 5.0 mm hook and Color A.
Oval Base
Foundation: Ch 13.
Rnd 1: Sc in the 2nd ch from hook and in the next 10 ch, 3 sc in the last ch. Working along the opposite side of the chain, sc in the next 10 ch, then 2 sc in the same ch as the first sc. Join. (26 sts)
Rnd 2: Inc in the next st, sc 10, inc in each of the next 3 sts, sc 10, inc in each of the last 2 sts. Join. (32 sts)
Rnd 3: [Sc 1, inc] once, sc 10, [sc 1, inc] 3 times, sc 10, [sc 1, inc] 2 times. Join. (38 sts)
Rnd 4: [Sc 2, inc] once, sc 10, [sc 2, inc] 3 times, sc 10, [sc 2, inc] 2 times. Join. (44 sts)
Rnd 5: [Sc 3, inc] once, sc 10, [sc 3, inc] 3 times, sc 10, [sc 3, inc] 2 times. Join. (50 sts)
Each round adds 6 sts, 3 at each curved end, so the straight sides stay 10 sts long and the base stays flat.
Turning Up the Sides
Rnd 6: Sc in BLO of each st around. Join. (50 sts)
The unworked front loops make the crisp ridge where the base meets the walls.
Place markers. Flatten the piece. Mark st 23 and st 48, which are the tips of the two narrow ends. The front is sts 23–47 (25 sts) and the back is sts 48–50 plus 1–22 (25 sts). The front center is st 35 and the back center is st 10.
Sides
Rnds 7–19: Sc in each st around. Join. (50 sts each rnd)
Check: the sides are 3.5 in (8.9 cm) tall.
Tissue Slot
Rnd 20: Sc 29, ch 10, sk the next 10 sts (sts 30–39), sc in the last 11 sts. Join. (29 sc + 10 ch + 11 sc = 50 sts)
Rnd 21: Sc 29, sc in each of the 10 ch, sc 11. Join. (50 sts)
The opening is 10 sts wide, about 2.9 in (7.4 cm), and centered on the front. When the tissue pack is inside, it relaxes into an oval about 1.25 in (3.2 cm) tall.
Upper Body
Rnds 22–38: Sc in each st around. Join. (50 sts each rnd)
Check: the sides are 6.25 in (15.9 cm) tall after Rnd 30 and 8.25 in (21.0 cm) after Rnd 38. Don’t fasten off. Continue to the rim in the Border section.
Strap
Use the 5.0 mm hook and Color A.
Foundation: Ch 33.
Row 1: Sc in the 2nd ch from hook and in each ch across. (32 sts)
Rows 2–3: Ch 1, turn, sc in each st across. (32 sts)
Fasten off, leaving a 16 in (40.6 cm) tail. The strap measures about 9 x 0.75 in (22.9 x 1.9 cm).
Roses (Make 3)
Use the 4.0 mm hook and Color B.
Small Rose (Make 2)
Foundation: Ch 26.
Row 1: Sc in the 2nd ch from hook. Sk 1 ch, 5 dc in the next ch, sk 1 ch, sc in the next ch. Repeat from * to * 6 times. (6 petals; 1 + 6 x 4 = 25 chains used)
Large Rose (Make 1)
Foundation: Ch 34.
Row 1: Sc in the 2nd ch from hook. Sk 1 ch, 5 dc in the next ch, sk 1 ch, sc in the next ch. Repeat 4 times. Then sk 1 ch, 7 dc in the next ch, sk 1 ch, sc in the next ch. Repeat 4 times. (8 petals; 1 + 8 x 4 = 33 chains used)
Rolling the Roses
Fasten off, leaving a 12 in (30.5 cm) tail. Start at the beginning end, where the petals are smallest, and roll the strip tightly. Keep the base level so the petals open outward. Stitch through all layers at the base 3–4 times to secure it.
The small roses measure about 1.75 in (4.4 cm) across and the large rose about 2.25 in (5.7 cm). The larger petals in the large rose end up on the outside, which gives it a fuller look.
Leaves (Make 6)
Use the 4.0 mm hook and Color C.
Foundation: Ch 7.
Rnd 1: Sc in the 2nd ch from hook, then hdc, dc, hdc and sc in the next 4 ch. In the last ch, work (sc, ch 2, sl st in the 2nd ch from hook, sc) to make a pointed tip. Working along the opposite side of the chain, sc, hdc, dc and hdc in the next 4 ch, then sc in the last ch. Join with a sl st to the first sc. (5 sts + 2 sc + picot + 5 sts = 12 sts plus the tip picot)
Fasten off, leaving a 10 in (25.4 cm) tail. Each leaf measures about 1.5 in (3.8 cm) long.
Border
The “border” on this piece is the rolled top rim plus the trim around the slot. Rim gauge matches the body: 3.5 sts per inch, worked 1 st into each st.
Top Rim
Rnd 39: Ch 1, sc in each st around. Join. (50 sts: 25 front + 25 back)
Rnd 40: Ch 1, rev sc in each st around. Join. (50 sts: 25 front + 25 back)
Fasten off and weave in the end.
Why the math works: each side already has 25 sts from Rnd 6 onward. Working exactly 1 st into each st keeps the rim the same 7 in (17.8 cm) width as the body. Reverse sc is a little more compact than sc, so the edge pulls in slightly and rolls into a firm cord instead of flaring out.
Slot Trim
Join Color A at the bottom-right corner of the slot. Work 1 round around the opening:
- 10 sc into the 10 skipped sts of Rnd 19 along the bottom edge
- 2 sc into the side of the Rnd 20 stitch at the left end
- 10 sc into the free loops of the 10 chains along the top edge
- 2 sc into the side of the Rnd 20 stitch at the right end
Join. (10 + 2 + 10 + 2 = 24 sts)
Why the math works: using 1 st per stitch along the long edges keeps the slot exactly 10 sts wide. The 2 sc at each end ease the trim around the curve without making the opening ruffle.
Assembly
Strap: Fold the strap into an inverted U. On the inside back wall, stitch the end of one leg flat over sts 4–7, overlapping 1 in (2.5 cm) below the rim. Stitch the other leg over sts 14–17 the same way. That leaves a 6-st gap, about 1.7 in (4.3 cm), between the legs, centered on back st 10. Sew around all four edges of each overlap twice. The loop stands about 3.5 in (8.9 cm) above the rim.
Roses: Center the large rose on front st 35, with its top just under the rim, spanning about Rnds 33–38. Center the small roses on sts 28 and 42, which puts their centers 2 in (5.1 cm) from the large rose’s center so the edges just touch. Sew each rose through its base all the way around.
Leaves: Sew 1 leaf at each outer end, pointing sideways so the tip extends about 0.5 in (1.3 cm) past the side edge. Sew 2 leaves pointing down in the gaps between the roses, around Rnds 30–32. Sew 1 more pointing down and outward under each small rose. The band of roses and leaves spans about 8 in (20.3 cm).
Weave in all ends on the inside.
Final Blocking
- Lightly mist the body with water until it’s damp but not soaked.
- Slide in a tissue pack or a folded towel shaped to 7 x 2.75 in (17.8 x 7.0 cm).
- Square the base ridge and line up the narrow-end tips (sts 23 and 48) on the sides.
- Shape the slot into an even oval with your fingers.
- Pin the strap straight and flat while it dries.
- Fluff the rose petals outward and flatten the leaves with your fingertips.
- Let it dry completely, about 24 hours, before hanging.
Final Quality-Control Checklist
- Base is 5.5 x 2.75 in (14.0 x 7.0 cm) and lies flat.
- Every body round has 50 sts.
- Body is 7 in (17.8 cm) wide and 8.75 in (22.2 cm) tall.
- Slot is centered on the front, with 24 trim sts.
- Rim has 50 rev sc and lies as a smooth cord.
- Strap legs are 6 sts apart and centered on the back.
- Large rose is centered on st 35, with the small roses evenly spaced on each side.
- All 6 leaves are secure, with no curled tips.
- No loose ends show inside or out.
Troubleshooting
The base cups up like a bowl. You’re working too tightly at the ends. Loosen your tension on the increases, or go up half a hook size for Rnds 1–5 only.
The base ripples. You’ve added extra stitches. Count again: each round should grow by exactly 6.
The join seam slants across the body. Make sure the first sc of each round goes into the same st as the sl st join, not the next one.
The slot gapes or sags. Your chains were too loose. Redo Rnd 20 with tighter chains, or work the slot trim with the 4.0 mm hook.
The rim flares. Work Rnd 40 with the 4.0 mm hook.
The roses look flat. Roll them tighter and stitch through more layers at the base.
The strap stretches. Add a fourth row, or sew a length of cotton tape to the back of the strap.
Care
Hand wash in cool water with mild soap, press out the water in a towel, and dry flat over a shaping form. Don’t tumble dry. It can distort the base and flatten the roses.
Final Notes
Each measurement leads to the next. A 5.5 x 2.75 in (14.0 x 7.0 cm) base gives a 50-stitch round, which is 25 stitches, or 7 in (17.8 cm), on each face. Thirty-three straight rounds bring the body to 8.25 in (21.0 cm), and the two-round rim finishes it at 8.75 in (22.2 cm). The 10-stitch slot, the 32-stitch strap and the three roses all line up with those same counts. If you hit each checkpoint, the finished holder will match the size above.
Happy crocheting!