

This hanging car tissue holder is a slim octagon worked in filet crochet. Rings of solid blocks frame a long vertical slot, so the open mesh looks like a lattice window, and a tissue sits in the center ready to grab.
It uses one quiet color, a warm taupe cotton thread that suits beige or gray car interiors. The look is neat and architectural, with straight sides, crisp 45-degree corners, and a smooth crab-stitch rim.
The pattern uses US crochet terms. The finished pouch is about 7.4 in (18.8 cm) wide and 13.4 in (34.0 cm) tall, plus a strap that rises about 7 in (17.8 cm) above the top edge.
You make a filet front panel with a slot worked in two sections, a solid back panel with the same outline, and a narrow strap. Each panel gets an edge round. Then you join the panels with single crochet along the sides and bottom and finish with crab stitch. The top stays open so you can load tissues.
Finished Size and Construction
- Finished size: 7.4 in (18.8 cm) x 13.4 in (34.0 cm), not counting the strap
- Skill level: Intermediate
- Terminology: US
- Yarn weight: Size 3 cotton crochet thread
- Hook: 2.25 mm (US B-1)
- Number of pieces: 3 (front panel, back panel, strap)
- Layout: front stacked on back, strap sewn to the top center of the back
- Piece size: 17 squares x 32 rows = 6.8 in (17.3 cm) x 12.8 in (32.5 cm)
- Size before border: 6.8 in (17.3 cm) x 12.8 in (32.5 cm)
- Border depth: about 0.3 in (0.8 cm) per side
- Slot: 3 squares x 12 rows = 1.2 in (3.0 cm) x 4.8 in (12.2 cm) before edging
- Fits: soft flat tissue packs up to about 6 in (15.2 cm) x 11 in (27.9 cm)
Materials
Use a mercerized size 3 cotton thread. It keeps the filet squares open and the blocks sharp, and it holds up well in a warm car.
- Taupe (only color): about 60 g, 165 yd (151 m)
Tools:
- 2.25 mm (US B-1) crochet hook
- Tapestry needle
- Locking stitch markers
- One 0.75 in (1.9 cm) button and sewing thread
- Blocking mat, rust-proof pins, spray bottle
- Scissors and tape measure
The quantities include about a 25% margin for the swatch and for differences in tension.
Abbreviations (US Terms)
- ch – chain
- sl st – slip stitch
- sc – single crochet
- dc – double crochet
- sk – skip
- sp – space
- st(s) – stitch(es)
- tch – turning chain
- RS / WS – right side / wrong side
- fdc – foundation double crochet: yo, insert hook in the base of the last st made, yo and pull up a loop, yo and draw through 1 loop (this makes the base chain), [yo and draw through 2 loops] twice. Work each following fdc into the base chain of the one before.
- crab st – reverse sc: work left to right, insert hook in the next st to the right, yo and pull up a loop, yo and draw through both loops.
Filet terms:
- Post: the dc between squares. A row of N squares has 3N + 1 sts.
- Block: over a block, dc in next 3 sts. Over a space, 2 dc in ch-2 sp, dc in next dc.
- Space: ch 2, sk 2 sts (or the ch-2 sp), dc in next dc.
- Beginning block increase: ch 5, dc in 4th ch from hook, dc in next ch, dc in first st. Adds 3 sts.
- End block increase: after the last st, work 3 fdc. Adds 3 sts.
- Beginning decrease: don’t chain. Sl st in each of the first 4 sts, then ch 3 (counts as dc). Removes 3 sts.
- End decrease: stop at the post before the last square and leave the last 3 sts unworked. Removes 3 sts.
Gauge and Checkpoints
Gauge: 10 squares and 10 rows = 4 in (10.2 cm) in filet mesh, so 1 square = 0.4 in (1.0 cm).
Swatch: Ch 39, then dc in the 4th ch from hook and in each ch across (37 sts = 12 squares). Work 11 more rows of spaces with a block at each edge. Measure the central 10 squares.
Test one piece first. The back panel is solid and quick to measure, so it makes the best test. Check it at these points:
- After Row 1: 3.6 in (9.1 cm) wide
- After Row 5: 6.8 in (17.3 cm) wide, 2 in (5.1 cm) tall
- After Row 10: 4.0 in (10.2 cm) tall
- After Row 22: 8.8 in (22.4 cm) tall
- After Row 32: 12.8 in (32.5 cm) tall
You can be off by up to 0.25 in (0.6 cm). If the panel is too big, go down 0.25 mm in hook size. If it’s too small, go up 0.25 mm. If only the height is off, pull the first loop of each dc slightly higher or lower.
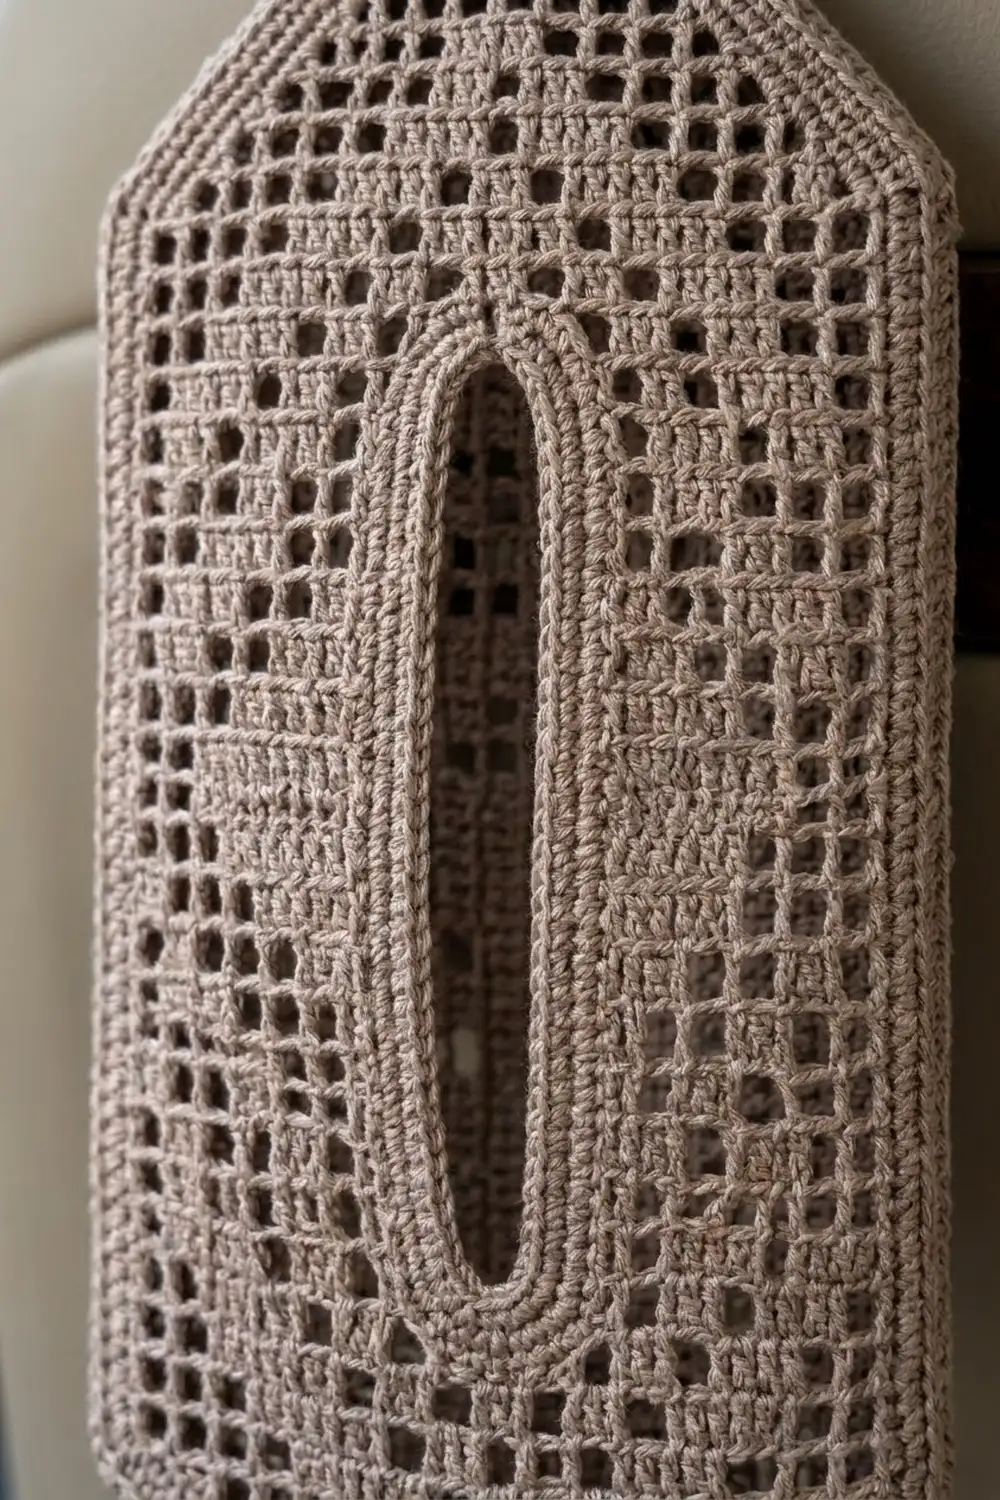
Front Panel
Work the front from the bottom up using the chart. X = block, . = space, _ = slot (not worked), and blank = outside the panel. There are 17 columns. The chart is symmetrical, so every row reads the same in either direction. Rows 24–32 repeat Rows 9–1 in reverse order.
Row 10 & 23    X.X.X.XXXXX.X.X.X
Rows 11-22     X.X.X.X___X.X.X.X
Row 9 & 24     X..X.X.....X.X..X
Row 8 & 25     X...X.X...X.X...X
Row 7 & 26     X....X.X.X.X....X
Row 6 & 27     X.....X.X.X.....X
Row 5 & 28     X......X.X......X
Row 4 & 29      X......X......X
Row 3 & 30       X...........X
Row 2 & 31        X.........X
Row 1 & 32         XXXXXXXXX
Plain rows begin with ch 3, which counts as the first dc. Work the last dc of each row in the top of the tch, then turn.
Row 1 (RS): Ch 30, dc in 4th ch from hook and in each ch across. (28 sts = 9 blocks)
Row 2: Beginning block increase, 9 spaces, end block increase. (34 sts = 11 squares)
Row 3: Beginning block increase, work chart, end block increase. (40 sts = 13 squares)
Row 4: Beginning block increase, work chart, end block increase. (46 sts = 15 squares)
Row 5: Beginning block increase, work chart, end block increase. (52 sts = 17 squares)
Each bottom chamfer now goes 4 squares in and 4 rows up, about 1.6 in (4.1 cm) each way.
Rows 6–10: Work chart. (52 sts each row) The 5 center blocks in Row 10 form the bottom rim of the slot.
Left section, Rows 11–22: Ch 3, then work columns 1–7 only: block, space, block, space, block, space, block. (22 sts) Leave the rest of the row unworked and turn. Work 11 more rows on these 22 sts, ending at the outer edge. Put the live loop on a locking marker.
Right section, Rows 11–22: Sk the next 8 sts of Row 10. Join thread in the next st (the column 10 post) with ch 3, then work columns 11–17. (22 sts) Work 11 more rows, ending at the slot edge. Fasten off.
Both sections are 12 rows, 4.8 in (12.2 cm).
Row 23 (bridge row): Put the left-section loop back on your hook. Ch 3 and work columns 1–7. (22 sts) Work 8 fdc across the slot, dc in the first st of the right section, then work columns 11–17. (22 + 8 + 22 = 52 sts) The fdc and that dc make the top-rim blocks. The bridge should span the 1.2 in (3.0 cm) gap exactly.
Rows 24–28: Work chart. (52 sts each row)
Row 29: Beginning decrease, work chart, end decrease. (46 sts)
Row 30: Same as Row 29. (40 sts)
Row 31: Same as Row 29. (34 sts)
Row 32: Same as Row 29, with all blocks. (28 sts) Don’t fasten off.
Edge Round (both panels)
Ch 1. Sc around the panel as follows, then join with a sl st:
- Top edge: 1 sc in each st: 28 sc
- Each top chamfer: 4 sc per step (2 in the row end, 2 across the square edge) x 4 steps: 16 sc
- Each side (Rows 5–28): 2 sc per row end x 24 rows: 48 sc
- Each bottom chamfer: 16 sc
- Bottom edge: 1 sc in each ch: 28 sc
Total: 28 + 28 + (4 x 16) + (2 x 48) = 216 sc. Fasten off.
Slot Edging (front only)
With RS facing, join at a bottom corner of the slot. Work 8 sc across the unworked Row 10 sts, 24 sc up the side, 8 sc across the fdc bases, and 24 sc down the other side. (64 sc) Join and fasten off.
Back Panel
Work the back like the front, but make every square a block and skip the slot. Use the same increases and decreases. Stitch counts: Row 1: 28; Row 2: 34; Row 3: 40; Row 4: 46; Rows 5–28: 52; Row 29: 46; Row 30: 40; Row 31: 34; Row 32: 28. Finish with the Edge Round. (216 sc)
Strap
Row 1: Ch 12, dc in 4th ch from hook and in each ch across. (10 sts)
Rows 2–19: Ch 3, dc in next 3 sts, ch 2, sk 2, dc in next st, dc in next 2 sts, dc in top of tch. (10 sts: block, space, block)
Row 20: Ch 3, dc in next 3 sts, 2 dc in ch-2 sp, dc in next 3 sts, dc in top of tch. (10 sts)
Edge Round: Ch 1. Work 10 sc across Row 20, 40 sc down the side, 10 sc across the foundation, and 40 sc up the other side. (100 sc) Join.
Button loop: Sl st to the 5th sc of the top edge, ch 10, sl st in the same st. Fasten off.
Before edging, the strap measures 1.2 in (3.0 cm) x 8.0 in (20.3 cm).
Make All Pieces
Make 1 of each piece, all in taupe:
[ Strap ]          3 x 20 squares, filet center
       |
[ Front panel ]    17 x 32 squares, filet with slot   (top layer)
[ Back panel  ]    17 x 32 squares, solid dc          (bottom layer)
Joining
Place the front on the back, WS together, with the slot facing you. Both edge rounds have 216 sc in the same order, so the stitches line up one to one.
Join at the corner where the right top chamfer starts. Working through both layers, sc in each matching pair: 48 down the side, 16 along the chamfer, 28 across the bottom, 16 along the other chamfer, and 48 up the side. (156 sc)
At the left corner, keep going through the front only and work 60 sc (16 + 28 + 16) back to the right corner. Then move to the back and work its 60 open sts to the left corner. (156 + 60 + 60 = 276 sc) Fasten off.
Keep your tension even. If the seam ripples, your loops are too loose. If it pulls in, relax your grip. The joined pouch should measure about 7.2 in (18.3 cm) x 13.2 in (33.5 cm).
Border
Border gauge: 3 sc per square along stitch edges, 2 sc per row end, and 4 sc per chamfer step. Each rate fits its edge, so the border lies flat.
Crab Stitch Round: Join at a corner. Work 1 crab st in each sc of the joining round. That’s 48 on each side, 16 on each bottom chamfer, 28 across the bottom, 60 across the front’s open top, and 60 across the back’s open top. (276 crab st) Fasten off.
Why the math works: Each panel’s edge round has 216 sc. The seam uses 156 matched pairs, which leaves 60 open sts per panel (156 + 60 = 216). The border adds 1 crab st per joining sc, so the stitch count doesn’t change and the corners stay crisp.
Attach the strap: Center the strap’s foundation end over columns 4–6 of the back panel’s top edge, on the seat side. Overlap it by 1 in (2.5 cm) and sew it down firmly. Wrap the strap around the headrest post and sew the button where the loop lands, about 3 in (7.6 cm) below the strap’s top.
Final Blocking
- Mist the holder until it’s damp.
- Pin it RS up to 7.4 in (18.8 cm) x 13.4 in (34.0 cm).
- Pin the chamfers straight at 45 degrees.
- Pin the slot open to about 1 in (2.5 cm) wide.
- Nudge the squares straight with your fingers.
- Pin the strap straight at 1.4 in (3.6 cm) wide.
- Let it dry completely before you unpin.
Final Quality-Control Checklist
- Each panel edge round has 216 sc
- The joining round and the crab round each have 276 sts
- The slot edging has 64 sc and lies flat
- The block rings match on both sides of the slot
- All 8 corners are even
- The strap is secure and the button fastens easily
- Ends are woven in through solid blocks
Troubleshooting
- Squares lean: your dc heights vary. Keep each yo even, then block firmly.
- Slot sections don’t match: both sections need exactly 12 rows.
- Bridge puckers: redo the fdc so they span the gap.
- Chamfers ruffle: use 3 sc per step on both panels so they still match.
- Edges don’t match when you join: recount both edge rounds before joining.
Care
Hand wash in cool water, roll in a towel to remove the water, and dry flat. Don’t leave it on a hot dashboard for long.

Final Notes
Everything starts from one measurement: 1 square = 0.4 in (1.0 cm). Seventeen squares make 6.8 in (17.3 cm) of width and 32 rows make 12.8 in (32.5 cm) of height. The edge, joining, and crab rounds add about 0.3 in (0.8 cm) per side, for a finished size of 7.4 in (18.8 cm) x 13.4 in (34.0 cm). Check your gauge early and match your edge counts, and the rest falls into place.
Happy crocheting!