

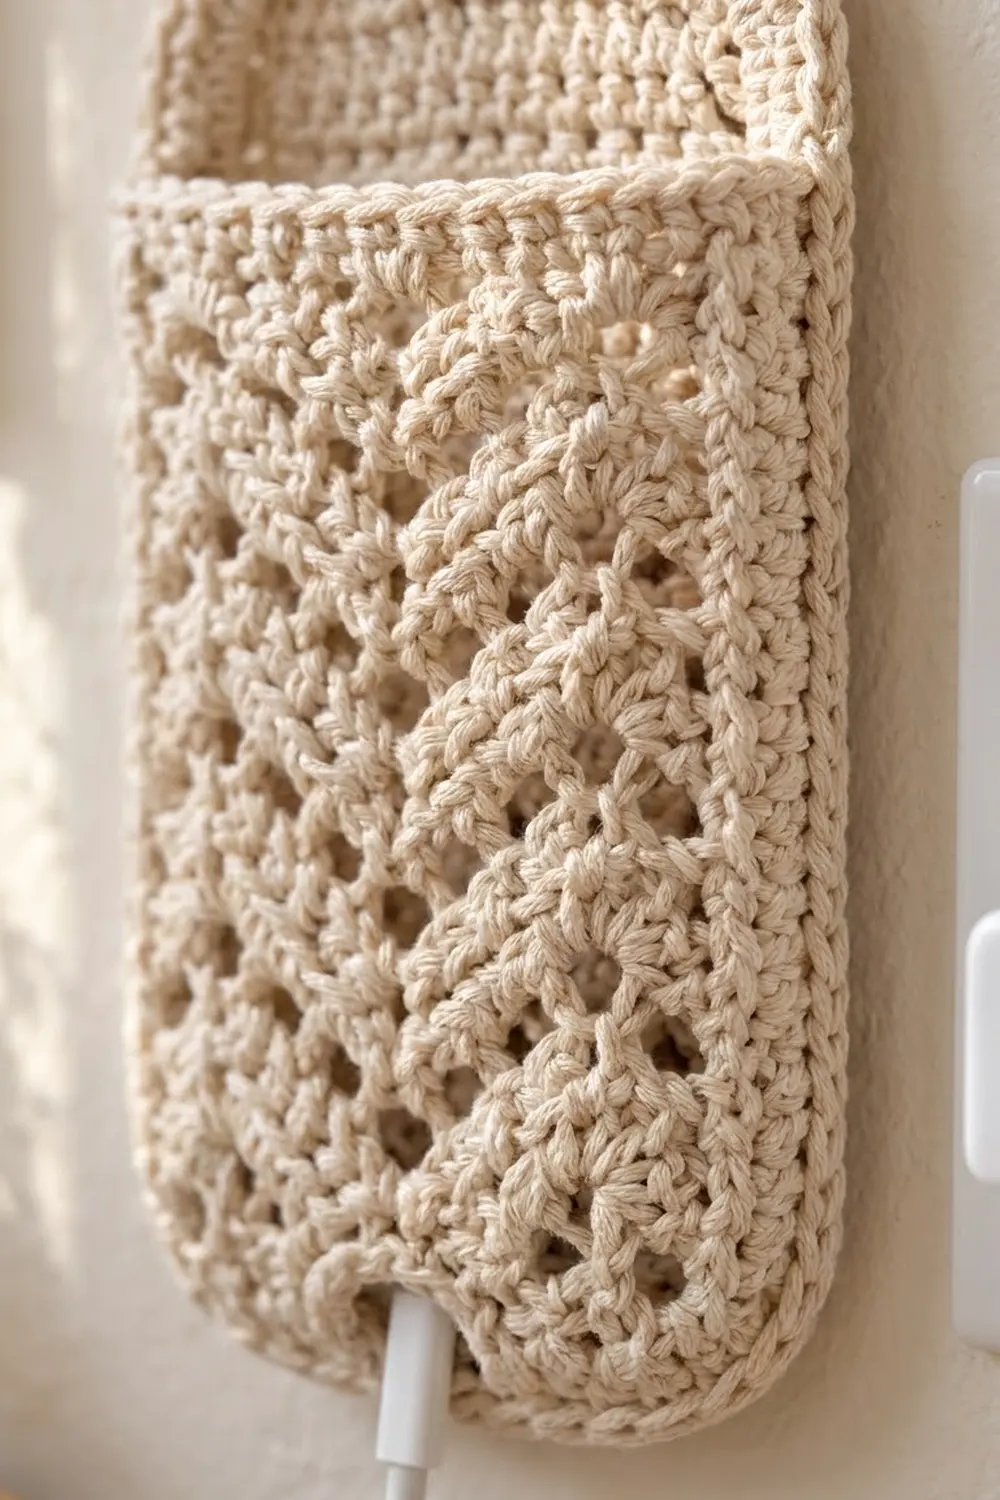
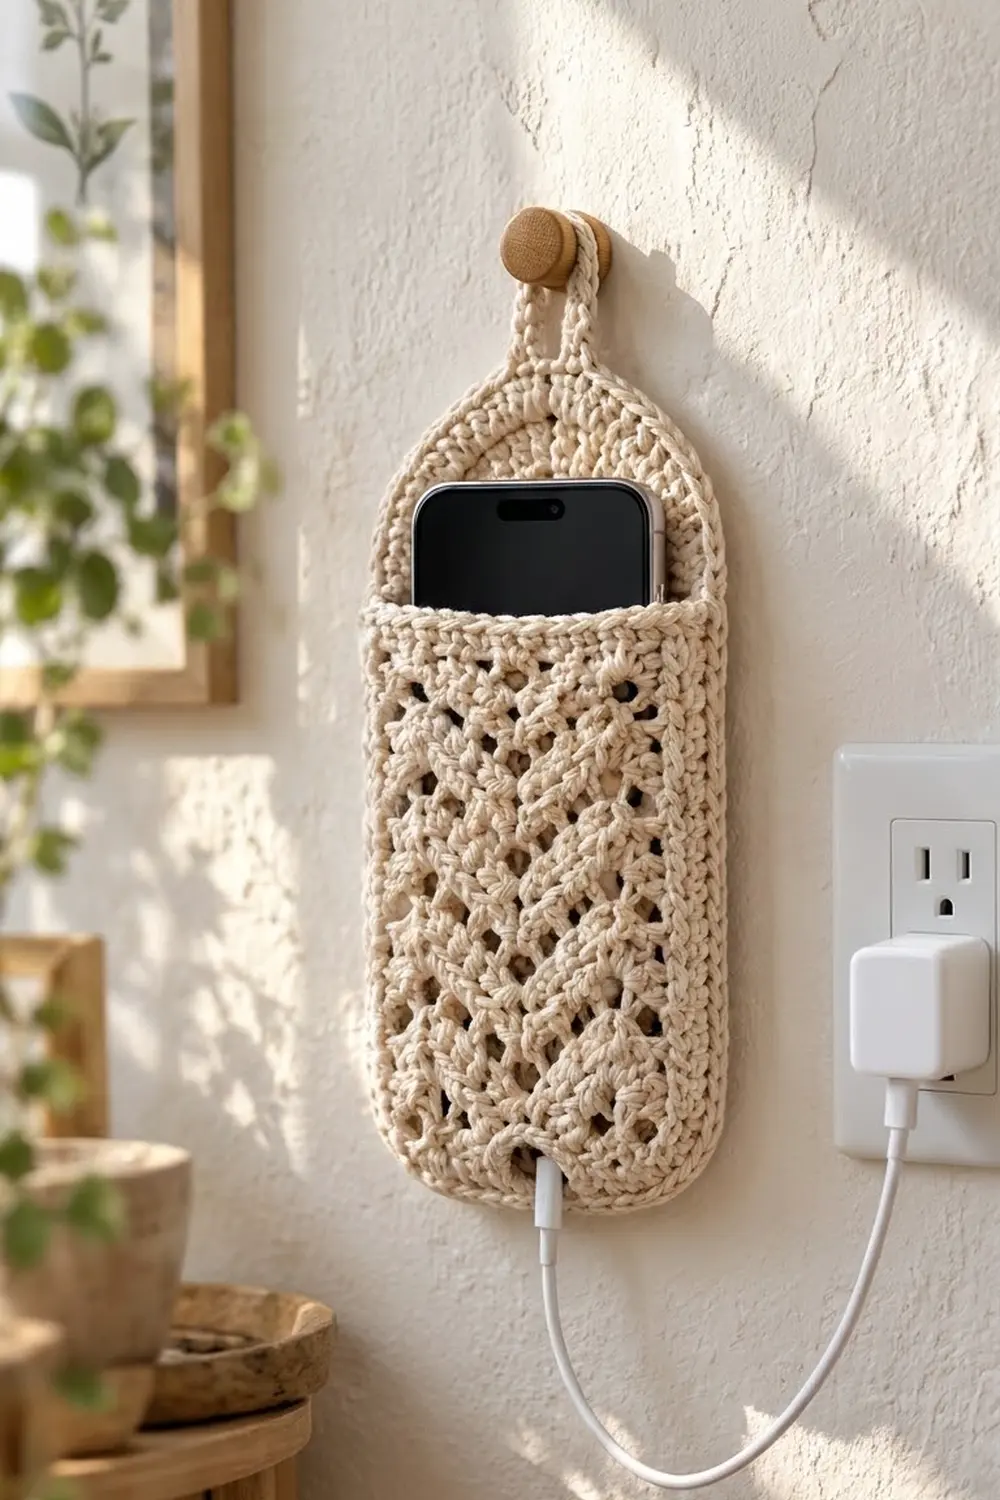
The Willow Lace Wall Charging Phone Holder is a slim, hanging pocket that keeps your phone off the counter while it charges. It has a solid back panel with a rounded arch top and a hanging loop. The front pocket has eyelet chevrons that look like rows of willow leaves.
It is made in one natural cream cotton, which suits a calm, Scandinavian-style room. The lace pocket is light enough to look pretty but firm enough to hold a phone in a slim case. A small slot at the bottom center lets the charging cable come out of the pocket.
The pattern uses US crochet terms. The finished holder is 4.5 in (11.4 cm) wide and 10 in (25.4 cm) long, plus a 1.5 in (3.8 cm) hanging loop.
Construction overview: You work the back panel flat from the bottom up, with increases for rounded corners and decreases for the arch. You work the pocket flat from the bottom up too, using the same corner shaping. Then you lay the pocket on top of the back panel. Border Round 1 joins the two layers, Round 2 adds a reverse single crochet (rope-like) edge, and the loop goes on last.
Finished Size and Construction
- Finished size: 4.5 in x 10 in (11.4 cm x 25.4 cm), loop not included
- Hanging loop: 1.5 in (3.8 cm) above the top edge
- Pocket height (finished): 5.75 in (14.6 cm)
- Skill level: Easy-intermediate
- Terminology: US
- Yarn weight: Worsted (#4) cotton
- Hook: 4.0 mm (G-6)
- Number of pieces: 2 (1 back panel, 1 front pocket)
- Layout: Pocket laid over the lower part of the back panel, with the bottom edges lined up
- Back panel before border: 4 in x 9.5 in (10.2 cm x 24.1 cm)
- Pocket before border: 4 in x 5.5 in (10.2 cm x 14.0 cm)
- Border depth: 0.25 in (0.6 cm) on each edge
Materials
Yarn: Use a smooth worsted-weight cotton or cotton blend. Cotton holds its shape well and won’t stretch out under the weight of a phone. Avoid acrylic that sags or very splitty yarn, because the eyelets need crisp stitch tops.
- Cream / Natural: 50 g, about 85 m (93 yd)
The quantity includes a margin of roughly 20% for swatching and the border. The holder itself uses about 40 g.
Tools:
- 4.0 mm (G-6) crochet hook
- Tapestry needle
- 6 to 8 locking stitch markers
- Rust-proof pins and a blocking mat
- Measuring tape or ruler
- Scissors
Abbreviations (US Terms)
- ch – chain
- sc – single crochet
- sc2tog – single crochet 2 together (decrease)
- sl st – slip stitch
- sk – skip
- st(s) – stitch(es)
- sp – space
- RS / WS – right side / wrong side
- rev sc – reverse single crochet
Special stitches:
- Eyelet: ch 1, sk 1 st. On the next row, work 1 sc into the ch-1 sp.
- Double eyelet: ch 2, sk 2 sts. On the next row, work 2 sc into the ch-2 sp.
- Reverse sc (crab stitch): Work from left to right (right-handed). Insert the hook into the next st to the right, yarn over, pull up a loop, then yarn over and pull through both loops. This makes the rope-like edge.
Turning chains: The ch 1 at the start of each row does not count as a stitch.
Gauge and Checkpoints
Gauge: 16 sc and 18 rows = 4 in (10.2 cm) in sc, which is 4 sts and 4.5 rows per inch. The eyelet rows are the same height as plain rows, so the pocket matches this gauge.
Test piece first: Make the pocket first and use it as your gauge test, since its lace shows any tension problems.
Checkpoints:
- After Row 3 (either piece): 16 sts, 4 in (10.2 cm) wide
- Pocket after Row 20: about 4.5 in (11.4 cm) tall
- Pocket after Row 25: 5.5 in (14.0 cm) tall
- Back panel after Row 35: about 7.75 in (19.7 cm) tall
- Back panel after Row 43: 9.5 in (24.1 cm) tall
If your piece is too big: Go down a hook size, to 3.75 mm (F-5). If it’s too small: Go up to 4.5 mm (7). Row height matters most here, because the pocket rows have to line up with the back panel rows when you join them. Both pieces must be made at the same tension.
Front Pocket
Ch 13.
Row 1 (RS): Sc in 2nd ch from hook and in each ch across, turn. (12 sts)
Row 2 (WS): Ch 1, 2 sc in first st, sc in next 10 sts, 2 sc in last st, turn. (14 sts)
Row 3: Ch 1, 2 sc in first st, sc in next 12 sts, 2 sc in last st, turn. (16 sts)
Row 4: Ch 1, sc in each st across, turn. (16 sts)
Across the 16 sts, stitch positions 1 and 16 are always plain edge sts. In the eyelet rows the holes move outward by one stitch every two rows, which makes stacked V chevrons with a double eyelet at each point.
Row 5 (Row A, RS): Ch 1, sc 2, eyelet, sc 3, eyelet, sc 2, eyelet, sc 3, eyelet, sc 2, turn. (12 sc + 4 ch-1 sps = 16 sts)
Row 6 and all even rows through Row 22 (WS): Ch 1, sc in each sc and in each ch-1 sp across; work 2 sc in any ch-2 sp, turn. (16 sts)
Row 7 (Row B): Ch 1, sc 1, eyelet, sc 3, eyelet, sc 4, eyelet, sc 3, eyelet, sc 1, turn. (12 sc + 4 ch-1 sps = 16 sts)
Row 9 (Row C): Ch 1, sc 4, eyelet, sc 6, eyelet, sc 4, turn. (14 sc + 2 ch-1 sps = 16 sts)
Row 11 (Row D): Ch 1, sc 3, eyelet, sc 3, double eyelet, sc 3, eyelet, sc 3, turn. (12 sc + 2 ch-1 sps + 1 ch-2 sp = 16 sts)
Row 12: Work as Row 6. (16 sts)
Rows 13–20: Repeat Rows 5–12 once more.
Row 21: Work as Row A. (16 sts)
Row 22: Work as Row 6. (16 sts)
Rows 23–25 (top band): Ch 1, sc in each st across, turn. (16 sts)
Fasten off and weave in the ends. The pocket should measure 4 in x 5.5 in (10.2 cm x 14.0 cm), with 25 row-ends on each side and 12 foundation chains along the bottom.
Back Panel
Ch 13.
Rows 1–3: Work as Pocket Rows 1–3. (12, 14, then 16 sts)
Rows 4–35: Ch 1, sc in each st across, turn. (16 sts)
Checkpoint: about 7.75 in (19.7 cm) tall.
Arch shaping:
Row 36: Ch 1, sc2tog, sc 12, sc2tog, turn. (14 sts)
Row 37: Ch 1, sc in each st across, turn. (14 sts)
Row 38: Ch 1, sc2tog, sc 10, sc2tog, turn. (12 sts)
Row 39: Ch 1, sc in each st across, turn. (12 sts)
Row 40: Ch 1, sc2tog, sc 8, sc2tog, turn. (10 sts)
Row 41: Ch 1, sc2tog, sc 6, sc2tog, turn. (8 sts)
Row 42: Ch 1, sc2tog, sc 4, sc2tog, turn. (6 sts)
Row 43: Ch 1, sc2tog, sc 2, sc2tog. (4 sts)
Fasten off. The back panel should measure 4 in x 9.5 in (10.2 cm x 24.1 cm), with 43 row-ends on each side, 12 foundation chains along the bottom, and 4 sts across the top.
Make All Pieces
Make 1 back panel and 1 front pocket, both in Cream. Here is how they stack, seen from the front:
      ( loop )
     /  arch  \      Back rows 36–43
    |  back    |     Back rows 26–35
    |----------|     Pocket top band (rows 23–25)
    | v  v  v  |
    |  pocket  |     Pocket rows 1–25 over back rows 1–25
    | v  v  v  |
     \__ slot__/     Bottom: 12 chains, both layers
Joining
Method: Lay the back panel RS up. Place the pocket on top, RS up, with the bottom edges lined up. Border Round 1 below joins them by working sc through both layers.
Stitch-to-stitch logic: Both pieces start with the same 13-chain foundation and the same Rows 1–3, so their bottom curves match exactly. Pocket row-ends 1–25 sit on back row-ends 1–25, one to one. Pin them at Rows 1, 10, 20 and 25 on each side.
Tension: Insert the hook through the pocket edge first, then the back panel edge, and keep your sc relaxed. If you pull tight, the pocket will pucker and the side edges will come out shorter than the center.
Checkpoint: Once pinned, the pocket should sit flat with its top band 4 in (10.2 cm) below the top of the arch.
Border
Border gauge: 1 sc per row-end and 1 sc per stitch or foundation chain. The two rounds together add 0.25 in (0.6 cm) to each edge.
Round 1 (sc, joining): With RS facing, join yarn in the first st of back Row 43.
- Top: sc in each of the 4 sts. (4 sc)
- First side: sc into each row-end from Row 43 down to Row 1. Work the first 18 (Rows 43–26) through the back panel only, then the next 25 (Rows 25–1) through both layers. (43 sc)
- Bottom: 2 sc in the first foundation ch, then sc in the next 3 chs through both layers. Work sc in the next 4 chs through the back panel only to leave the cable slot. Then sc in the next 3 chs through both layers and 2 sc in the last ch. (2 + 3 + 4 + 3 + 2 = 14 sc)
- Second side: sc into each row-end from Row 1 up to Row 43. Work the first 25 through both layers, then the last 18 through the back only. (43 sc)
- Sl st to the first sc. Total: 4 + 43 + 14 + 43 = 104 sc.
Round 2 (rev sc): Ch 1, rev sc in each st around, then sl st to join. (Top 4, sides 43 each, bottom 14 = 104 sts) Fasten off.
Hanging loop: Join yarn in the 2nd st of the top edge. Ch 16, then sl st in the 3rd top st. Work 20 sc into the ch-16 loop, then sl st into the 2nd top st. Fasten off. The loop stands about 1.5 in (3.8 cm) tall.
Why the math works: The side counts are 43 because the back panel has 43 rows. The joined stretch is 25 because the pocket has 25 rows that match back Rows 1–25 exactly. The bottom count of 14 is the 12 shared foundation chains (worked 1 per chain) plus 2 extra sts at the corners, which round off the bottom. No stitches are added at the seams. With 0.25 in (0.6 cm) on each edge, 4 in becomes 4.5 in (11.4 cm), 9.5 in becomes 10 in (25.4 cm), and the pocket becomes 5.75 in (14.6 cm).
Final Blocking
- Mist the holder lightly with water, or dampen it and gently squeeze it out in a towel.
- Lay it flat, back panel down, on the blocking mat.
- Pin the sides straight to 4.5 in (11.4 cm) wide and the length to 10 in (25.4 cm).
- Shape the arch and the bottom corners into smooth curves with your fingers.
- Open each eyelet slightly with a fingertip so the chevrons line up.
- Slide a piece of card about 3 in (7.6 cm) wide into the pocket so the layers don’t dry stuck together.
- Let it dry completely before you take out the pins.
Final Quality-Control Checklist
- Holder measures 4.5 in x 10 in (11.4 cm x 25.4 cm)
- Pocket top band sits 4 in (10.2 cm) below the top edge
- Border Round 1 has 104 sts: top 4, sides 43 each, bottom 14
- Cable slot is open, 1 in (2.5 cm) wide, at the bottom center
- Eyelets form clean V chevrons with no missing holes
- Loop is centered and firmly anchored
- All ends are woven in securely, away from the eyelets
Troubleshooting
Pocket rows don’t line up with the back: Your row tension changed between the pieces. Count row-ends instead of measuring and match them 1 to 1, easing gently if needed.
Chevrons look uneven: Check that every WS row has 16 sts and that you worked 2 sc into each ch-2 sp.
Pocket puckers: Round 1 was too tight. Redo it with a looser tension or a 4.5 mm hook.
Phone is too snug: The pocket fits phones up to about 3.2 in (8.1 cm) wide, including the case. For a wider phone, add 4 sts to the chain for both pieces (ch 17) and add 2 sts to each eyelet row’s center sc group.
Edge is wavy: You worked more than 1 sc per row-end. Recount against 43 per side.
Cable slot is closed: You worked the center 4 bottom chs through both layers. Undo the bottom of Round 1 and redo them through the back only.
Care
Hand wash in cool water with mild soap, press out the water in a towel, and dry flat. Reshape the pocket while it’s damp.
Final Notes
Here is how the measurements build on each other. A gauge of 16 sc x 18 rows = 4 in (10.2 cm) gives a 16-stitch panel 4 in (10.2 cm) wide. The 43-row back panel is 9.5 in (24.1 cm) tall and the 25-row pocket is 5.5 in (14.0 cm) tall. The 104-stitch, two-round border adds 0.25 in (0.6 cm) on each edge, so the finished holder is 4.5 in x 10 in (11.4 cm x 25.4 cm) with a 1.5 in (3.8 cm) loop. As long as you count rows and keep the same tension on both pieces, the pocket and panel will line up when you join them.
Happy crocheting!