

The Rosewave Hanging Toilet Paper Holder turns a basic bathroom item into a piece of soft lace. A long panel hangs from a hook. A column of open filet squares runs up the middle, with a raised ribbon wave on each side. At the bottom, two round cups hold the roll between them, so you don’t need a metal holder.
The sample uses one dusty rose cotton, which suits warm wood, stone, and cream bathrooms. The style is calm and a little vintage: a solid frame, open lace, and a corded edge that holds its shape.
This pattern uses US crochet terms. The finished panel measures 6 in (15.2 cm) wide by 15.25 in (38.7 cm) tall. With the hanging loop, it is 17.25 in (43.8 cm) long. Each cup measures 4.75 in (12.1 cm) across and 0.75 in (1.9 cm) deep.
You’ll work the panel flat in double crochet rows from the bottom up, decrease it into an arch, and then add a border round that builds in the hanging loop. The two cups are worked in joined rounds and sewn to the front of the panel.
Finished Size and Construction
- Finished size: 6 in x 15.25 in (15.2 cm x 38.7 cm) panel; 17.25 in (43.8 cm) total with loop
- Skill level: Intermediate (post stitches, decreases, reverse single crochet)
- Terminology: US
- Yarn weight: Worsted (#4) cotton
- Hook: 5.0 mm (H-8)
- Number of pieces: 3 (1 panel, 2 end cups)
- Layout: Panel hangs vertically; the cups face each other at its lower edge
- Panel size before border: 5.25 in x 14.5 in (13.3 cm x 36.8 cm)
- Cup size: 4.75 in (12.1 cm) across, 0.75 in (1.9 cm) wall
- Border depth: 3/8 in (1.0 cm) per side
Materials
Yarn: Use a smooth, mercerized or matte worsted-weight cotton. Cotton holds up to humidity, keeps its shape, and shows the post-stitch ribbons clearly. Avoid acrylic, which gets fuzzy and stretches when it hangs.
- Dusty Rose: 120 g, about 185 m (202 yd)
The panel uses about 60 g and each cup about 15 g. The amount above includes a margin of roughly 30 g for your gauge swatch and any differences in tension.
Tools:
- 5.0 mm (H-8) crochet hook
- Tapestry needle
- 4 locking stitch markers
- Measuring tape
- Rust-proof pins and a blocking mat
- One standard toilet paper roll, about 4 in (10.2 cm) wide and 4.5 in (11.4 cm) across, for fitting
Abbreviations (US Terms)
- ch – chain
- sl st – slip stitch
- sc – single crochet
- dc – double crochet
- dc2tog – double crochet 2 together
- FPdc – front post double crochet
- BPdc – back post double crochet
- BLO – back loop only
- MR – magic ring
- sk – skip
- st(s) – stitch(es)
- sp – space
- RS / WS – right side / wrong side
Special stitches:
- Rib (ribbon stitch): On RS rows, work a FPdc. On WS rows, work a BPdc. Either way, the stitch stands up on the RS. Skip the stitch behind each Rib so the count stays the same.
- Beginning decrease (beg dec): Ch 2, then dc in the next st. Together these count as one dc2tog.
- Reverse sc: Work sc from left to right (right-handed), inserting the hook into the next stitch to the right. This makes the rope-like edge.
Gauge and Checkpoints
Gauge: 16 dc and 8 rows = 4 in (10.2 cm). 16 sc and 18 rounds = 4 in (10.2 cm).
Before you start, work Rows 1–9 of the panel as your test piece. It is the full pattern width and one full wave repeat.
Checkpoints:
- After Row 1: 5.25 in (13.3 cm) wide
- After Row 9: 4.5 in (11.4 cm) tall
- After Row 25: 12.5 in (31.8 cm) tall
- After Row 29: 14.5 in (36.8 cm) tall; top edge 3.25 in (8.3 cm) wide
- Cup Rnd 5: about 2.4 in (6.1 cm) across
- Cup Rnd 10: 4.75 in (12.1 cm) across
If your piece is too big, go down to a 4.5 mm hook. If it is too small, go up to a 5.5 mm hook. For this item, width matters more than height, because the cups depend on the panel’s width.
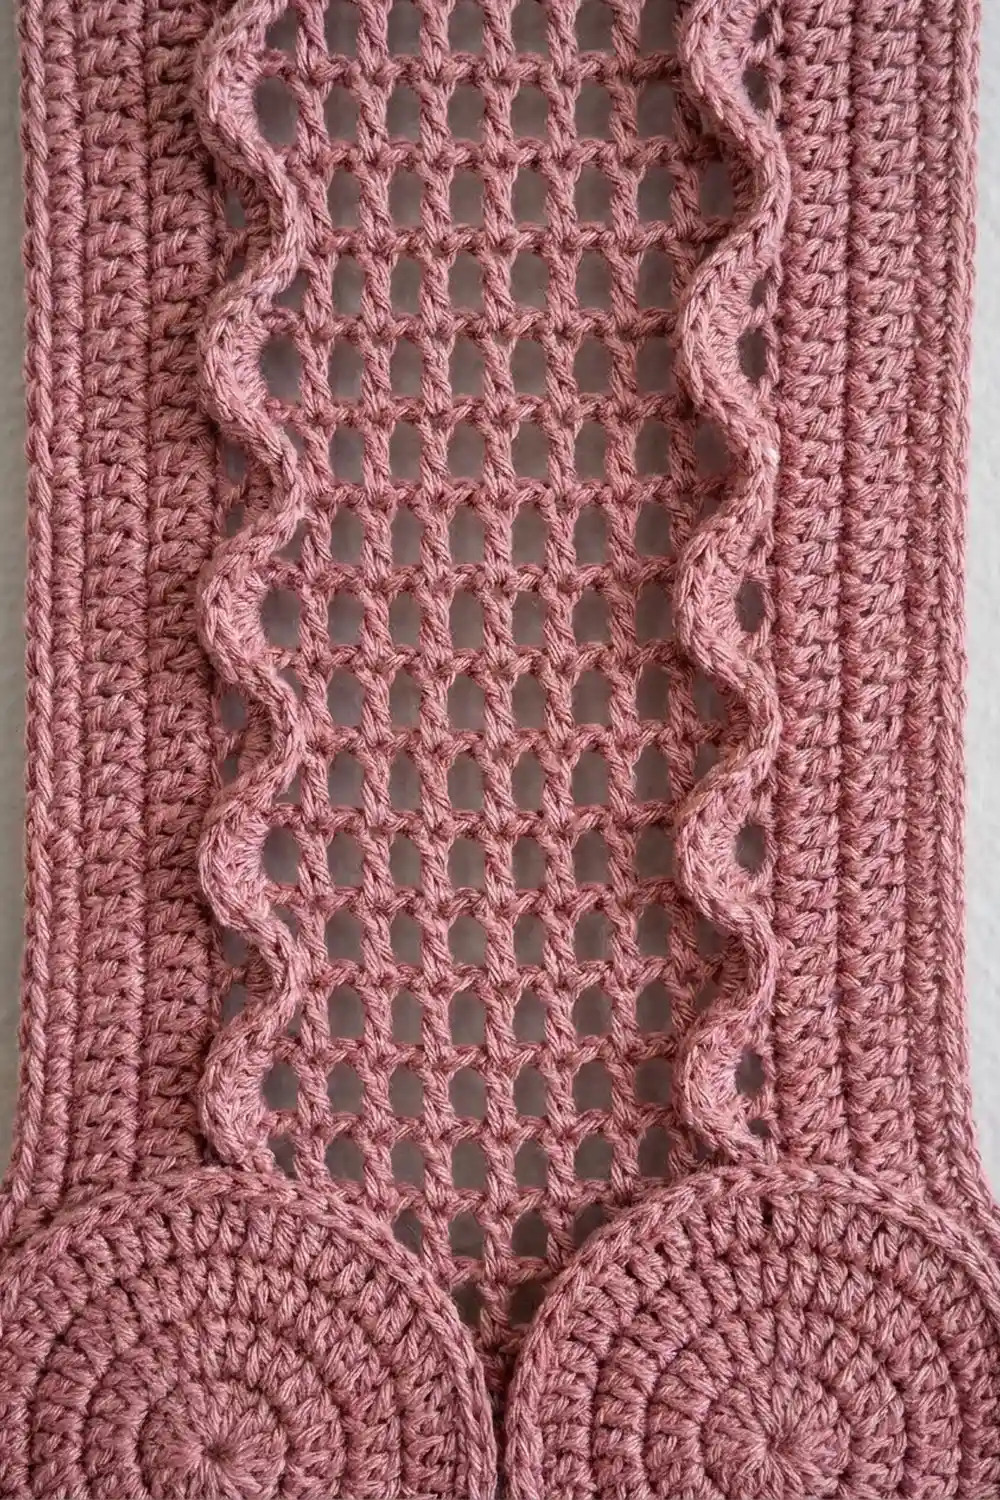
Back Panel
The panel has 21 stitches. Each ch-1 space counts as one stitch. From edge to edge, every row reads:
Edge (2) – Wave A (5) – Mesh (7) – Wave B (5) – Edge (2)
The panel is symmetric, so the row reads the same from either direction. Count Wave A’s stitches from the outer edge inward. Wave B is worked as Wave A’s mirror image.
- Edge start: Ch 3 (counts as dc), dc in next st.
- Mesh: Dc in next st, [ch 1, sk next st or ch-1 sp, dc in next dc] 3 times. That’s 7 sts with 3 open squares.
- Edge end: Dc in next st, dc in top of turning ch.
Moving the ribbon: Work each pair of Ribs around the posts of the previous row’s pair, in order. When the position changes, the post stitch reaches one stitch over at an angle, which makes the wave lean. Work a dc into the top of every stitch that isn’t a Rib.
Row 1 (WS): Ch 23, dc in 4th ch from hook and in each ch across. Turn. (21 sts)
Rows 2–25: Work the 8-row wave repeat 3 times. In the table, “Rib 2” means two Ribs side by side.
| Repeat row | Panel rows | Wave A (outer to inner) | Wave B (inner to outer) |
|---|---|---|---|
| 1 (RS) | 2, 10, 18 | Rib 2, dc 3 | dc 3, Rib 2 |
| 2 (WS) | 3, 11, 19 | dc 1, Rib 2, dc 2 | dc 2, Rib 2, dc 1 |
| 3 (RS) | 4, 12, 20 | dc 2, Rib 2, dc 1 | dc 1, Rib 2, dc 2 |
| 4 (WS) | 5, 13, 21 | dc 3, Rib 2 | Rib 2, dc 3 |
| 5 (RS) | 6, 14, 22 | dc 3, Rib 2 | Rib 2, dc 3 |
| 6 (WS) | 7, 15, 23 | dc 2, Rib 2, dc 1 | dc 1, Rib 2, dc 2 |
| 7 (RS) | 8, 16, 24 | dc 1, Rib 2, dc 2 | dc 2, Rib 2, dc 1 |
| 8 (WS) | 9, 17, 25 | Rib 2, dc 3 | dc 3, Rib 2 |
Each row is worked as: edge start, Wave A, Mesh, Wave B, edge end. Turn at the end of every row. (21 sts every row)
The ribbons move toward the mesh for 4 rows, then back toward the edges for 4 rows. This makes the two mirrored S-curves on either side of the mesh.
Arch top: The waves end after Row 25. In Rows 26–29, keep the mesh over the center 7 sts and work dc in every other stitch.
- Row 26 (RS): Beg dec, dc in next 5 sts, Mesh, dc in next 5 sts, dc2tog. Turn. (19 sts)
- Row 27: Beg dec, dc in next 4 sts, Mesh, dc in next 4 sts, dc2tog. Turn. (17 sts)
- Row 28: Beg dec, dc in next 3 sts, Mesh, dc in next 3 sts, dc2tog. Turn. (15 sts)
- Row 29: Beg dec, dc in next 2 sts, Mesh, dc in next 2 sts, dc2tog. (13 sts) Don’t fasten off.
The panel should now measure 5.25 in x 14.5 in (13.3 cm x 36.8 cm).
End Cups (make 2)
Work in joined rounds. Don’t turn. The beginning ch 1 doesn’t count as a stitch.
- Rnd 1: 6 sc in MR, sl st to first sc. (6)
- Rnd 2: Ch 1, 2 sc in each st, join. (12)
- Rnd 3: Ch 1, [sc in next st, 2 sc in next st] 6 times, join. (18)
- Rnd 4: Ch 1, [sc in next 2 sts, 2 sc in next st] 6 times, join. (24)
- Rnd 5: Ch 1, [sc in next 3 sts, 2 sc in next st] 6 times, join. (30)
- Rnd 6: Ch 1, sc in next 2 sts, 2 sc in next st, [sc in next 4 sts, 2 sc in next st] 5 times, sc in next 2 sts, join. (36)
- Rnd 7: Ch 1, [sc in next 5 sts, 2 sc in next st] 6 times, join. (42)
- Rnd 8: Ch 1, sc in next 3 sts, 2 sc in next st, [sc in next 6 sts, 2 sc in next st] 5 times, sc in next 3 sts, join. (48)
- Rnd 9: Ch 1, [sc in next 7 sts, 2 sc in next st] 6 times, join. (54)
- Rnd 10: Ch 1, sc in next 4 sts, 2 sc in next st, [sc in next 8 sts, 2 sc in next st] 5 times, sc in next 4 sts, join. (60)
The disc should measure 4.75 in (12.1 cm) across. Offsetting the increases on alternate rounds keeps the disc round instead of six-sided.
- Rnd 11: Ch 1, sc in BLO of each st around, join. (60) This round turns the edge up into a wall and leaves a ridge where the base meets the wall.
- Rnds 12–13: Ch 1, sc in each st around, join. (60)
- Rnd 14: Ch 1, reverse sc in each st around, join. (60) Fasten off and leave a 24 in (61.0 cm) tail for sewing.
The wall should be 0.75 in (1.9 cm) deep.
Make All Pieces
- Dusty Rose: 1 back panel and 2 end cups
Layout (front view):
            ( loop )
        +-------------+
        |   arched    |
        |    top      |
        |  W  MESH  W |
        |  A  MESH  A |
        |  V  MESH  V |
        |  E  MESH  E |
        |             |
     [CUP]>  roll  <[CUP]
        +-------------+
Border
Finish the border before sewing on the cups.
Border gauge: 4 sc = 1 in (2.5 cm). Along the sides, each dc row-end is 0.5 in (1.3 cm) tall and takes 2 sc.
Rnd 1: Ch 1. Turn the panel and work sc evenly around the whole edge. Join with sl st to the first sc.
- Each long side: 2 sc in each of the 29 row-ends = 58 sc
- Bottom: 1 sc in each of the 21 foundation loops, with 3 sc in each corner stitch = 21 + 4 extra = 25 sc
- Top: 1 sc in each of the 13 sts of Row 29, with 2 sc in the first and last sts = 13 + 2 extra = 15 sc
Total: 58 + 58 + 25 + 15 = 156 sc
Mark the center sc of each bottom corner. Also mark top sts 5 and 11, counting the top’s 15 sc from right to left.
Rnd 2 (hanging loop): Ch 1. Sc in each st around, with 3 sc in each marked bottom-corner st. When you reach the top: sc in top sts 1–5, ch 16, sk top sts 6–10, then sc in top sts 11–15. Join.
Count: 151 sc worked one per existing st + 4 extra corner sc = 155 sc, plus one ch-16 loop.
Per side:
- Each long side: 58
- Bottom: 25 + 4 extra = 29
- Top: 5 + 5 = 10
Rnd 3: Ch 1. Reverse sc in each sc around, and work 24 reverse sc into the ch-16 loop. Join and fasten off.
Count: 155 + 24 = 179 sts
Why the math works: At 4 sc per inch, 58 sc fits the 14.5 in (36.8 cm) sides and 21 sc fits the 5.25 in (13.3 cm) base, so the edges lie flat without ruffling or pulling in. Packing 24 stitches onto a 16-chain loop makes it firm, so it won’t stretch under the roll’s weight. The border adds 3/8 in (1.0 cm) on each side. That brings the panel to 6 in x 15.25 in (15.2 cm x 38.7 cm). The loop rises about 2 in (5.1 cm) above the top.
Joining
Method: Whipstitch with the yarn tail, through both layers.
- Lay the panel RS up. With pins, mark a vertical line 7/8 in (2.2 cm) in from each finished side edge. The lines will be 4.25 in (10.8 cm) apart, which gives a standard 4 in (10.2 cm) roll 1/4 in (0.6 cm) of ease.
- Stand a cup on its edge with the open side facing the panel’s center. Line the lowest point of the cup up with the bottom edge of the panel.
- Find the Rnd 11 ridge, where the base meets the wall. Count 12 stitches of the ridge, centered on the part touching the panel.
- Sew those 12 ridge stitches to the pinned line, one stitch to each panel row-end. That covers 3 in (7.6 cm) of the panel’s height.
- Repeat with the second cup on the other side, mirroring it.
Tension: Pull each stitch snug but not tight. If the seam puckers, the cups will tilt inward and pinch the roll.
Size checkpoint: The inside faces of the cup bases should be 4.25 in (10.8 cm) apart and parallel. The roll should slide in when you gently flex one cup wall outward.
Final Blocking
- Wet the finished holder in cool water and gently squeeze out the extra. Don’t wring it.
- Roll it in a towel to remove more water.
- Pin the panel to 6 in x 15.25 in (15.2 cm x 38.7 cm). Shape the arch as an even curve.
- Pin the mesh squares open and straighten the ribbon waves so they mirror each other.
- Slip a dry roll between the cups so they keep the right spacing while drying.
- Leave it to dry completely, which takes about 24 hours.
Final Quality-Control Checklist
- The panel has 21 sts on Rows 1–25 and ends with 13 sts on Row 29.
- Both waves mirror each other row by row.
- The mesh shows 3 open squares in every row.
- The border has 179 sts in Rnd 3, and the loop is firm.
- Each cup has 60 sts and is 4.75 in (12.1 cm) across.
- The cups sit level, line up with the panel’s bottom edge, and are 4.25 in (10.8 cm) apart.
- All tails are woven in on the WS.
Troubleshooting
- The ribbons look flat. Check that you’re working BPdc on WS rows, not FPdc.
- The wave looks jagged. Each Rib should go around the matching Rib from the row below, not around a regular dc.
- The panel is narrowing. You’re probably missing the last stitch, which is the turning chain. Count 21 after every row.
- The cup is cupping or ruffling. Your increases are drifting off the stated counts, or your tension is uneven. Check your count after each round.
- The roll falls out. Move the joining lines 1/8 in (0.3 cm) further inward.
- The loop stretches. Add a second round of sl sts inside the loop.
Care
Hand wash in cool water with mild soap, press out the water, and dry flat. Reshape it over a roll before hanging it again.
Final Notes
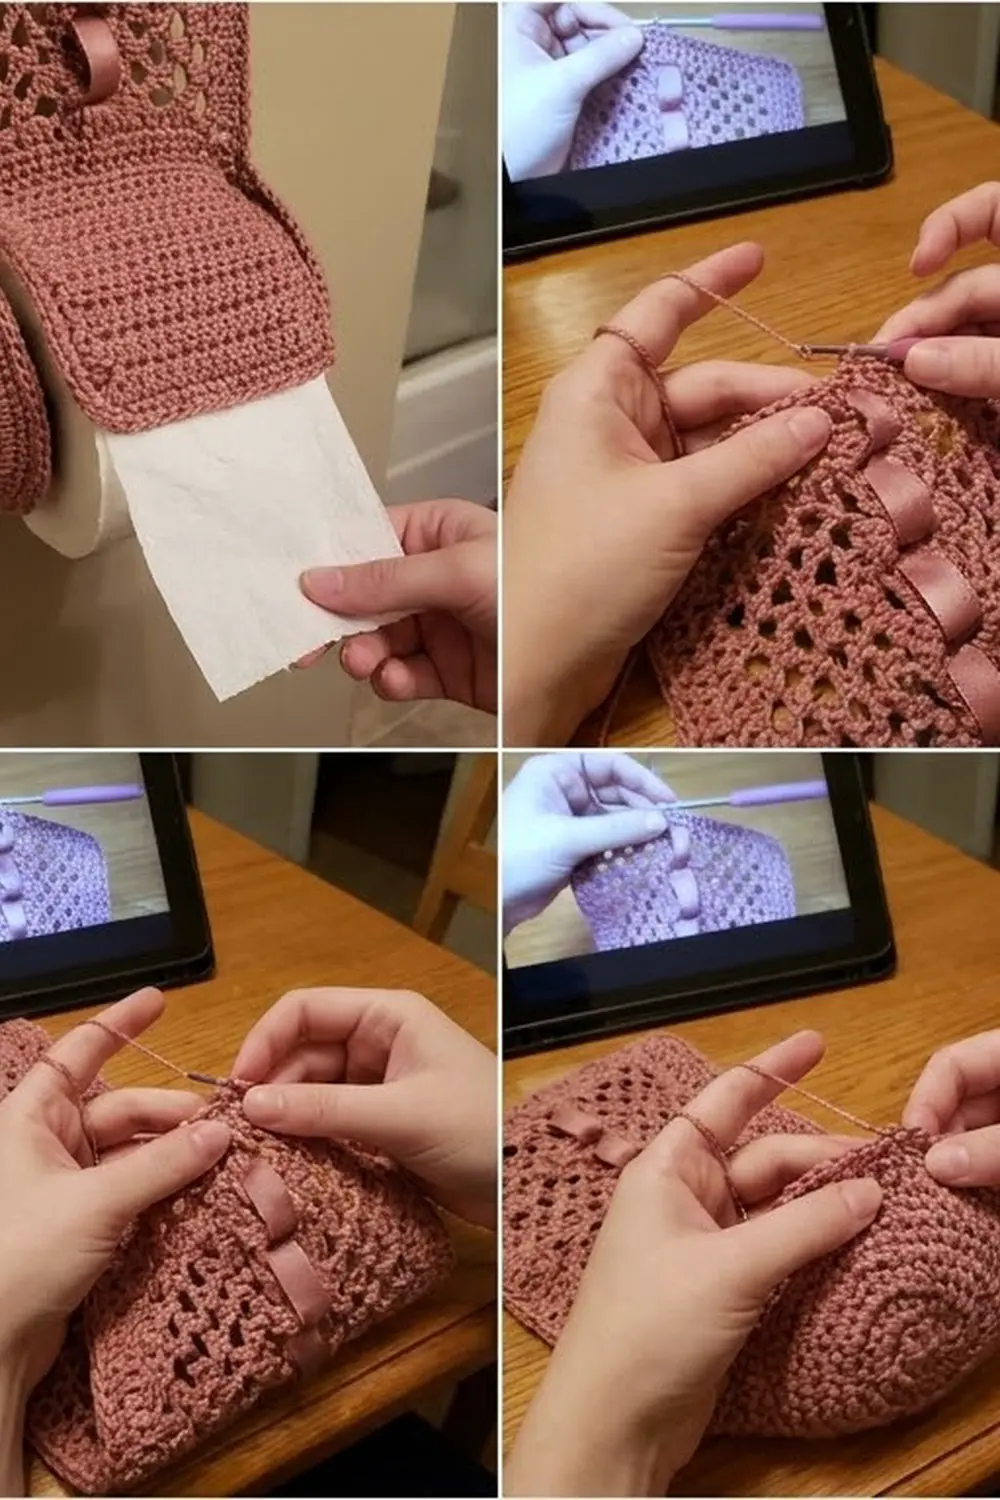
The measurements build on each other. The 5.25 in (13.3 cm) foundation becomes a 14.5 in (36.8 cm) lace panel. The border brings it to 6 in x 15.25 in (15.2 cm x 38.7 cm), and the loop adds 2 in (5.1 cm) for a total length of 17.25 in (43.8 cm). The 4.75 in (12.1 cm) cups sit 4.25 in (10.8 cm) apart to hold a 4 in (10.2 cm) roll. If you keep your gauge steady at each checkpoint, the pieces will fit together.
Happy crocheting!