

Two pink tulip-shaped baskets stacked on sage-green straps give a small bathroom wall storage space. The top tier holds lotion bottles and brushes, and the bottom tier holds spare toilet rolls. A pair of green leaves between the tiers makes the whole piece look like a tulip stem.
The baskets are dusty pink with a pointed six-petal rim. The straps and leaves are soft sage green, and two light wooden dowels hold everything straight. The chunky cotton and dense single crochet keep the baskets firm, so they hold their shape even when full.
This pattern uses US crochet terms. The organizer is about 14 in (35.6 cm) wide and about 28.5 in (72.4 cm) tall from the top dowel to the bottom of the lower basket. Each basket is about 10.5 in (26.7 cm) long, 6 in (15.2 cm) deep, and 7.75 in (19.7 cm) tall at the petal tips.
You’ll work each basket bottom-up: first an oval base, then straight sides, then six petals worked in rows. Next you’ll make two edged straps and two leaves. The straps wrap around the dowels, the baskets are sewn to the straps, and a final single-crochet border sharpens every petal.
Finished Size and Construction
- Finished size (hung): 14 in wide x 28.5 in tall (35.6 x 72.4 cm)
- Skill level: Intermediate
- Terminology: US
- Yarn weight: Bulky (5) cotton or cotton blend
- Hook: 6.0 mm (US J-10)
- Number of pieces: 6 crocheted pieces (2 baskets, 2 straps, 2 leaves), plus 2 wooden dowels
- Layout: 2 baskets stacked in one vertical column, joined by 2 parallel straps, with 1 leaf on each strap between the tiers
- Basket size: 10.5 x 6 in (26.7 x 15.2 cm) base; 30 in (76.2 cm) around
- Strap size: 2 x 32.5 in (5.1 x 82.6 cm) after edging
- Leaf size: 4 x 2 in (10.2 x 5.1 cm), plus a 1.5 in (3.8 cm) stem
- Basket size before border: 7.5 in (19.1 cm) tall; petals 2.5 in (6.4 cm) tall
- Border depth: 1 round of sc, about 0.25 in (0.6 cm)
Materials
Use a smooth, firm bulky cotton or cotton blend, about 110 m per 100 g. Cotton holds the petal points and won’t sag under weight the way acrylic can. Avoid fuzzy or very stretchy yarns.
- Dusty pink: 320 g / 350 m (2 baskets)
- Sage green: 100 g / 110 m (2 straps, 2 leaves, sewing, and dowel lashing)
These quantities include a margin of about 15% for your gauge swatch and sewing.
Tools:
– 6.0 mm (US J-10) crochet hook
– 2 wooden dowels, each 14 in (35.6 cm) long and 0.75 in (1.9 cm) across
– Large-eye blunt tapestry needle
– 8 locking stitch markers
– Measuring tape
– Scissors
– Spray bottle and old towels for blocking
– 1 sturdy wall hook
Abbreviations (US Terms)
- ch: chain
- sl st: slip stitch
- sc: single crochet
- hdc: half double crochet
- dc: double crochet
- sc2tog: single crochet 2 together
- BLO: back loop only
- st(s): stitch(es)
- sp: space
- rnd(s): round(s)
Special stitches:
- sc3tog: (Insert hook in next st, yarn over, pull up a loop) 3 times, then yarn over and pull through all 4 loops on the hook.
- Surface sl st: Hold the yarn behind the work. Insert the hook from front to back, pull up a loop, and pull it through the loop on the hook. Repeat along a line to make a raised ridge.
Gauge and Checkpoints
Gauge: 12 sc and 13 rows (or rnds) = 4 in (10.2 cm).
Test with one basket base first. It’s your gauge swatch and your first real piece.
Checkpoints:
– Foundation chain: the 15 straight chains measure 5 in (12.7 cm).
– After Rnd 5 (60 sts): the base is about 7.5 x 3 in (19.1 x 7.6 cm).
– After Rnd 10 (90 sts): the base is about 10.5 x 6 in (26.7 x 15.2 cm) and lies flat.
– After Rnd 26: the sides are 5 in (12.7 cm) tall.
– After the petals: each petal is 2.5 in (6.4 cm) tall and 5 in (12.7 cm) wide at its base.
If your base is too big, go down to a 5.5 mm hook. If it’s too small, go up to a 6.5 mm hook. If it ruffles, your increases are too loose, so tighten your tension. If it cups before Rnd 10, go up a hook size.
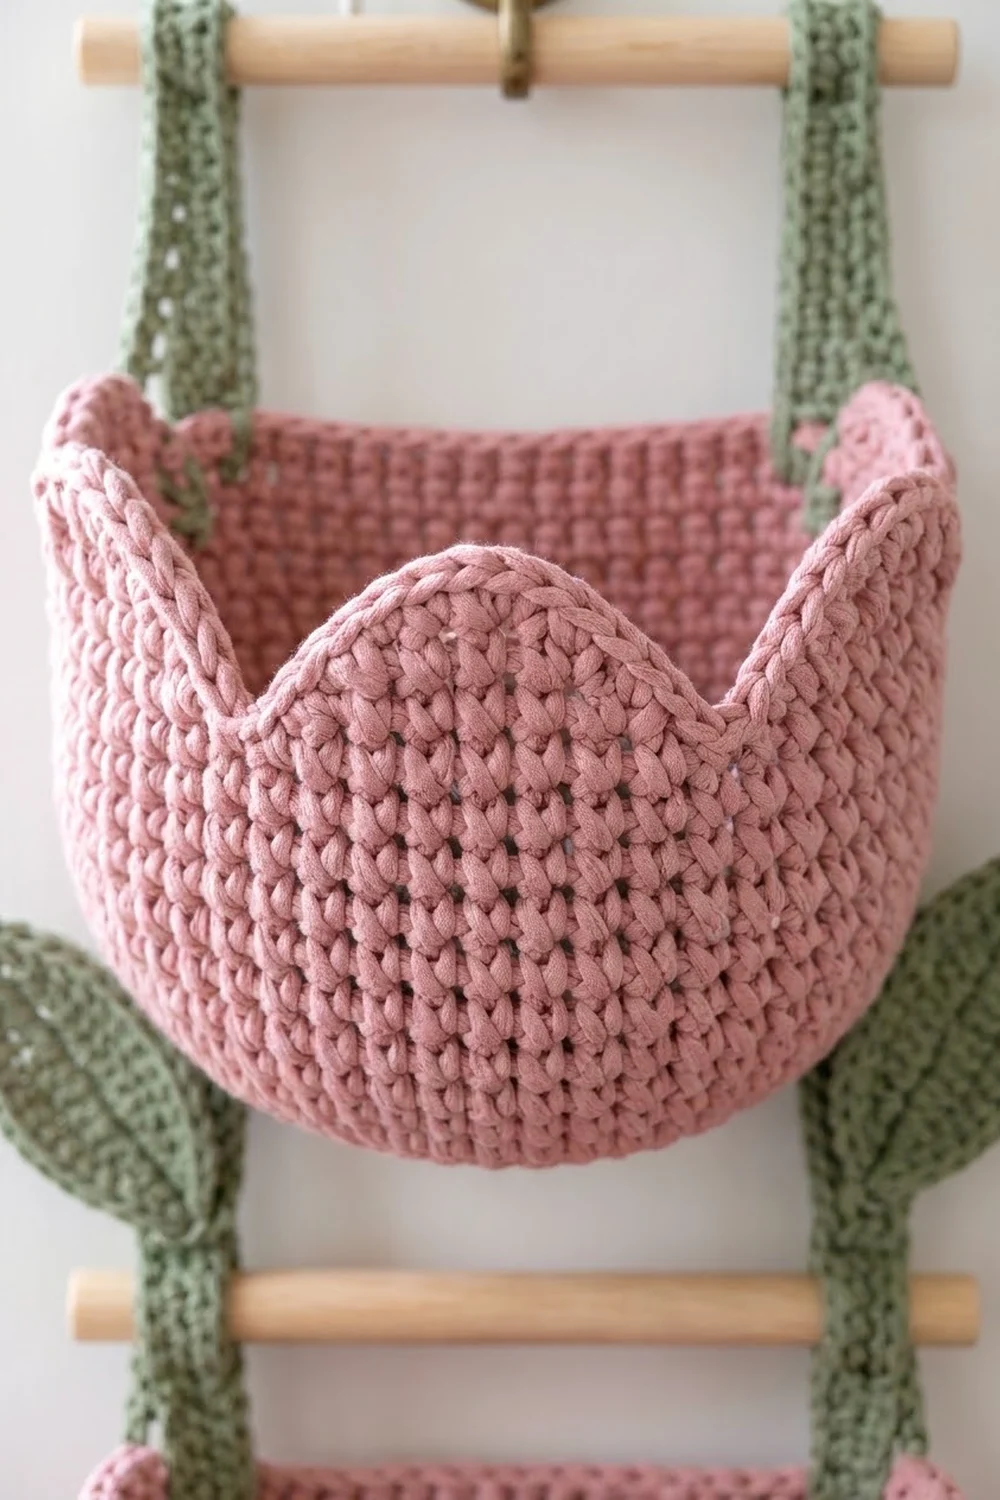
Basket (Make 2, Pink)
Join each round with a sl st to the first sc and ch 1. The ch 1 never counts as a stitch.
Oval Base
Ch 18.
Rnd 1: 3 sc in 2nd ch from hook, sc in next 15 ch, 3 sc in last ch. Rotate and work along the opposite side of the chain: sc in next 15 ch. Join. (36 sts)
Rnd 2: [2 sc in each of next 3 sts, sc in next 15 sts] 2 times. Join. (42 sts)
Rnd 3: [(sc in next st, 2 sc in next st) 3 times, sc in next 15 sts] 2 times. Join. (48 sts)
Rnd 4: [(sc in next 2 sts, 2 sc in next st) 3 times, sc in next 15 sts] 2 times. Join. (54 sts)
Rnd 5: [(sc in next 3 sts, 2 sc in next st) 3 times, sc in next 15 sts] 2 times. Join. (60 sts)
Rnd 6: [(sc in next 4 sts, 2 sc in next st) 3 times, sc in next 15 sts] 2 times. Join. (66 sts)
Rnd 7: [(sc in next 5 sts, 2 sc in next st) 3 times, sc in next 15 sts] 2 times. Join. (72 sts)
Rnd 8: [(sc in next 6 sts, 2 sc in next st) 3 times, sc in next 15 sts] 2 times. Join. (78 sts)
Rnd 9: [(sc in next 7 sts, 2 sc in next st) 3 times, sc in next 15 sts] 2 times. Join. (84 sts)
Rnd 10: [(sc in next 8 sts, 2 sc in next st) 3 times, sc in next 15 sts] 2 times. Join. (90 sts)
Each round adds 6 sts: 3 around each curved end. The 15 straight sts on each long side stay the same every round.
Sides
Rnd 11: Sc in BLO of each st around. Join. (90 sts) The unused front loops form a crisp ridge where the base meets the sides.
Rnds 12–26: Sc in each st around. Join. (90 sts)
The sides are 16 rnds, or 5 in (12.7 cm), tall. Don’t fasten off. Place markers every 15 sts to divide Rnd 26 into 6 sections of 15 sts (6 x 15 = 90). Start the markers at one end of the basket’s long axis, so that a valley between petals falls at each short end where the straps will go.
Tulip Petals (work 6 per basket)
You’ll work each petal in rows over one 15-st section. For petals 2–6, join the pink yarn in the first st of the next section.
Row 1: Ch 1, sc in each of the 15 sts of the section, turn. (15 sts)
Row 2: Ch 1, sc2tog, sc in next 11 sts, sc2tog, turn. (13 sts)
Row 3: Ch 1, sc2tog, sc in next 9 sts, sc2tog, turn. (11 sts)
Row 4: Ch 1, sc2tog, sc in next 7 sts, sc2tog, turn. (9 sts)
Row 5: Ch 1, sc2tog, sc in next 5 sts, sc2tog, turn. (7 sts)
Row 6: Ch 1, sc2tog, sc in next 3 sts, sc2tog, turn. (5 sts)
Row 7: Ch 1, sc2tog, sc in next st, sc2tog, turn. (3 sts)
Row 8: Ch 1, sc3tog. Fasten off. (1 st)
Repeat for all 6 sections. Each petal uses 64 sts (15 + 13 + 11 + 9 + 7 + 5 + 3 + 1) and comes to a single-stitch point. Because each petal starts in the stitch right after the last one ended, the bases touch and form sharp V-shaped valleys.
Strap (Make 2, Green)
Ch 5.
Row 1: Sc in 2nd ch from hook and in each ch across, turn. (4 sts)
Rows 2–104: Ch 1, sc in each st across, turn. (4 sts)
Before edging, the strap is 1.3 x 32 in (3.3 x 81.3 cm). Don’t fasten off.
Strap Edging Rnd: Ch 1. Along the top of Row 104, work 3 sc in the first st, sc in next 2 sts, and 3 sc in the last st (8 sts across the short end, corners included). Down the long side, work 1 sc in each of the 104 row-ends. Along the base of Row 1, work 3 sc in the first st, sc in next 2 sts, and 3 sc in the last st (8 sts). Up the other long side, work 1 sc in each of the 104 row-ends. Join and fasten off. (224 sts)
Total check: 8 + 104 + 8 + 104 = 224. After edging, the strap is 2 in (5.1 cm) wide (6 sts) and about 32.5 in (82.6 cm) long.
Leaf (Make 2, Green)
Ch 13.
Rnd 1: Sl st in 2nd ch from hook, sc in next ch, hdc in next 2 ch, dc in next 4 ch, hdc in next 2 ch, sc in next ch, and (sc, ch 2, sc) in last ch for the tip. Rotate and work along the opposite side of the chain: sc in next ch, hdc in next 2 ch, dc in next 4 ch, hdc in next 2 ch, sc in next ch, sl st in last ch. (24 sts and 1 ch-2 sp)
Rnd 2: Ch 1, sc in each st to the tip, 3 sc in the ch-2 sp, then sc in each remaining st. Join. (27 sts)
Stem: Ch 6, sl st in 2nd ch from hook and in next 4 ch. (5 sl sts) Join to the base of the leaf.
Vein: Work surface sl sts along the foundation chain from the base of the leaf to the tip. Fasten off and leave a 12 in (30.5 cm) tail for sewing.
The leaf is about 4 x 2 in (10.2 x 5.1 cm), and the stem adds 1.5 in (3.8 cm).
Make All Pieces
- Pink: 2 baskets (90 sts per round, 6 petals each)
- Green: 2 straps (224 edging sts each) and 2 leaves (27 sts each)
- Hardware: 2 dowels
Layout grid (distances are measured down from the top dowel):
   [=========== TOP DOWEL 14 in ===========]   0 in
       ||                             ||
       ||   /\  /\  /\  /\  /\  /\    ||       3 in    petal tips
       ||  |    UPPER BASKET      |   ||       5.5 in  top of sides
       ||  |______________________|   ||       10.5 in bottom of sides
  (leaf)||                            ||(leaf) 11.5-15.5 in
   [========== MIDDLE DOWEL 14 in =========]   17 in
       ||   /\  /\  /\  /\  /\  /\    ||       18 in   petal tips
       ||  |    LOWER BASKET      |   ||       20.5 in top of sides
       ||  |______________________|   ||       25.5 in bottom of sides
       ||======== tucked under base ==||       28.5 in strap ends
Joining
Method: Whipstitch with green yarn through the outer edging loops of the strap and the matching stitch posts of the basket.
- Top dowel. Wrap the top 4 in (10.2 cm) of each strap over the top dowel toward the back. Whipstitch the end to the back of the strap, 1 st into 1 st. Space the straps so their centers are 10.5 in (26.7 cm) apart, leaving 1.75 in (4.4 cm) of dowel past each strap center.
- Upper basket. Line up a strap behind each short end of the basket, centered on the valley at that end. Place the top of the sides (Rnd 26) 5.5 in (14.0 cm) below the dowel. Sew both long edges of the strap to the sides, from Rnd 26 down to Rnd 11.
- Stitch-to-stitch logic. The strap’s edging sts sit 1 per row, and the basket’s rounds have the same height (13 per 4 in / 10.2 cm). So each sc along the strap edge matches one basket round: 16 strap sts to 16 basket rnds on each edge.
- Middle dowel. At 17 in (43.2 cm) below the top dowel, lay the second dowel across the back of both straps. Lash it at each strap with 4 crossed wraps of green yarn.
- Lower basket. Place the top of the sides (Rnd 26) 20.5 in (52.1 cm) below the top dowel. Sew from Rnd 26 down to Rnd 11, the same way as the upper basket. Then curve the last 3 in (7.6 cm) of each strap under the base and sew it down. This tucked end supports the weight of the rolls.
- Leaves. Sew each stem to the outer edge of a strap so the leaf covers 11.5–15.5 in (29.2–39.4 cm) below the top dowel, angled outward and upward. Tack the leaf tip lightly to keep it in place.
Tension: Pull each whipstitch snug, but don’t let it dimple the basket. The strap should lie flat with no ripples.
Size checkpoint: The strap centers are 10.5 in (26.7 cm) apart at every basket, and the total drop is 28.5 in (72.4 cm).
Border: Tulip Petal Edging
Border gauge: The border uses the same gauge, 12 sc per 4 in (10.2 cm). On the slanted petal sides, each row-end needs about 1.33 sc.
Work this round on each basket after joining. Join pink in the Row 2 row-end on the right side of any petal.
Border Rnd, per petal:
– Up the right side (8 sts): sc in row-ends of Rows 2–7, with 2 sc in the Row 3 and Row 6 row-ends.
– Tip (3 sts): 3 sc in the tip st.
– Down the left side (8 sts): sc in row-ends of Rows 7–2, with 2 sc in the Row 6 and Row 3 row-ends.
– Valley (1 st): sc2tog across the Row 1 row-end of this petal and the Row 1 row-end of the next petal.
Repeat for all 6 petals. Join to the first sc and fasten off. (20 sts per petal; 120 sts total)
Why the math works: Each petal row steps in 1 st and up 1 row, so its slanted edge is longer than a straight row. Six row-ends need about 8 sc to lie smoothly, and the 2 extra sc on each side cover that difference. The 3 sc at the tip keep the point sharp. The sc2tog pulls each valley into a clean V, which gives 6 x 20 = 120.
Final Blocking
- Weave in all ends along stitches of matching color.
- Hang the organizer from a hook or lay it flat face-up.
- Mist the baskets and leaves until they’re damp, not soaked.
- Fill each basket firmly with rolled towels to set the oval shape.
- Pinch each petal tip into a point and smooth the valleys.
- Lay the leaves flat and pat the vein straight.
- Let everything dry for 24 hours before loading the baskets.
Final Quality-Control Checklist
- Base is 10.5 x 6 in (26.7 x 15.2 cm) and lies flat
- Sides are 5 in (12.7 cm) tall, with 90 sts every round
- 6 petals per basket, each 15 sts wide at the base and ending in 1 st
- Border has 120 sts, with crisp tips and valleys
- Straps are 2 in (5.1 cm) wide and 224 edging sts each
- Strap centers are 10.5 in (26.7 cm) apart
- Both dowels are level
- Leaves sit evenly between the tiers
- All ends are woven in securely
Troubleshooting
- Base ruffles: Your increases are too loose. Tighten your tension or go down a hook size.
- Sides flare outward: Check for 90 sts every round. An extra st per round adds up fast.
- Petals curl outward: Steam them gently while the basket is stuffed with towels.
- Petal tips are blunt: Work the 3 tip sc into the exact center loop of the sc3tog.
- Strap twists: Make sure every row has 4 sts, then block the strap flat.
- Basket tilts: Re-sew it so Rnd 26 is at the same height on both straps.
- Lower basket sags: Sew the tucked strap ends to the base more firmly.
Care
Remove the dowels and hand wash in cool water. Reshape the baskets and dry them flat, stuffed with towels.

Final Notes
Each measurement builds on the last:
- Gauge: 12 sc and 13 rnds = 4 in (10.2 cm).
- Base: 90 sts around, 10.5 x 6 in (26.7 x 15.2 cm).
- Sides: 16 rnds, 5 in (12.7 cm) tall.
- Petals: 6 petals of 15 sts each, 2.5 in (6.4 cm) tall.
- Border: 120 sts, finishing the basket at 7.75 in (19.7 cm) tall.
- Straps: 104 rows, finishing at 2 x 32.5 in (5.1 x 82.6 cm).
- Hung: 14 x 28.5 in (35.6 x 72.4 cm).
Check each stage before moving on, and the finished organizer will hang straight and hold its shape.
Happy crocheting!