

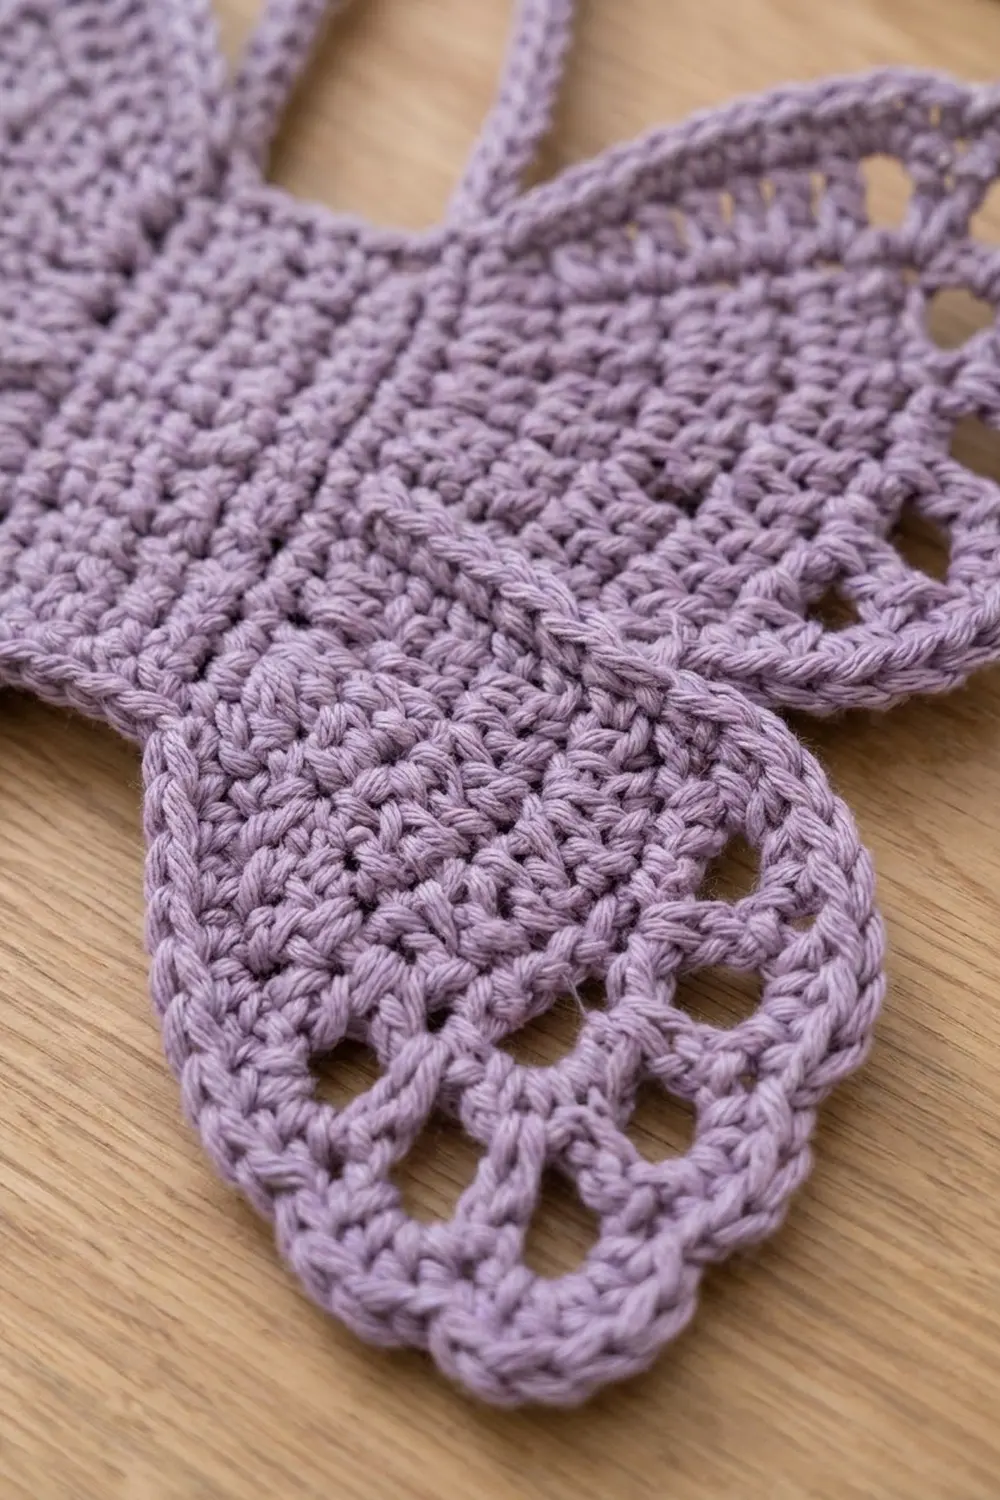
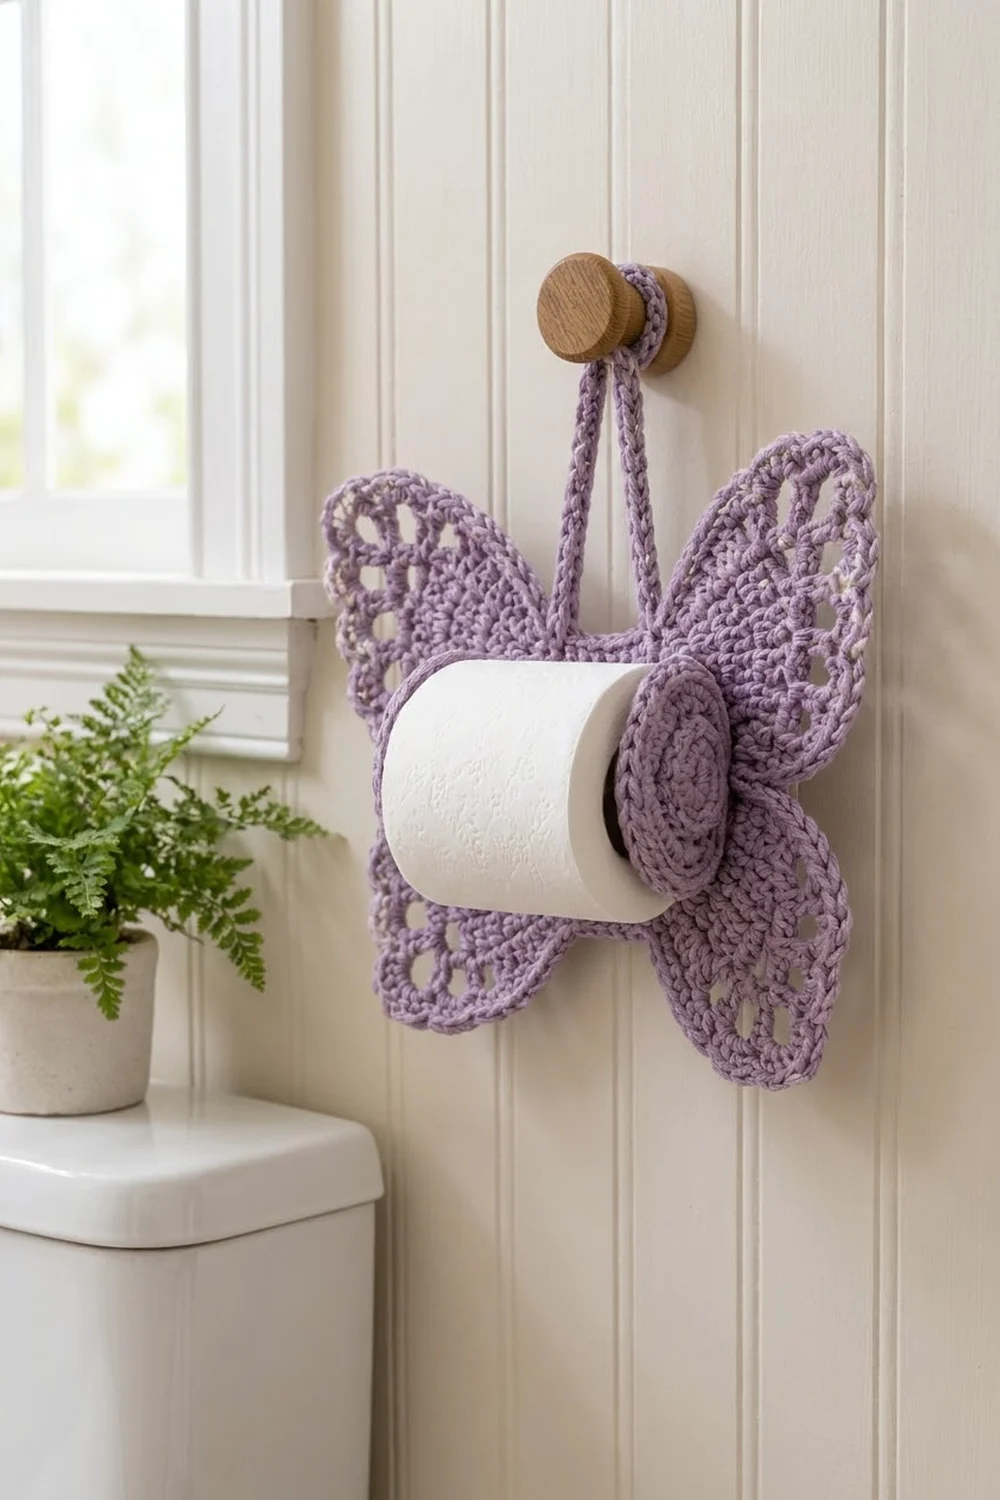
This butterfly hangs on a wall knob and holds a full roll of toilet paper on a padded spool at its center. It is worked in one soft lavender cotton. Each of the four wings has a ring of open oval windows and a small scalloped edge, so the piece looks lacy but stays firm enough for daily use.
The pattern uses US crochet terms throughout. The finished butterfly measures about 12 in (30.5 cm) wide and 10 in (25.4 cm) tall. The strap loop adds about 5 in (12.7 cm) above the body.
Construction is simple and modular. You crochet a rectangular body in rows, two oval upper wings and two round lower wings in rounds, a tube, two discs, and a strap. Then you sew the wings to the body and work one continuous scalloped border around the butterfly. Last, you sew on the spool and the strap.
All the stitches are basic: single, double, and treble crochet. The lace comes from a single round of tall stitches and chain spaces in each wing.
Finished Size and Construction
- Finished size: about 12 in (30.5 cm) wide x 10 in (25.4 cm) tall, plus strap loop
- Skill level: Intermediate (simple rounds, careful counting, neat seaming)
- Terminology: US crochet terms
- Yarn weight: Worsted (#4), 100% cotton
- Hook: 4.0 mm (G-6)
- Number of pieces: 9 (1 body, 2 upper wings, 2 lower wings, 1 tube, 2 discs, 1 strap)
- Layout: body in the center, one upper wing and one lower wing on each side, spool centered on the front, strap on the back
- Piece sizes: body 2.5 in x 5.8 in (6.4 cm x 14.7 cm); upper wing 5.5 in x 4 in (14.0 cm x 10.2 cm); lower wing 4 in (10.2 cm) across
- Size before border: about 11 in x 9 in (27.9 cm x 22.9 cm)
- Border depth: 0.5 in (1.3 cm)
Materials
Yarn: Use a smooth worsted-weight cotton. Cotton holds its shape, handles humidity, and shows stitch definition. Avoid fuzzy or very stretchy yarns, because the panel needs to hang flat under the weight of a roll.
- Lavender: 85 g (about 130 m / 142 yd). One 100 g ball is enough.
Tools:
- 4.0 mm (G-6) crochet hook
- Tapestry needle
- 6 removable stitch markers
- Scissors
- One sheet of 7-count plastic canvas, cut to 4.75 in x 5 in (12.1 cm x 12.7 cm)
- Blocking mat and rust-proof pins
- Spray bottle
The yarn amount includes a margin of about 30% for gauge swatches, long sewing tails, and small tension differences.
Abbreviations (US Terms)
- ch – chain
- sl st – slip stitch
- sc – single crochet
- dc – double crochet
- tr – treble crochet
- BLO – back loop only
- MR – magic ring
- st(s) – stitch(es)
- sp – space
- rnd – round
- rep – repeat
- RS / WS – right side / wrong side
Special stitch – Scallop: Sc in next st, skip next st, 5 dc in next st, skip next st. One scallop uses 4 stitches.
Gauge and Checkpoints
Gauge: 16 sc x 18 rows = 4 in (10.2 cm). In dc, 16 sts x 8 rows = 4 in (10.2 cm).
Before you make everything, make one lower wing as your test piece. It uses every wing stitch and is quick to finish.
Checkpoints:
- Lower wing after Rnd 2: 2 in (5.1 cm) across
- Lower wing after Rnd 4: 4 in (10.2 cm) across
- Upper wing after Rnd 2: 3.5 in x 2 in (8.9 cm x 5.1 cm)
- Upper wing after Rnd 4: 5.5 in x 4 in (14.0 cm x 10.2 cm)
- Body after Row 26: 2.5 in x 5.8 in (6.4 cm x 14.7 cm)
- Disc after Rnd 5: 2.2 in (5.6 cm) across
- Tube: 4.5 in (11.4 cm) around, 4.9 in (12.4 cm) long
If your piece is too big, go down to a 3.75 mm hook. If it is too small, go up to a 4.5 mm hook. Also check the tube against your roll. The tube must slide easily into a roll core, which is usually about 1.6 in (4.1 cm) inside.
Body
Worked in rows with the RS facing on odd rows.
Ch 11.
Row 1: Sc in 2nd ch from hook and in each ch across. (10 sc)
Rows 2–26: Ch 1, turn, sc in each st across. (10 sc)
Fasten off and weave in the ends. The body should measure 2.5 in x 5.8 in (6.4 cm x 14.7 cm). Row 26 is the top edge.
Upper Wings (Make 2)
The upper wing is an oval with a narrow “tip” end, which gets sewn to the body, and a wide “outer” end.
Ch 11.
Rnd 1: 6 dc in 4th ch from hook (skipped 3 ch do not count). Dc in next 6 ch, then 6 dc in last ch. Rotate and work along the other side of the foundation chain: dc in next 6 ch. Join with sl st to first dc. (24 dc: 6 tip, 6 side, 6 outer, 6 side)
The skipped ch-3 sits at the tip and will be hidden in the seam.
Rnd 2: Ch 2 (does not count here and throughout). 2 dc in same st as join, 2 dc in each of next 5 sts (12 tip). Dc in next 6 sts (side). 2 dc in each of next 6 sts (12 outer). Dc in next 6 sts (side). Join. (36 dc)
Rnd 3 (window round): Ch 4 (counts as tr), ch 4, skip next 2 sts. [Tr in next st, ch 4, skip next 2 sts] 3 times (tip done). [Tr in next st, ch 2, skip next 2 sts] twice (side). [Tr in next st, ch 4, skip next 2 sts] 4 times (outer). [Tr in next st, ch 2, skip next 2 sts] twice (side). Join to 4th ch of beginning ch. (12 tr, 8 ch-4 sps, 4 ch-2 sps)
The shorter ch-2 spaces keep the straight sides of the oval from rippling.
Rnd 4: Ch 1. Sc in same st as join, 5 sc in next ch-4 sp. [Sc in next tr, 5 sc in next ch-4 sp] 3 times (24 tip). [Sc in next tr, 2 sc in next ch-2 sp] twice (6 side). [Sc in next tr, 5 sc in next ch-4 sp] 4 times (24 outer). [Sc in next tr, 2 sc in next ch-2 sp] twice (6 side). Join. (60 sc)
The sc wrap over each chain but leave the opening below it, so you get 12 oval windows.
Fasten off, leaving a 12 in (30.5 cm) tail. Place a marker in Rnd 4 st 7 and st 18. These 12 stitches are centered on the tip and will be sewn to the body.
Lower Wings (Make 2)
Rnd 1: MR, ch 2, 12 dc in ring. Join. (12 dc)
Rnd 2: Ch 2, 2 dc in each st around. Join. (24 dc)
Rnd 3 (window round): Ch 4 (counts as tr), ch 4, skip next 2 sts. [Tr in next st, ch 4, skip next 2 sts] 7 times. Join to 4th ch of beginning ch. (8 tr, 8 ch-4 sps)
Rnd 4: Ch 1. [Sc in next tr, 5 sc in next ch-4 sp] 8 times. Join. (48 sc)
Fasten off, leaving a 12 in (30.5 cm) tail. Mark st 1 and st 12. These are the sewing stitches, and they hide the round join.
Spool Tube
Work in a continuous spiral and move a marker up each round.
Rnd 1: MR, 6 sc in ring. (6 sc)
Rnd 2: 2 sc in each st. (12 sc)
Rnd 3: [Sc in next st, 2 sc in next st] 6 times. (18 sc)
Rnd 4: Sc BLO in each st. (18 sc) This turns the edge to form a flat closed end.
Rnds 5–25: Sc in each st. (18 sc)
The tube is 4.5 in (11.4 cm) around and 4.9 in (12.4 cm) long from the fold. Fasten off with a 12 in (30.5 cm) tail. Roll the plastic canvas into a tube 5 in (12.7 cm) around, overlapping to fit, and slide it inside.
Discs (Make 2)
Rnd 1: MR, 6 sc in ring. (6 sc)
Rnd 2: 2 sc in each st. (12 sc)
Rnd 3: [Sc in next st, 2 sc in next st] 6 times. (18 sc)
Rnd 4: [Sc in next 2 sts, 2 sc in next st] 6 times. (24 sc)
Rnd 5: [Sc in next 3 sts, 2 sc in next st] 6 times. Sl st in next st. (30 sc)
Fasten off with a 12 in (30.5 cm) tail. Each disc measures 2.2 in (5.6 cm) across and shows the spiral rounds on its front.
Strap
Ch 41.
Row 1: Sc in 2nd ch from hook and in each ch across. (40 sc)
Fasten off with tails at both ends. The strap measures 10 in (25.4 cm).
Make All Pieces
Everything is worked in Lavender:
- 1 body (10 sts x 26 rows)
- 2 upper wings (60 sc each)
- 2 lower wings (48 sc each)
- 1 tube (18 sc around)
- 2 discs (30 sc each)
- 1 strap (40 sc)
Layout (RS facing, top at the top):
            [strap loop on WS]
 [UPPER WING] [ BODY rows 15-26 ] [UPPER WING]
              [ waist rows 13-14 ]
 [LOWER WING] [ BODY rows 1-12  ] [LOWER WING]
          spool centered on body rows 9-18
Joining
Method: Whipstitch with the yarn tails, RS facing, edge to edge.
Upper wings: Lay an upper wing beside the body with its marked tip next to rows 15–26. Sew one wing stitch to one row end, from marker st 7 to marker st 18. That joins 12 stitches to 12 rows, a 1:1 match. Repeat on the other side. The oval is symmetric, so both upper wings are sewn the same way.
Lower wings: Sew lower wing sts 1–12 to body rows 1–12, one stitch per row. Repeat on the other side.
Rows 13–14 stay free on each side. This gives the butterfly its pinched waist.
Tension: The 12 wing stitches measure 3 in (7.6 cm). The 12 rows measure about 2.7 in (6.9 cm). Ease the curved wing edge in gently. Pull each stitch snug but not tight, so the seam lies flat and the wing does not cup.
Size checkpoint: The joined panel should measure about 11 in x 9 in (27.9 cm x 22.9 cm).
Border
Border gauge: One scallop covers 4 base stitches, which is 1 in (2.5 cm), and stands 0.5 in (1.3 cm) deep.
Free stitches available:
- Upper wing: 60 – 12 sewn = 48 sts (12 scallops)
- Lower wing: 48 – 12 sewn = 36 sts (9 scallops)
- Body top and bottom: 10 sts each
- Waist: 2 row ends on each side
Border round (RS facing): Join with a sl st in the first st of Row 26 at the top right corner of the body. Ch 1.
- Body top: Sc in each of the 10 sts. (10 sc)
- Left upper wing: Starting at the first free st beside the seam, work 12 scallops across the 48 free sts. (12 scallops)
- Left waist: Sc in the row end of row 14 and row 13. (2 sc)
- Left lower wing: Work 9 scallops across the 36 free sts. (9 scallops)
- Body bottom: Sc in each of the 10 sts of the foundation chain. (10 sc)
- Right lower wing: Work 9 scallops across the 36 free sts. (9 scallops)
- Right waist: Sc in the row end of row 13 and row 14. (2 sc)
- Right upper wing: Work 12 scallops across the 48 free sts. (12 scallops)
Join with a sl st to the first sc. Fasten off.
Totals: 192 base stitches are worked (10 + 48 + 2 + 36 + 10 + 36 + 2 + 48). The finished border has 24 sc on the body and 42 scallops on the wings.
Why the math works: Each scallop uses exactly 4 stitches. Both 48 and 36 divide evenly by 4, so every wing edge starts and ends with a full scallop and there are no partial repeats at the seams. The body edges get 1 sc per stitch or row, so they stay straight. On the wings, each 5 dc shell fans out over a 1 in (2.5 cm) span. That adds just enough length for the curved edges to lie flat.
Final Blocking
- Weave in all remaining ends, except the tails you still need for the spool and strap.
- Mist the butterfly panel until it is damp but not wet.
- Pin it RS up on the mat. Pin the body straight first: 2.5 in x 5.8 in (6.4 cm x 14.7 cm).
- Pin each wing out to its size and open every window with a pin.
- Pin the point of each scallop so the edge looks even.
- Let it dry completely, at least 12 hours.
- Spool: Sew the open end of the tube (Rnd 25, 18 sts) to the WS of one disc along its Rnd 3, one stitch per stitch. Sew the free front loops of the tube’s Rnd 3 (18 sts) to Rnd 3 of the second disc in the same way.
- Center the back disc on the front of the body over rows 9–18. Whipstitch all 30 stitches of its Rnd 5 to the body.
- Strap: Fold the strap into a loop without twisting it. Sew one end to the WS of body sts 1–2 and the other end to sts 9–10, each over rows 24–26.
Final Quality-Control Checklist
- Body is 10 sts x 26 rows.
- Upper wings have 60 sc and 12 windows. Lower wings have 48 sc and 8 windows.
- Each wing is sewn on with exactly 12 stitches.
- The border has 42 scallops plus 24 sc.
- The panel is about 12 in x 10 in (30.5 cm x 25.4 cm).
- The spool sticks straight out and does not wobble.
- The tube slides easily into a roll core.
- The strap is not twisted, and the panel hangs level.
Troubleshooting
Wings cup: Your tension is tight in the sc rounds. Go up a hook size, or block harder.
Wings ruffle: Check that you used ch 2, not ch 4, on the upper wing sides. Also check your Rnd 4 counts.
Scallops don’t fit: Recount the free stitches. Moving a seam by one stitch changes the count from 48 to 47.
Roll won’t slide on: Fold the front disc in half. Folded, it is about 1.1 in (2.8 cm) wide and fits through the core.
Spool droops: Add a second ring of stitches between the disc and the body around Rnd 3.
Panel tilts: Move one strap end until the panel hangs level.
Care
Hand wash in cool water and lay flat to dry. Remove the plastic canvas first if you want, or wash the spool as is and let it dry completely.
Final Notes
Each measurement leads to the next. Gauge is 16 sc = 4 in (10.2 cm). That gives a body of 2.5 in x 5.8 in (6.4 cm x 14.7 cm), an upper wing of 5.5 in x 4 in (14.0 cm x 10.2 cm), and a lower wing of 4 in (10.2 cm). Joined, the panel is 11 in x 9 in (27.9 cm x 22.9 cm). The 0.5 in (1.3 cm) border brings it to 12 in x 10 in (30.5 cm x 25.4 cm). If you check each stage, the scallops will land evenly and the butterfly will hang flat.
Happy crocheting!