

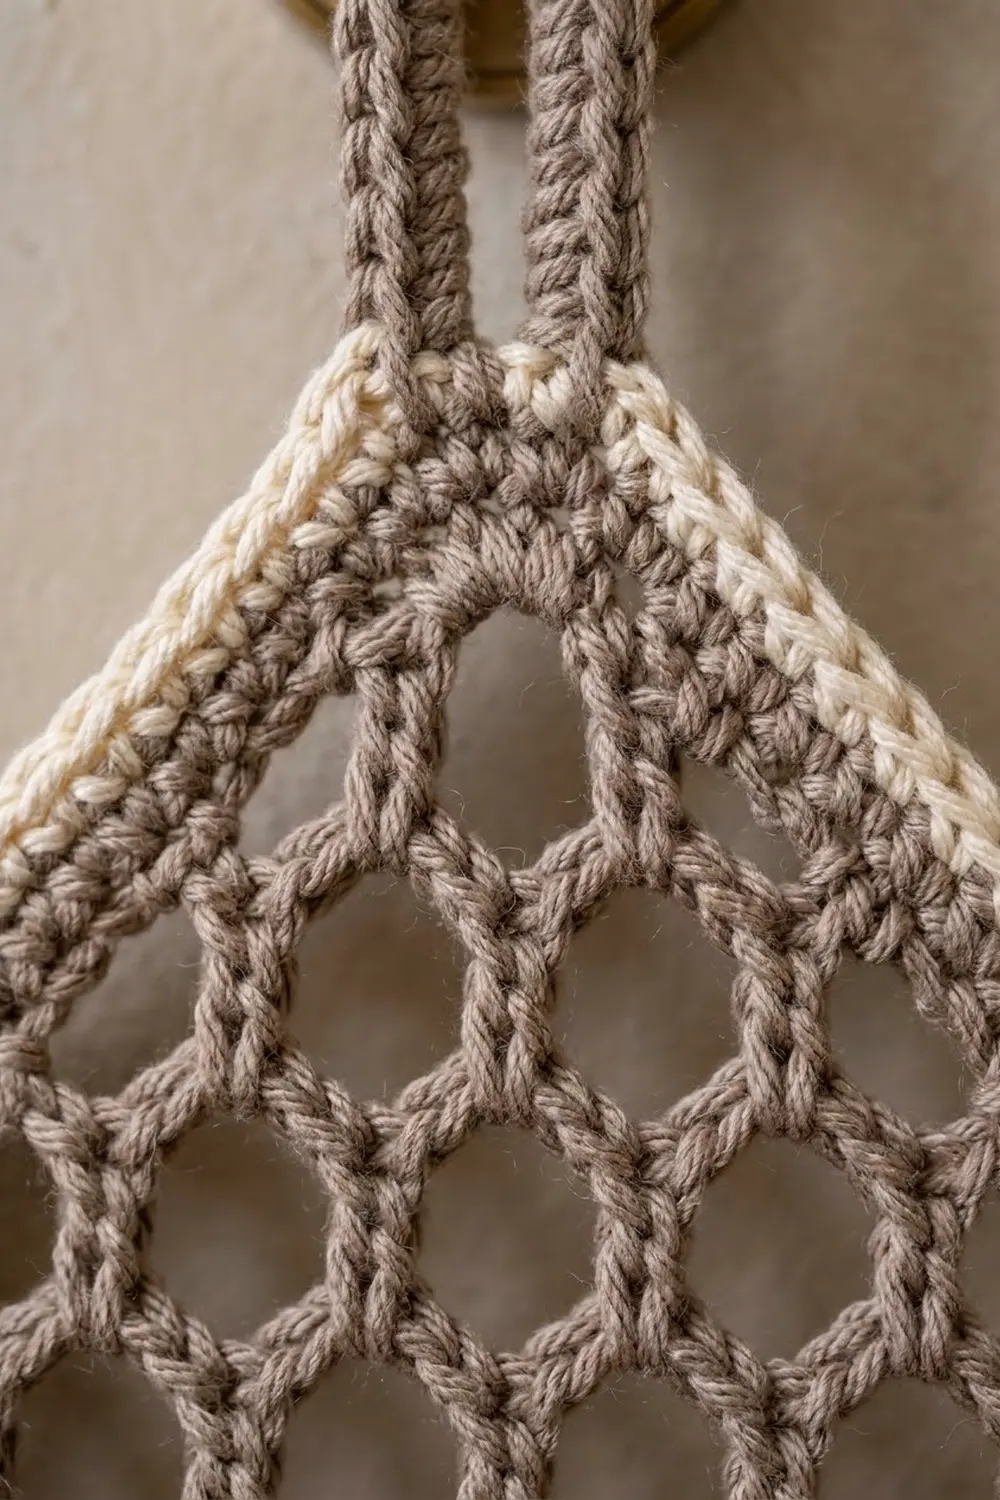
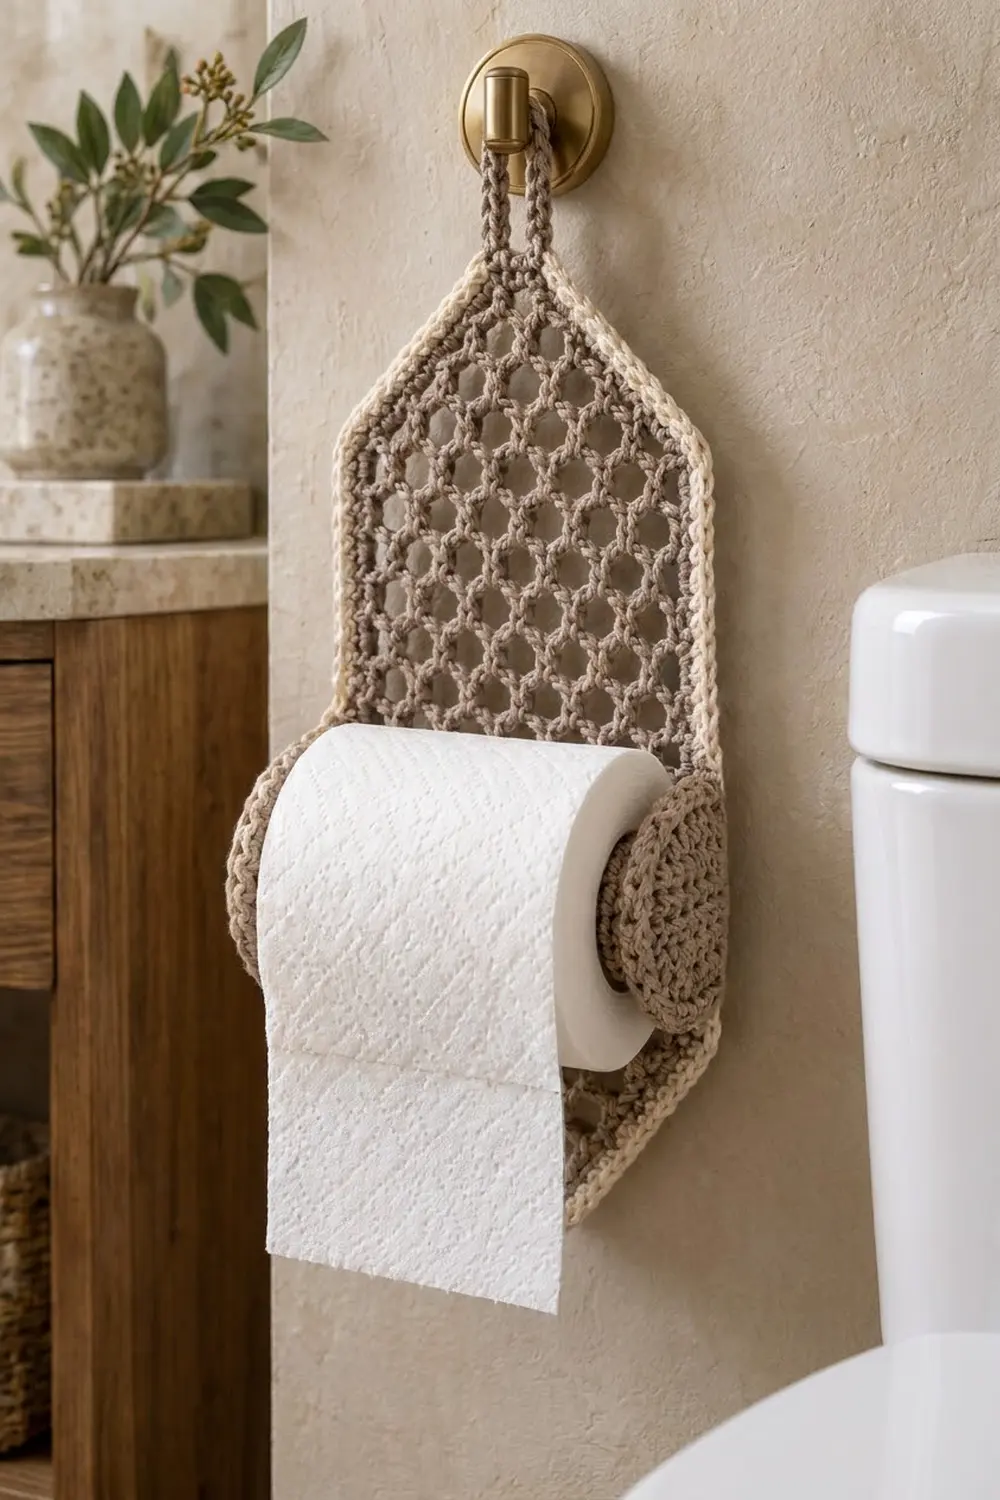
The Honeycomb Hollow Toilet Paper Holder is a wall panel that hangs from a hook and holds one roll of toilet paper on a soft crocheted rod. After blocking, the open net looks like a honeycomb. The long hexagon shape, pointed at the top and bottom, hangs neatly from a wall hook.
The colors are calm and natural. Warm taupe is used for the net, rod and end discs, and a cream outer border frames the shape. It suits a spa-style bathroom with wood, stone and brushed brass.
This pattern uses US crochet terms. The finished panel measures 7.5 in (19.1 cm) wide and 16.5 in (41.9 cm) tall from tip to tip, plus a 2.5 in (6.4 cm) hanging strap.
Construction is simple. You work the panel in rows of chain loops from the bottom point up: increase to full width, work straight, then decrease to the top point. Next you make a firm rod and two double-layer end discs and sew them on. To finish, you work a three-round border and a hanging strap.
Finished Size and Construction
- Finished size: 7.5 in (19.1 cm) wide x 16.5 in (41.9 cm) tall, plus a 2.5 in (6.4 cm) strap
- Skill level: Easy-Intermediate
- Terminology: US crochet terms
- Yarn weight: Worsted (#4), cotton or cotton blend
- Hooks: 5.0 mm (H-8) for the panel and border; 4.0 mm (G-6) for the rod and discs
- Number of pieces: 1 panel, 1 rod, 4 disc circles (sewn into 2 discs)
- Layout: 1 upright panel with a horizontal rod held between 2 side discs
- Panel size before border: 6 in (15.2 cm) wide x 15 in (38.1 cm) tall
- Border depth: 0.75 in (1.9 cm) on every edge
- Rod: about 4.8 in (12.2 cm) long and 1.1 in (2.8 cm) across
- Discs: 2.75 in (7.0 cm) across
Materials
Choose a smooth, firm cotton. Cotton holds the net shape after blocking and stretches very little under the weight of a full roll. Avoid fuzzy or very soft acrylic, which hides the honeycomb openings.
- Taupe (Color A): 100 g / 180 m worsted cotton
- Cream (Color B): 25 g / 45 m worsted cotton
Quantities include a margin of about 25 percent to cover gauge swatching and differences in tension.
Tools:
- 5.0 mm (H-8) and 4.0 mm (G-6) crochet hooks
- 1 wooden dowel, 0.75 in (1.9 cm) thick, cut to 4.25 in (10.8 cm)
- A small handful of polyester fiberfill
- 1 flat button, 0.75 in (1.9 cm)
- Tapestry needle, scissors and stitch markers
- Blocking mat, rustproof pins and a spray bottle
- Wall hook or knob
Abbreviations (US Terms)
- ch: chain
- sl st: slip stitch
- sc: single crochet
- sc2tog: single crochet 2 together
- st(s): stitch(es)
- rnd(s): round(s)
- ch-5 loop: the 5-chain arch in the net
Special stitch: Honeycomb Net. Each row is made of ch-5 loops. Each loop is anchored by 1 sc in the center of a loop from the row below. When pinned out, the loops open into rounded, six-sided cells.
Gauge and Checkpoints
Test the net first. Make a small sample by working Rows 1–6 below, then 4 more rows without shaping.
- Net gauge (5.0 mm hook): 4 loops and 8 rows = 4 in (10.2 cm), measured after a light steam. So 1 loop is 1 in (2.5 cm) wide and 1 row is 0.5 in (1.3 cm) tall.
- Sc gauge (5.0 mm hook): 16 sc = 4 in (10.2 cm), and 4 rnds = 1 in (2.5 cm)
- Firm sc gauge (4.0 mm hook): 18 sc and 20 rnds = 4 in (10.2 cm)
Checkpoints:
- After Row 6: 6 in (15.2 cm) wide
- After Row 25: 12.5 in (31.8 cm) tall
- After Row 30: 15 in (38.1 cm) tall
- After the border: 7.5 in x 16.5 in (19.1 cm x 41.9 cm)
If your net is too big, go down a hook size or try ch-4 loops. If it is too small, go up a hook size. Do not change the row counts, because the border counts depend on them.
Panel
Use Color A and the 5.0 mm hook.
Bottom point (increase rows):
Row 1: Ch 6, sc in 6th ch from hook. (1 loop)
Row 2: Ch 5, turn, sc in loop, ch 5, sc in same loop. (2 loops)
Row 3: Ch 5, turn, sc in first loop, ch 5, sc in next loop, ch 5, sc in same loop. (3 loops)
Rows 4–6: Ch 5, turn, sc in first loop, ch 5, sc in next loop, repeat to the last loop, then ch 5, sc in same last loop. (4, 5, 6 loops)
Each increase row has three kinds of loops: the turning loop, one loop between each pair of sc, and one extra loop at the end. Together they give the previous row’s count plus 1.
Checkpoint: Row 6 has 6 loops and is 6 in (15.2 cm) wide. The point is 3 in (7.6 cm) tall.
Straight section:
Rows 7–25: Ch 5, turn, sc in first loop, ch 5, sc in next loop, repeat across. (6 loops)
That is 19 rows, which makes 9.5 in (24.1 cm) of straight sides. Checkpoint: the panel is now 12.5 in (31.8 cm) tall.
Top point (decrease rows):
Rows 26–30: Ch 5, turn, sc in first loop, ch 5, sc in next loop, repeat until 1 loop remains. Leave the last loop unworked. (5, 4, 3, 2, 1 loops)
The top point is 2.5 in (6.4 cm) tall. Fasten off, but do not weave in the ends yet.
Checkpoint: 6 in x 15 in (15.2 cm x 38.1 cm). Steam the panel lightly and pin it to size now. This opens the cells and makes sewing easier.
Rod
Use Color A and the 4.0 mm hook. Work in continuous rnds and mark the first st of each rnd.
Rnd 1: 6 sc in a magic ring. (6)
Rnd 2: 2 sc in each st. (12)
Rnd 3: 2 sc in next st, sc in next 2 sts, repeat 4 times. (16)
Rnds 4–22: Sc in each st. (16)
Insert the dowel. Pad a thin layer of fiberfill around it so the rod is firm and smooth.
Rnd 23: Sc in next 2 sts, sc2tog, repeat 4 times. (12)
Rnd 24: Sc2tog 6 times. (6)
Fasten off, close the hole and weave in the end. The rod is about 4.8 in (12.2 cm) long and 1.1 in (2.8 cm) across. Sew the button to the center of the Rnd 24 end.
Disc Circles
Use Color A and the 4.0 mm hook. Make 4.
Rnd 1: For 2 of the circles, work 6 sc in a magic ring and pull it closed. For the other 2, ch 4 and sl st to the first ch to form a ring, then work 6 sc into the ring and leave it open. (6)
Rnd 2: 2 sc in each st. (12)
Rnd 3: 2 sc in next st, sc in next st, repeat 6 times. (18)
Rnd 4: 2 sc in next st, sc in next 2 sts, repeat 6 times. (24)
Rnd 5: 2 sc in next st, sc in next 3 sts, repeat 6 times. (30)
Rnd 6: 2 sc in next st, sc in next 4 sts, repeat 6 times. (36)
Rnd 7: 2 sc in next st, sc in next 5 sts, repeat 6 times. (42)
Checkpoint: each circle is 2.75 in (7.0 cm) across and lies flat.
Make the discs: Hold the 2 closed circles with wrong sides together. Sl st through both layers, 1 sl st per st (42 sl sts). This is the left disc. Repeat with the 2 open-ring circles, lining up the center holes. This is the right disc, and its center hole is the buttonhole.
Make All Pieces
- Color A: 1 panel, 1 rod and 4 disc circles (2 closed, 2 open)
- Color B: border Rnds 2–3 only
Front view layout:
        /\
       /  \        top point (Rows 26-30)
      |    |
      |    |       straight section (Rows 7-25)
    [L]====[R]     rod centered on Row 13
      |    |
       \  /        bottom point (Rows 1-6)
        \/
Joining
Sew on the rod and discs now, before the border. Use a long tail of Color A and a tapestry needle.
- Find Row 13, which is 6.5 in (16.5 cm) above the bottom tip. This is the rod’s center line.
- Stand the left disc on its edge at the left side of the panel, centered on Row 13. Its inner face should sit 0.625 in (1.6 cm) in from the net edge.
- Whipstitch the back arc of the disc to the net, using about 8 sts of the disc edge. Catch the sc anchors of Rows 11–15, not the loose chains.
- Repeat with the right disc on the right side. The inner faces of the discs are now 4.75 in (12.1 cm) apart, which fits a standard 4.25 in (10.8 cm) roll.
- Sew the closed end of the rod to the center of the left disc’s inner face, working through the rod’s Rnd 2 sts.
- Push the button end of the rod through the hole in the right disc.
Keep the whipstitch snug but not tight. If you pull hard, the net puckers around the disc. Check that the panel is still 6 in (15.2 cm) wide at Row 13.
To change the roll, unbutton the rod, slide on a new roll and button it again.
Border
Border gauge: 16 sc = 4 in (10.2 cm), so 4 sc per inch of edge. The counts below are for the side edges between corners. Corner sts are listed separately.
Rnd 1 (Color A, 5.0 mm hook): Join at the bottom tip and work 3 sc in the Row 1 loop (bottom tip). Then work up the first side:
- Bottom diagonal: 17 sc over the row ends of Rows 2–6 (3, 4, 3, 4, 3).
- Shoulder: 2 sc.
- Long side: 38 sc, with 2 sc in each row end of Rows 7–25.
- Shoulder: 2 sc.
- Top diagonal: 16 sc, with 4 sc in each row end of Rows 26–29.
Work 3 sc in the Row 30 loop (top tip). Repeat the same counts in reverse down the other side, then sl st to the first sc.
Count: sides 38 + 38 + 17 + 17 + 16 + 16 = 142, plus corners 3 + 3 + 2 + 2 + 2 + 2 = 14. (156)
Rnd 2 (Color B): Join in any side st. Sc in each st, except work 3 sc in the center st of each tip and 2 sc in the first st of each shoulder. Sl st to the first sc.
Count: 156 sts worked 1 per st + 8 added (2 at each tip, 1 at each shoulder) = 164. The sides stay at 142, each tip is now 5 sts and each shoulder is 3 sts.
Rnd 3 (Color B): Work as Rnd 2: sc in each st, 3 sc in the center st of each tip and 2 sc in the center st of each shoulder.
Count: 164 sts worked 1 per st + 8 added = 172. The sides stay at 142, each tip is now 7 sts and each shoulder is 4 sts.
Why the math works:
- The long sides are 9.5 in (24.1 cm) long, and 9.5 x 4 = 38 sc.
- The bottom diagonals run 3 in (7.6 cm) across and 3 in (7.6 cm) up, which is about 4.24 in (10.8 cm). 4.24 x 4 = 17 sc.
- The top diagonals run 3 in (7.6 cm) across and 2.5 in (6.4 cm) up, which is about 3.9 in (9.9 cm). 3.9 x 4 = 16 sc.
- The tips are sharp, so they need 2 extra sts per rnd. The shoulders are wide angles, so 1 extra st per rnd keeps them flat.
- Three rnds at 0.25 in (0.6 cm) each add 0.75 in (1.9 cm) to every edge. The width becomes 6 in + 1.5 in = 7.5 in (19.1 cm), and the height becomes 15 in + 1.5 in = 16.5 in (41.9 cm).
Hanging strap (Color A, 5.0 mm hook): Join in the center st of the top tip. Ch 20, then sl st in the same st to form a loop. Work 28 sc over the chain loop and sl st in the tip. Fasten off. The strap stands 2.5 in (6.4 cm) above the tip.
Weave in all ends.
Final Blocking
- Unbutton the rod and set it aside.
- Mist the panel until it is damp, not wet.
- Pin it face up to 7.5 in x 16.5 in (19.1 cm x 41.9 cm).
- Pin each tip and shoulder first, then the straight edges.
- Open each cell with a fingertip so the honeycomb shape is even.
- Shape the discs flat by hand. Let everything dry fully, which takes about 12 hours.
Final Quality-Control Checklist
- The panel is 7.5 in x 16.5 in (19.1 cm x 41.9 cm).
- The net has 6 loops across in Rows 7–25.
- Both points are centered and sharp.
- Border Rnd 3 has 172 sts and lies flat.
- The discs are 2.75 in (7.0 cm) across, level and 4.75 in (12.1 cm) apart.
- The rod buttons in and out easily.
- The strap is secure and 2.5 in (6.4 cm) tall.
- All ends are woven in.
Troubleshooting
- The panel leans to one side: You may have missed the extra loop at the end of an increase row, or worked into the last loop on a decrease row. Count your loops after each row.
- The net cells look like diamonds: Steam and pin the panel wider. Cotton needs blocking to open into hexagons.
- The border ruffles: Your sc is looser than gauge. Use a 4.5 mm hook for the border.
- The border cups or pulls in: Go up a hook size, or check the corner increases.
- The rod sags: Add a little more fiberfill, or use a thicker dowel.
- The button slips out: Sew on a slightly larger button, or tighten the hole with one round of sl sts.
Care
Remove the rod first, then hand wash the panel in cool water and lay it flat to dry. Wipe the rod with a damp cloth so the dowel stays dry.
Final Notes
The measurements build on each other in a short chain. One loop is 1 in (2.5 cm), so 6 loops make 6 in (15.2 cm). Thirty rows at 0.5 in (1.3 cm) make 15 in (38.1 cm). The border adds 0.75 in (1.9 cm) to every edge, for a finished size of 7.5 in x 16.5 in (19.1 cm x 41.9 cm). Discs set 4.75 in (12.1 cm) apart hold a standard roll. Check your gauge first and count your loops on every row, and the rest falls into place.
Happy crocheting!