

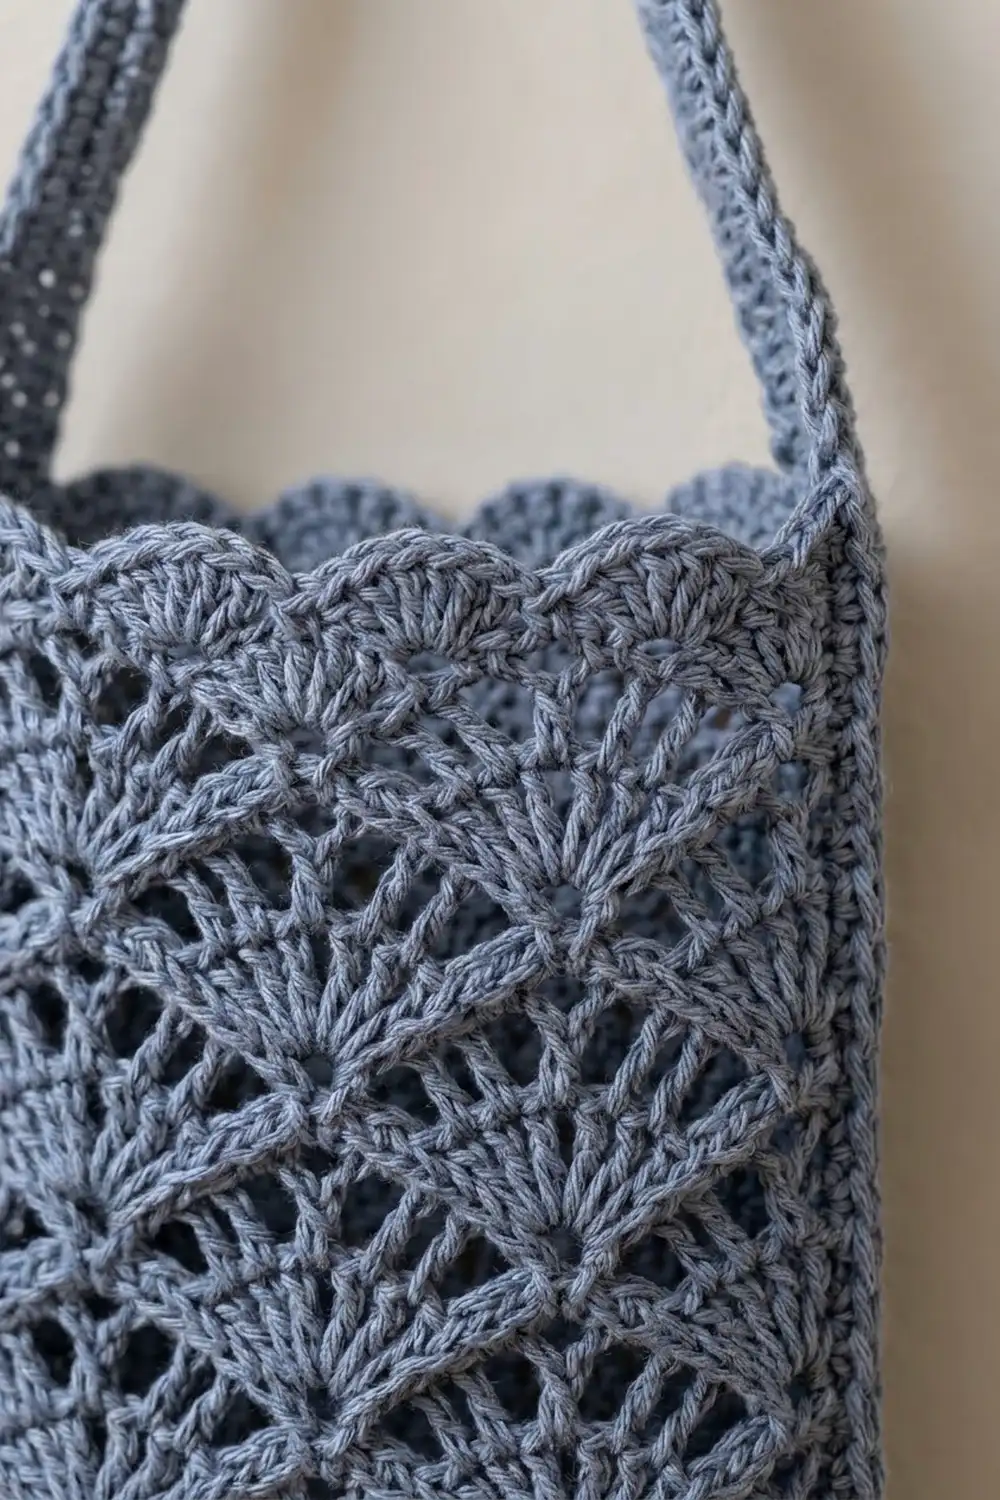
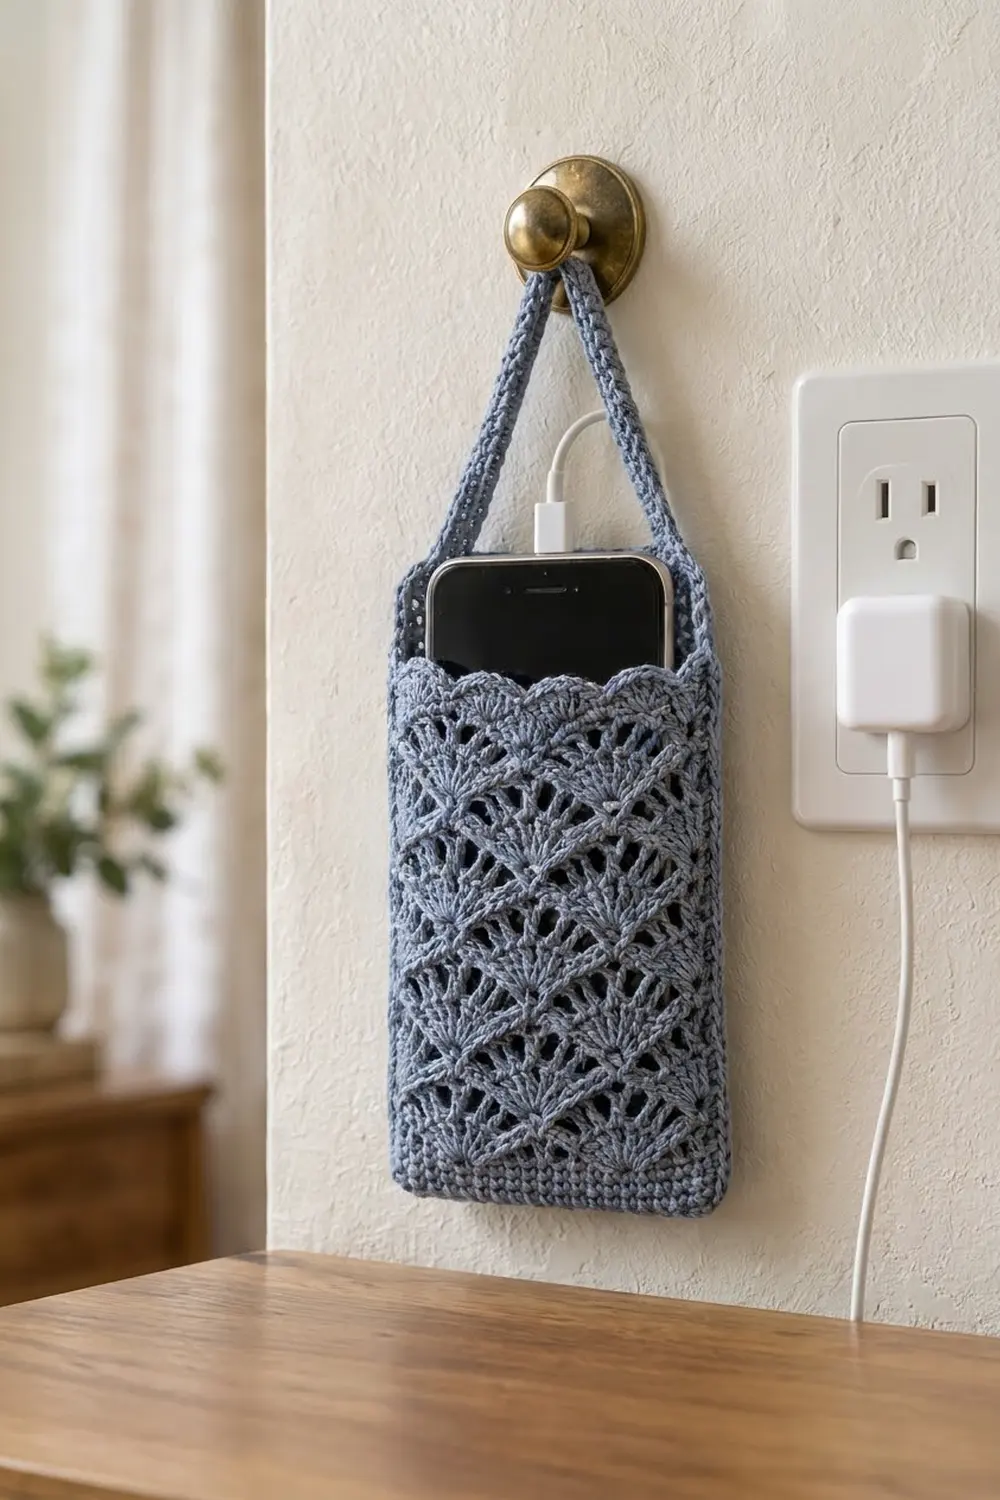
The Bluebell Fan Hanging Phone Holder is a small lace pouch that hangs from a hook or knob next to an outlet. Your phone charges inside it instead of lying on the floor or dangling from the cable. The pouch is made in one dusty slate-blue cotton. Rows of upright fans give it an airy lace texture, and a band of solid single crochet keeps the bottom firm.
The style is calm and slightly vintage. A row of small scallops trims the top edge. A slim single crochet strap arches above the pouch so you can hang it from a knob, a hook or a drawer pull.
This pattern uses US crochet terms. The finished pouch is 4 in (10.2 cm) wide and 5.5 in (14.0 cm) tall, not counting the strap. The strap is 10 in (25.4 cm) long before attaching, which leaves an arch of about 9 in (22.9 cm).
You start with a flat chain base and work single crochet around both sides of the chain, so the bottom needs no seam. Next come solid single crochet rounds, then seven rounds of fan lace and a two-round scalloped top edge. Last, you make the strap as a separate strip and sew its ends inside the side edges.
Finished Size and Construction
- Finished size: 4 in (10.2 cm) wide × 5.5 in (14.0 cm) tall, laid flat
- Skill level: Easy-intermediate
- Terminology: US crochet terms
- Yarn weight: Sport weight (#2) cotton
- Hook: 3.25 mm (US D-3)
- Number of pieces: 1 pouch body + 1 strap, sewn together into one finished item
- Layout: Worked in the round from the bottom up, with no side seams
- Pouch circumference: 48 stitches = 8 in (20.3 cm), so each flat face is 24 stitches = 4 in (10.2 cm)
- Size before top edge: 4 in (10.2 cm) wide × 5.1 in (13.0 cm) tall
- Top edge (border) depth: 0.4 in (1.0 cm)
- Fits: Phones up to about 3.1 in (7.9 cm) wide in a slim case, and about 6 in (15.2 cm) tall or more so the top of the phone sticks out
Materials
Use a smooth mercerized or soft matte cotton. Cotton keeps the fan shapes crisp and holds its shape under the weight of a phone. Avoid fuzzy yarns, because they blur the lace and catch on the charging cable.
- Dusty slate blue, sport weight cotton: 40 g (about 125 m). One 50 g ball is plenty.
The quantity includes a margin of about 15% for your gauge swatch and weaving in ends.
Tools:
– 3.25 mm (US D-3) crochet hook
– 2 locking stitch markers
– Tapestry needle
– Scissors
– Measuring tape or ruler
– Blocking mat and rust-proof pins
– Spray bottle with water
Abbreviations (US Terms)
- ch – chain
- sl st – slip stitch
- sc – single crochet
- hdc – half double crochet
- dc – double crochet
- tr – treble crochet
- st(s) – stitch(es)
- sk – skip
- rnd(s) – round(s)
- rep – repeat
Special stitch – Fan: 7 dc worked into the same stitch. The 4th dc is the center of the fan.
Special stitch – Scallop: 5 dc worked into the same stitch.
Gauge and Checkpoints
Single crochet gauge: 24 sc and 26 rnds = 4 in (10.2 cm).
Fan lace gauge: 3 fans (24 sts) = 4 in (10.2 cm) wide, and 5 fan rnds = 3 in (7.6 cm) tall. Each fan round is about 0.6 in (1.5 cm) tall.
This is a single piece, so the pouch is your test piece. Work Rounds 1–6 first, then check your gauge before you start the lace.
Checkpoints:
– After Round 1: The base strip lies flat and measures 4 in (10.2 cm) long.
– After Round 6: The pouch, pressed flat, is 4 in (10.2 cm) wide, and the solid band is about 0.9 in (2.3 cm) tall.
– After Round 13: The total height is 5.1 in (13.0 cm), and the width is still 4 in (10.2 cm).
– After Round 15: The total height is 5.5 in (14.0 cm).
If your piece is too big: If the width is more than 4.25 in (10.8 cm), go down one hook size and start again.
If your piece is too small: If the width is less than 3.75 in (9.5 cm), go up one hook size.
A difference of 0.25 in (0.6 cm) either way still holds most phones. The stitch counts stay the same for every hook size.
Pouch Body
Work in joined rounds. Do not turn at the end of a round unless the pattern tells you to. The beginning ch 1 never counts as a stitch. The beginning ch 3 and ch 4 do count as stitches.
Base and Solid Band
Round 1: Ch 25. Sc in the 2nd ch from the hook and in each of the next 23 ch (24 sc). Rotate the work so you are looking at the free loops on the underside of the chain. Work 1 sc in each of the same 24 ch, finishing in the ch that holds the first sc. Sl st to the first sc. (48 sc)
Place a marker in the first sc and another in the 25th sc. These two stitches are the side edges of the pouch. Move the markers up as you work.
Rounds 2–6: Ch 1, sc in each st around, sl st to the first sc. (48 sc in each round)
The pouch is now a flat tube that is closed at the bottom. Each face has 24 sts.
Fan Lace
You work the fans in two alternating rounds:
- Type A rounds have a single sc at each side edge.
- Type B rounds have a fan centered on each side edge.
Each round has 6 fans and 6 sc, for a total of 48 sts.
Round 7 (Type A): Ch 1, sc in the first st. Sk 3 sts, Fan in the next st, sk 3 sts, sc in the next st. Rep from * 4 more times. Then sk 3 sts, Fan in the next st, sk 3 sts, and sl st to the first sc. (6 fans + 6 sc = 48 sts)
Round 8 (Type B): Ch 3 (counts as 1 dc), then work 3 dc in the same st. Sk 3 dc, sc in the center dc of the fan, sk 3 dc, Fan in the next sc. Rep from * 4 more times. Then sk 3 dc, sc in the center dc, sk 3 dc, work 3 dc in the same st as the beginning ch 3, and sl st to the top of the ch 3. (5 full fans + 1 split fan of 7 sts + 6 sc = 48 sts)
The split fan sits exactly on the side edge. The ch 3 is its center stitch.
Round 9 (Type A): Ch 1, sc in the top of the beginning ch 3 (the same st as the join). Sk 3 dc, Fan in the next sc, sk 3 dc, sc in the center dc of the next fan. Rep from * 4 more times. Then sk 3 dc, Fan in the next sc, sk 3 dc, and sl st to the first sc. (48 sts)
Round 10: Repeat Round 8. (48 sts)
Round 11: Repeat Round 9. (48 sts)
Round 12: Repeat Round 8. (48 sts)
Round 13: Repeat Round 9. (48 sts)
Each face now shows 3 full fans in every Type A round. The offset Type B rounds make the open diamond gaps between the fans. Check the measurements: 4 in (10.2 cm) wide and 5.1 in (13.0 cm) tall.
Top Edge (Border)
Border gauge: Each scallop and the sc beside it use 4 base sts and measure 0.67 in (1.7 cm). There are 6 scallops per face.
Round 14 (leveling round): This round fills the dips between the fan tops so the scallops sit on a straight line. It has 1 st in each existing st and adds no extra stitches.
Ch 4 (counts as 1 tr) in the first sc. Then work across the next fan: dc in the 1st dc, hdc in the 2nd dc, sc in each of the 3rd, 4th and 5th dc, hdc in the 6th dc, dc in the 7th dc.
Tr in the next sc. Dc in the next dc, hdc in the next dc, sc in each of the next 3 dc, hdc in the next dc, dc in the next dc. Rep from * 4 more times. Sl st to the top of the ch 4.
Count: 48 sts worked 1 per existing st + 0 added = 48 sts, which is 24 sts per face.
Round 15 (scallop round): Ch 1, sc in the first st. Sk 1 st, Scallop in the next st, sk 1 st, sc in the next st. Rep from * 10 more times. Then sk 1 st, Scallop in the next st, sk 1 st, and sl st to the first sc. Fasten off.
Count: 12 scallops × 5 dc + 12 sc = 72 sts, which is 36 sts per face (6 scallops and 6 sc).
Why the math works: Each face has 24 sts. 24 ÷ 8 gives exactly 3 fans per face, and 24 ÷ 4 gives exactly 6 scallops per face. Both side edges land on an sc in Round 15, so the scallops meet evenly at the sides. The strap attaches at those two points.
Strap
Row 1: Ch 4. Sc in the 2nd ch from the hook and in each of the next 2 ch. Turn. (3 sc)
Rows 2–65: Ch 1, sc in each st across, turn. (3 sc in each row)
The strap measures 10 in (25.4 cm) long and 0.5 in (1.3 cm) wide. Fasten off, leaving a 10 in (25.4 cm) tail for sewing.
Optional edging: For a neater edge that matches the photo, sl st loosely along both long edges. Keep the stitches loose enough that the strap does not shorten.
Attaching the Strap
- Lay the pouch flat with the two side-edge markers at the folds.
- Place 0.5 in (1.3 cm) of one strap end inside the pouch, centered on a side-edge marker. The end should cover Rounds 13–14.
- Whipstitch around all four edges of the overlap, catching only the inside layer of stitches so the sewing does not show on the front.
- Make sure the strap is not twisted. Then sew the other end to the opposite side edge the same way.
- The visible arch is about 9 in (22.9 cm) long. Weave in all ends inside the solid band or along the strap.
Final Blocking
- Spray the pouch with water until it is damp but not dripping.
- Slide a piece of folded card, 4 in (10.2 cm) wide, inside the pouch to hold the faces apart.
- Pin the pouch flat on the blocking mat at 4 in (10.2 cm) wide × 5.5 in (14.0 cm) tall.
- Pin the top of each scallop so the curves are even, and open each fan by pinning gently at its center dc.
- Pin the strap straight at 10 in (25.4 cm), or 9 in (22.9 cm) after sewing.
- Let everything dry completely, then remove the pins and the card.
Final Quality-Control Checklist
- [ ] Rounds 1–6 each have 48 sc, and the bottom seam is closed and flat.
- [ ] Each lace round has 6 fans and 6 sc, a total of 48 sts.
- [ ] Each face shows 3 fans in every Type A round.
- [ ] The split fan in Type B rounds sits on a side edge.
- [ ] Round 14 has 48 sts and gives a level top line.
- [ ] Round 15 has 12 scallops, 6 per face, a total of 72 sts.
- [ ] The pouch measures 4 in (10.2 cm) × 5.5 in (14.0 cm).
- [ ] The strap measures 0.5 in (1.3 cm) × 10 in (25.4 cm) and is not twisted.
- [ ] The strap ends are sewn inside at both side edges.
- [ ] All ends are woven in securely.
Troubleshooting
The fans lean or spiral around the pouch. You probably missed a skip or placed a fan one stitch off. Count 8 sts per repeat and re-check that each sc lands on a fan’s center dc.
There are too many or too few fans. Check the base count. You need exactly 48 sts, and Round 7 must start with an sc in the first st.
The pouch flares at the top. The fan dc are probably looser than the sc band. Go down half a hook size for Rounds 7–13 only.
The top edge is wavy after blocking. Round 14 was worked with the wrong stitch heights. Work tr over each sc and short sts over the center of each fan.
The phone slides out too easily. Your gauge is loose. Rework the pouch with a smaller hook, or wear the phone case inside the pouch.
The strap stretches under the phone’s weight. Work the strap with a hook one size smaller, or add the optional sl st edging.
Care
Hand wash in cool water with mild soap. Press out the water in a towel, then reshape and dry flat, using the folded card again if you like.
Final Notes
The measurement chain is simple:
- 24 sc per face = 4 in (10.2 cm) of width.
- 6 solid rounds ≈ 0.9 in (2.3 cm).
- 7 fan rounds = 4.2 in (10.7 cm), bringing the height to 5.1 in (13.0 cm).
- The 2-round top edge adds 0.4 in (1.0 cm), for a finished height of 5.5 in (14.0 cm).
- A 65-row strap = 10 in (25.4 cm), which leaves an arch of about 9 in (22.9 cm) once sewn.
If the counts at each checkpoint match, the pouch will hang straight and hold your phone right by the outlet.
Happy crocheting!