

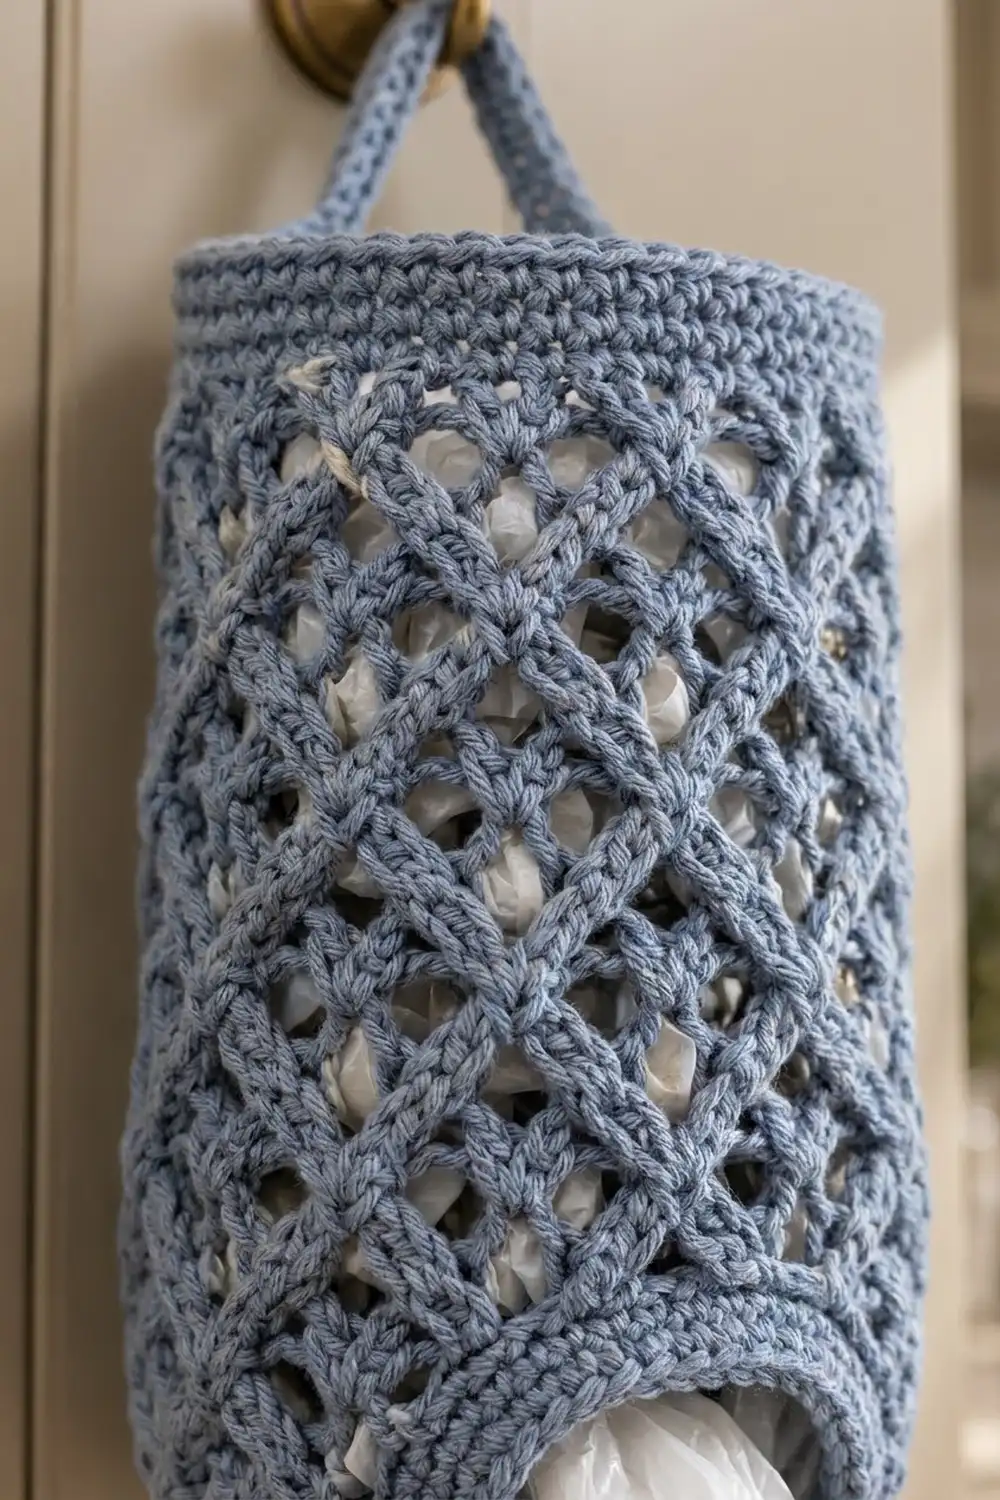
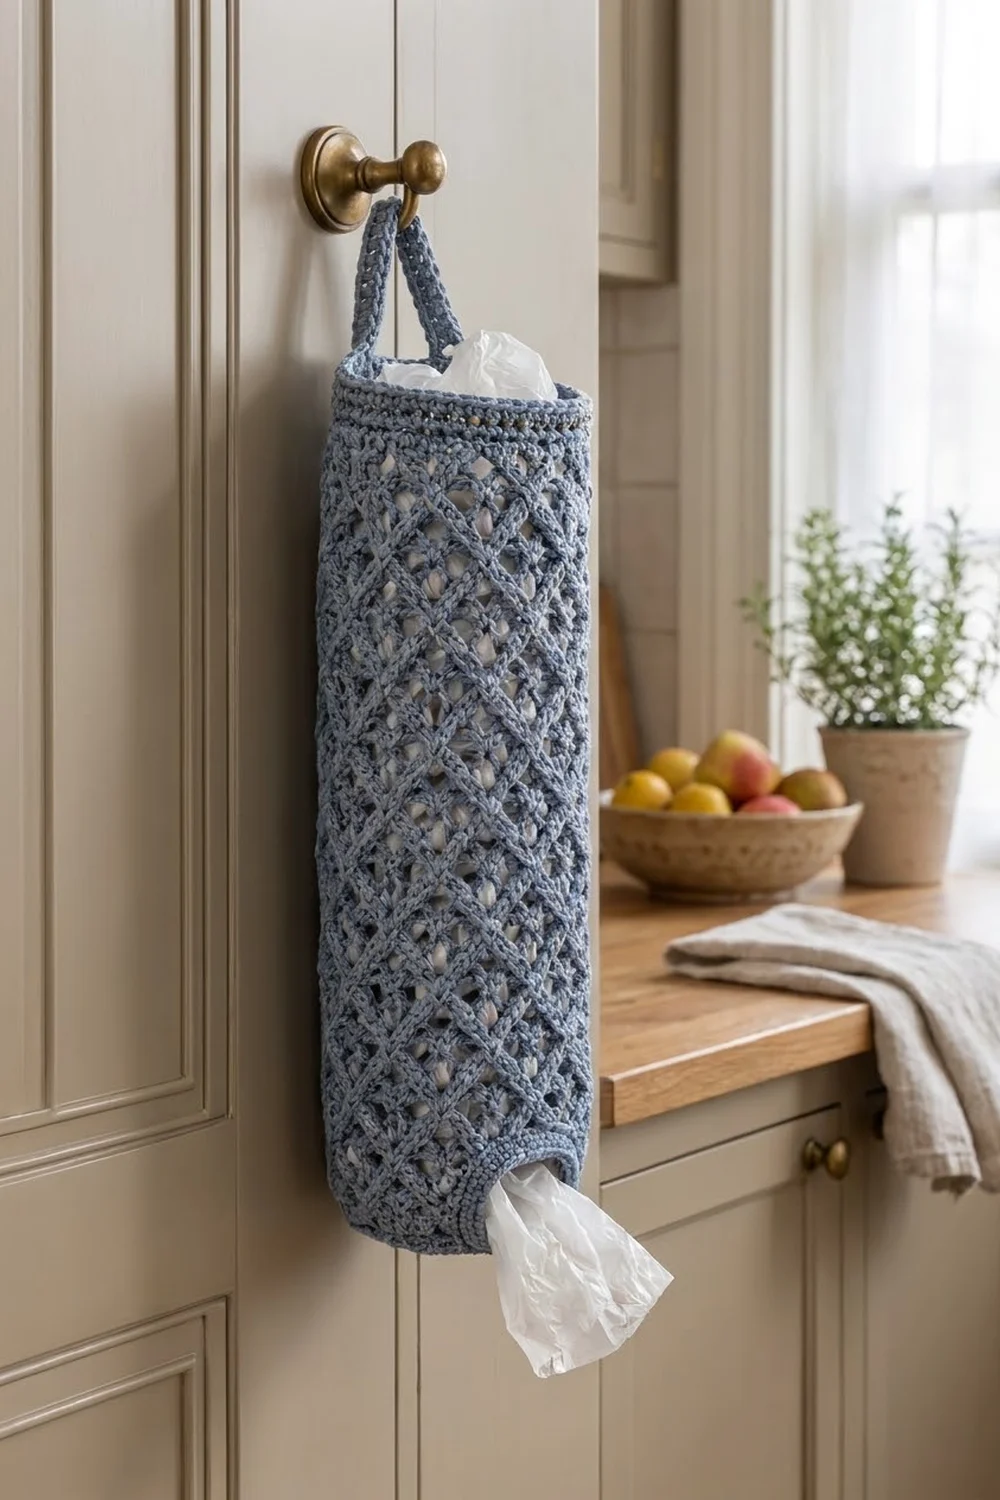
The Bluebell Lattice Bag Holder is a tidy, practical way to store plastic grocery bags. You push bags in through the wide top and pull them out one at a time through the small opening at the bottom. The open diamond lattice keeps it light and lets you see when it’s running low.
This sample uses a single dusty denim-blue worsted cotton. Solid single-crochet bands frame the open mesh at both ends, and a narrow strap at the back lets it hang from a cabinet knob, hook, or door rail. It looks calm and homey, like a farmhouse kitchen, and it is very easy to make.
The pattern uses US crochet terms. The finished holder is 7 in (17.8 cm) wide when flat and 19.5 in (49.5 cm) long, not counting the strap. The strap arch rises about 3 in (7.6 cm) above the rim.
You make it in one piece from the bottom up. Start with a solid band around the small dispenser opening, increase to full width, and work 20 rounds of diamond net. Then switch back to solid single crochet for the top band, add the strap, and finish with a slip-stitch edge. There is no sewing apart from fastening off the strap.
Finished Size and Construction
- Finished size: 7 in (17.8 cm) flat width × 19.5 in (49.5 cm) body length
- Circumference: 14 in (35.6 cm) at the body; 7.5 in (19.1 cm) at the bottom opening
- Skill level: Easy
- Terminology: US crochet terms
- Yarn weight: Worsted (#4) cotton
- Hook: 5.0 mm (US H-8)
- Number of pieces: 1 (seamless tube with an attached strap)
- Layout: Vertical tube: bottom band, then increase section, lattice body, top band, and strap
- Piece size: 7 in × 19.5 in (17.8 cm × 49.5 cm) flat
- Size before border: 7 in × 19.5 in (17.8 cm × 49.5 cm)
- Border depth: Slip-stitch edge, about 1/8 in (0.3 cm). It adds no real length.
Materials
Yarn: Use a smooth worsted-weight cotton or cotton blend. Cotton holds its shape when you stuff it with bags and doesn’t stretch much on the hook. Avoid pure acrylic, which can sag lengthwise over time. A slightly twisted, cord-like cotton gives the crisp, raised lattice bars shown.
- Dusty Denim Blue: 90 g, about 155 m (170 yd)
This includes a margin of about 15 percent for your gauge swatch and tension differences. Two 50 g balls are plenty for most crocheters.
Tools:
- 5.0 mm (US H-8) crochet hook
- 2 stitch markers (one for the start of the round, one for the strap position)
- Tapestry needle
- Scissors
- Tape measure
- Rust-proof pins and a spray bottle for blocking
- A rolled towel or a 4.5 in (11.4 cm) wide cardboard tube for blocking
Abbreviations (US Terms)
- ch – chain
- sc – single crochet
- sl st – slip stitch
- st(s) – stitch(es)
- sp – space
- sk – skip
- rnd(s) – round(s)
- 2 sc in next – increase (2 single crochet in the same stitch)
- ch-5 sp – the space under a 5-chain loop
Special stitch: Diamond Net Round. Each round has 14 sc and 14 ch-5 loops. Every sc sits in the center of a loop from the round below. Because each round is offset by half a loop, the loops line up into diagonal bars that cross to make diamonds.
Gauge and Checkpoints
Solid sc gauge: 16 sc and 16 rnds = 4 in (10.2 cm), worked in the round.
Lattice gauge: 14 ch-5 loops around = 14 in (35.6 cm). That is 1 loop per 1 in (2.5 cm), and 5 net rounds = 4 in (10.2 cm), measured with light downward tension.
Test first: Work Rnds 1–8, then 5 net rounds, before you commit to the full length. This short tube is your swatch, and you can keep going from it if it matches.
Checkpoints:
- After Rnd 5: The bottom band is 7.5 in (19.1 cm) around (3.75 in / 9.5 cm flat) and 1.25 in (3.2 cm) tall.
- After Rnd 8: Circumference is 14 in (35.6 cm), or 7 in (17.8 cm) flat. The piece is 2 in (5.1 cm) tall.
- After Rnd 13 (5 net rnds): The net section is 4 in (10.2 cm) tall with gentle tension.
- After Rnd 28: The body is 18 in (45.7 cm) tall.
- After Rnd 34: The body is 19.5 in (49.5 cm) tall.
If too big: Go down a half size (4.5 mm), or chain tighter in the net rounds. Loose ch-5 loops are the most common reason the tube ends up too long.
If too small: Go up to a 5.5 mm (US I-9) hook. In the net section, don’t pull the sc tight over the loop below.
Bottom Band and Increase Section
Rnd 1: Ch 30. Sl st into the first ch to make a ring, taking care not to twist the chain. Ch 1, sc in each ch around. Join with a sl st to the first sc. (30 sc)
Rnds 2–5: Ch 1, sc in each st around, join. (30 sc)
This solid band is the dispenser opening. Its 7.5 in (19.1 cm) circumference gives an opening about 2.4 in (6.1 cm) across. That’s tight enough to hold the bags in and loose enough to pull them out one by one.
Rnd 6 (growth): Ch 1, sc in next 4 sts, 2 sc in next st; repeat from * 6 times total, join. (36 sc)*
Rnd 7 (growth): Ch 1, sc in next 5 sts, 2 sc in next st; repeat from * 6 times total, join. (42 sc)*
Rnd 8 (growth): Ch 1, sc in next 2 sts, 2 sc in next st; repeat from * 14 times total, join. (56 sc)*
Check: 56 sc ÷ 16 sc per 4 in = 14 in (35.6 cm). The three growth rounds give the gentle tapered shoulder you see near the bottom opening.
Diamond Lattice Body
Rnd 9 (first net round): Ch 1, sc in the first st, ch 5, sk next 3 sts, sc in next st; repeat from * around. End with ch 5, sk the last 3 sts, and join with a sl st to the first sc. (14 sc, 14 ch-5 loops)*
Check: each repeat uses 4 stitches (1 sc plus 3 skipped), and 14 × 4 = 56. The repeat comes out exactly.
Rnd 10: Sl st in each of the next 2 ch, then sl st into the ch-5 sp. This moves you to the center of the first loop. Ch 1, sc in the same ch-5 sp, ch 5, sc in next ch-5 sp; repeat from * around. End with ch 5, join to the first sc. (14 sc, 14 ch-5 loops)*
Rnds 11–28: Repeat Rnd 10. That makes 20 net rounds in total (Rnds 9–28). (14 sc, 14 ch-5 loops in every round)
Check: 20 rounds ÷ 5 rounds per 4 in = 16 in (40.6 cm) of lattice. Each sc pinches a loop of the round below at its center, so you get the diamond holes and crossing diagonal bars from the photo.
Tip: The net slants slightly as you go, which is normal for this stitch in the round. Keep your start-of-round marker in the first sc of each round. Blocking will straighten the lattice.
Top Band
Rnd 29 (conversion): Ch 1, sc in next sc, 3 sc in next ch-5 sp; repeat from * 14 times total, join. (56 sc = 14 sc worked 1 per existing sc + 42 sc added as 3 per loop)*
This changes the net back to a solid fabric with exactly the 56 stitches you had at the bottom of the lattice, so the tube stays straight.
Rnds 30–34: Ch 1, sc in each st around, join. (56 sc)
The top band is 6 rounds (Rnds 29–34), which is 1.5 in (3.8 cm) tall. Fasten off and weave in the end.
Check: bottom section 2 in (5.1 cm) + lattice 16 in (40.6 cm) + top band 1.5 in (3.8 cm) = 19.5 in (49.5 cm).
Hanging Strap
Flatten the tube so the start-of-round jog runs along one side fold. Count 28 stitches for the front and 28 for the back. On the back half, count to the 11th stitch from the fold and place a marker. This centers the strap: 10 sts + 4 strap sts + 4 gap sts + 4 strap sts + 6 sts = 28.
Row 1: With the outside facing, join yarn in the marked stitch. Ch 1, sc in the same st and in the next 3 sts. (4 sc)
Rows 2–28: Ch 1, turn, sc in each st across. (4 sc)
Check: 4 sc = 1 in (2.5 cm) wide, and 28 rows = 7 in (17.8 cm) long.
Attach: Skip the next 4 rim stitches after the strap base to leave a 1 in (2.5 cm) gap. Bring the free end of the strap over, without twisting it, to the following 4 rim stitches. Sl st through each strap stitch and its matching rim stitch together. (4 sl st) Fasten off.
The 7 in (17.8 cm) strap minus the 1 in (2.5 cm) gap leaves about 6 in (15.2 cm) to form the arch. Each half stands about 3 in (7.6 cm) tall, so the strap rises from the back of the rim as a narrow upright loop.
Border
Border gauge: The slip-stitch edge matches the sc gauge of the rim, 1 sl st per stitch, or 4 per 1 in (2.5 cm). Work loosely so the edge doesn’t draw in.
Top rim: Join yarn at the side fold. Sl st in each of the 56 top stitches. Where the strap ends sit, slip-stitch through the strap base and rim together. Join. (56 sl st: 28 front + 28 back)
Strap edges: Join yarn at one base of the strap. Work 1 sc in each row-end up one long edge (28 sc), sc across the 4 stitches at the top of the arch, then 1 sc in each row-end down the other long edge (28 sc). Fasten off. (60 sc total: 28 + 4 + 28)
Bottom rim: Join yarn in a free loop of the foundation chain. Sl st in each of the 30 free loops, join. (30 sl st: 15 front + 15 back)
Why the math works: Each edge gets exactly 1 border stitch per existing stitch or row-end. The 56-stitch top has 28 per flat side, the 30-stitch bottom has 15 per flat side, and each 28-row strap edge gets 28 sc. Nothing is added or skipped, so the rims stay at 14 in (35.6 cm) and 7.5 in (19.1 cm) around, and the strap lies flat instead of rippling.
Final Blocking
- Weave in all ends along the solid bands, never through the open lattice where they would show.
- Soak the holder in cool water for 10 minutes. Gently press out the water; don’t wring it.
- Roll it in a towel to remove most of the moisture.
- Slide it over a rolled towel or a cardboard tube about 4.5 in (11.4 cm) wide. Pull gently from both ends so the lattice reaches 16 in (40.6 cm) and the diamonds open evenly.
- Straighten any slant by turning the lattice until the diamond columns run vertically.
- Pin the strap flat at 1 in (2.5 cm) wide.
- Let it dry completely, usually 12–24 hours, before hanging.
Final Quality-Control Checklist
- Flat width is 7 in (17.8 cm) through the body.
- Body length is 19.5 in (49.5 cm) from the bottom rim to the top rim.
- The bottom opening is 7.5 in (19.1 cm) around and isn’t flared.
- Every net round has 14 loops, with no extra or missing diamonds.
- The top band has 56 stitches and the bottom band has 30.
- The strap is centered on the back, 1 in (2.5 cm) wide, and not twisted.
- All ends are hidden in the solid bands.
- The slip-stitch edges lie flat without puckering.
Troubleshooting
The lattice is too long and droopy. Your ch-5 loops are loose. Try ch 4 per loop, or a 4.5 mm hook for the net rounds only.
The diamonds look uneven. Make sure each sc goes into the ch-5 space, not into a chain stitch. Always slip-stitch to the loop’s center before you start each round.
The tube twisted during the net section. This is normal. Block it on a tube and rotate the fabric until the columns hang straight.
The bottom opening flares. Your bottom band is too loose. Rework Rnds 1–5 with a smaller hook, or start with ch 28 and increase evenly by 2 in Rnd 6 so you still reach 36.
Bags fall out on their own. Add one more sc round to the bottom band, or work the bottom border as sc instead of sl st to firm up the rim.
The strap stretches under weight. Work the strap with a hook one size smaller, or add a second sc row along each strap edge.
Care
Machine wash cold on a gentle cycle in a mesh laundry bag, then reshape and lay flat or hang to dry. Avoid hot dryer settings, which can shrink cotton unevenly.
Final Notes
The size of this holder comes from a short, simple chain of measurements. A 30-stitch bottom band gives a 7.5 in (19.1 cm) dispenser opening. Three growth rounds take it to 56 stitches, or 14 in (35.6 cm) around and 7 in (17.8 cm) flat. That 56 divides evenly into 14 lattice loops, and 20 net rounds give 16 in (40.6 cm) of diamond lattice. The conversion round goes back to exactly 56 sc, and the 1.5 in (3.8 cm) top band finishes the body at 19.5 in (49.5 cm). The 28-row strap makes an arch about 3 in (7.6 cm) tall.
If your swatch matches the gauge, every checkpoint will follow. Measure at each stage, block over a tube, and your holder will hang straight and dispense bags neatly.
Happy crocheting!