

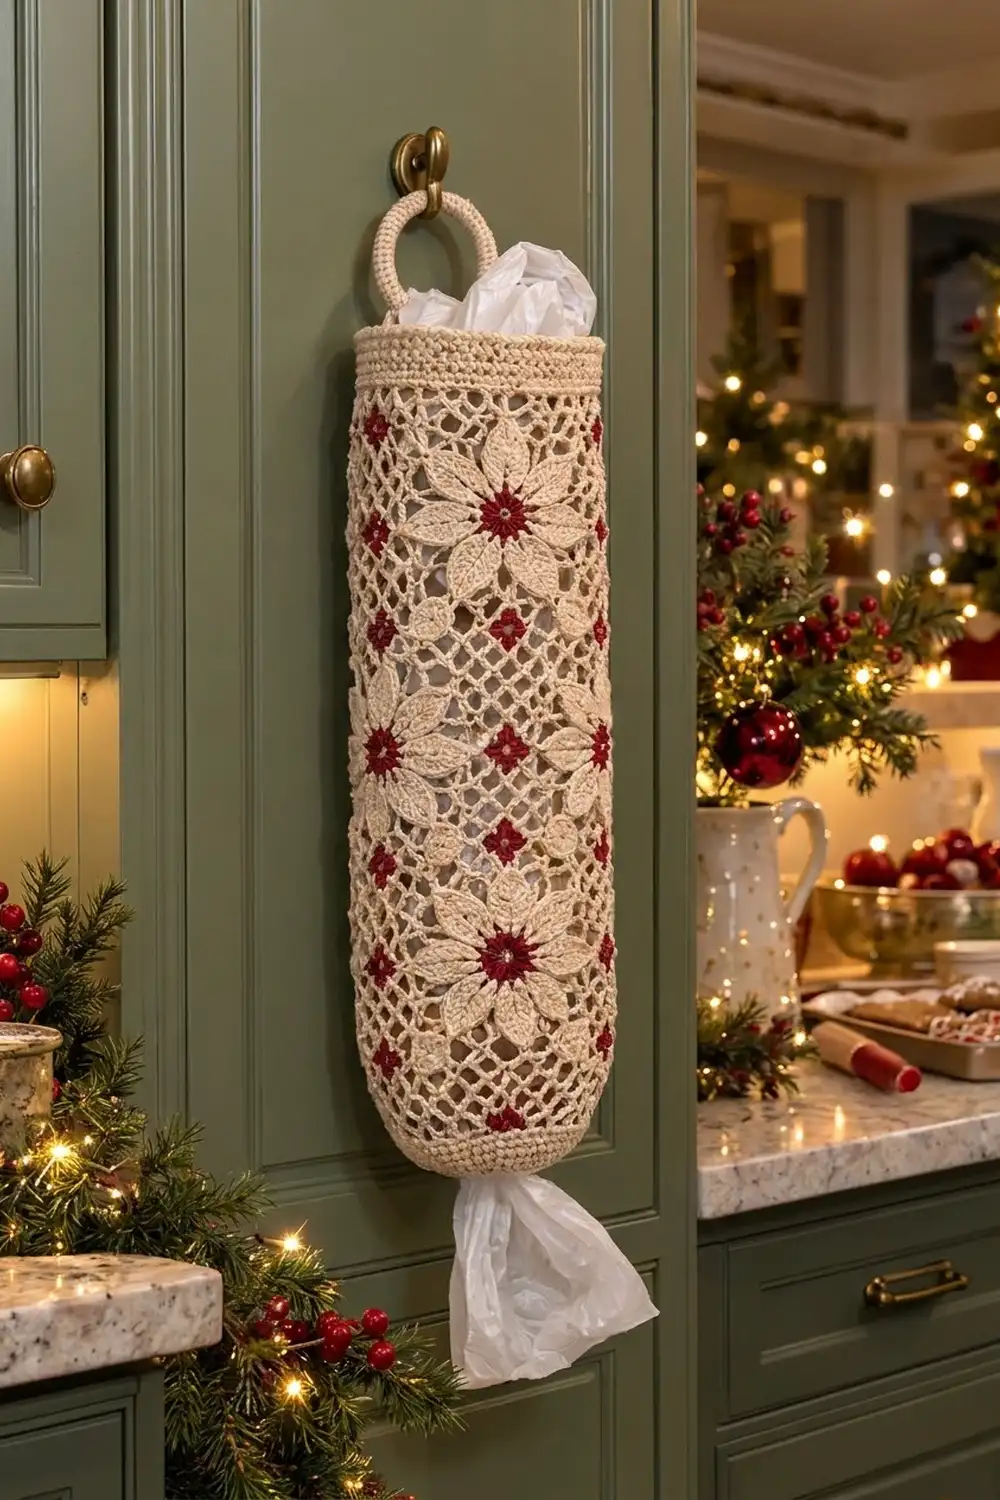
This bag holder turns a plain kitchen job into a small holiday detail. Large cream flowers with deep red centers sit in a checkerboard with tiny red diamonds, all framed by an open lattice. A solid band at the top holds the shape, and a tapered bottom lets you pull out one bag at a time.
The palette is two colors only: soft cream for the body, mesh, bands and ring, and cranberry red for the flower centers and diamond accents. Mercerized cotton shows off the petal texture and holds up well with daily use.
The pattern uses US crochet terms. The finished holder is 9 in (22.9 cm) wide laid flat, 18 in (45.7 cm) around, and 21.25 in (54.0 cm) long from the bottom edge to the top edge. With the hanging ring it is about 24.25 in (61.6 cm) long.
Construction is simple and modular. You make 16 square motifs of two types, join them into a 4 x 4 panel, and seam the panel into a tube. Then you work a solid top band and a decreasing bottom straight into the motif edges. Last, you cover a ring and attach it with a short tab.
Finished Size and Construction
- Finished size: 9 in (22.9 cm) flat width x 21.25 in (54.0 cm) length, plus ring
- Circumference: 18 in (45.7 cm)
- Skill level: Intermediate
- Terminology: US
- Yarn weight: DK (3), cotton
- Hook: E-4 (3.5 mm)
- Number of pieces: 16 squares (8 Flower, 8 Diamond), plus ring and tab
- Layout: 4 squares around x 4 squares tall, checkerboard
- Piece size: 4.5 in (11.4 cm) square
- Size before border: 18 in (45.7 cm) around x 18 in (45.7 cm) tall
- Border depth: top band 1.5 in (3.8 cm), tapered bottom 1.75 in (4.4 cm)
Materials
Use a smooth mercerized DK cotton, about 113 m (124 yd) per 50 g. Cotton keeps the petals crisp and doesn’t stretch out under the weight of a bag stash. Acrylic works too, but the lattice will be softer.
- Cream: 200 g, about 452 m (494 yd)
- Cranberry red: 25 g, about 57 m (62 yd)
Tools:
- E-4 (3.5 mm) crochet hook
- One 3 in (7.6 cm) metal or plastic ring
- Tapestry needle
- Stitch markers
- Blocking mats and rust-proof pins
- Spray bottle
- Measuring tape
The yarn amounts include about a 20% margin for gauge swatches and differences in tension.
Abbreviations (US Terms)
- ch – chain
- sl st – slip stitch
- sc – single crochet
- hdc – half double crochet
- dc – double crochet
- tr – treble crochet
- sc2tog – single crochet 2 together
- sp(s) – space(s)
- st(s) – stitch(es)
- BLO – back loop only
- rnd(s) – round(s)
Special stitch – Petal: In one ch-3 sp, work (sc, hdc, 2 dc, tr, 2 dc, hdc, sc). That is 9 sts, and the tr is the pointed tip.
Gauge and Checkpoints
Make one Flower Square and one Diamond Square before anything else. Block them, then measure.
Motif gauge: One finished square measures 4.5 in (11.4 cm) per side, with 23 sc per side.
Band gauge: 23 sc = 4.5 in (11.4 cm); 11 rnds of sc = 2 in (5.1 cm).
Checkpoints for the Flower Square:
- After Rnd 1: about 1.25 in (3.2 cm) across
- After Rnd 3: about 3 in (7.6 cm) tip to tip
- After Rnd 5: about 3.75 in (9.5 cm) per side
- After Rnd 7: 4.5 in (11.4 cm) per side
The Diamond Square should match the Flower Square after its Rnd 3 and at the end.
If your square is too big, go down to a D-3 (3.25 mm) hook. If it is too small, go up to a 4.0 mm hook. Both types must end at the same size. If only one type is off, tighten or loosen your chains in the open rounds (Flower Rnd 4, Diamond Rnd 2) instead of changing hooks.
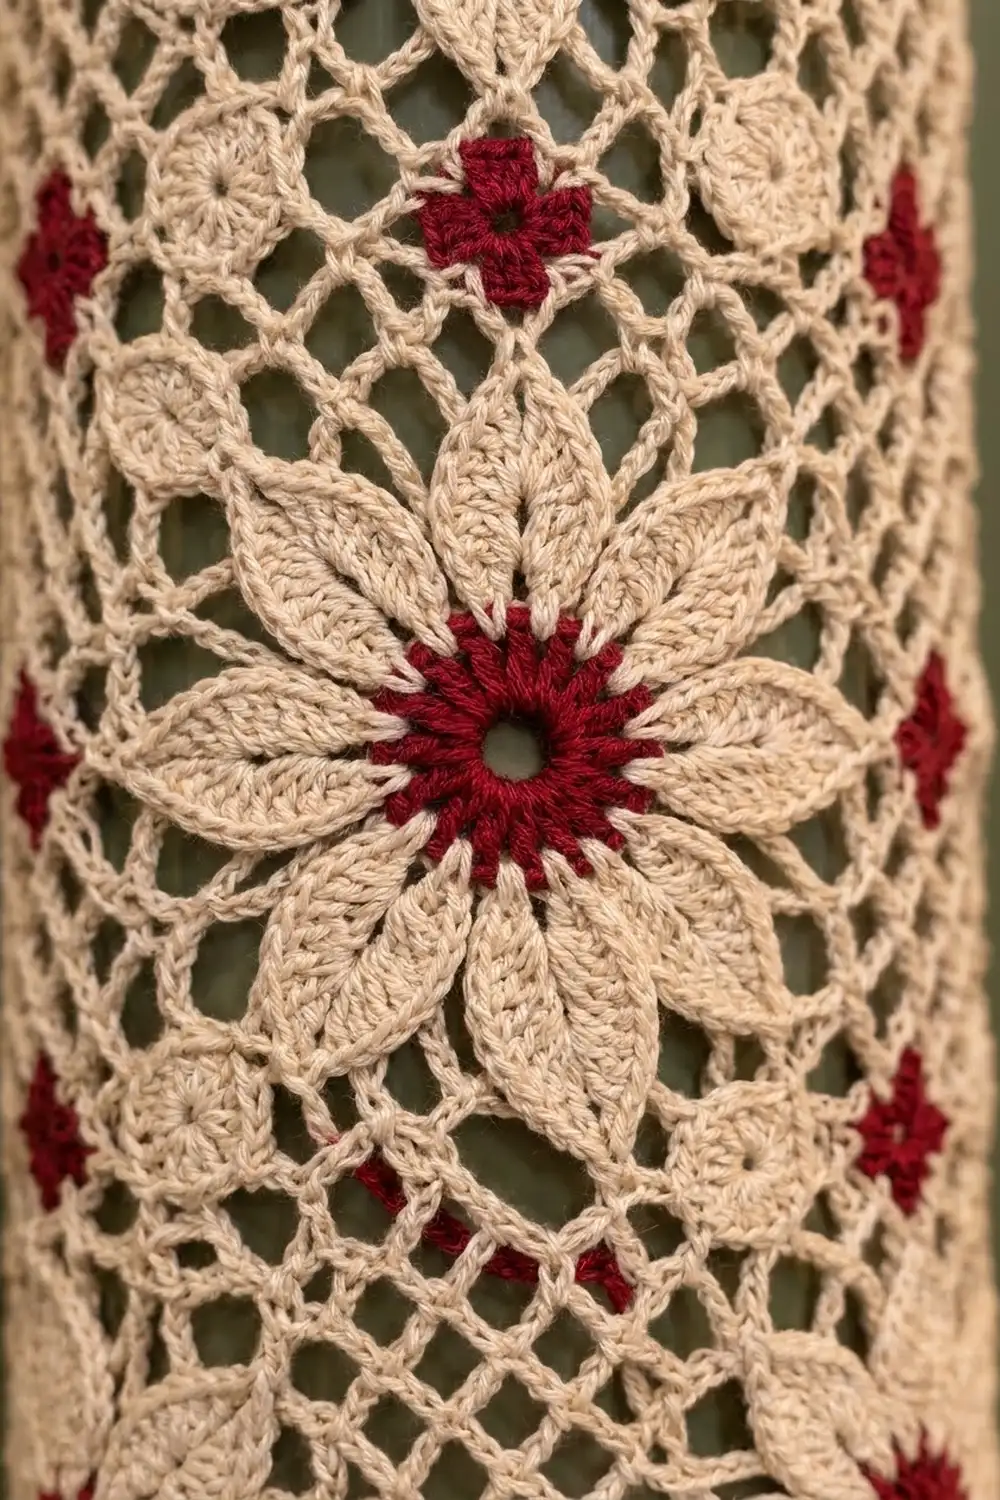
Flower Square (Make 8)
Rnd 1 (red): Make a magic ring, ch 3 (counts as dc), 15 dc in the ring, sl st to the top of ch-3. (16 dc)
Rnd 2 (red): Ch 1, sc in the same st, ch 3, skip next st, sc in next st, ch 3, skip next st; repeat from * 6 more times, sl st to first sc. (8 sc, 8 ch-3 sps)* Fasten off red.
Rnd 3 (cream): Join cream in any ch-3 sp. Work 1 Petal in each ch-3 sp around, sl st to first sc. (8 petals, 72 sts)
You should now have eight pointed petals around a solid red center. If you like, add a cream or gold French knot to the middle of the center.
Rnd 4: Sl st up to the tr tip of the first petal. Ch 1, sc in the tr, ch 5, sc in tr of next petal; repeat from * 6 more times, ch 5, sl st to first sc. (8 sc, 8 ch-5 sps)*
Rnd 5: Sl st into the first ch-5 sp. Ch 3 (counts as dc), (2 dc, ch 3, 3 dc) in the same sp for a corner, 5 dc in the next sp, (3 dc, ch 3, 3 dc) in the next sp, 5 dc in the next sp; repeat from * 2 more times, sl st to the top of ch-3. (44 dc: 11 dc per side, 4 corner ch-3 sps)*
Rnd 6 (lattice): Sl st to the first corner sp. Ch 6 (counts as dc + ch 3), dc in the same sp. [Ch 2, skip 1 st, dc in next st] 5 times, ch 2, skip last st; (dc, ch 3, dc) in corner sp; repeat from * 2 more times. Then [ch 2, skip 1 st, dc in next st] 5 times, ch 2, skip last st, sl st to the 3rd ch of ch-6. (28 dc: 7 per side including 2 corner dc; 24 ch-2 sps; 4 corner ch-3 sps)*
Rnd 7: Sl st into the corner sp. Ch 1, 3 sc in the corner sp. Sc in the next dc, [2 sc in the ch-2 sp, sc in the next dc] 6 times, 3 sc in the corner sp; repeat from * 2 more times. Then sc in the next dc, [2 sc in the ch-2 sp, sc in the next dc] 6 times, sl st to the first sc. (88 sc)* Fasten off and leave a 20 in (50.8 cm) tail on 4 of the squares for joining.
Side count check: Count from one corner’s middle sc to the next: corner sc (1) + 1 sc + corner dc (1) + 12 sc in sps + 5 sc in inner dc + corner dc (1) + 1 sc + corner sc (1) = 23 sts per side, including both corners. That gives 4 x 22 = 88 sts.
Diamond Square (Make 8)
Rnd 1 (red): Make a magic ring, ch 3 (counts as dc), 2 dc, ch 3, 3 dc, ch 3; repeat from * 2 more times, sl st to the top of ch-3. (12 dc, 4 ch-3 sps)* Fasten off red.
This tiny red square becomes the on-point diamond. Its corners point toward the middle of each side of the cream frame.
Rnd 2 (cream): Join cream in any red ch-3 sp. Ch 1, sc in the same sp, ch 7, sc in next ch-3 sp; repeat from * 2 more times, ch 7, sl st to the first sc. (4 sc, 4 ch-7 loops)*
Rnd 3: Sl st into the first ch-7 loop. Ch 3 (counts as dc), (4 dc, ch 3, 5 dc) in the same loop, dc in the next sc, (5 dc, ch 3, 5 dc) in the next loop, dc in the next sc; repeat from * 2 more times, sl st to the top of ch-3. (44 dc: 11 dc per side, 4 corner ch-3 sps)*
Each side is 5 dc + 1 dc + 5 dc = 11. This matches Flower Rnd 5 exactly.
Rnds 4–5: Work them exactly like Flower Square Rnds 6–7. (88 sc, 23 per side including corners)
Make All Pieces
- Flower Squares: 8, with red Rnds 1–2 and cream Rnds 3–7
- Diamond Squares: 8, with red Rnd 1 and cream Rnds 2–5
Layout as a flat panel, seen from the right side (F = Flower, D = Diamond):
Row 4 (top):    D  F  D  F
Row 3:          F  D  F  D
Row 2:          D  F  D  F
Row 1 (bottom): F  D  F  D
Because there are 4 columns, the checkerboard carries on correctly across the last seam when you roll the panel into a tube.
Block all 16 squares to 4.5 in (11.4 cm) before you join them.
Joining
Method: Slip stitch join through the BLO, with right sides facing up. This leaves a neat chain ridge on the wrong side and a flat seam on the front.
Stitch-to-stitch logic: Each side has 23 sts. Put two squares edge to edge, starting at the middle corner sc of each. Sl st through the back loop of one st on each square, matching 1-to-1, and end at the next corner sc. That is 23 sl sts per seam. The seams don’t add or remove any edge stitches.
Order:
- Join the squares in each row into strips of 4 (3 seams per strip).
- Join the 4 strips together along their long edges. Where four corners meet, work through the corner sts at the same point so the lattice lines up.
- Fold the panel with right sides out and join the left edge of each row to its right edge. This makes the tube.
Tension: Keep the sl sts as loose as the sc edge. Pull up each loop slightly. A tight seam will pucker the lattice.
Checkpoint: The tube should measure 18 in (45.7 cm) around and 18 in (45.7 cm) tall, or 9 in (22.9 cm) wide when laid flat.
Border: Top Band and Tapered Bottom
Border gauge: 23 sc = 4.5 in (11.4 cm); 11 rnds = 2 in (5.1 cm).
Top Band
Rnd 1: Join cream at any seam along the top edge. Ch 1, sc in each st around, including the corner sts on both sides of every seam, sl st to the first sc. (92 sc: 23 per square x 4 squares)
Rnds 2–8: Ch 1, sc in each st around, sl st to the first sc. (92 sc)
The band is 1.5 in (3.8 cm) deep. Don’t fasten off yet.
Hanging tab: Place a marker on the 8 sts centered over one seam. This is the back. Join the yarn at the first marked st and work in rows:
- Row 1: Ch 1, sc in each of the 8 sts, turn. (8 sc)
- Rows 2–10: Ch 1, sc in each st, turn. (8 sc)
The tab is about 1.75 in (4.4 cm) long. Fasten off and leave a 12 in (30.5 cm) tail.
Tapered Bottom
Rnd 1: Join cream at any seam along the bottom edge. Ch 1, sc in each st around, sl st to the first sc. (92 sc)
Rnd 2: Ch 1, sc in the next 21 sts, sc2tog; repeat from * 3 more times. (88 sc)*
Rnd 3: Sc in the next 9 sts, sc2tog; repeat from * 7 more times. (80 sc)*
Rnd 4: Sc in the next 8 sts, sc2tog; repeat from * 7 more times. (72 sc)*
Rnd 5: Sc in the next 7 sts, sc2tog; repeat from * 7 more times. (64 sc)*
Rnd 6: Sc in the next 6 sts, sc2tog; repeat from * 7 more times. (56 sc)*
Rnd 7: Sc in the next 5 sts, sc2tog; repeat from * 7 more times. (48 sc)*
Rnd 8: Sc in the next 4 sts, sc2tog; repeat from * 7 more times. (40 sc)*
Rnds 9–10: Sc in each st around. (40 sc) Fasten off.
The bottom is 1.75 in (4.4 cm) deep. The opening is about 8 in (20.3 cm) around, or roughly 2.5 in (6.4 cm) across. That’s snug enough to hold bags in and still let one pull out.
Why the Math Works
Each square edge has 23 sts, and there are 4 squares around, so 4 x 23 = 92. At 23 sc per 4.5 in (11.4 cm), 92 sts measure exactly 18 in (45.7 cm). That matches the tube, so the band won’t flare or pull in. In the bottom, each decrease round removes a fixed number of sts per repeat (4, then 8 per round), so the taper stays even.
Covered Ring
Join cream around the 3 in (7.6 cm) ring and work 60 sc over it, pushing the sts together until the ring is fully covered. Sl st to the first sc and fasten off.
Pass the tab through the ring from front to back. Fold it down inside the top band and sew the last row to the inside of Rnd 4 of the band with the tail. Weave in all ends along the seams.
Final Blocking
- Turn the holder right side out and spray it until damp, not soaked.
- Lay it flat on the mats, with one seam column at each folded edge.
- Pin the body to 9 in (22.9 cm) wide and 18 in (45.7 cm) tall.
- Open each petal and pin the tips to point outward.
- Smooth the top band straight and shape the bottom into an even curve.
- Let it dry fully. Then flip it and steam the other side lightly.
- Check the total length: 21.25 in (54.0 cm) from the bottom edge to the top edge.
Final Quality-Control Checklist
- All 16 squares measure 4.5 in (11.4 cm) and have 23 sts per side
- The checkerboard alternates correctly in every row and across the back seam
- The four-corner meeting points line up with no gaps
- Top band Rnd 1 has exactly 92 sc
- The bottom decreases end at 40 sc and the opening is centered
- The ring is fully covered and the tab is sewn securely
- Every end is woven into a seam or band, not into the open lattice
Troubleshooting
Petals cup or ruffle: Your Rnd 4 chains are too short. Work ch 6 instead of ch 5, and keep the next round’s stitch count the same.
Diamond Squares come out smaller than Flower Squares: Loosen the ch-7 loops in Rnd 2, or work ch 8.
Top band flares: Your tension in the band is looser than in the motifs. Go down half a hook size for the band only.
Seams pucker: Pick out the join and redo it with looser sl sts, or whipstitch through the back loops instead.
Bags won’t come out of the bottom: Leave out Rnd 8 and end with 2 even rnds of 48 sc.
Care
Hand wash in cool water with mild soap, press out the water in a towel, and dry flat, reshaping the petals. Don’t tumble dry.
Final Notes
The measurements build on each other. Each square is 23 sts and 4.5 in (11.4 cm) per side. Four squares around make 92 sts and 18 in (45.7 cm). Four squares tall make an 18 in (45.7 cm) body. A 1.5 in (3.8 cm) top band and a 1.75 in (4.4 cm) bottom bring the length to 21.25 in (54.0 cm), and the ring adds about 3 in (7.6 cm). If your first square matches the gauge, everything after it will fit.
Happy crocheting!