

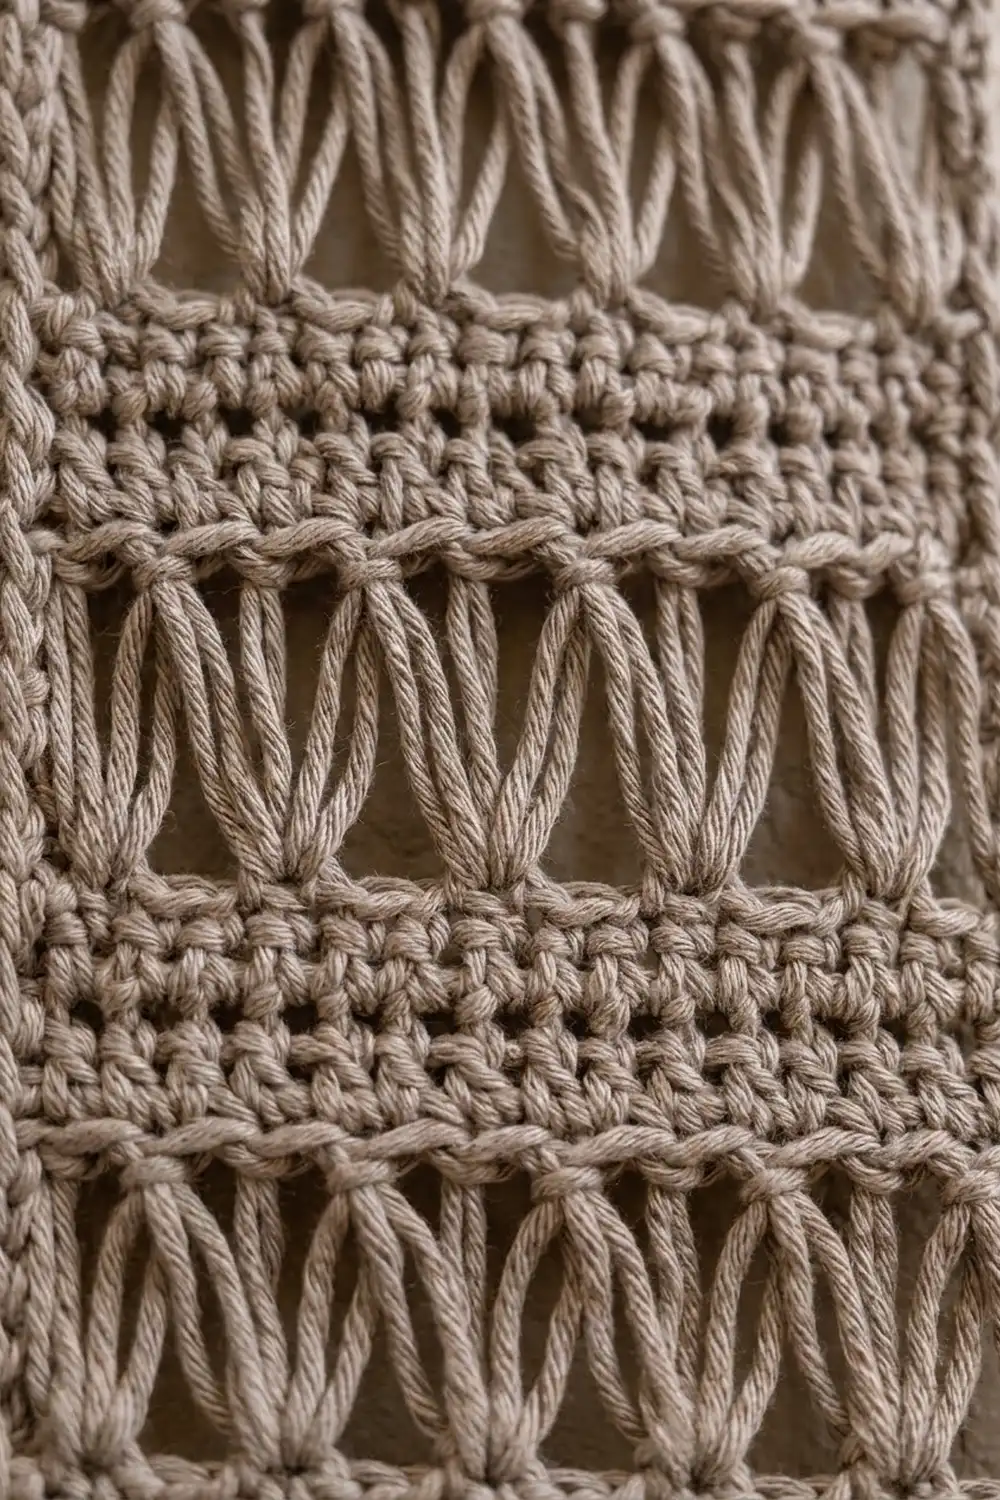
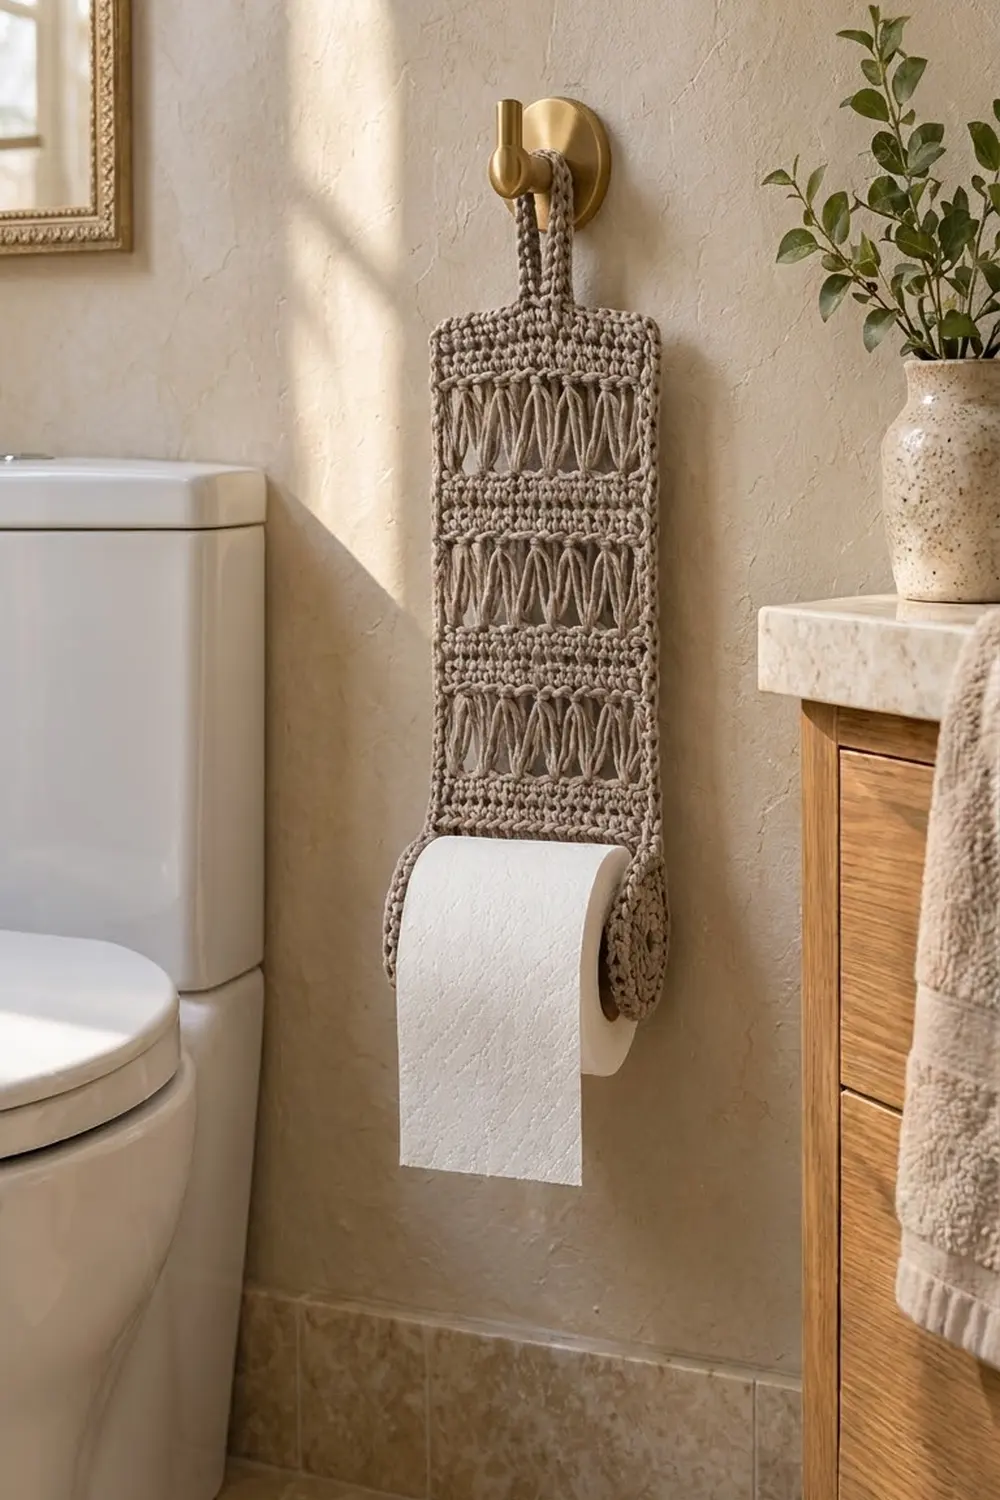
The Linen Ladder holder is a slim hanging panel that holds a toilet paper roll on a soft crocheted rod. Tall broomstick-lace loops stack up the panel like ladder rungs, with bands of firm single crochet between them. The look is calm and textured, and it suits a neutral bathroom.
The sample uses one color, a warm taupe in worsted-weight cotton blend. Because it’s a single color, the texture does the decorating. This pattern uses US crochet terms throughout.
The finished panel is 5½ in (14.0 cm) wide and 11½ in (29.2 cm) tall. With the hanging loop it measures 12¾ in (32.4 cm). Each side disc is 3 in (7.6 cm) across, and the rod is 5 in (12.7 cm) long.
You work the panel flat from the bottom up and add one border round. Then you add the tabs and the hanging strap. The discs are two layers each, and the tube is worked in the round over a short dowel. To change the roll, you unbutton the right disc.
Finished Size and Construction
- Panel size: 5½ × 11½ in (14.0 × 29.2 cm); 12¾ in (32.4 cm) tall including the loop
- Skill level: Intermediate (broomstick lace, working in rounds, assembly)
- Terminology: US
- Yarn weight: Worsted (Category 4)
- Hook: 5.0 mm (H-8)
- Number of pieces: 4 – one panel (tabs and strap worked onto it), two discs, one tube
- Layout: panel on the wall, tube held horizontally between the two discs
- Panel before border: 5 × 11 in (12.7 × 27.9 cm)
- Border depth: ¼ in (0.6 cm), 1 round
- Disc: 3 in (7.6 cm) across; tube: 5 in (12.7 cm) long, 4 in (10.2 cm) around
Materials
Yarn: Choose a smooth worsted cotton or cotton blend at about 200 m per 100 g. Cotton holds the broomstick loops crisply and stands up to bathroom humidity.
- Taupe: 120 g / 240 m in total (panel 65 g, discs 20 g, tube 10 g, tabs and strap 5 g, plus margin)
These quantities include about a 20% margin.
Tools:
– 5.0 mm (H-8) crochet hook
– 19 mm (US 35) knitting needle, or a ¾ in (1.9 cm) smooth dowel, for the broomstick loops
– 1¼ in (3.2 cm) wooden dowel or PVC pipe cut to 4¾ in (12.1 cm)
– One ½ in (13 mm) button
– Tapestry needle, stitch markers, rustproof pins
Abbreviations (US Terms)
- ch – chain
- sc – single crochet
- sl st – slip stitch
- st(s) – stitch(es)
- BLO – back loop only
- sc2tog – single crochet 2 together
- MR – magic ring
- RS / WS – right side / wrong side
- rnd – round
Special stitch – Broomstick band (2 passes):
Loop pass: Don’t turn. Pull the loop on your hook up and slip it onto the needle; this is loop 1. Working back along the row, insert the hook in the next st, yarn over, pull up a loop and slip it onto the needle. Repeat to the end of the row: 20 loops.
Return pass: Insert the hook through the first 4 loops together and slide them off the needle. Yarn over, pull through, ch 1, then work 4 sc into the center of the group. Insert the hook through the next 4 loops, slide them off, and work 4 sc into the group. Repeat to the end: 5 groups, 20 sc.
Gauge and Checkpoints
Gauge: 16 sc and 16 rows = 4 in (10.2 cm). That gives 4 sts and 4 rows per inch (2.5 cm). One broomstick band = 1 in (2.5 cm) tall.
Swatch first. Make the panel’s Rows 1–10 (one solid band, one broomstick band and the solid band above it) and check them before you go on.
Checkpoints:
– After Row 4: 5 in (12.7 cm) wide, 1 in (2.5 cm) tall
– After Row 10: 3 in (7.6 cm) tall
– After Row 22: 7 in (17.8 cm) tall
– After Row 34: 11 in (27.9 cm) tall
– Disc layer after Rnd 6: about 2¾ in (7.0 cm) across
– Tube cap after Rnd 3: 1¼ in (3.2 cm) across
If your fabric is too big, use a 4.5 mm hook. If it’s too small, use a 5.5 mm hook. If only the broomstick bands come out the wrong height, change the needle size and keep the hook the same.
Back Panel
Ch 21.
Row 1 (WS): Sc in the 2nd ch from the hook and in each ch across. Turn. (20 sc)
Rows 2–4: Ch 1, sc in each st across. Turn at the end of Rows 2 and 3, but don’t turn after Row 4. (20 sc) Row 4 is a RS row.
Rows 5–6 (RS, broomstick band): Work the loop pass (Row 5: 20 loops), then the return pass (Row 6: 20 sc in 5 groups of 4).
Rows 7–10: Ch 1, turn, sc in each st across. (20 sc) Rows 7 and 9 are WS rows; Rows 8 and 10 are RS rows. Don’t turn after Row 10.
Rows 11–34: Repeat Rows 5–10 four more times. That makes 5 broomstick bands in total.
Each repeat starts after a RS row, so all five bands face the same way. Row 34 is a RS sc row. (20 sc) Fasten off.
Checkpoint: 5 × 11 in (12.7 × 27.9 cm). Each band has 5 even loop groups.
Border
Border gauge: 4 sc per inch (2.5 cm) along every edge.
With RS facing, join yarn in the first st of Row 34.
Rnd 1:
– Top: 3 sc in the same st (corner), sc in the next 18 sts, 3 sc in the last st (corner).
– Side: work 44 sc down the side edge. That’s 1 sc in each sc row end and 4 sc evenly spaced along each broomstick band.
– Bottom: working in the free loops of the foundation chain, 3 sc in the first ch, sc in the next 18 ch, 3 sc in the last ch.
– Other side: 44 sc.
– Sl st to the first sc. Don’t fasten off yet; you’ll mark tab positions next.
Total: 136 sc. Counting the center st of each 3-sc corner group as the corner stitch:
– Top and bottom each have 22 sts, including both corner sts (1 + 1 + 18 + 1 + 1).
– Each long side has 48 sts, including both corner sts (1 + 1 + 44 + 1 + 1).
– Each corner is shared by two sides, so the total is 2(22) + 2(48) − 4 = 136.
Why the math works: Each side edge has 24 sc rows and 5 bands. The sc rows give 24 sc and the bands give 5 × 4 = 20 sc, so each side gets 44 sc. Along the top, the 20 original sts take 18 plain sc plus two 3-sc corners. Every edge is worked at gauge, so the border lies flat without rippling or pulling in.
Checkpoint: 5½ × 11½ in (14.0 × 29.2 cm). Fasten off.
Tabs (make 2 on the panel)
With RS facing, join yarn in a bottom corner stitch.
Row 1: Ch 1, sc in the same corner st and the next 3 sts along the bottom edge, working toward the center. (4 sc)
Rows 2–8: Ch 1, turn, sc in each st. (4 sc)
Fasten off and leave a 12 in (30.5 cm) tail. Repeat at the other bottom corner, again working from the corner toward the center.
Each tab is 1 in (2.5 cm) wide and 2 in (5.1 cm) long. The 14 bottom sts between the tabs stay free.
Hanging Strap
The top edge has 22 sts, counting both corner sts. With RS facing, count 9 sts in from either corner, starting with the corner st, and join yarn in the 10th st.
Row 1: Ch 1, sc in the same st and the next 3 sts. (4 sc, centered with 9 sts on each side)
Rows 2–14: Ch 1, turn, sc in each st. (4 sc)
Fasten off and leave a 12 in (30.5 cm) tail. The strap is 3½ in (8.9 cm) long.
Fold the strap toward the WS. Pin Row 14 flat against the WS of the panel, 1 in (2.5 cm) below the top edge. Sew all 4 sts down, then sew both side edges of the overlap.
This makes a loop about 1¼ in (3.2 cm) tall. Check that it fits your hook.
Side Discs (make 4 layers)
Layers A (make 2, center buttonhole): Ch 5 and sl st to form a ring.
Layers B (make 2, solid center): Start with an MR.
Rnd 1: 6 sc in the ring (or MR). Sl st to the first sc. (6)
Rnd 2: Ch 1, 2 sc in each st. Join. (12)
Rnd 3: Ch 1, sc in the next st, 2 sc in the next; repeat around. Join. (18)
Rnd 4: Ch 1, sc in the next 2 sts, 2 sc in the next; repeat around. Join. (24)
Rnd 5: Ch 1, sc in the next 3 sts, 2 sc in the next; repeat around. Join. (30)
Rnd 6: Ch 1, sc in the next 4 sts, 2 sc in the next; repeat around. Join. (36)
Fasten off Layer A pieces. Keep the working loop on the Layer B pieces.
Checkpoint: each layer is about 2¾ in (7.0 cm) across and lies flat.
Tube Rod
Rnd 1: 6 sc in an MR. Join. (6)
Rnd 2: Ch 1, 2 sc in each st. Join. (12)
Rnd 3: Ch 1, sc in the next 2 sts, 2 sc in the next; repeat 4 times. Join. (16)
Rnd 4: Ch 1, sc in the BLO of each st. Join. (16) This turns the edge to start the tube wall.
Rnds 5–23: Ch 1, sc in each st. Join. (16)
Checkpoint: Rnds 4–23 make 20 rnds, which is 5 in (12.7 cm). The tube is 4 in (10.2 cm) around.
Insert the dowel now, pushing it against the cap.
Rnd 24: Ch 1, working in the BLO, sc in the next 2 sts, sc2tog; repeat 4 times. Join. (12)
Rnd 25: Ch 1, sc2tog 6 times. (6)
Fasten off, leaving a 12 in (30.5 cm) tail. Weave the tail through the front loops of Rnd 25 and pull tight. Keep the rest of the tail for sewing.
Sew the button to the center of the Rnd 1 cap.
Make All Pieces
- Panel: 1, with 2 tabs and 1 strap worked on, about 75 g with border
- Disc Layer A: 2 (buttonhole centers)
- Disc Layer B: 2 (solid centers)
- Tube: 1, with dowel and button
Layout (front view):
        [ strap loop ]
   +-------------------+
   |   solid band      |
   |   broomstick x5   |
   |   (alternating)   |
   +--[tab]------[tab]-+
   (L disc)=====tube=====(R disc)
      sewn             buttoned
Joining
Discs: joining round. Hold one Layer A behind one Layer B, WS together, with the B layer in front. Line up the stitches and make sure the Layer A ring sits exactly behind the B center.
Using the B layer’s working loop, ch 1 and sc through both layers in each st around. Join. (36) This makes the right disc. Its inner face, the A side, has the buttonhole.
Join the second pair the same way to make the left disc. You can leave its Layer A ring open, because it will be covered.
Each disc is now 3 in (7.6 cm) across. The rule is 1 st to 1 st: 36 + 36 sts become 36.
Tube to left disc. Rnd 24 has 12 sts. Center the tube end on the inner face of the left disc and whipstitch the 12 sts of Rnd 24 to the 12 sts of Rnd 2, 1 st to 1 st.
Tabs to discs. Give each tab a quarter turn so its WS lies against the outer face of a disc. Each tab must point straight down from the corner.
Sew the 4 sts of Row 8 across the disc’s Rnd 2, just above center. Then tack both edges of the tab down through Rnds 3–6. About 1¼ in (3.2 cm) of each tab overlaps its disc.
Tension: Pull each stitch snug but not puckered. The seams should be about as firm as the fabric.
Checkpoint: button the right disc onto the tube. Measure the clear space between the inner faces of the discs. It should be 5 in (12.7 cm), and the disc centers should sit about 1½ in (3.8 cm) below the bottom of the panel. A standard 4½ in (11.4 cm) roll will then fit with a little room.
Final Blocking
- Unbutton the right disc and slide the tube out of the way.
- Mist the panel until it is damp.
- Pin it to 5½ × 11½ in (14.0 × 29.2 cm). Pin both side edges straight.
- Spread each broomstick group so its loops fan evenly.
- Mist the discs and pat them flat. Their joining round should be smooth.
- Let everything dry completely before you unpin it.
Final Quality-Control Checklist
- Every sc row has 20 sts, and each band has 5 groups of 4 loops.
- The border has 136 sts, with corners of 3 sc each.
- The panel is 5½ × 11½ in (14.0 × 29.2 cm).
- The strap is centered, with 9 border sts on each side.
- The tabs are mirror images, each 4 sts wide and 8 rows long.
- The discs are 3 in (7.6 cm) across and lie flat.
- The button passes through the right disc’s center ring easily and stays put.
- The roll turns freely on the tube.
Troubleshooting
Loops are uneven heights: Pull each loop straight up to the needle before you slip it on. Don’t twist it.
Band has too few loops: Remember that the loop already on your hook counts as loop 1.
Side edges wavy: Rework the border with exactly 4 sc per broomstick band.
Disc cups: Check that each round adds 6 sts. Rnd 6 should have 36.
Disc ruffles: Go down a hook size for the disc layers.
Tube is too tight for the dowel: Use a 1 in (2.5 cm) dowel, or add 1 st by working a 17th sc in Rnd 3.
Button slips out: Sew a few tightening stitches across the Layer A ring.
Care
Remove the dowel and button first. Then hand wash the pieces cool and dry them flat.
Final Notes
Each measurement leads to the next:
- Gauge is 4 sts and 4 rows per inch (2.5 cm).
- The panel is 20 sts wide and 34 rows tall: 5 × 11 in (12.7 × 27.9 cm).
- With the 136-st border it becomes 5½ × 11½ in (14.0 × 29.2 cm).
- Two 2 in (5.1 cm) tabs hold two 3 in (7.6 cm) discs.
- The discs hold a 5 in (12.7 cm) tube.
Check each stage before moving on, and the roll will hang straight and turn easily.
Happy crocheting!