

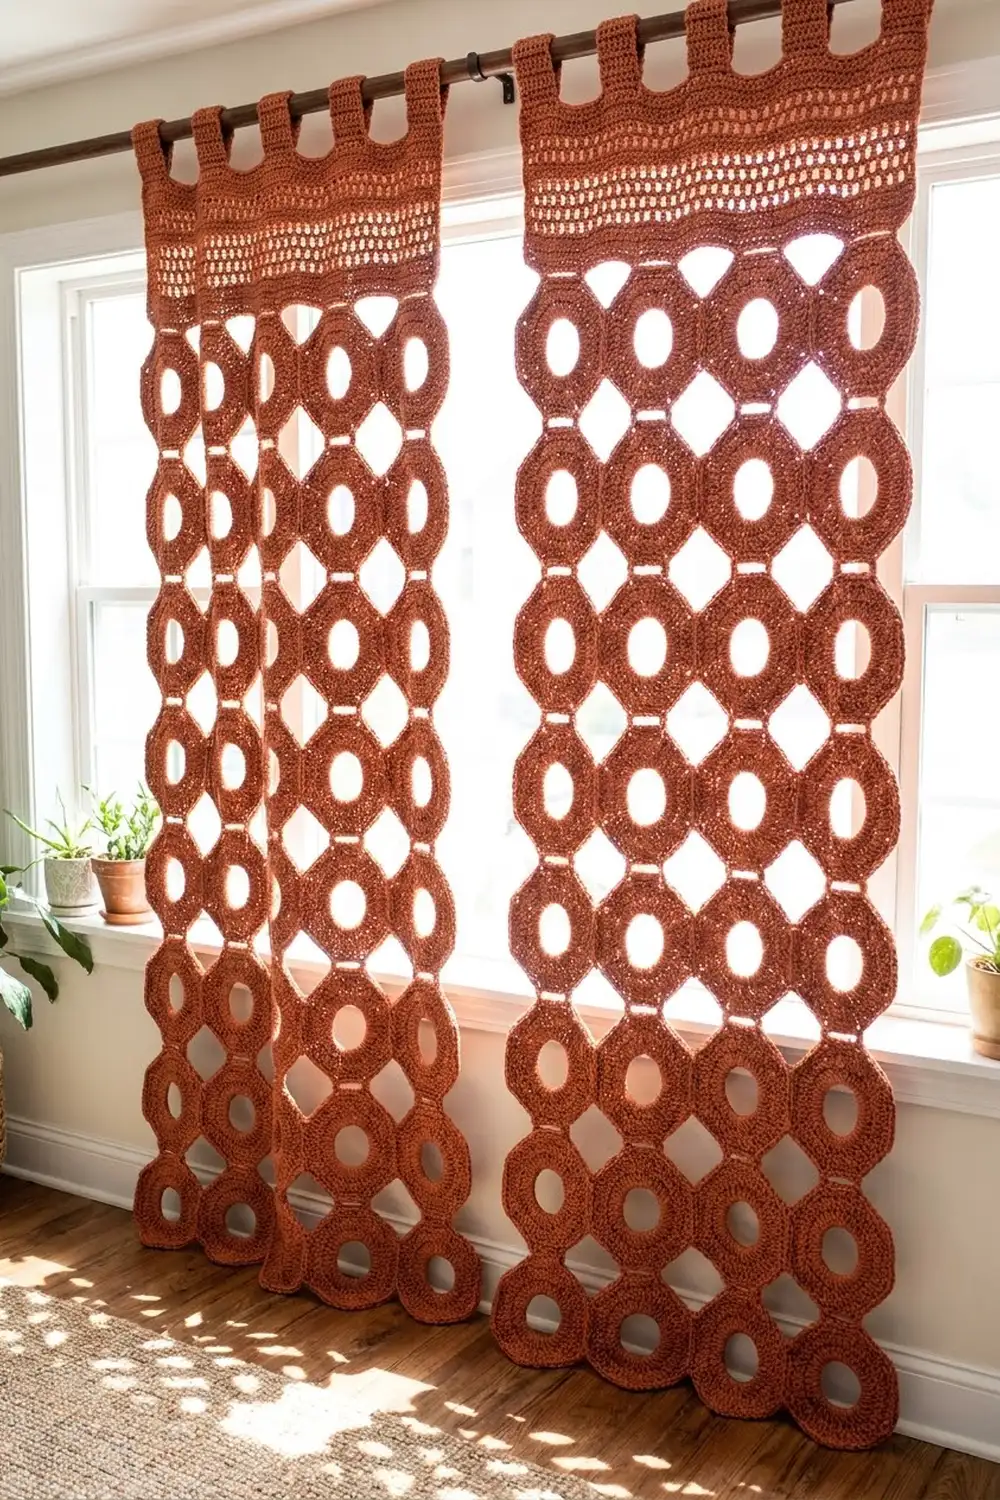
These curtain panels turn a plain window into a warm, sun-dappled lattice. Each panel is made of chunky hexagon rings with round open centers. Short crocheted bridges join the rings into an airy grid. A solid header band with tab tops finishes the top edge, and the bottom edge stays pointed and scalloped.
The pattern uses one color, a warm terracotta (rust-clay) cotton, so the texture and the shadows it casts do the decorating. The style is boho and earthy and suits a sunny room. All instructions use US crochet terms.
Each finished panel is 23.5 in (59.7 cm) wide and about 74.5 in (189.2 cm) long, measured from the top of the header to the bottom motif points. With the tabs, it hangs about 77.5 in (196.9 cm) below the rod. A pair covers about 47 in (119.4 cm) of rod.
The construction is simple and repetitive. You make a two-round hexagon ring and join each new ring to its neighbors on its last round (join-as-you-go). Six rings across and sixteen rings down make one panel. Then you work a header band across the top and add six tabs.
Finished Size and Construction
- Finished panel size: 23.5 in x 74.5 in (59.7 cm x 189.2 cm), plus tab loops of about 3 in (7.6 cm)
- Skill level: Easy-intermediate
- Terminology: US crochet terms
- Yarn weight: Worsted (#4) cotton
- Hook: 5 mm (H-8)
- Number of pieces: 2 panels of 96 hexagon ring motifs each (192 motifs total)
- Layout: 6 motifs across x 16 motifs down per panel
- Motif size: 3.5 in (8.9 cm) from flat side to flat side, 4 in (10.2 cm) from point to point
- Bridge length: 0.5 in (1.3 cm)
- Size before border: 23.5 in x 71.5 in (59.7 cm x 181.6 cm)
- Border (header) depth: about 3 in (7.6 cm) above the top motif points, plus tabs
Materials
Use a smooth, mercerized or combed worsted cotton. Cotton holds the hexagon shape, drapes well, and stretches very little while hanging. Avoid splitty or fuzzy yarns, because the ring stitches are packed tightly.
- Terracotta (rust-clay): 14 skeins of 100 g / 190 m (208 yd) each, for a total of 1,400 g / 2,660 m (2,909 yd)
This is enough for both panels. Each motif uses about 10 m (10.9 yd), so all 192 motifs use about 1,920 m. The two headers and their tabs use about 340 m. The quantities include a margin of about 15% for gauge differences, swatching, and ends.
Tools:
- 5 mm (H-8) crochet hook
- Tapestry needle
- Stitch markers
- Measuring tape
- Blocking mats and rust-proof pins
- Spray bottle
- Scissors
Abbreviations (US Terms)
- ch – chain
- sl st – slip stitch
- sc – single crochet
- hdc – half double crochet
- dc – double crochet
- tr – treble crochet
- dtr – double treble crochet
- sk – skip
- sp – space
- st(s) – stitch(es)
- rep – repeat
- RS / WS – right side / wrong side
Special stitch – Bridge: Ch 2, sl st in the named st or sp of the finished neighbor motif, ch 2. This makes a short double-strand bar about 0.5 in (1.3 cm) long.
Gauge and Checkpoints
Before you start a panel, make one complete test motif. Block it lightly and measure it flat.
- After Round 1: The ring is about 2.75 in (7.0 cm) across, with an opening about 1.5 in (3.8 cm) across.
- After Round 2: The motif is 3.5 in (8.9 cm) from flat side to flat side and 4 in (10.2 cm) from point to point.
- Header gauge: About 18 sc and 20 rows = 4 in (10.2 cm). The key checkpoint is header Row 2: its 107 sts should measure 23.5 in (59.7 cm).
If the motif is too big, change to a 4.5 mm hook. If it is too small, change to a 5.5 mm hook, then make and measure a new test motif. Small errors add up. A motif that is off by 1/4 in (0.6 cm) changes the panel by 1.5 in (3.8 cm) across and 4 in (10.2 cm) in length.
A test motif should weigh about 5 g. If yours is much heavier, you crochet loosely and will need more yarn.
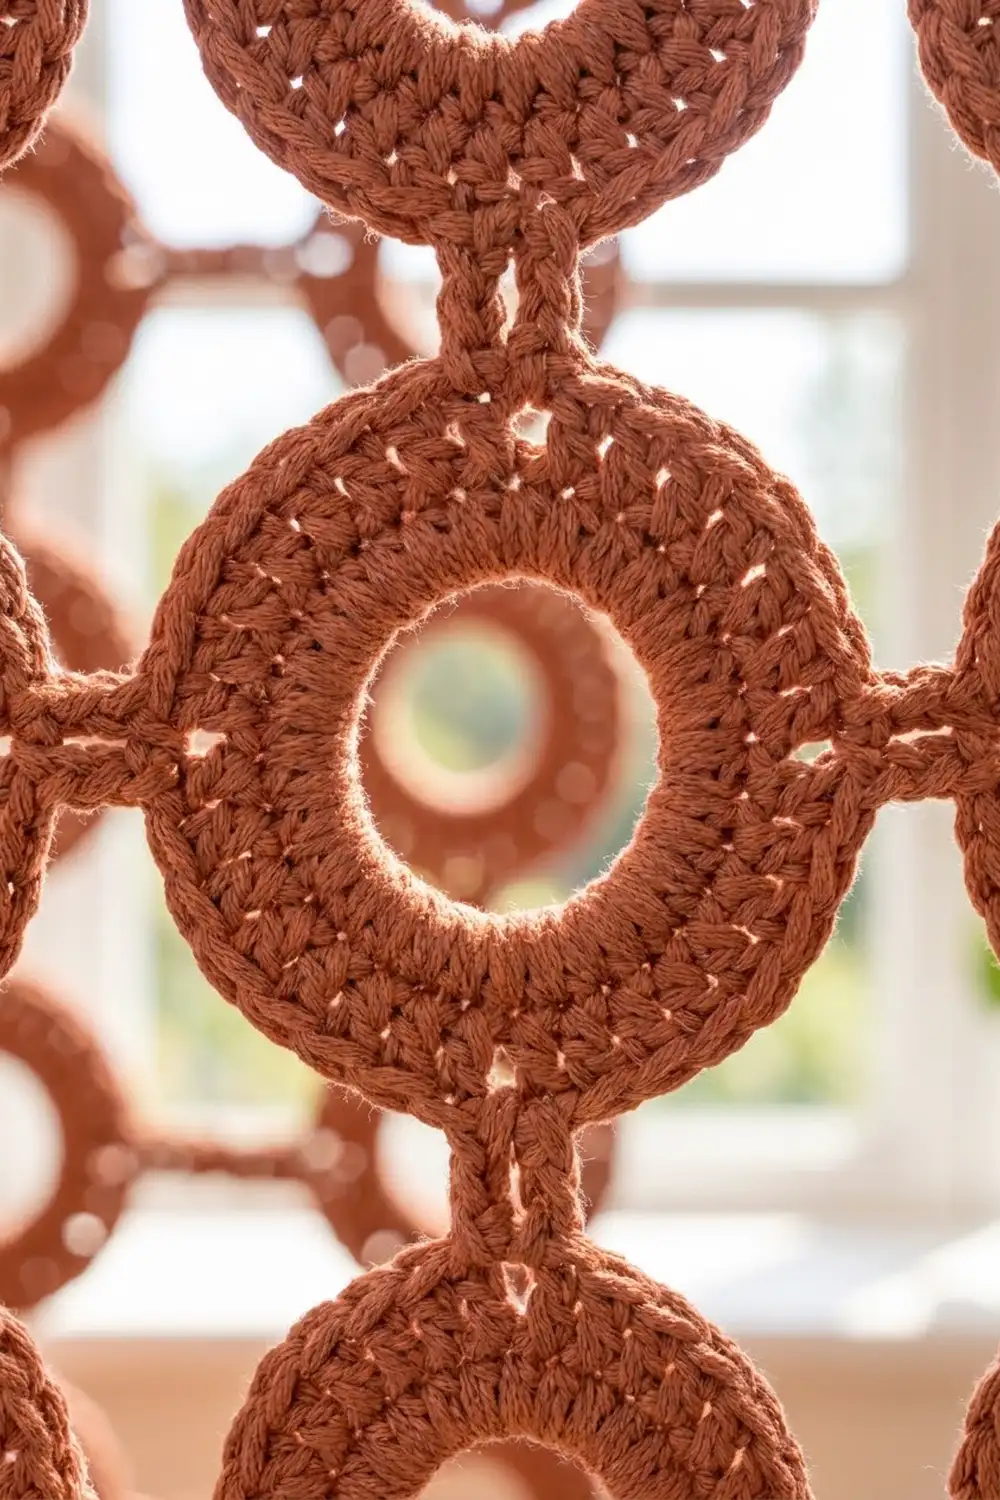
Hexagon Ring Motif
Work in the round with the RS facing, and do not turn.
Foundation: Ch 18, sl st in first ch to form a ring.
Round 1: Ch 3 (counts as dc), 35 dc into the ring, sl st in top of beginning ch-3. (36 dc)
Slide the stitches along the chain ring as you work so they pack evenly. Packing them tightly makes the round, chunky ring and the open center.
Round 2 (hexagon round): Ch 2 (does not count as a st), (hdc, ch 2, hdc) in same st as join for the top corner. Hdc in next 5 sts, (hdc, ch 2, hdc) in next st for the next corner; rep from * 4 more times. Hdc in next 5 sts, sl st in first hdc. Fasten off. (42 hdc and 6 ch-2 corner sps)*
Each side has 7 hdc: the second hdc of one corner, 5 plain hdc, and the first hdc of the next corner. The ch-2 corner sps are not counted as stitches.
Orientation: Hold the motif with the first corner at the top. Going counterclockwise, the corners are top, upper-left, lower-left, bottom, lower-right, and upper-right. This gives the motif a point at the top and bottom, and flat vertical sides on the left and right.
Each “hdc in next 5 sts” group makes one side. In order, the groups are: A = upper-left side, B = left side, C = lower-left side, D = lower-right side, E = right side, F = upper-right side.
Center stitch of a side: the 3rd of the side’s 5 plain hdc, which is the 4th of its 7 hdc.
Make All Pieces
Every motif uses the terracotta color.
- Per panel: 96 motifs (6 across x 16 down)
- Total: 192 motifs
Make the first motif of each panel exactly as written. Work every other motif through Round 1, then join it to its neighbors as you work its Round 2 (see Joining).
Layout for one panel (O = motif, dash or bar = bridge):
Row 1:   O-O-O-O-O-O
         | | | | | |
Row 2:   O-O-O-O-O-O
         | | | | | |
Row 3:   O-O-O-O-O-O
  ...
Row 16:  O-O-O-O-O-O
The columns line up straight. Each bottom point meets the top point of the motif below it, and each right side meets the left side of the motif next to it.
Joining
You join each new motif on its Round 2. Work the motifs left to right in rows, starting at the top-left of the panel.
Top join: Replace the first corner of Round 2 with (hdc, ch 2, sl st in bottom corner ch-2 sp of motif above, ch 2, hdc) in same st as join.
Left join: When you reach group B, work: hdc in next 2 sts, hdc in next st, ch 2, sl st in center hdc of group E (the right side) of the left neighbor, ch 2, sl st in top of hdc just made, hdc in next 2 sts. Then continue Round 2 as written.
Which joins to use:
- Row 1, motif 1: no joins
- Row 1, motifs 2–6: left join only
- Rows 2–16, motif 1: top join only
- Rows 2–16, motifs 2–6: top join and left join
Stitch-to-stitch logic: A bridge always links a corner sp to a corner sp, or a center hdc to a center hdc. The joins never use up or add stitches, so every motif keeps its 42 hdc and 6 corner sps. This keeps the grid square, and the header counts below depend on it.
Tension: Make the bridge chains the same size as your other chains. Lay the work flat after each row of motifs. If the bridges distort the motifs, your chains are too tight. If the bridges sag, your chains are too loose.
Size checkpoint: Each row of motifs should measure 23.5 in (59.7 cm) across: 6 x 3.5 in plus 5 x 0.5 in. Three rows should measure 13 in (33.0 cm) long: 3 x 4 in plus 2 x 0.5 in. All 16 rows should measure 71.5 in (181.6 cm): 16 x 4 in plus 15 x 0.5 in.
Weave in the ends as you finish each row, then make the second panel the same way.
Border: Header Band and Tabs
The border is a header band across the top edge only. The sides and the scalloped bottom edge are left as they are.
Border gauge: About 18 sc = 4 in (10.2 cm). Across the panel, 107 sts = 23.5 in (59.7 cm).
Row 1 (leveling row, RS): With the RS facing, join yarn in the upper-right corner sp of the rightmost motif in Row 1. Working right to left, work across each motif as follows:
Dtr in upper-right corner sp. Along the upper-right side: tr in next 2 sts, dc in next 2 sts, hdc in next 2 sts, sc in next st. Sc in top corner sp. Along the upper-left side: sc in next st, hdc in next 2 sts, dc in next 2 sts, tr in next 2 sts. Dtr in upper-left corner sp.
Each motif gets 1 + 7 + 1 + 7 + 1 = 17 sts. Ch 1 across each gap between motifs. Turn at the end of the row.
Count: 6 x 17 + 5 ch-1 = 107 sts. The ch-1s count as stitches.
The tall stitches fill the low valleys and the short stitches sit on the high points, so the top edge comes out straight.
Row 2 (WS): Ch 1, sc in each st and ch across. Turn. (107 sc)
Row 3 (RS, mesh): Ch 4 (counts as dc + ch 1), sk next st, dc in next st, ch 1, sk next st, dc in next st; rep from * across. Turn. (54 dc + 53 ch-1 sps = 107 sts)*
Row 4 (WS): Ch 1, sc in each dc and each ch-1 sp across, ending with sc in 3rd ch of the turning ch. Turn. (107 sc)
Rows 5–7: Rep Rows 3, 4 and 3. (107 sts in each row)
Rows 8–11: Ch 1, sc in each st across. Turn. (107 sc) Fasten off after Row 11.
The header now stands about 3 in (7.6 cm) above the top motif points.
Tabs: Each tab is 7 sts wide. Work tabs on sts 1–7, 21–27, 41–47, 61–67, 81–87, and 101–107 of Row 11, leaving 13 sts between tabs.
Tab Row 1: Join yarn in the first st of the tab, ch 1, sc in same st and next 6 sts. Turn. (7 sc)
Tab Rows 2–30: Ch 1, sc in each st across. Turn. (7 sc)
Fasten off, leaving a 12 in (30.5 cm) tail. Each tab is 6 in (15.2 cm) long and 1.5 in (3.8 cm) wide. Fold the tab to the WS and whipstitch its last row to Row 10, directly behind the tab base. This makes a loop about 3 in (7.6 cm) tall, which fits rods up to 1.25 in (3.2 cm) in diameter.
Why the math works: Each motif gives exactly 17 leveling stitches: 7 on each upper side plus 3 in the corner spaces. The 5 gaps add 1 ch each, and the bridges add nothing. So 102 + 5 = 107. The mesh needs an odd count, and 107 = 1 + 53 x 2. The tabs use exactly the same 107 sts: 6 x 7 + 5 x 13 = 107.
Final Blocking
- Weave in all remaining ends along the backs of stitches. Never carry them across an open center.
- Lay one panel flat on mats or on a clean sheet. If you lack space, block it in sections.
- Mist the panel until it is evenly damp but not soaked.
- Pin the header straight, at 23.5 in (59.7 cm) wide.
- Pin each column straight down. Each motif should be 4 in (10.2 cm) from point to point, with 0.5 in (1.3 cm) bridges.
- Pin each bottom point to even out the scalloped edge.
- Let the panel dry completely, then unpin it. Block the second panel the same way.
Final Quality-Control Checklist
- Every motif has 42 hdc and 6 crisp ch-2 corners.
- All bridges are the same length and none are twisted.
- Each panel has 6 columns x 16 rows = 96 motifs.
- The columns hang straight.
- Header Row 2 has 107 sc and measures 23.5 in (59.7 cm).
- There are six tabs, each 7 sts wide, evenly spaced, and sewn at the same depth.
- The two panels match within 1/2 in (1.3 cm).
- No ends show inside the open centers.
Troubleshooting
Round 1 crowds the chain ring: Slide the stitches back along the ring often. If it is still too crowded, start every motif with ch 20.
The motif cups: Round 2 is too tight. Use a hook one size larger for Round 2.
The motif ruffles: Round 2 is too loose. Use a hook one size smaller for Round 2.
The panel leans: A left join probably went into a slanted side. Bridges must always link the center hdc of the vertical sides.
The header pulls in: Recount Row 1, which should have 107 sts. If the count is right, work Rows 2–11 with a hook one size larger.
Care
Hand wash in cool water, or machine wash on a gentle cycle in a laundry bag. Lay flat to dry, then reshape and pin if needed.
Final Notes
Here is the measurement chain. One motif is 3.5 in (8.9 cm) wide and 4 in (10.2 cm) tall, and the bridges are 0.5 in (1.3 cm). Six motifs across make 23.5 in (59.7 cm), and sixteen motifs down make 71.5 in (181.6 cm). The 107-stitch header keeps that 23.5 in (59.7 cm) width and adds about 3 in (7.6 cm) of depth, with tab loops of about 3 in (7.6 cm) on top. Get the first motif right and keep the bridges even, and the rest of the panel will follow.
Happy crocheting!