

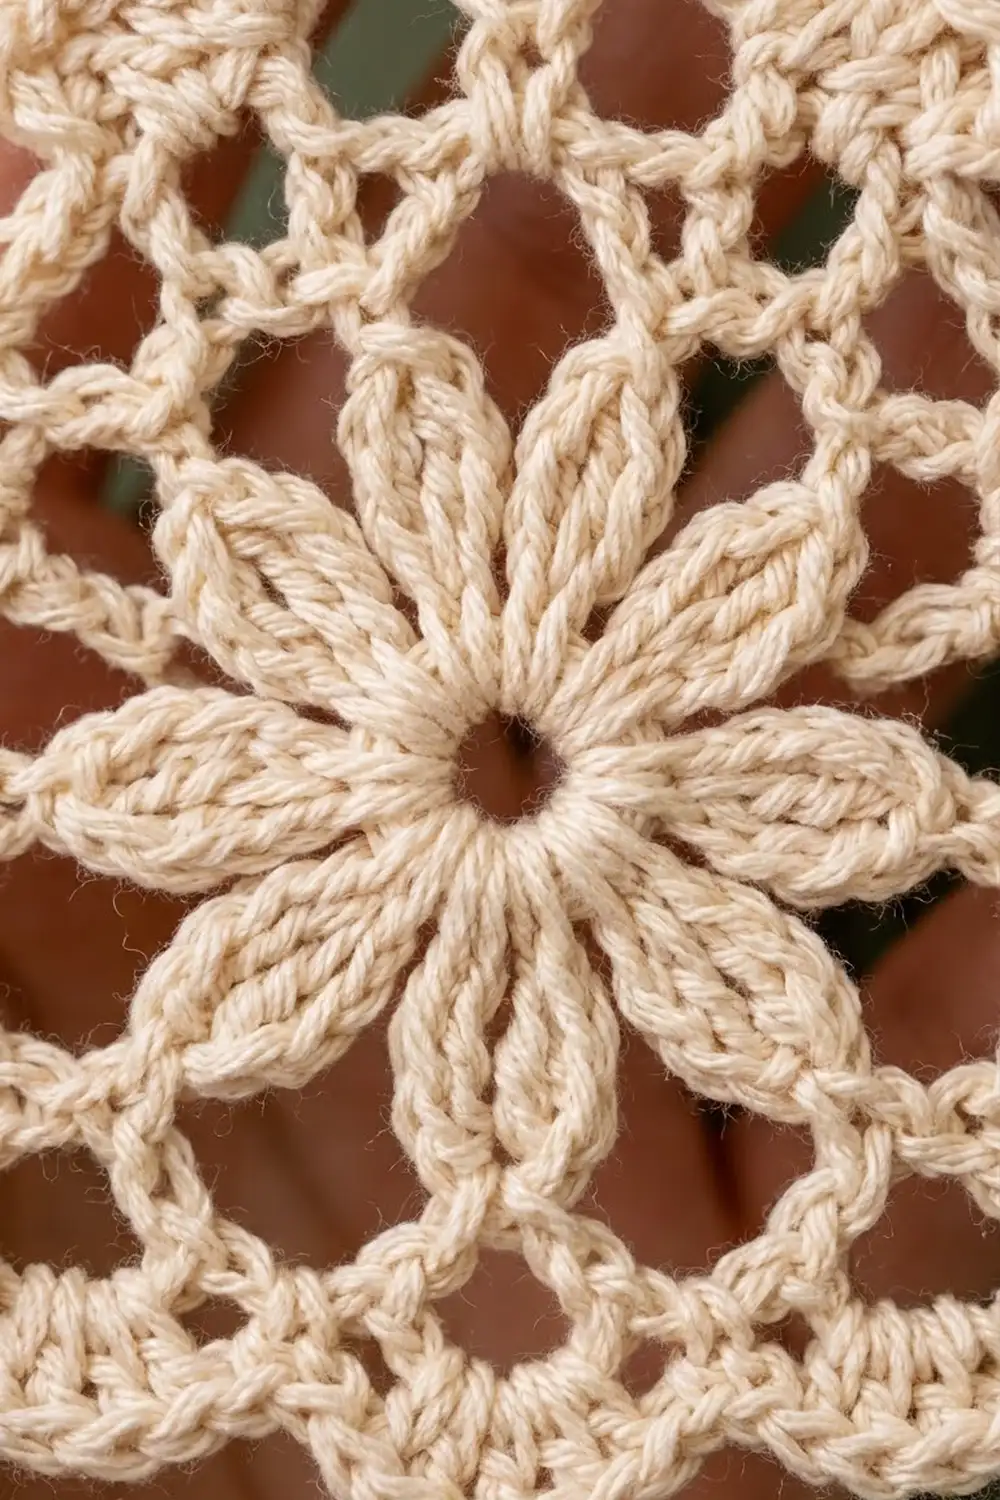
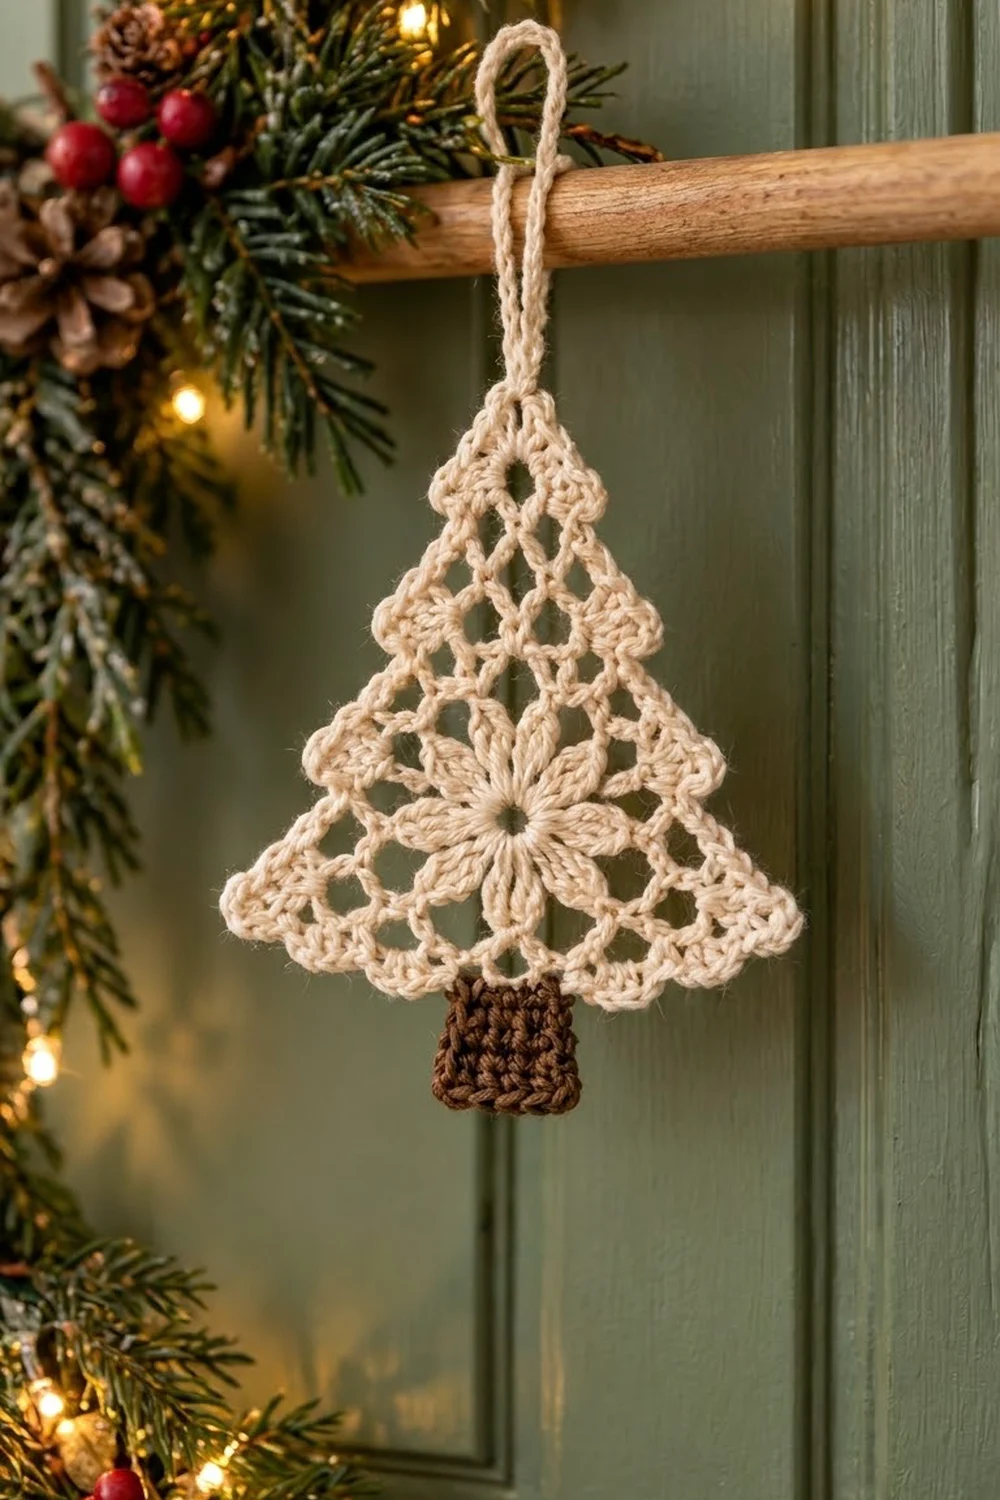
This little lace tree is a quiet, elegant ornament for the holidays. It has a cream eight-petal flower in the center, an open diamond mesh around it, a soft scalloped edge, and a solid chocolate-brown trunk. It looks lovely on a tree, on a door rod, or tied onto a gift.
The palette is just two colors: warm cream for the lace and dark brown for the trunk. The style is light and airy, a bit like vintage thread lace, but you work it in a smooth DK cotton, so it goes quickly and holds its shape well after blocking.
This pattern uses US crochet terms. The finished tree measures 4.5 in (11.4 cm) wide by 4.75 in (12.1 cm) tall. With the trunk it is 5.5 in (14.0 cm) tall, not counting the hanging loop.
You start with the flower, worked in the round. Then two mesh rounds turn the round flower into a triangle with three set corners. A shell border finishes the edge and builds a flat base for the trunk. The brown trunk is worked in short rows down from that base, and a chain loop is added at the top point.
Finished Size and Construction
- Finished size: 4.5 in (11.4 cm) wide x 4.75 in (12.1 cm) tall for the tree. Total height with trunk is 5.5 in (14.0 cm).
- Skill level: Easy-intermediate
- Terminology: US crochet terms
- Yarn weight: DK (#3) cotton or cotton blend
- Hook: 3.5 mm (E-4)
- Number of pieces: 1 (one-piece ornament, no sewing of parts)
- Layout: A single triangle with the flower in the lower center and the trunk at bottom center
- Flower motif size (Rnd 4): 2.5 in (6.4 cm) across
- Size before border (Rnd 6): 4 in (10.2 cm) wide x 4.25 in (10.8 cm) tall
- Border depth: 0.25 in (0.6 cm)
- Trunk: 1 in (2.5 cm) wide x 0.75 in (1.9 cm) tall
- Hanging loop: 2.5 in (6.4 cm) long
Materials
Use a smooth mercerized or combed cotton. It shows the lace clearly and takes starch well. Fuzzy or very splitty yarn hides the mesh, so avoid it. Any DK cotton of about 2.3 m per gram (roughly 115 m per 50 g) works.
Yarn (per ornament):
– Cream (Color A): 10 g, about 23 m
– Dark brown (Color B): 3 g, about 7 m
These amounts already include a margin for your gauge swatch, joins, and weaving in ends.
Tools:
– 3.5 mm (E-4) crochet hook
– Tapestry needle
– Scissors
– Stitch markers (2-3)
– Blocking mat and rust-proof pins
– Spray starch or a fabric stiffener (optional, recommended)
– Ruler or tape measure
Abbreviations (US Terms)
- ch – chain
- sl st – slip stitch
- sc – single crochet
- hdc – half double crochet
- dc – double crochet
- tr – treble crochet
- sp(s) – space(s)
- st(s) – stitch(es)
- RS – right side
Special stitches:
– Petal: (sc, hdc, dc, tr, dc, hdc, sc) all in the same space. That is 7 sts, and the tr makes the point.
– Shell: (sc, hdc, dc, hdc, sc) all in the same ch-5 space. That is 5 sts.
– Corner group: (2 sc, hdc, dc, ch 3, dc, hdc, 2 sc) all in the same ch-7 space. That is 8 sts plus one ch-3 sp.
Gauge and Checkpoints
Gauge isn’t critical for an ornament, but it does control the final size and how well the triangle lies flat. Make one complete tree first and measure it at each checkpoint before you make a set.
Checkpoints:
– After Rnd 1: 1 in (2.5 cm) across
– After Rnd 3 (petals): 2.25 in (5.7 cm) from petal tip to petal tip
– After Rnd 4: 2.5 in (6.4 cm) across
– After Rnd 6: 4 in (10.2 cm) wide at the base and 4.25 in (10.8 cm) tall, gently stretched flat
– After Rnd 7: 4.5 in (11.4 cm) x 4.75 in (12.1 cm)
If your piece is too big: go down to a 3.25 mm hook, or keep your chains snugger. Loose chains are the most common cause of an oversized mesh.
If your piece is too small or cups: go up to a 3.75 mm hook. If only the mesh cups, make your chains a little more relaxed but keep the same hook.
Flower Center
Work with Color A (cream) throughout this section. Do not turn between rounds. The RS faces you the whole time.
Rnd 1: Make a magic ring. Ch 3 (counts as dc), work 15 dc into the ring, then sl st to the top of the beginning ch-3. Pull the ring closed, leaving a small center hole about 0.125 in (0.3 cm) wide. (16 dc)
Rnd 2: Ch 1, sc in the same st, ch 4, skip next st. Sc in next st, ch 4, skip next st. Repeat from * 6 more times. Sl st to the first sc. (8 sc, 8 ch-4 sps)
Rnd 3: Sl st into the next ch-4 sp. Work a Petal in that sp and in each remaining ch-4 sp around. Sl st to the first sc. (8 petals = 56 sts)
The petals should be pointed, with the tr at the tip, and close together at their bases.
Rnd 4: Sl st in the next hdc, dc, and tr, so you are at the tip of the first petal. Ch 1, sc in the same tr. Ch 7, sc in the tr of the next petal. Repeat from * 6 more times. Ch 7, sl st to the first sc. (8 sc, 8 ch-7 sps)
This round frames the flower as an octagon with a sc on each petal tip.
Orientation: The sc you just joined into marks the top of the tree. Place a marker in it. Working around from there, the petal-tip sc’s sit at the 12, 1:30, 3, 4:30, 6, 7:30, 9, and 10:30 positions on a clock face. The tree’s three corners will be built on the 12 o’clock tip (top), the 4:30 tip (bottom right), and the 7:30 tip (bottom left). Mark the 4:30 and 7:30 tips now.
Checkpoint: 2.5 in (6.4 cm) across.
Tree Mesh
The next two rounds turn the flower into a tall triangle. Each sloping side has more loops than the bottom, which gives the tree its narrow top and wide base.
Rnd 5 (setup round):
Ch 1, (sc, ch 7, sc) in the same marked sc. This is the top corner.
Right side: [Ch 5, sc in next ch-7 sp, ch 5, sc in next sc] 2 times, ch 5, sc in next ch-7 sp, ch 5, (sc, ch 7, sc) in the next marked sc. This is the bottom-right corner.
Bottom: Ch 5, sc in next ch-7 sp, ch 5, sc in next sc, ch 5, sc in next ch-7 sp, ch 5, (sc, ch 7, sc) in the next marked sc. This is the bottom-left corner.
Left side: [Ch 5, sc in next ch-7 sp, ch 5, sc in next sc] 2 times, ch 5, sc in next ch-7 sp, ch 5, sl st to the first sc.
Counts for Rnd 5:
– Each sloping side has 6 ch-5 sps.
– The bottom has 4 ch-5 sps.
– There are 3 ch-7 corner sps.
– Total: 16 ch-5 sps + 3 ch-7 sps = 19 sps, and 19 sc (2 per corner x 3 = 6, plus 13 between corners).
Rnd 6: Sl st into the top ch-7 sp. Ch 1, (sc, ch 7, sc) in the same sp. [Ch 5, sc in next ch-5 sp] 6 times, ch 5, (sc, ch 7, sc) in next ch-7 sp. [Ch 5, sc in next ch-5 sp] 4 times, ch 5, (sc, ch 7, sc) in next ch-7 sp. [Ch 5, sc in next ch-5 sp] 6 times, ch 5, sl st to the first sc.
Counts for Rnd 6:
– Each sloping side has 7 ch-5 sps.
– The bottom has 5 ch-5 sps.
– There are 3 ch-7 corner sps.
– Total: 19 ch-5 sps + 3 ch-7 sps = 22 sps, and 22 sc (6 corner sc + 16 sc worked in the Rnd 5 loops).
Each side gains exactly 1 loop because you work one sc into every loop and add one new chain after the last sc. The bottom ends with 5 loops, an odd number, so loop 3 sits exactly at the center. That is where the trunk will go.
Checkpoint: 4 in (10.2 cm) wide x 4.25 in (10.8 cm) tall when gently flattened. The diamond mesh should sit above and beside the flower, with about 3 rows of diamonds stacked toward the top point.
Border
Border gauge: each shell covers one ch-5 loop and measures about 0.5 in (1.3 cm) along the edge. The border adds 0.25 in (0.6 cm) all around.
Rnd 7: Sl st into the top ch-7 sp. Ch 1, work a Corner group in the same sp.
- Right side: Shell in each of the next 7 ch-5 sps. (35 sts)
- Corner group in the next ch-7 sp. (8 sts + ch-3)
- Bottom: Shell in each of the next 2 ch-5 sps, 7 sc in the next (center) ch-5 sp, then Shell in each of the next 2 ch-5 sps. (4 x 5 + 7 = 27 sts)
- Corner group in the next ch-7 sp. (8 sts + ch-3)
- Left side: Shell in each of the next 7 ch-5 sps. (35 sts)
- Sl st to the first sc.
Total for Rnd 7: 35 + 27 + 35 = 97 side sts, plus 3 corner groups x 8 = 24 sts, for 121 sts and 3 ch-3 corner sps.
Note that the side counts above do not include the corner groups. The corners are counted separately, so nothing is counted twice.
Why the math works: Every side stitch sits on one Rnd 6 loop, so each side’s length depends only on its loop count. The sloping sides have 7 loops each and the bottom has 5, which keeps the tall triangle proportions. The 7 sc in the center loop make a flat, firm base that is exactly the width of the trunk.
Hanging loop: Do not fasten off. Sl st in the next 2 sc, hdc, and dc, then sl st into the top ch-3 sp. Ch 35, then sl st into the same ch-3 sp. Fasten off. The 35-chain is about 5 in (12.7 cm) long, which folds to a 2.5 in (6.4 cm) loop. Weave the tail back through the base of the loop twice to make it stronger.
Trunk
Work in Color B (dark brown), with the RS facing and the tree upside down so the bottom edge is on top.
Row 1: Join Color B with a standing sc in the first of the 7 center sc. Sc in each of the next 6 sc. (7 sc)
Rows 2-6: Ch 1, turn, sc in each st across. (7 sc)
Fasten off and leave a 6 in (15.2 cm) tail.
Checkpoint: the trunk should be 1 in (2.5 cm) wide x 0.75 in (1.9 cm) tall, a solid rectangle with straight sides. If it flares, go down one hook size for the trunk only.
Weave in all ends along stitches of the same color: cream tails into the mesh chains, and brown tails into the trunk sides.
Final Blocking
- Wet the ornament in cool water, then press it gently in a towel until it is just damp.
- Lay it RS up on a blocking mat.
- Pin the top corner first, then both bottom corners. Measure to 4.5 in (11.4 cm) across the base and 4.75 in (12.1 cm) from the base to the top tip.
- Pin the center of each ch-5 loop along both sloping sides so the edges run straight from corner to corner.
- Pin each petal tip outward so the flower sits flat and evenly spaced.
- Square the trunk to 1 in x 0.75 in (2.5 cm x 1.9 cm) with two pins at its bottom corners.
- Spray with starch, or brush on fabric stiffener for a crisp ornament.
- Let it dry completely, at least 6 hours, before you unpin it.
Final Quality-Control Checklist
- 8 pointed petals, evenly spaced, with a small closed center hole
- Rnd 6 loop counts of 7 / 5 / 7, with 3 corner ch-7 sps
- 121 border sts plus 3 ch-3 corners
- Trunk centered directly under the top point
- Tree measures 4.5 in (11.4 cm) x 4.75 in (12.1 cm)
- Total height with trunk is 5.5 in (14.0 cm)
- Hanging loop is secure, 2.5 in (6.4 cm), and comes straight out of the top tip
- All ends woven in and invisible from the RS
Troubleshooting
The flower ruffles. Your Rnd 1 is too tight, or the ch-4 spaces are too short. Redo Rnd 2 with slightly looser chains.
The triangle leans to one side. You probably placed a corner on the wrong tip. Count 3 tips (4:30) and 5 tips (7:30) around from the top marker, and check the 6 / 4 / 6 loop counts in Rnd 5.
The bottom edge bows upward. The bottom chains are too tight. Loosen them, or block with extra pins along the base.
The trunk is off-center. The center ch-5 loop must be the 3rd of 5 bottom loops. Recount before you work the 7 sc.
The edges look wavy after blocking. Pin every loop and use a stronger stiffener.
Care
Hand wash in cool water, press out excess water in a towel, and dry flat. Re-starch and re-pin if the ornament softens over time.
Final Notes
Here is the measurement chain in short. The flower measures 2.5 in (6.4 cm) at Rnd 4. The mesh triangle reaches 4 in x 4.25 in (10.2 cm x 10.8 cm) at Rnd 6. The 0.25 in (0.6 cm) border brings the tree to 4.5 in x 4.75 in (11.4 cm x 12.1 cm). The 0.75 in (1.9 cm) trunk brings the total height to 5.5 in (14.0 cm). If each checkpoint matches, the finished ornament will too. Make one, block it, and then make as many as your tree needs.
Happy crocheting!