

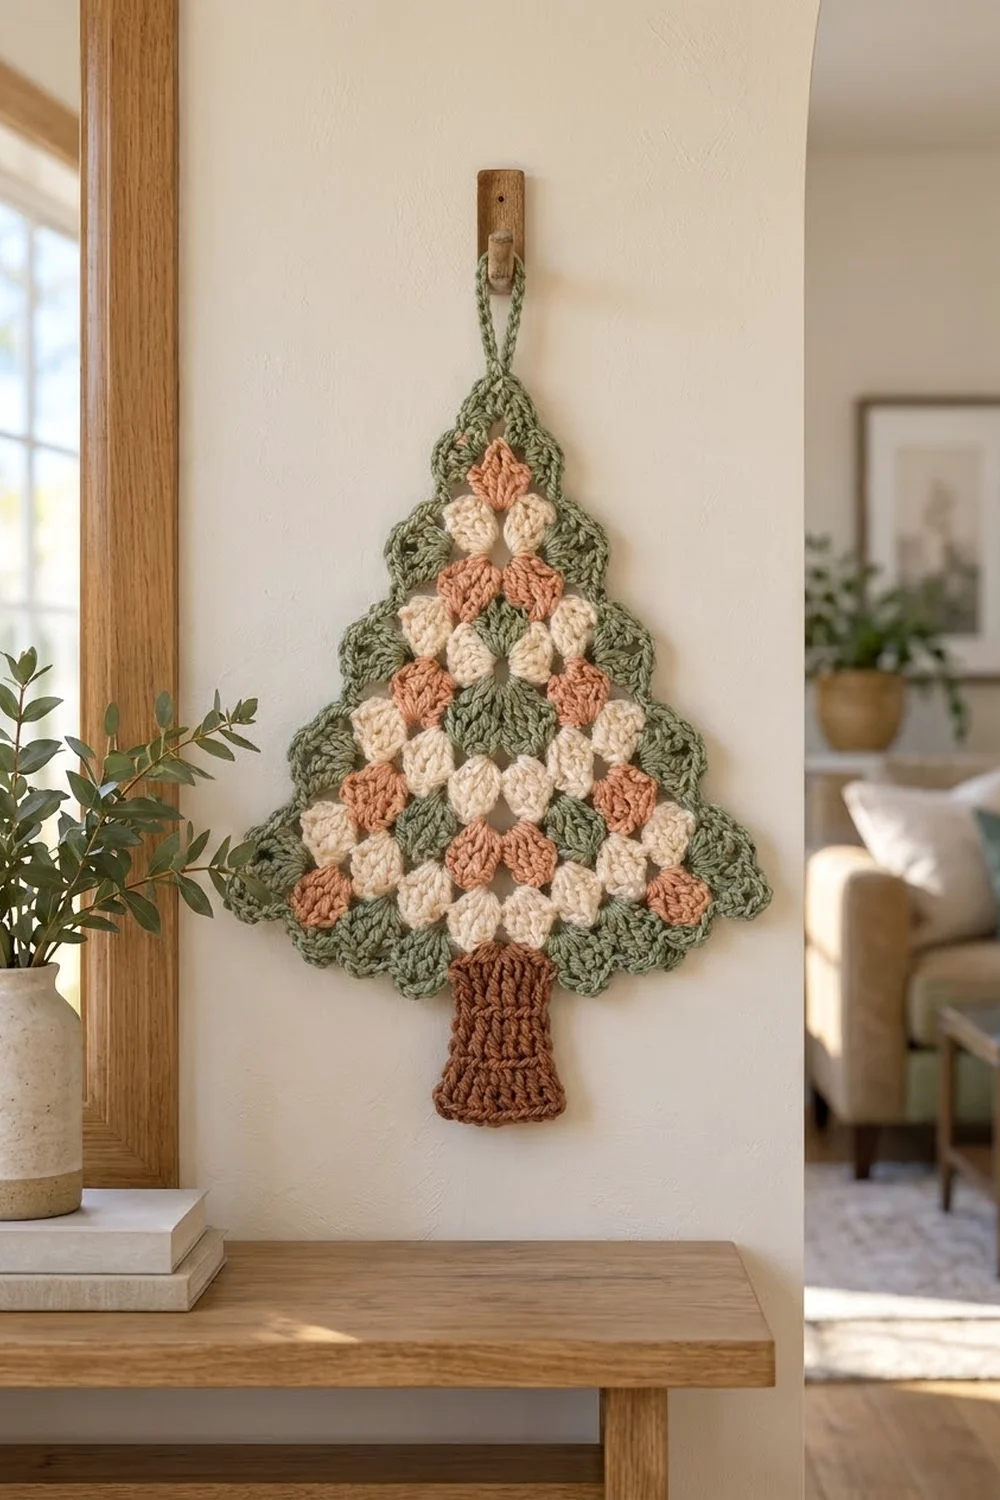
The Sage Hearth Granny Tree is a small, cozy wall hanging. It brings granny-square charm to your holiday decor without needing a whole blanket’s worth of squares. The tree body is a triangle of classic 3-dc clusters in cream, peach and sage. A puffy sage scallop edge frames it, and a ribbed rust-brown trunk sits underneath.
The colors are muted and warm: sage green for the frame, cream and peach for the “ornaments,” and rust for the trunk. It suits a Scandinavian-style entryway, a mantel or a nursery door.
This pattern uses US crochet terms. The finished tree measures about 8 in (20.3 cm) wide and 9 in (22.9 cm) tall from the tip to the bottom of the trunk. The hanging loop adds 1.5 in (3.8 cm).
Construction is simple. You crochet the tree body in rows from the top point down, adding one cluster per row. Then you work two border rounds around the whole triangle and make the trunk as a separate small rectangle. Finally, you sew the trunk to the back of the tree.
Finished Size and Construction
- Finished size: 8 in (20.3 cm) wide x 9 in (22.9 cm) tall, plus a 1.5 in (3.8 cm) loop
- Skill level: Easy-intermediate (simple color carrying)
- Terminology: US crochet terms
- Yarn weight: Worsted (#4)
- Hook: 5.0 mm (H-8)
- Number of pieces: 2 (tree body and trunk)
- Layout: Single tree, with the trunk centered under the bottom edge
- Tree body before border: 6 in (15.2 cm) wide x 5 in (12.7 cm) tall
- Tree body after border: 8 in (20.3 cm) wide x 7 in (17.8 cm) tall
- Border depth: about 1 in (2.5 cm), in 2 rounds
- Trunk: 2 in (5.1 cm) wide x 2.5 in (6.4 cm) tall, with 0.5 in (1.3 cm) hidden behind the tree
Materials
Choose a smooth worsted-weight yarn in cotton, a cotton blend or soft acrylic. Smooth yarn shows the clusters and scallops clearly. Very fuzzy yarn hides the gaps between clusters, and those gaps are what give the granny look.
- Sage green (G): 25 g / 50 m (55 yd)
- Cream (C): 15 g / 30 m (33 yd)
- Peach (P): 12 g / 24 m (26 yd)
- Rust brown (R): 10 g / 20 m (22 yd)
Tools:
- 5.0 mm (H-8) crochet hook
- Tapestry needle
- Scissors
- Stitch markers (2)
- Blocking mat and rust-proof pins
- Spray bottle
- Optional: a small wooden dowel or a nail for hanging
All yarn quantities include a margin of about 20% for gauge swatches and weaving in ends.
Abbreviations (US Terms)
- ch: chain
- sl st: slip stitch
- sc: single crochet
- dc: double crochet
- sp: space
- BLO: back loop only
- RS / WS: right side / wrong side
Special stitches:
- Cluster: 3 dc worked into the same stitch or space. A beginning ch 3 plus 2 dc also counts as one cluster.
- Shell: 5 dc worked into the same stitch.
- Corner: (3 dc, ch 2, 3 dc) worked into the same stitch or space. It counts as 2 clusters.
Gauge and Checkpoints
Gauge: 4 clusters with ch-1 spaces between them = 3 in (7.6 cm) wide, and 4 rows = 2.5 in (6.4 cm) tall. Each cluster plus its ch-1 space is about 0.75 in (1.9 cm) wide.
The tree is its own swatch. Work Rows 1–4 and measure before you continue.
Checkpoints:
- After Row 4: the bottom edge is 3 in (7.6 cm) wide and the piece is 2.5 in (6.4 cm) tall.
- After Row 8: the body is 6 in (15.2 cm) wide x 5 in (12.7 cm) tall.
- After Border Round 1: the bottom edge is about 7 in (17.8 cm) wide.
- After Border Round 2: the body is 8 in (20.3 cm) wide x 7 in (17.8 cm) tall.
If your piece is too big, go down 0.5 mm in hook size. If it’s too small, go up 0.5 mm. If the width is right but the rows are too short, pull each dc up a little taller rather than changing hooks.
Color Carrying
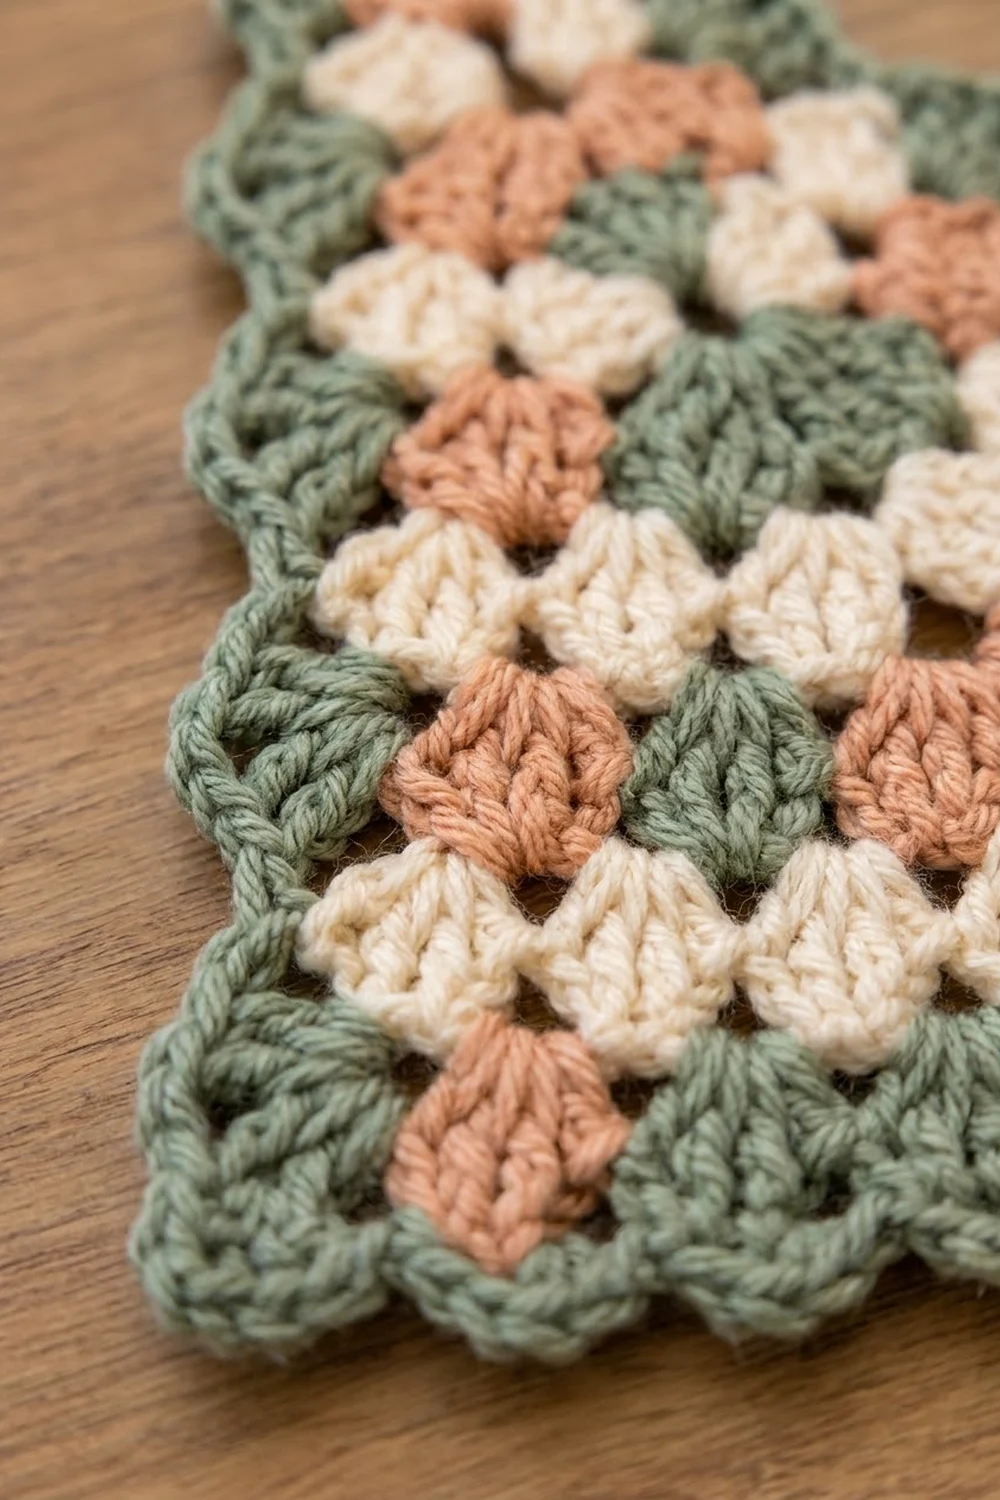
Each colorwork row uses no more than two colors. To change color, work the last dc of a cluster until 2 loops remain on the hook. Pick up the new color and pull it through to finish the stitch.
Lay the unused color along the top of the stitches you’re working into, and work your dc over it so it stays hidden inside the clusters. Carry loosely across the ch-1 spaces so the work doesn’t pucker. At the end of each row, drop any color that the next row doesn’t use and fasten it off with a 4 in (10.2 cm) tail.
Tree Body
The rows are worked back and forth. Each row adds exactly one cluster, so Row n has n clusters and n − 1 ch-1 spaces.
Basic row method (used from Row 2 on): Ch 3 (counts as dc) and turn. Work 2 dc in the first dc to complete the edge cluster, then ch 1. Work 1 cluster in each ch-1 space across, with ch 1 after each one. Finish with 1 cluster in the top of the turning ch-3. The edge clusters on both ends step outward, which creates the stepped tree sides.
Row 1 (P): Ch 4. Work 2 dc in the 4th ch from the hook (the skipped ch count as the first dc). (1 cluster)
Row 2 (C): Follow the basic row method: ch 3, turn, 2 dc in the first dc, ch 1, 3 dc in the top of the turning ch. (2 clusters, 1 ch-1 sp)
Rows 3–8: Use the basic row method. Work the clusters in the colors shown below, reading each row in the direction you work it.
| Row | Colors | Clusters | ch-1 sps |
|---|---|---|---|
| 3 | P, G, P | 3 | 2 |
| 4 | C, P, P, C | 4 | 3 |
| 5 | G, C, G, C, G | 5 | 4 |
| 6 | P, C, P, P, C, P | 6 | 5 |
| 7 | C, G, C, G, C, G, C | 7 | 6 |
| 8 | P, C, P, C, P, C, P, C | 8 | 7 |
Totals: 36 clusters (108 dc): 16 cream, 13 peach and 7 sage. Check: 1 + 2 + 3 + 4 + 5 + 6 + 7 + 8 = 36.
Fasten off and weave in all ends. Check that the body measures 6 in (15.2 cm) wide x 5 in (12.7 cm) tall. Row 8 forms the bottom of the tree, and the foundation ch of Row 1 is the top point.
Make All Pieces
You need one tree body (G, C and P) and one trunk (R). There is only one of each, so there is no grid. The layout is:
   /\      tree body (point up)
  /  \
 /____\
   ||      trunk, centered, behind the bottom edge
Trunk
Work in rust (R) throughout.
Row 1: Ch 11. Work 1 sc in the 2nd ch from the hook and in each ch across. (10 sc)
Rows 2–10: Ch 1 and turn. Work 1 sc in the BLO of each sc across. (10 sc)
Fasten off and leave a 12 in (30.5 cm) tail for sewing. The trunk measures 2 in (5.1 cm) across the rows x 2.5 in (6.4 cm) along the stitches. Turn it so the foundation chain runs vertically and the ribs run up and down, matching the photo.
Joining (Attaching the Trunk)
Attach the trunk after the border and the final blocking are finished, so the bottom scallops can be pinned straight first.
- Lay the tree WS up and find the center shell of the bottom edge (shell 5 of 9).
- Center the trunk on that shell, ribs vertical, so its top 0.5 in (1.3 cm) overlaps the back of the border. About 2 in (5.1 cm) of trunk should show below the scallops.
- With the tail, whipstitch the top edge of the trunk to the back loops of Border Round 1. Go through only one loop of each dc so nothing shows on the front.
- Tack each top corner of the trunk with 2 extra stitches.
Keep the tension even and snug, but don’t pull hard enough to dimple the front. Checkpoint: the total height from the tip to the bottom of the trunk is 9 in (22.9 cm).
Border
Border gauge: each cluster plus its ch-1 space measures 0.75 in (1.9 cm). Each border round adds about 0.5 in (1.3 cm) of depth.
Round 1 (G): granny frame
With RS facing, join G in the free loop of the foundation ch at the top point.
- Tip corner: Ch 3 (counts as dc), then work (2 dc, ch 2, 3 dc) in the same place.
- First slanted side: Ch 1. Work 1 cluster around the post of the edge stitch of each of Rows 2–7, with ch 1 after each one. (6 clusters)
- Bottom corner: Work a corner in the outermost dc of Row 8, then ch 1.
- Bottom edge: Work 1 cluster in each of the 7 ch-1 spaces of Row 8, with ch 1 after each one.
- Second bottom corner: Work a corner in the last dc of Row 8, then ch 1.
- Second slanted side: Work 1 cluster around the edge stitch of each of Rows 7–2, with ch 1 after each one. (6 clusters)
- Sl st to the top of the beginning ch-3.
Counts per side (each side includes half of each corner at its ends):
- Each slanted side: 3 dc + 6 clusters + 3 dc = 8 clusters, or 24 dc
- Bottom: 3 dc + 7 clusters + 3 dc = 9 clusters, or 27 dc
- Round total: 25 clusters (75 dc), 3 ch-2 corners and 22 ch-1 spaces
Why the math works: The sides use one cluster per row end for Rows 2–7, which is 6 rows. Row 1 is covered by the tip corner and Row 8 by the bottom corners. The bottom uses Row 8’s 7 ch-1 spaces. Adding it up: 8 + 8 + 9 = 25 clusters. Counted the other way, 6 corner halves + 6 + 6 + 7 = 25. Both counts agree, so no corner is counted twice.
Round 2 (G): scallops and hanging loop
- Sl st into the next 2 dc so you reach the tip ch-2 space.
- Hanging loop: Work (sc, ch 15, sc) in the tip ch-2 space.
- First slanted side: Skip 1 dc and work a shell in the center dc of the next cluster. Then sc in the next ch-1 space, skip 1 dc, and work a shell in the center dc of the next cluster. Repeat from * along the side. (8 shells)
- Bottom corner: Work (sc, ch 2, sc) in the corner ch-2 space.
- Bottom edge: Work shells in the same way as the side. (9 shells)
- Second bottom corner: Work (sc, ch 2, sc) in the corner ch-2 space.
- Second slanted side: Work shells in the same way. (8 shells)
- Sl st to the first sc.
Round total: 25 shells (125 dc), 22 sc in the ch-1 spaces and 6 corner sc. That gives one shell for each Round 1 cluster.
Fasten off and weave in all ends. Checkpoint: 8 in (20.3 cm) wide x 7 in (17.8 cm) tall, with a 1.5 in (3.8 cm) loop.
Final Blocking
- Lightly mist the tree body until it is damp, not soaked.
- Lay it RS up on a blocking mat.
- Pin the tip, then the two bottom corners, so the bottom edge measures 8 in (20.3 cm) and the height is 7 in (17.8 cm).
- Pin the bottom edge straight between the corners.
- Pin each slanted side straight from the tip to the corner, and fluff each shell into a round scallop with your fingers.
- Open the ch-1 gaps between clusters so the granny texture shows.
- Let it dry completely, ideally overnight.
- Unpin it and attach the trunk as described in the Joining section.
Final Quality-Control Checklist
- Row 8 has 8 clusters and 7 ch-1 spaces.
- The color order matches the chart, and no carried strands show on the RS.
- Border Round 1 has 25 clusters: 8, 8 and 9 per side.
- Border Round 2 has 25 shells and three corners worked correctly.
- The hanging loop is centered at the tip and doesn’t twist.
- The trunk is centered, with its ribs vertical and 2 in (5.1 cm) showing.
- The total height is 9 in (22.9 cm) and the width is 8 in (20.3 cm).
- All ends are woven in on the WS.
Troubleshooting
- Tree is leaning: you probably missed an edge cluster on one end of a row. Count the clusters per row against the chart.
- Carried yarn shows through: work the dc more snugly over the float, or carry the strand slightly behind the stitches.
- Sides ruffle in Round 1: your row-end clusters are too loose. Go down 0.5 mm in hook size for the border only.
- Bottom edge cups: the shells are tight. Make the ch-1 sc looser, or re-block with more pins.
- Trunk looks lumpy: sew through one loop only, and press flat under a damp cloth.
Care
Hand wash in cool water with mild soap, press out the water in a towel and dry flat in shape. Store it flat or hang it from its loop, away from direct sunlight to protect the colors.
Final Notes
Here is the full measurement chain:
- 4 clusters = 3 in (7.6 cm)
- 8 rows make a 6 in x 5 in (15.2 cm x 12.7 cm) body
- 2 border rounds bring the tree to 8 in x 7 in (20.3 cm x 17.8 cm)
- The 2 in (5.1 cm) of trunk showing gives a total height of 9 in (22.9 cm)
If you check your size at each step, the last steps will go smoothly. Happy crocheting!