

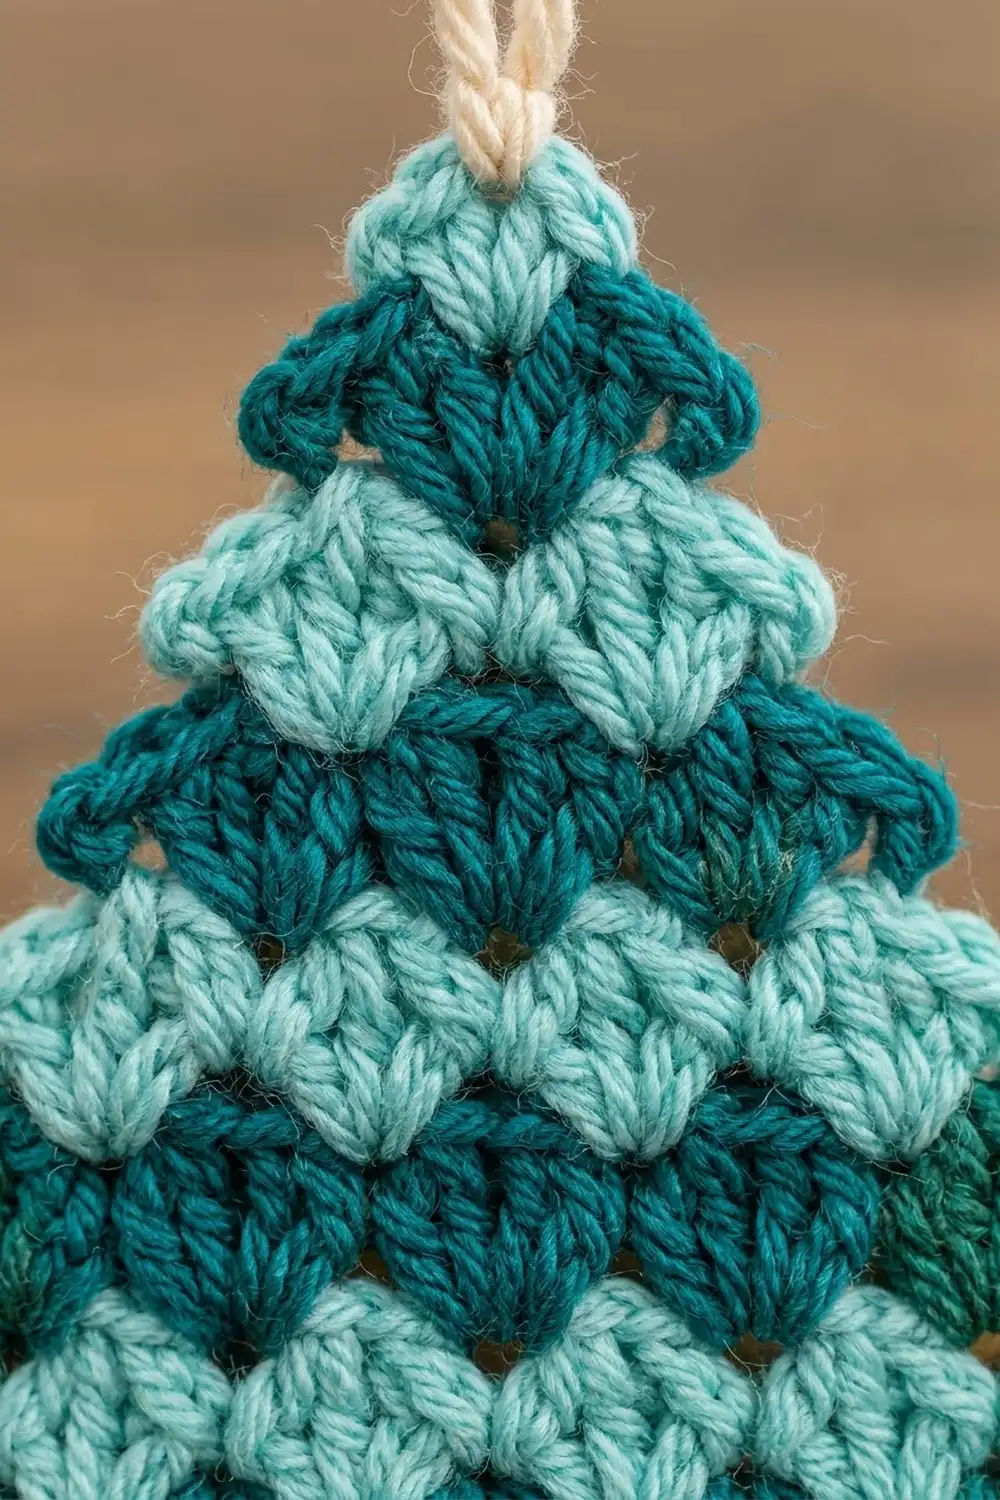
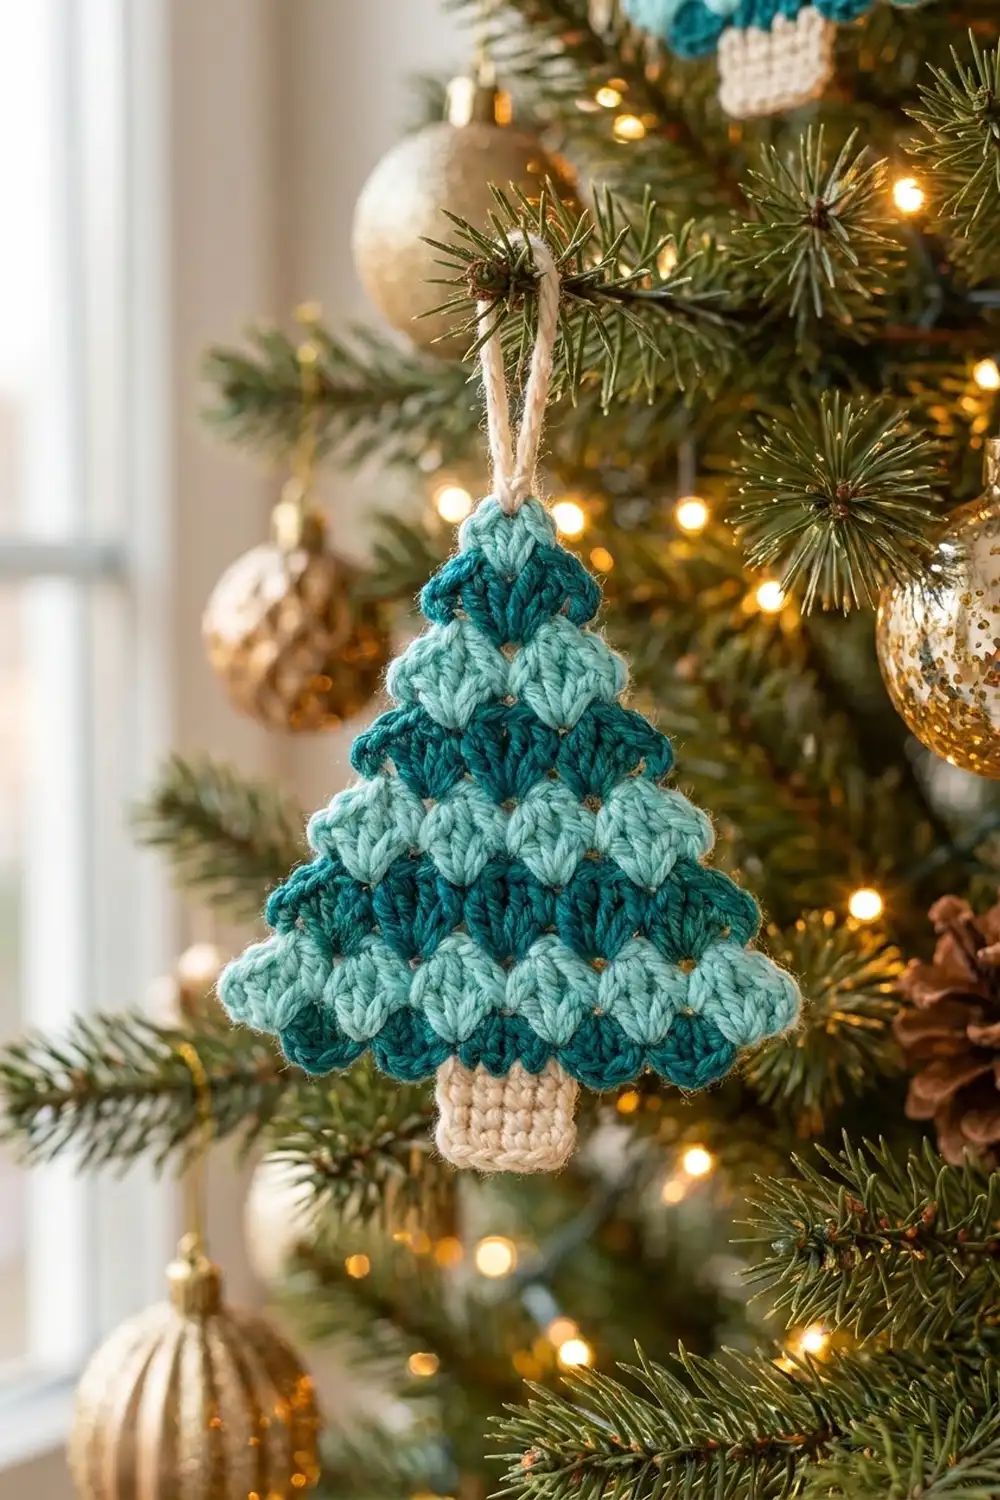
The Frosted Spruce ornament is a small, flat Christmas tree built from rows of plump clusters. Each band of clusters sits between the clusters of the band below, so the tree gets a neat diamond texture and stepped, branch-like edges with no shaping at all.
The colors alternate between light aqua and deep teal, with a cream trunk and a cream hanging loop. The palette looks frosty and modern, and it shows up well against green branches and warm lights. The style is simple and graphic, and the tree looks the same from a distance as it does up close.
This pattern uses US crochet terms. The finished tree is 3.75 in (9.5 cm) wide at the base and 4.7 in (11.9 cm) tall from the bottom of the trunk to the top cluster. The hanging loop adds about 2 in (5.1 cm).
Construction is quick. You crochet one teal foundation row of single crochet. Then you work seven cluster rows from the bottom up, changing color every row, and each row loses one cluster on its own. After that you add a five-stitch cream trunk to the underside of the foundation and finish with a chain loop at the tip.
Finished Size and Construction
- Finished size: 3.75 in (9.5 cm) wide x 4.7 in (11.9 cm) tall, not counting the loop
- Skill level: Easy (beginner-plus)
- Terminology: US crochet terms
- Yarn weight: Worsted (medium, #4)
- Hook: 4.5 mm (US 7)
- Number of pieces: 1 (one single ornament worked in one piece)
- Layout: Single flat tree, displayed hanging from a loop
- Tree body size (foundation + cluster rows): 3.75 in (9.5 cm) wide x 3.7 in (9.4 cm) tall
- Size before trunk and loop: 3.75 in x 3.7 in (9.5 cm x 9.4 cm)
- Trunk depth: 1 in (2.5 cm) below the base, 1.25 in (3.2 cm) wide
Materials
Use a smooth worsted-weight yarn. Acrylic or a wool blend both work. Smooth yarn makes the clusters stand out crisply, and fuzzy yarn blurs the diamond texture. A yarn at about 200 m per 100 g (2 m per gram) matches the quantities below.
- Light aqua (Color A): 4 g, about 8 m. Used for Rows 2, 4, 6 and 8.
- Deep teal (Color B): 4 g, about 8 m. Used for Rows 1, 3, 5 and 7.
- Cream (Color C): 3 g, about 6 m. Used for the trunk and the hanging loop.
Tools:
- 4.5 mm (US 7) crochet hook
- Tapestry needle
- Scissors
- Pins and a foam blocking mat
- Spray bottle with water
All quantities include a generous margin for the many color-change tails. Each cluster row is fastened off, so you’ll leave a 4 in (10.2 cm) tail at each end of every row.
Abbreviations (US Terms)
- ch – chain
- sl st – slip stitch
- sc – single crochet
- dc – double crochet
- dc2tog – double crochet 2 together, worked into one stitch or space
- CL – cluster (see below)
- sp(s) – space(s)
- sk – skip
- st(s) – stitch(es)
- RS – right side
- yo – yarn over
Cluster (CL): [Yo, insert hook in the indicated st or sp, yo and pull up a loop, yo and draw through 2 loops] 3 times, all in the same place. You now have 4 loops on the hook. Yo and draw through all 4 loops.
Starting cluster: Ch 2, then dc2tog in the same st or sp. This counts as the first CL of the row and has the same height and shape as a regular CL.
Gauge and Checkpoints
Gauge: 16 sc and 20 rows = 4 in (10.2 cm) in sc. One cluster row is 0.5 in (1.3 cm) tall.
Gauge matters more than you might expect for an ornament. If your tension is loose, the clusters splay, the diamonds lose their shape, and the tree flops on the branch. Make one complete tree before you start a batch, and check it against these measurements:
- After Row 1: the foundation is 3.75 in (9.5 cm) wide and about 0.2 in (0.5 cm) tall.
- After Row 2: the first cluster row spans about 3.25 in (8.3 cm), and the piece is 0.7 in (1.8 cm) tall.
- After Row 5: the piece is 2.2 in (5.6 cm) tall.
- After Row 8: the tree body is 3.7 in (9.4 cm) tall.
- After the trunk: the total height is 4.7 in (11.9 cm).
If your tree is too big, go down to a 4.0 mm (US G-6) hook. If it’s too small or very stiff, go up to a 5.0 mm (US H-8) hook. Change the hook, not the stitch counts. The shaping depends on the counts, so changing them will distort the triangle.
Pattern
Work every row with the RS facing. Do not turn between rows. You start each cluster row at the right edge (left edge if you crochet left-handed) and fasten off at the other end. Since the colors change every row, this keeps all the cluster tops facing the same way, so the diamonds look identical on every band.
Row 1 – Foundation (Color B, deep teal)
With Color B, ch 16.
Sc in the 2nd ch from the hook and in each ch across. (15 sc)
Fasten off and leave a 4 in (10.2 cm) tail. Don’t turn the piece over. Keep the same side facing you for the rest of the tree.
Row 2 – First cluster row (Color A, light aqua)
Join Color A with a sl st in the 2nd sc of Row 1. Make a starting cluster in the same sc.
[Ch 1, sk next sc, CL in next sc] 6 times. The last CL goes into the 14th sc.
(7 CL, 6 ch-1 sps)
The 1st and 15th sc stay unworked. Those two teal stitches peek out from under the corners and give the base its dark edge. Fasten off.
Row 3 (Color B)
Join Color B with a sl st in the first ch-1 sp of Row 2. Make a starting cluster in the same sp.
[Ch 1, CL in next ch-1 sp] 5 times.
(6 CL, 5 ch-1 sps)
Fasten off. Each cluster now sits in the gap between two clusters below. That offset makes the diamond pattern, and it also sets the row half a cluster in at each side, which forms the stepped edge.
Row 4 (Color A)
Join Color A with a sl st in the first ch-1 sp. Make a starting cluster in the same sp.
[Ch 1, CL in next ch-1 sp] 4 times.
(5 CL, 4 ch-1 sps)
Fasten off.
Row 5 (Color B)
Join Color B with a sl st in the first ch-1 sp. Make a starting cluster in the same sp.
[Ch 1, CL in next ch-1 sp] 3 times.
(4 CL, 3 ch-1 sps)
Fasten off. Checkpoint: the piece is 2.2 in (5.6 cm) tall.
Row 6 (Color A)
Join Color A with a sl st in the first ch-1 sp. Make a starting cluster in the same sp.
[Ch 1, CL in next ch-1 sp] twice.
(3 CL, 2 ch-1 sps)
Fasten off.
Row 7 (Color B)
Join Color B with a sl st in the first ch-1 sp. Make a starting cluster in the same sp.
Ch 1, CL in next ch-1 sp.
(2 CL, 1 ch-1 sp)
Fasten off.
Row 8 – Treetop (Color A)
Join Color A with a sl st in the only ch-1 sp. Make a starting cluster in the same sp.
(1 CL)
Fasten off. Checkpoint: the tree body is 3.7 in (9.4 cm) tall and 3.75 in (9.5 cm) wide at the foundation.
Row summary: 15 sc, then 7, 6, 5, 4, 3, 2 and 1 CL. That makes 28 clusters in total: 16 in light aqua (7 + 5 + 3 + 1) and 12 in deep teal (6 + 4 + 2).
Weaving in ends
Weave each tail into stitches of its own color on the back. Teal tails go into teal bands and aqua tails go into aqua bands, so nothing shows through. Weave each tail along the row it came from instead of up the sides, so the stepped edge stays crisp.
Border (Trunk, Base Edge and Hanging Loop)
This ornament has no all-around border. The stepped cluster edges are the finished sides. The only “border” work is the cream trunk, worked into the base, and the cream loop at the tip. Both use the same gauge as Row 1: 16 sc and 20 rows = 4 in (10.2 cm).
Trunk (Color C, cream)
Hold the tree upside down with the RS facing you, so you can see the free loops on the underside of the foundation chain. There are 15 free loops, one under each sc of Row 1.
Row 1: Count 5 free loops in from the edge and join Color C in the 6th loop. Ch 1. Sc in the same loop and in the next 4 loops. (5 sc)
Rows 2–5: Ch 1, turn. Sc in each sc across. (5 sc)
Fasten off and weave in the ends.
Counts along the base edge: 5 free loops to the left of the trunk, 5 loops used by the trunk, and 5 free loops to the right of the trunk.
Why the math works: 5 + 5 + 5 = 15, which matches the 15 sc in Row 1 exactly, so the trunk is perfectly centered. Five sc at 4 sts per in give a trunk 1.25 in (3.2 cm) wide, about a third of the 3.75 in (9.5 cm) base. Five rows at 5 rows per in give 1 in (2.5 cm) of height, which brings the full tree to 3.7 + 1 = 4.7 in (11.9 cm).
Hanging loop (Color C)
Join Color C with a sl st in the top of the Row 8 cluster. Ch 20. Sl st in the same place where you joined. Fasten off and weave both tails down into the treetop cluster.
The 20 chains fold into a loop about 2 in (5.1 cm) tall. That gives a total hanging height of about 6.7 in (17.0 cm).
Final Blocking
- Weave in all ends before you block. Blocking sets the tails in place as well.
- Lightly mist the ornament with water until it’s damp but not soaked. Don’t steam acrylic hard, because it will flatten the clusters.
- Lay the tree RS up on the blocking mat.
- Pin the two bottom corners of Row 1 so they’re 3.75 in (9.5 cm) apart.
- Pin the treetop cluster centered above the base, 3.7 in (9.4 cm) above the bottom of Row 1.
- Ease each cluster row so it sits level, and gently push each cluster into a rounded diamond with your fingertip.
- Pin the trunk straight down, 1.25 in (3.2 cm) wide and 1 in (2.5 cm) deep.
- Let it dry completely, usually several hours, before you unpin it.
Final Quality-Control Checklist
- The tree is one single piece with 8 tree rows, a 5-row trunk and one loop.
- Row counts are 15 sc, then 7, 6, 5, 4, 3, 2 and 1 CL.
- The colors run aqua at the bottom cluster row, then teal, aqua, teal, aqua, teal, and aqua at the top.
- A teal sc shows at each bottom corner, under the first aqua row.
- Each cluster sits centered between two clusters below it.
- The trunk is centered with 5 free loops on each side.
- The base measures 3.75 in (9.5 cm), and the height without the loop is 4.7 in (11.9 cm).
- No tails show on the RS.
- The loop is secure and centered on the top cluster.
Troubleshooting
The tree leans to one side. You probably skipped a ch-1 sp at the start or end of a row. Count the clusters against the row summary and redo the row that’s off.
The diamonds look uneven from band to band. You may have turned the work between rows. Keep the RS facing for every cluster row.
The clusters look flat or thin. Pull up each loop to the full height of a dc before you close the cluster, and don’t yank the final yo tight.
The edges curl. Your foundation chain was probably tighter than your stitches. Remake it with a hook one size larger for the chain only.
The trunk is off-center. Recount the free loops. There must be exactly 5 on each side of the trunk.
The ornament is floppy. Go down a hook size, or block it and let it dry flat for longer.
Care
Spot clean with cool water and mild soap, then reshape and dry flat. Store the ornament flat between tissue paper so the clusters keep their shape until next season.
Final Notes
The whole ornament follows one short chain of measurements. A 15-sc teal foundation at 4 sts per in gives a base 3.75 in (9.5 cm) wide. Seven cluster rows at 0.5 in (1.3 cm) each, sitting on that 0.2 in (0.5 cm) foundation, bring the tree body to 3.7 in (9.4 cm). A centered 5-sc trunk adds 1 in (2.5 cm) for a total of 4.7 in (11.9 cm), and the cream loop adds about 2 in (5.1 cm) for hanging.
If your first tree matches those numbers, every tree after it will too. That makes this an easy ornament to repeat for gifts, gift toppers or your own tree.
Happy crocheting!