

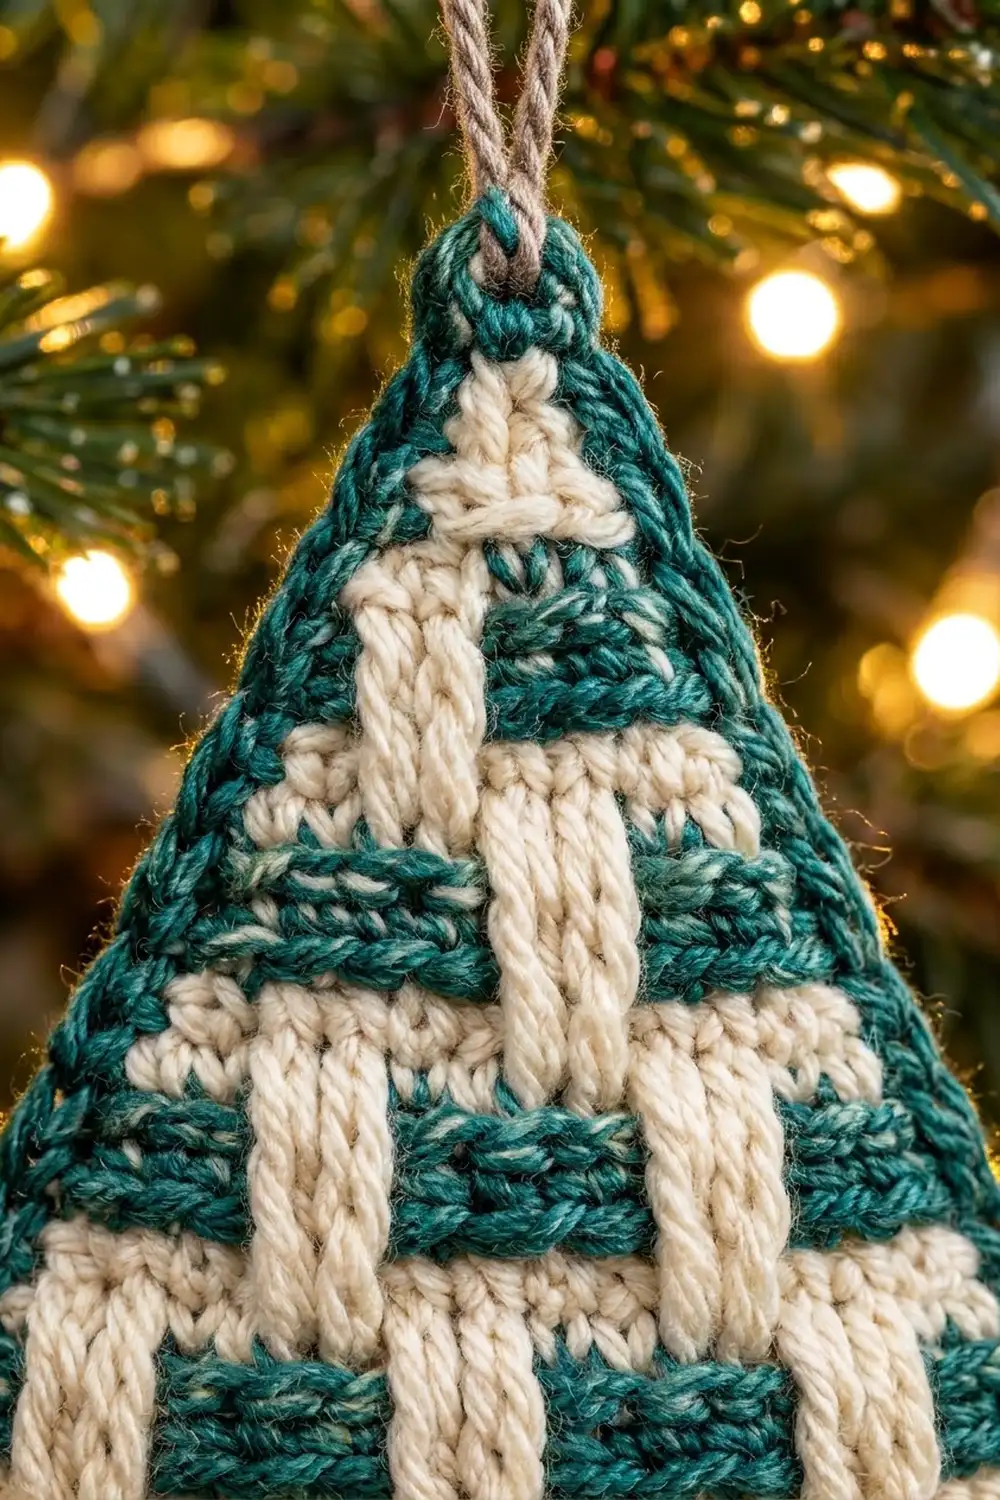
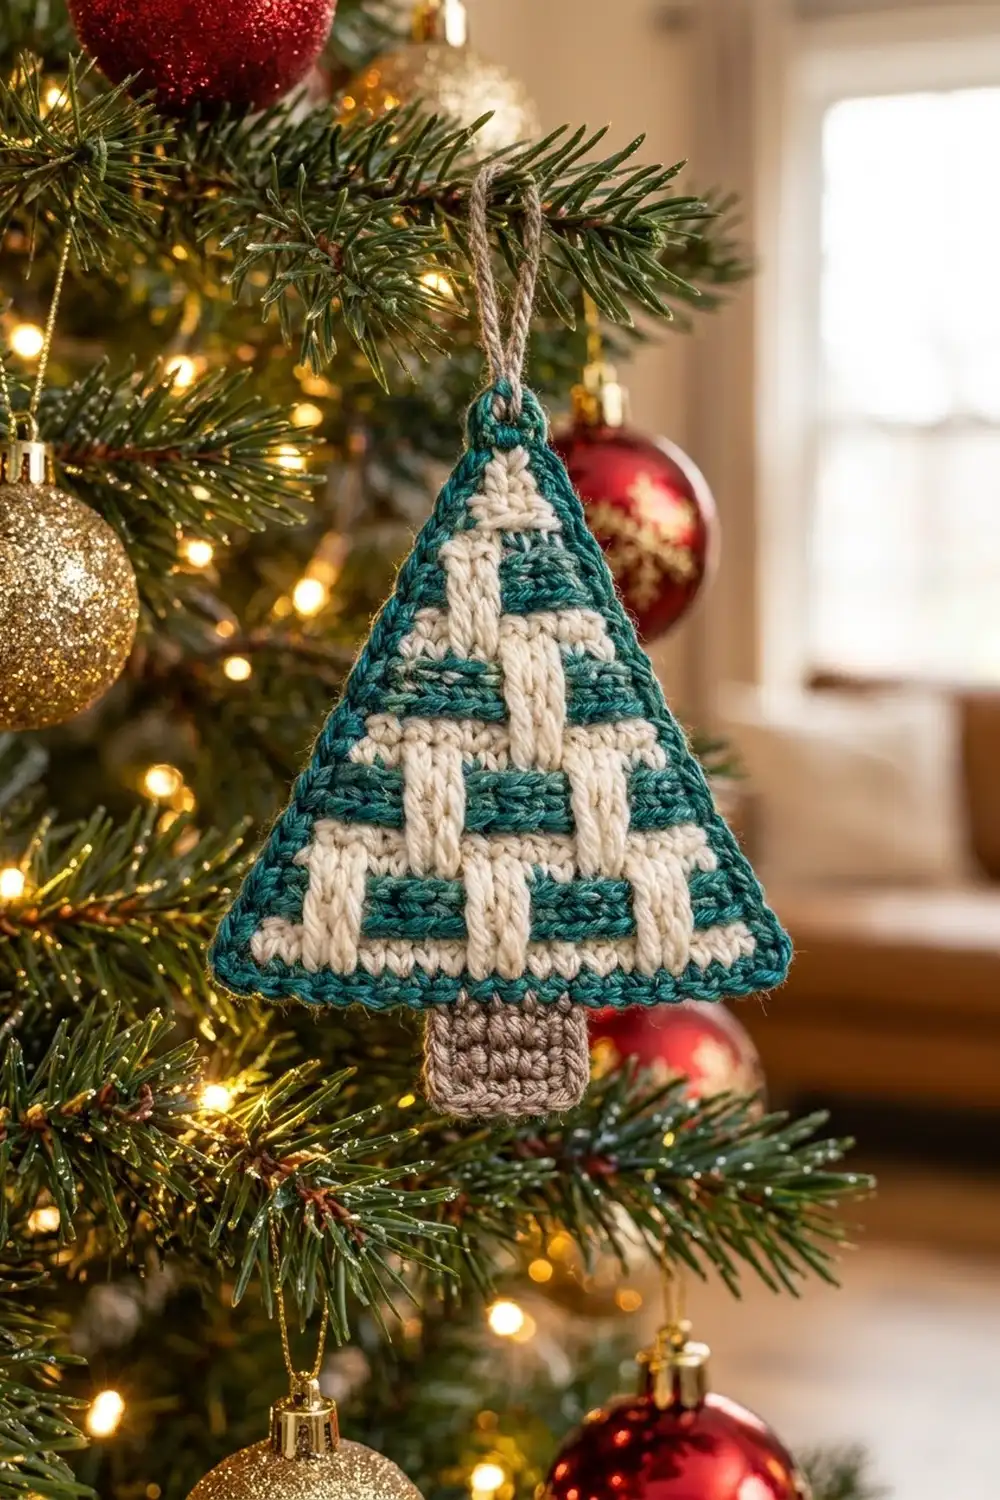
This little tree ornament looks woven, but it is one flat piece in simple single crochet. Cream vertical bars cross over deep teal bands, so the triangle reads like a tiny basketweave. A crisp teal border frames the shape, and a soft taupe trunk sits at the bottom center.
The colors are cream, deep teal and warm taupe. The look is cozy and Scandinavian, and the ornament works on a tree, a gift tag or a wreath. The pattern uses US crochet terms throughout.
The finished ornament is 4.2 in (10.7 cm) wide across the base and 4.4 in (11.2 cm) tall from tip to trunk, not counting the hanging loop.
Construction is simple. You crochet the triangle from the base up in two-row stripes and decrease at both ends on every even row. Long spike stitches carry the cream color down over each teal band. Then you work one teal border round, add the trunk in taupe and finish with a taupe hanging loop.
Finished Size and Construction
- Finished size: 4.2 in (10.7 cm) wide x 4.4 in (11.2 cm) tall, not counting the loop
- Skill level: Easy to intermediate (spike stitches and color changes)
- Terminology: US crochet terms
- Yarn weight: DK (light, weight 3) cotton or cotton blend
- Hook: 3.5 mm (E-4)
- Number of pieces: 1 (the trunk and loop are worked directly onto the tree)
- Layout: One flat triangle with the trunk attached at bottom center
- Triangle size before border: 3.8 in (9.7 cm) wide x 3.0 in (7.6 cm) tall
- Border depth: 0.2 in (0.5 cm), one round of single crochet
- Triangle size after border: 4.2 in (10.7 cm) wide x 3.4 in (8.6 cm) tall
- Trunk: 1.0 in (2.5 cm) wide x 1.0 in (2.5 cm) tall
- Hanging loop: about 1.25 in (3.2 cm) tall when folded
Materials
Choose a smooth DK-weight cotton, either mercerized or matte. Cotton gives the spike stitches clean edges and helps the ornament lie flat. Acrylic also works, but it may need firmer blocking.
- Color A, cream: 8 g, about 18 m
- Color B, deep teal: 8 g, about 18 m
- Color C, taupe: 3 g, about 7 m
These amounts include extra yarn for checking gauge and weaving in ends.
Tools:
- 3.5 mm (E-4) crochet hook
- Tapestry needle
- Scissors
- 2 or 3 locking stitch markers
- Ruler or tape measure
- Blocking mat and rustproof pins
- Spray bottle with water
Abbreviations (US Terms)
- ch: chain
- sc: single crochet
- sc2tog: single crochet 2 together (decrease)
- sc3tog: single crochet 3 together (double decrease)
- sl st: slip stitch
- st(s): stitch(es)
- Spike: spike single crochet (see below)
- RS / WS: right side / wrong side
Spike single crochet (Spike): Insert the hook into the stitch directly below the next stitch, 3 rows down. This is the last cream row below the teal band. Yarn over and pull up a long loop to the height of the row you are working. Yarn over and pull through both loops on the hook. Skip the stitch of the current row that sits behind the spike.
Keep the long loop relaxed. It should lie flat over the teal band without pulling the fabric up.
Gauge and Checkpoints
Gauge: 20 sc and 24 rows = 4 in (10.2 cm) in single crochet.
That works out to 5 stitches and 6 rows per inch (2.5 cm). Because this is a single piece, the ornament itself is your test. Work Rows 1 to 6 and measure before going further.
Checkpoints:
- Row 1: 19 sts measure 3.8 in (9.7 cm) across.
- After Row 6: the triangle measures 1.0 in (2.5 cm) tall.
- After Row 12: the triangle measures 2.0 in (5.1 cm) tall.
- After Row 18: the triangle measures 3.0 in (7.6 cm) tall.
- After the border: 4.2 in (10.7 cm) wide x 3.4 in (8.6 cm) tall.
- After the trunk: 4.4 in (11.2 cm) total height.
If your piece is too big, go down to a 3.25 mm hook. If it is too small, go up to a 3.75 mm hook. Small differences are fine for an ornament, but keep the triangle’s proportions. If your rows are too tall for the width, the tree will look stretched, so check row gauge as well as stitch gauge.
Tree Body
The body is worked flat in rows, from the base up. The ch 1 at the start of each row does not count as a stitch.
Color sequence (two rows of each color, alternating):
- Rows 1–2: Color A (cream)
- Rows 3–4: Color B (teal)
- Rows 5–6: Color A
- Rows 7–8: Color B
- Rows 9–10: Color A
- Rows 11–12: Color B
- Rows 13–14: Color A
- Rows 15–16: Color B
- Rows 17–18: Color A
To change colors, work the last stitch of the old color until 2 loops remain on the hook. Yarn over with the new color and pull through. Each stripe is two rows, so both colors always end up at the same side edge. Carry the unused color loosely up that edge instead of cutting it. The border will hide it.
Row 1 (RS): With Color A, ch 20. Sc in 2nd ch from hook and in each ch across. (19 sts)
Row 2: Ch 1, turn. Sc2tog, sc in next 15 sts, sc2tog. (17 sts) Change to Color B in the last st.
Row 3: Ch 1, turn. Sc in each st across. (17 sts)
Row 4: Ch 1, turn. Sc2tog, sc in next 13 sts, sc2tog. (15 sts) Change to Color A.
Row 5 (first spike row): Ch 1, turn. Sc in first st, *Spike into Row 2, sc in next 3 sts; repeat from * 2 more times, Spike into Row 2, sc in last st. (15 sts: 4 Spikes + 11 sc)
Row 6: Ch 1, turn. Sc2tog, sc in next 11 sts, sc2tog. (13 sts) Change to Color B.
Row 7: Ch 1, turn. Sc in each st across. (13 sts)
Row 8: Ch 1, turn. Sc2tog, sc in next 9 sts, sc2tog. (11 sts) Change to Color A.
Row 9 (second spike row): Ch 1, turn. Sc in first st, *Spike into Row 6, sc in next 3 sts; repeat from * 1 more time, Spike into Row 6, sc in last st. (11 sts: 3 Spikes + 8 sc)
Row 10: Ch 1, turn. Sc2tog, sc in next 7 sts, sc2tog. (9 sts) Change to Color B.
Row 11: Ch 1, turn. Sc in each st across. (9 sts)
Row 12: Ch 1, turn. Sc2tog, sc in next 5 sts, sc2tog. (7 sts) Change to Color A.
Row 13 (third spike row): Ch 1, turn. Sc in first st, Spike into Row 10, sc in next 3 sts, Spike into Row 10, sc in last st. (7 sts: 2 Spikes + 5 sc)
Row 14: Ch 1, turn. Sc2tog, sc in next 3 sts, sc2tog. (5 sts) Change to Color B.
Row 15: Ch 1, turn. Sc in each st across. (5 sts)
Row 16: Ch 1, turn. Sc2tog, sc in next st, sc2tog. (3 sts) Change to Color A.
Row 17 (fourth spike row): Ch 1, turn. Sc in first st, Spike into Row 14, sc in last st. (3 sts: 1 Spike + 2 sc)
Row 18: Ch 1, turn. Sc3tog. (1 st)
Fasten off Color A. Cut Color B, leaving a 6 in (15.2 cm) tail.
How the woven look forms: Each spike row lays cream bars over the teal band below it. From bottom to top, the spike rows have 4, 3, 2 and 1 bars. The bars sit at different positions in each band, and that offset creates the over-and-under basketweave effect.
Lining up the spikes: The edges decrease, so stitches shift slightly from row to row. Always put the spike into the cream stitch straight below, so each bar hangs vertically. Don’t count stitches in the row below to find the spot.
Border
Border gauge: The border uses the same gauge, 5 sc per inch (2.5 cm). One round adds 0.2 in (0.5 cm) to every edge.
Border Round (RS, Color B): With RS facing and the foundation chain at the bottom, join Color B with a sl st in the free loop of the first foundation ch at the bottom right corner.
- Bottom right corner: Ch 1, 3 sc in the same st.
- Bottom edge: Sc in the free loop of each of the next 17 foundation chs.
- Bottom left corner: 3 sc in the last foundation ch.
- Left slanted edge: Sc in the end of each row from Row 2 to Row 17. (16 sc)
- Tip corner: 3 sc in the single st of Row 18.
- Right slanted edge: Sc in the end of each row from Row 17 back down to Row 2. (16 sc)
Join with a sl st to the first sc. (58 sts)
Border count by section:
- Corner groups: 3 corners x 3 sc = 9 sts
- Bottom edge: 17 sts
- Left slanted edge: 16 sts
- Right slanted edge: 16 sts
- Total: 9 + 17 + 16 + 16 = 58 sts
Fasten off and weave in ends.
Why the math works: The bottom edge has 19 foundation stitches. The first and last each hold a corner group, and each of the middle 17 gets 1 sc. Add the side stitch from each corner group and the bottom edge has 19 sts, which matches its 3.8 in (9.7 cm) width.
Each slanted side rises 3.0 in (7.6 cm) over a horizontal distance of 1.9 in (4.8 cm), so the slanted edge is about 3.55 in (9.0 cm) long. At 5 sts per inch, that edge needs about 18 sts. The 16 row-end sc plus the 2 corner-group stitches that turn onto that edge give 18. That keeps the side flat, with no ruffling or cupping.
The center stitch of each 3-sc corner group points outward, which keeps all three points sharp.
Trunk
The trunk is worked in Color C, directly into the bottom edge of the border.
With RS facing, count the 17 sc of the bottom edge from right to left. The trunk uses the center 5 sts, which are sts 7 to 11. Place markers in st 7 and st 11.
Row 1 (RS): Join Color C with a sl st in st 7. Ch 1, sc in the same st and in each of the next 4 sts. (5 sts)
Rows 2–6: Ch 1, turn. Sc in each st across. (5 sts)
Fasten off and weave in ends.
Checkpoint: The trunk measures 1.0 in (2.5 cm) wide x 1.0 in (2.5 cm) tall. At 6 rows per inch, 6 rows make exactly 1 in. The ornament now measures 4.4 in (11.2 cm) from tip to trunk.
Hanging Loop
Join Color C with a sl st in the center sc of the tip corner group. Ch 15, then sl st in the same st. Fasten off, leaving a 6 in (15.2 cm) tail.
Pass the tail through the base of the loop twice to anchor it. Then weave it into the border on the WS. The folded loop stands about 1.25 in (3.2 cm) tall.
Final Blocking
- Draw a triangle template 4.2 in (10.7 cm) wide at the base and 3.4 in (8.6 cm) tall. Add a 1.0 in (2.5 cm) square below the center of the base.
- Lay the template on your blocking mat and cover it with plastic wrap.
- Spray the ornament until it is evenly damp, not soaked.
- Place it RS up on the template and pin the three corners first.
- Pin along each slanted edge every 0.5 in (1.3 cm) so the sides are straight.
- Gently nudge each cream spike so it runs straight up and down.
- Square the trunk and pin its two bottom corners.
- Let it dry completely, usually 4 to 6 hours, then unpin.
Final Quality-Control Checklist
- Triangle measures 4.2 in (10.7 cm) wide x 3.4 in (8.6 cm) tall.
- Full height with trunk is 4.4 in (11.2 cm).
- Nine color stripes are visible, with cream at the base and tip.
- From bottom to top, the bands have 4, 3, 2 and 1 spike bars.
- Every spike runs vertically and lies flat over the teal band.
- The border round has 58 sts and all three corners are sharp.
- The yarn carried up the side edge is fully hidden by the border.
- The trunk is centered, with 6 border sts on each side of it.
- The hanging loop is secure and centered on the tip.
- All ends are woven in on the WS.
Troubleshooting
The spikes pucker the fabric. The long loop is too short. Pull it up to the full height of the working row before you finish the stitch.
The spikes look loose or saggy. You are pulling up too much yarn. Keep the loop level with the top of the current row.
The slanted edges ripple. You worked more than 1 sc in some row ends. Rework the border with exactly 16 sc on each side.
The slanted edges cup inward. You may have skipped row ends. Count again; each side needs 16 sc.
The triangle is lopsided. A decrease was missed on one end. Check the count after each even row: 17, 15, 13, 11, 9, 7, 5, 3 and 1.
The trunk is off center. Remove it and recount the 17-st bottom edge: 6 sts, then 5 trunk sts, then 6 sts.
Care
Hand wash in cool water with mild soap, roll in a towel and dry flat. If the shape relaxes, pin it to the template again.
Final Notes
Each measurement builds on the one before it. A gauge of 5 sts and 6 rows per inch gives a 19-stitch base of 3.8 in (9.7 cm) and an 18-row triangle 3.0 in (7.6 cm) tall. One border round adds 0.2 in (0.5 cm) per edge, bringing the triangle to 4.2 in (10.7 cm) by 3.4 in (8.6 cm). The 6-row trunk adds 1.0 in (2.5 cm), for a finished height of 4.4 in (11.2 cm).
Check each of those numbers as you go, and the ornament will come out crisp, flat and true to shape.
Happy crocheting!