

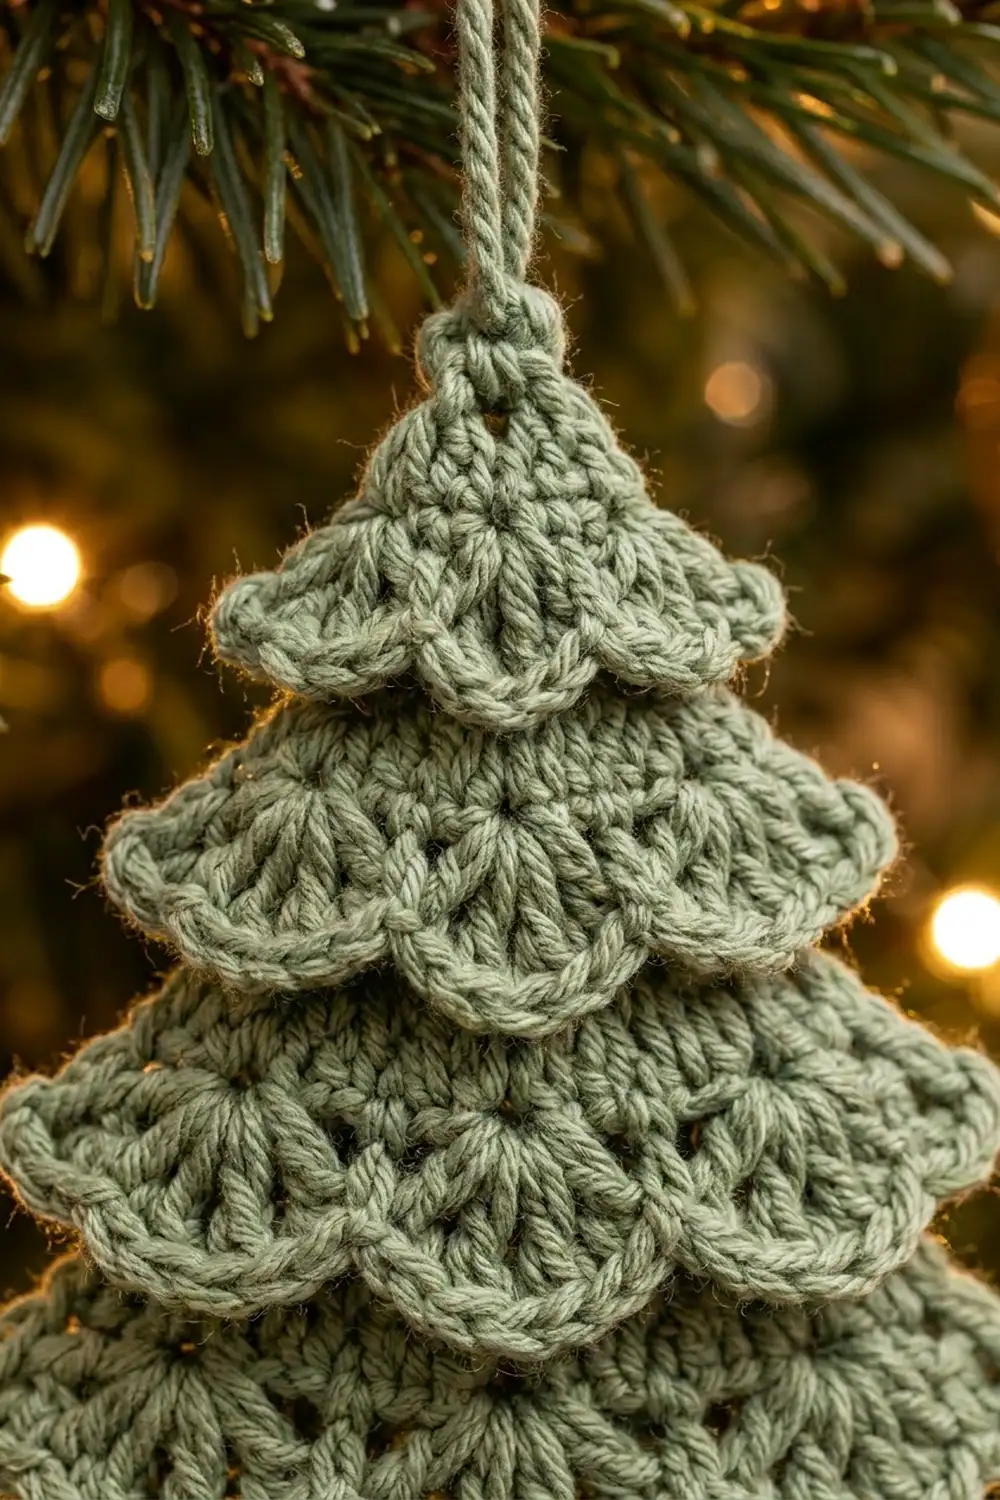
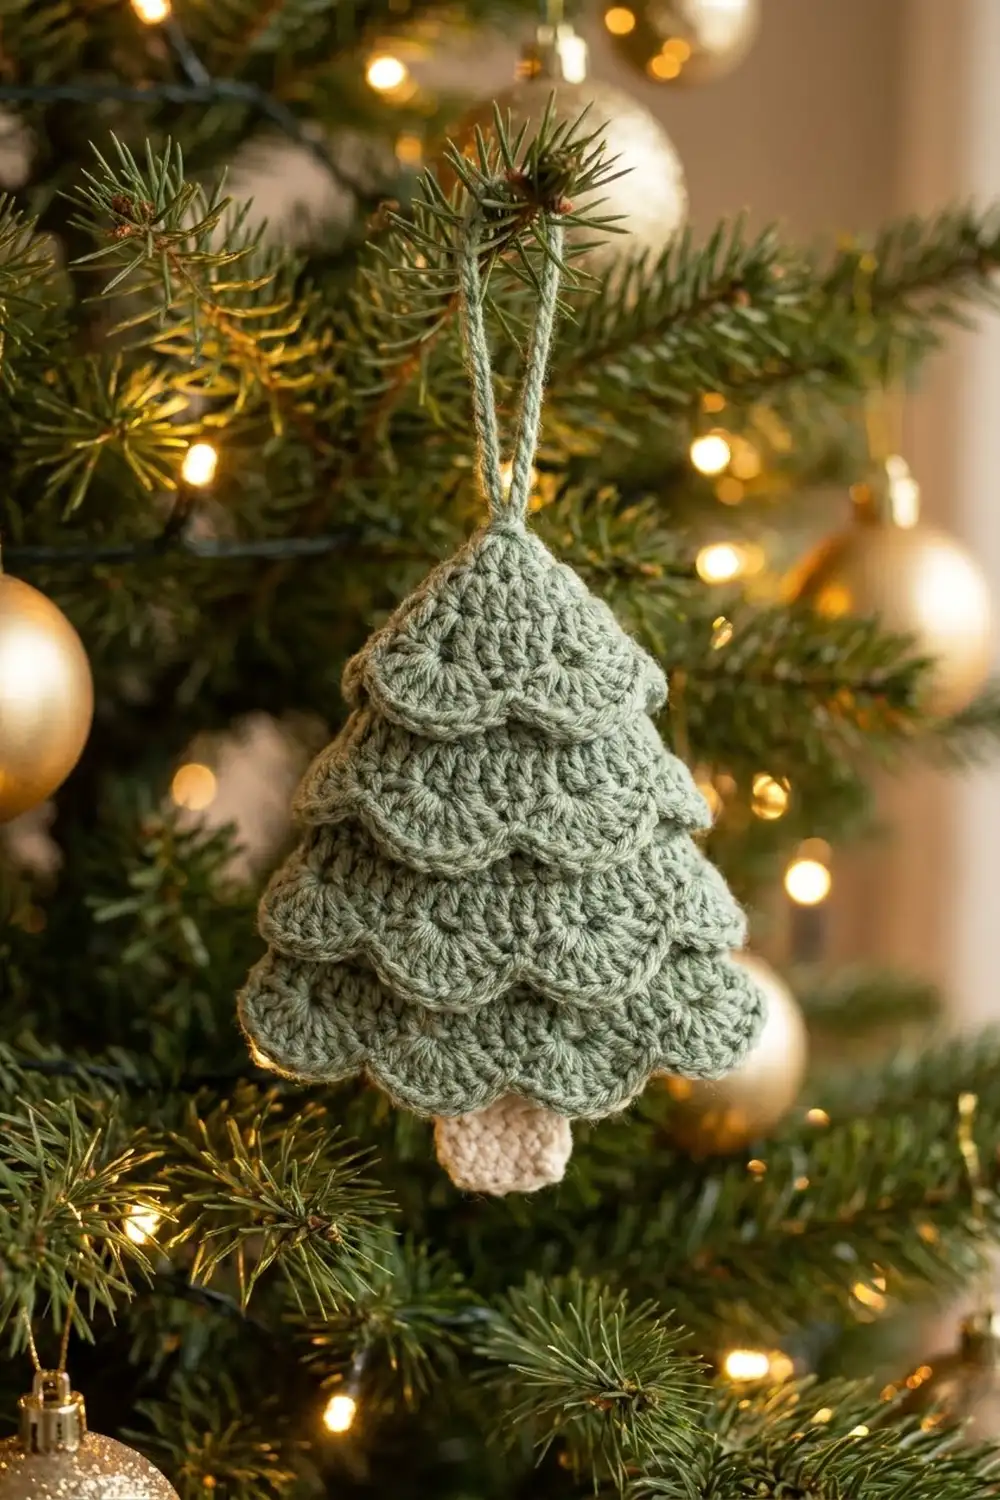
This little tree is a soft, cozy ornament made of four scalloped tiers stacked on top of each other, with a cream trunk peeking out at the bottom. Each tier ends in a row of fan-shaped shells, so the tree looks layered and full, like branches dusted with frost.
The palette is quiet and natural: a muted sage green for the tree and a warm cream for the trunk. It suits a rustic, Scandinavian, or farmhouse tree, and it also looks good tied onto a gift or hung in a window. Once you know the rhythm of the tiers, one ornament takes about an hour, so it’s easy to make a set.
This pattern uses US crochet terms. The finished ornament measures about 4.5 in (11.4 cm) wide at the bottom tier and 4.0 in (10.2 cm) tall from the tip to the bottom of the trunk, not counting the hanging loop.
The tree is worked in one piece, top down, in rows. Plain single crochet rows form a triangular body. At the end of each tier you work a shell frill into the front loops of the last row, then continue the body in the unused back loops. That way each frill hangs over the tier below it. The trunk is worked from the bottom row, and a slip-stitch edge adds the hanging loop.
Finished Size and Construction
- Finished size: 4.5 in (11.4 cm) wide x 4.0 in (10.2 cm) tall, plus a 1.5 in (3.8 cm) loop
- Skill level: Easy (advanced beginner)
- Terminology: US crochet terms
- Yarn weight: DK (light worsted, #3)
- Hook: 3.5 mm (US E-4)
- Number of pieces: 1 (one ornament, worked in one piece)
- Layout: 4 stacked tiers on a single triangular body, with the trunk below
- Body size (before frills and trunk): 4.2 in (10.7 cm) wide at the last row x 2.8 in (7.1 cm) tall
- Size before border: 4.5 in (11.4 cm) x 4.0 in (10.2 cm); the border does not change the width or height
- Border depth: 1 slip stitch along each slanted side, under 0.1 in (0.3 cm)
Materials
Choose a smooth DK cotton or cotton blend. Cotton shows the shell texture clearly and keeps the frills crisp after blocking. Avoid fuzzy or very splitty yarn, because the shells will lose their definition.
- Color A, sage green: 15 g, about 35 m (38 yd), for the body, frills, and edge
- Color B, cream: 3 g, about 7 m (8 yd), for the trunk
The meters are based on a DK cotton with about 115 m per 50 g. Both quantities include a margin of roughly 25% for your gauge check and for weaving in ends.
If you only have worsted weight yarn, the tree will come out bigger. Keep the same stitch counts and expect it to be about 5.5 in (14.0 cm) wide.
Tools:
- 3.5 mm (US E-4) crochet hook
- Tapestry needle
- 2 locking stitch markers
- Scissors
- Ruler or tape measure
- Blocking mat, rust-proof pins, and a spray bottle
Abbreviations (US Terms)
- ch – chain
- sl st – slip stitch
- sc – single crochet
- dc – double crochet
- st(s) – stitch(es)
- sk – skip
- FLO – front loop only
- RS / WS – right side / wrong side
- rep – repeat
- inc row – 2 sc in the first st, 1 sc in each st across to the last st, 2 sc in the last st (adds 2 sts)
Special stitch – Shell: 5 dc in the same stitch.
Unused loops: after you work a frill into the front loops of a row, the back loops of that row are still free. The next body row is worked into these unused loops.
Gauge and Checkpoints
Gauge: 20 sc and 20 rows = 4 in (10.2 cm). That is 5 sts and 5 rows per 1 in (2.5 cm), so each sc row adds 0.2 in (0.5 cm) of height.
Test one tier first. Work Rows 1–6 below and measure before you go on. This small section is your gauge swatch. Lay it flat without stretching. Measure the width across Row 5, and the height from the tip straight down to the top of Row 5.
Checkpoints (body only, measured flat, with the frills lifted out of the way):
- After Row 5: 9 sts wide = 1.8 in (4.6 cm); height 1.0 in (2.5 cm)
- After Row 9: 13 sts = 2.6 in (6.6 cm); height 1.6 in (4.1 cm)
- After Row 13: 17 sts = 3.4 in (8.6 cm); height 2.2 in (5.6 cm)
- After Row 17: 21 sts = 4.2 in (10.7 cm); height 2.8 in (7.1 cm)
- After the trunk: total height 4.0 in (10.2 cm)
If your tier is too big, go down one hook size, to 3.25 mm (US D-3). If it is too small, go up to 3.75 mm (US F-5). Change hooks, not stitch counts, because the shell math depends on the exact counts.
Pattern: Tree Body and Frills
Work in rows. The ch 1 at the start of a row does not count as a stitch. Each frill counts as a row, so the RS and WS labels stay consistent.
Tier 1 (top)
With Color A, ch 2.
Row 1 (WS): 3 sc in 2nd ch from hook. (3 sts)
Row 2 (RS): Ch 1, turn, inc row. (5 sts)
Row 3 (WS): Ch 1, turn, inc row. (7 sts)
Row 4 (RS): Ch 1, turn, inc row. (9 sts)
Row 5 (WS): Ch 1, turn, sc in each st across. (9 sts)
Place a marker on the RS so you can always find it.
Row 6 (RS, Frill A): Ch 1, turn. Working in FLO of Row 5: sl st in first st, *sk 1, shell in next st, sk 1, sl st in next st; rep from * across. (2 shells and 3 sl sts: 10 dc + 3 sl sts)
The shells now sit on the RS and hang down over the body. Keep the sl sts relaxed so the shells can fan out.
Tier 2
Row 7 (WS): Ch 1, turn. Working in the unused loops of Row 5, inc row. (11 sts)
Row 8 (RS): Ch 1, turn, sc in each st across. (11 sts)
Row 9 (WS): Ch 1, turn, inc row. (13 sts)
Row 10 (RS, Frill B): Ch 1, turn. Working in FLO of Row 9: sl st in first st, *sk 1, shell in next st, sk 1, sl st in next st; rep from * across. (3 shells and 4 sl sts: 15 dc + 4 sl sts)
Tier 3
Row 11 (WS): Ch 1, turn. Working in the unused loops of Row 9, inc row. (15 sts)
Row 12 (RS): Ch 1, turn, sc in each st across. (15 sts)
Row 13 (WS): Ch 1, turn, inc row. (17 sts)
Row 14 (RS, Frill C): Ch 1, turn. Working in FLO of Row 13: sl st in first st, *sk 1, shell in next st, sk 1, sl st in next st; rep from * across. (4 shells and 5 sl sts: 20 dc + 5 sl sts)
Tier 4 (bottom)
Row 15 (WS): Ch 1, turn. Working in the unused loops of Row 13, inc row. (19 sts)
Row 16 (RS): Ch 1, turn, sc in each st across. (19 sts)
Row 17 (WS): Ch 1, turn, inc row. (21 sts)
Row 18 (RS, Frill D): Ch 1, turn. Working in FLO of Row 17: sl st in first st, *sk 1, shell in next st, sk 1, sl st in next st; rep from * across. (5 shells and 6 sl sts: 25 dc + 6 sl sts)
Fasten off Color A, leaving a 4 in (10.2 cm) tail.
Why the frills fit: each shell repeat uses 4 sts (sk 1, shell, sk 1, sl st), plus 1 starting sl st. The frills are worked on 9, 13, 17, and 21 sts. Each of those counts is (4 x number of shells) + 1, so every frill starts and ends with a sl st in an edge stitch and the tiers come out symmetrical.
How the tiers overlap: the frills attach 0.6 in (1.5 cm) apart, which is 3 body rows. Each shell hangs about 0.5 in (1.3 cm), so it covers almost all of the tier below. Only a 0.1 in (0.3 cm) strip of plain sc shows under each frill.
Trunk
Turn the tree so the WS faces you, with the top of Row 17 at the top. Frill D sits in the front loops of Row 17, and the back loops are free. Find the center 5 sts (sts 9 through 13), which leaves 8 sts free on each side.
Trunk Row 1: Join Color B with a sl st in the unused loop of st 9. Ch 1, sc in the same st and in each of the next 4 sts. (5 sts)
Trunk Rows 2–6: Ch 1, turn, sc in each st across. (5 sts)
Fasten off. The trunk is 5 sts = 1.0 in (2.5 cm) wide and 6 rows = 1.2 in (3.0 cm) long. Frill D covers the top 0.5 in (1.3 cm), so about 0.7 in (1.8 cm) of cream trunk shows below the tree. Use the cream tails to close any small gap where the trunk meets the body.
Checkpoint: from the tip to the bottom of the trunk, the ornament is 2.8 in + 1.2 in = 4.0 in (10.2 cm).
Border: Slip-Stitch Side Edge and Hanging Loop
The sides of a triangle worked in rows can look a little stepped. One row of sl sts tidies them, and you add the loop in the same pass.
Border gauge: 1 sl st per sc row end. The body has 5 rows per 1 in (2.5 cm), so this matches the body exactly and the edge won’t pull in or ripple.
Row ends per side: each slanted side has 14 body row ends: Rows 1–5 (5), Rows 7–9 (3), Rows 11–13 (3), and Rows 15–17 (3). Skip the ends of the frill rows (Rows 6, 10, 14, and 18), because the shells sit in front of the edge.
Border: With the RS facing, join Color A with a sl st in the row end of Row 17 on the right-hand edge.
- Right side: sl st in each body row end up to Row 1. (14 sl sts, counting the joining sl st)
- Tip: sl st in the tip of the foundation ch, ch 20, sl st in the same tip. (1 loop of 20 ch)
- Left side: sl st in each body row end down to Row 17. (14 sl sts)
Fasten off. Total: 28 sl sts along the sides, plus the 2 sl sts at the tip and the 20-ch loop.
Why the math works: the two sides mirror each other. Every inc row adds exactly 1 st at each edge, and both edges have the same 14 body row ends, so 14 sl sts per side keeps the slopes identical. Row 1 has 3 sts and Row 17 has 21 sts. That is 18 sts gained over 9 inc rows (Rows 2, 3, 4, 7, 9, 11, 13, 15, and 17) at 2 sts each, so the counts match. The 20-ch loop hangs about 1.5 in (3.8 cm) above the tip.
Final Blocking
- Weave in all ends on the WS. Hide the green tails behind the frills and the cream tails inside the trunk.
- Lay the tree RS up on the blocking mat.
- Pin the tip. Then pin the bottom corners of Row 17 so the body is 4.2 in (10.7 cm) wide.
- Check that the height from tip to trunk is 4.0 in (10.2 cm).
- Fan out each shell with your fingers. Pin the outer dc of each end shell so the bottom tier flares to 4.5 in (11.4 cm).
- Pin the trunk straight, 1.0 in (2.5 cm) wide.
- Mist the piece until it is damp but not soaked.
- Let it dry completely, about 6 to 8 hours, before you take out the pins.
Final Quality-Control Checklist
- From top to bottom, the frills have 2, 3, 4, and 5 shells.
- Every frill starts and ends with a sl st in an edge stitch.
- All four frills are on the same side (the RS).
- The body is 21 sts, 4.2 in (10.7 cm), wide at Row 17.
- Total height is 4.0 in (10.2 cm), not counting the loop.
- The trunk is centered, with 8 free sts on each side.
- About 0.7 in (1.8 cm) of trunk shows below Frill D.
- Each side edge has 14 sl sts, and the two edges match.
- The loop is secure and about 1.5 in (3.8 cm) tall.
- No ends show on the front.
Troubleshooting
A frill is on the back of the tree. You worked it from the WS. Every frill row is an RS row. Check your marker, rip back to the end of the last WS row, and work the frill again.
A frill doesn’t end with a sl st. The row below has the wrong count. Rip back and recount; you need 9, 13, 17, or 21 sts.
The frills cup or ruffle too much. Your dc tension is different from your sc tension. Go down half a hook size for the frill rows only, or relax your yarn-overs.
There are big gaps between the tiers. Your rows are too tall. Check your row gauge and go down a hook size if needed.
The sides are uneven. You missed an increase. Compare your stitch counts with the checkpoints and fix the row.
The tip is lumpy. Pull the starting tail snug before you work Row 2, then weave it in toward the WS.
The trunk is off-center. Count again from both edges of Row 17. There should be 8 free sts on each side.
The loop twists. Block it flat, or work the chain with a slightly larger hook.
Care
Hand wash in cool water with mild soap, gently squeeze out the water, and dry flat, reshaping the shells. Store the ornament flat or hanging so the frills don’t get crushed.
Final Notes
The whole ornament depends on one chain of measurements. A gauge of 5 sts and 5 rows per 1 in (2.5 cm) gives a top tier 9 sts, or 1.8 in (4.6 cm), wide. Each tier adds 4 sts and 0.6 in (1.5 cm), until the body is 21 sts, 4.2 in (10.7 cm) wide and 2.8 in (7.1 cm) tall. The 1.2 in (3.0 cm) trunk brings the height to 4.0 in (10.2 cm), and the bottom frill flares to 4.5 in (11.4 cm). Check these numbers as you go, and your tree will come out right from the first tier to the last stitch.
Make one for your own tree, then a few more to use as gift toppers.
Happy crocheting!