

The Lavender Frost Lace Tree is a Christmas tree ornament with three tiers of openwork lace triangles. A small lavender triangle sits on top, a white triangle forms the middle tier, and a wide lavender triangle makes the bottom. A small tan trunk peeks out underneath, and a white chain loop at the tip lets it hang from a branch.
Each tier has a small open ring set low at its center. Double crochet spokes and groups of double crochet, separated by small chain spaces, radiate out from the ring. Tiny shell scallops run along the bottom of every tier, and a neat single crochet edge finishes the two slanted sides. The look is light, lacy and a little vintage.
This pattern uses US crochet terms. The finished ornament measures 5.25 in (13.3 cm) wide and 5.5 in (14.0 cm) tall from tip to trunk. It is 6.75 in (17.1 cm) tall including the hanging loop.
Each tier is worked in rows from a magic ring as a half-granny triangle, so the apex forms naturally at the center of every row. Each tier gets a scalloped border. Then the tiers are stacked with a small overlap and sewn together. The trunk is a small single crochet rectangle sewn behind the bottom tier.
Finished Size and Construction
- Finished size: 5.25 in (13.3 cm) wide x 5.5 in (14.0 cm) tall; 6.75 in (17.1 cm) with loop
- Skill level: Easy
- Terminology: US crochet terms
- Yarn weight: Sport weight (#2) cotton
- Hook: 2.75 mm (C-2)
- Number of pieces: 4 (3 lace tiers + 1 trunk), plus a hanging loop worked onto the top tier
- Layout: 1 column, stacked vertically: small tier, medium tier, large tier, trunk
- Piece sizes (bordered): top 2.25 x 1.25 in (5.7 x 3.2 cm); middle 3.25 x 1.75 in (8.3 x 4.4 cm); bottom 5.25 x 2.75 in (13.3 x 7.0 cm); trunk 1 x 1 in (2.5 x 2.5 cm)
- Size before border: top 2 x 1 in (5.1 x 2.5 cm); middle 3 x 1.5 in (7.6 x 3.8 cm); bottom 5 x 2.5 in (12.7 x 6.4 cm)
- Border depth: 0.25 in (0.6 cm) at the base scallops; about 0.125 in (0.3 cm) along the slanted sides
Materials
Choose a smooth, mercerized sport weight cotton with about 330 m per 100 g. Cotton holds the lace open and blocks crisply.
- Lavender: 10 g (33 m), for the top and bottom tiers
- White: 4 g (13 m), for the middle tier and the hanging loop
- Tan: 2 g (7 m), for the trunk
These quantities include a margin of about 25 percent for gauge testing and weaving in.
Tools:
- 2.75 mm (C-2) crochet hook
- Tapestry needle
- Scissors
- Blocking board or foam mat
- Rust-proof pins
- Spray bottle with water
- Optional: fabric stiffener
Abbreviations (US Terms)
- ch – chain
- sl st – slip stitch
- sc – single crochet
- hdc – half double crochet (troubleshooting option only)
- dc – double crochet
- sp(s) – space(s)
- st(s) – stitch(es)
- MR – magic ring
- tch – turning chain
- RS / WS – right side / wrong side
Special stitches:
- Group: 3 dc worked into the same space.
- Scallop: (sc, 3 dc, sc) worked into the same row-end or space. One scallop = 5 sts.
Gauge and Checkpoints
Make the top tier first and use it as your test piece. It is small and fast, and it tells you everything you need to know.
Body gauge: Rows 1–2 of the half-granny triangle = 2 in (5.1 cm) wide along the base x 1 in (2.5 cm) tall from the base center to the apex. Each additional row adds 1 in (2.5 cm) to the base width and 0.5 in (1.3 cm) to the height.
Trunk gauge: 6 sc x 7 rows = 1 x 1 in (2.5 x 2.5 cm).
Checkpoints:
- After Row 2: 2 x 1 in (5.1 x 2.5 cm)
- After Row 3: 3 x 1.5 in (7.6 x 3.8 cm)
- After Row 5: 5 x 2.5 in (12.7 x 6.4 cm)
- After the border: add 0.25 in (0.6 cm) to both the width and the height
The apex is a right angle, so the width should always be exactly twice the height. If your triangle is too big, go down to a 2.5 mm hook. If it is too small, go up to a 3 mm hook. If the width is right but the height is short, pull each dc loop up a little taller instead of changing hooks.
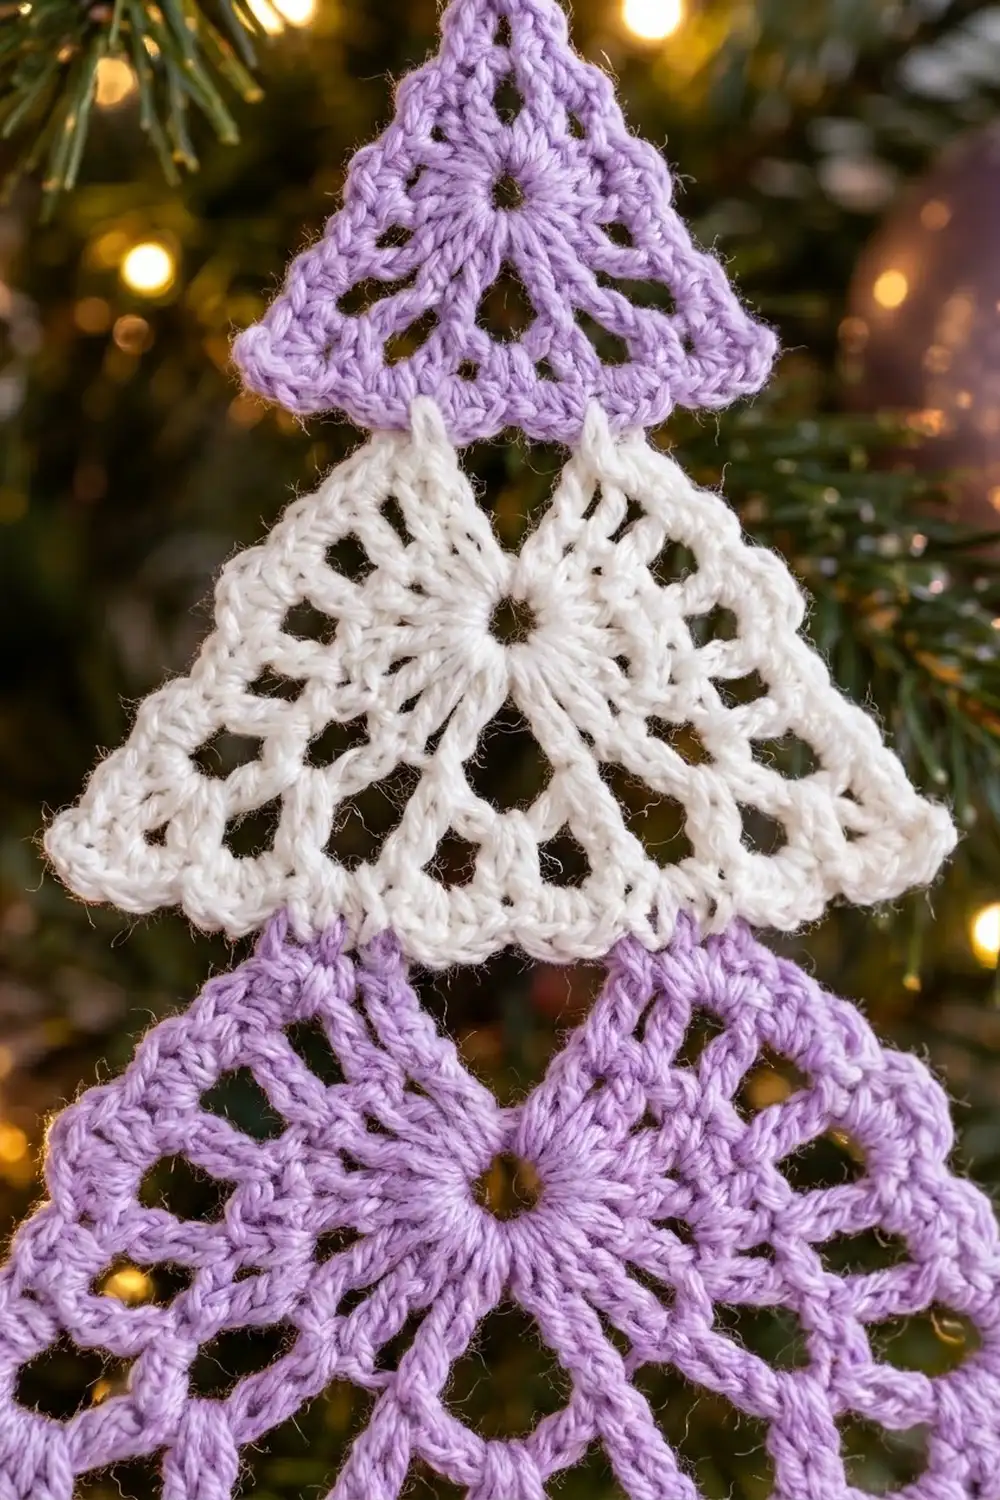
Lace Tier (Half-Granny Triangle)
All three tiers use the same instructions. Only the number of rows changes:
- Top tier: lavender, work Rows 1–2
- Middle tier: white, work Rows 1–3
- Bottom tier: lavender, work Rows 1–5
The magic ring sits at the center of the base, and you turn at the end of every row. The two halves of each row form the two slanted sides. The ch-3 space at the middle of each row becomes the apex.
Row 1 (RS): MR. Ch 4 (counts as dc + ch 1), 3 dc in ring, ch 3, 3 dc in ring, ch 1, dc in ring. Pull the ring closed until only a small hole about 0.125 in (0.3 cm) across remains.
Count: 8 dc (2 groups + 2 edge dc), 2 ch-1 sps, 1 ch-3 apex sp.
These 8 dc are the spokes that radiate from the ring.
Row 2 (WS): Ch 4 (counts as dc + ch 1), turn. 3 dc in first ch-1 sp, ch 1, (3 dc, ch 3, 3 dc) in apex sp, ch 1, 3 dc in tch sp, ch 1, dc in 3rd ch of tch.
Count: 14 dc (4 groups + 2 edge dc), 4 ch-1 sps, 1 apex sp.
Row 3: Ch 4 (counts as dc + ch 1), turn. 3 dc in first ch-1 sp, ch 1, 3 dc in next ch-1 sp, ch 1, (3 dc, ch 3, 3 dc) in apex sp, [ch 1, 3 dc in next ch-1 sp] 2 times (the last group goes into the tch sp), ch 1, dc in 3rd ch of tch.
Count: 20 dc (6 groups + 2 edge dc), 6 ch-1 sps, 1 apex sp.
Rows 4–5: Ch 4 (counts as dc + ch 1), turn. Work 3 dc in each ch-1 sp up to the apex, with ch 1 between groups. Ch 1, (3 dc, ch 3, 3 dc) in apex sp. [Ch 1, 3 dc in next ch-1 sp] across, ending in the tch sp. Ch 1, dc in 3rd ch of tch.
Row 4 count: 26 dc (8 groups + 2 edge dc), 8 ch-1 sps, 1 apex sp.
Row 5 count: 32 dc (10 groups + 2 edge dc), 10 ch-1 sps, 1 apex sp.
The rule behind the counts: Row n has 2n groups, 6n + 2 dc in total and 2n ch-1 sps. Each half holds n groups, and each new row adds one group to each half.
Do not fasten off. Work the Border directly from the last row.
Hanging Loop (top tier only)
After you finish the top tier’s border, join white with a sl st in the apex ch-2 sp. Ch 15, then sl st in the same sp. Fasten off. The loop hangs about 1.25 in (3.2 cm) above the tip.
Trunk
With tan, ch 7.
Row 1: Sc in 2nd ch from hook and in each ch across. (6 sc)
Rows 2–7: Ch 1, turn, sc in each st across. (6 sc)
Fasten off, leaving a 10 in (25.4 cm) tail. The trunk measures 1 x 1 in (2.5 x 2.5 cm) and has a firm little grid texture.
Make All Pieces
For one ornament, make:
- Lavender: 1 top tier (2 rows) and 1 bottom tier (5 rows), both bordered
- White: 1 middle tier (3 rows), bordered, plus the hanging loop
- Tan: 1 trunk
Work the border on every tier before joining. Layout, top to bottom:
          [ white loop ]
         [  TOP TIER   ]      lavender, 2 rows
       [   MIDDLE TIER   ]    white, 3 rows
    [     BOTTOM TIER       ] lavender, 5 rows
           [ TRUNK ]          tan, 6 sc x 7 rows
Center every piece on one vertical line that runs through each ring and each apex.
Joining
Method: Overlap and sew. Each upper tier sits in front of the tier below it and covers its tip. Sew with the upper tier’s color so the stitches hide in the lace.
Overlap: 0.5 in (1.3 cm). The base of the upper tier lies 0.5 in (1.3 cm) below the apex of the lower tier.
Stitch-to-stitch logic:
- Lay the middle tier RS up. Place the top tier on it, with the top tier’s ring directly above the middle tier’s apex.
- Slide the top tier down until the middle tier’s apex ch-2 sp sits behind the top tier’s ring. Tack the ch-2 sp to the back of the ring with 2 small stitches.
- The sides slope at 45 degrees, so the lower tier is 1 in (2.5 cm) wide at 0.5 in (1.3 cm) below its apex. The upper tier’s base line crosses each slanted side of the lower tier at about the 5th side sc down from the apex. Count the apex sc as the 1st.
- Tack each crossing point to the nearest scallop sc on the upper tier.
- Backstitch through both layers along the upper tier’s base line, just above the scallops, between the two crossing points. Leave the scallops free.
- Repeat Steps 1–5 to join the middle tier to the bottom tier.
- Center the trunk behind the bottom tier’s ring scallop, with its top 2 rows hidden (about 0.25 in, or 0.6 cm). Whipstitch the 6 sc of the trunk’s last row to the back of the bottom tier’s Rows 1–2.
Tension: Keep your sewing stitches snug but not tight. If they pull, the upper base line puckers and the scallops tilt backward.
Size checkpoint: The tier heights add up to 1.25 + 1.75 + 2.75 in (3.2 + 4.4 + 7.0 cm). Subtract two 0.5 in (1.3 cm) overlaps to get 4.75 in (12.1 cm). Add 0.75 in (1.9 cm) of visible trunk for a total of 5.5 in (14.0 cm). The width matches the bottom tier: 5.25 in (13.3 cm).
Border
Work this border on each tier right after its last body row, before joining.
Border gauge: One scallop per row-end along the base, about 2 scallops per 1 in (2.5 cm). Along the slanted sides, work 1 sc in each dc and each ch-1 sp.
At the end of the last row, your hook is at a base corner. Do not turn.
Border Round: Ch 1. Rotate the piece to work along the base.
- Base: Work 1 scallop in each row-end down to the ring. Work 1 scallop around the lower edge of the ring by inserting the hook under the ring strands between the two Row 1 edge stitches. Then work 1 scallop in each row-end on the other half, up to the opposite corner.
- First slanted side: Sc in 3rd ch of the corner tch (or in the corner dc). Sc in each ch-1 sp and each dc up to the apex. Work (sc, ch 2, sc) in the apex ch-3 sp.
- Second slanted side: Sc in each dc and each ch-1 sp down to the corner, then sc in the corner edge st.
- Sl st to the first sc of the first scallop. Fasten off and weave in ends.
Counts per tier (n = number of body rows):
| Tier | Base scallops | Base sts | Each slanted side | Total sts |
|---|---|---|---|---|
| Top (n = 2) | 5 | 25 | 10 sc | 45 + ch-2 |
| Middle (n = 3) | 7 | 35 | 14 sc | 63 + ch-2 |
| Bottom (n = 5) | 11 | 55 | 22 sc | 99 + ch-2 |
Why the math works:
- Base: Each half has n row-ends, so the base has 2n row-ends plus the ring, for 2n + 1 scallops. That number is always odd, so the ring scallop sits exactly in the center.
- Sides: Each half of the last row holds 1 edge dc, n ch-1 sps and n groups (3n dc), which takes 4n + 1 sc. Each side also owns 1 of the 2 apex sc, for a total of 4n + 2. Each apex sc is counted only once.
- One sc per dc and per ch-1 sp matches the natural width of the lace, so the sides lie flat without ruffling or cupping.
Final Blocking
- Weave in all ends, leaving 0.5 in (1.3 cm) tails until the ornament is dry.
- Mist the ornament until it is damp but not dripping.
- Lay it RS up on the blocking board.
- Pin the bottom tier’s corners 5.25 in (13.3 cm) apart, then pin its apex.
- Pin each scallop so the scallops fan out evenly.
- Pin the middle and top tiers, keeping every ring and apex on the center line.
- Check the full height: 5.5 in (14.0 cm) without the loop.
- Optional: brush on stiffener so the lace stays crisp on the tree.
- Let it dry completely, then unpin and trim the tails.
Final Quality-Control Checklist
- [ ] Top tier is 2.25 x 1.25 in (5.7 x 3.2 cm)
- [ ] Middle tier is 3.25 x 1.75 in (8.3 x 4.4 cm)
- [ ] Bottom tier is 5.25 x 2.75 in (13.3 x 7.0 cm)
- [ ] Each tier has an odd number of scallops, with the ring scallop centered
- [ ] Rings are pulled tight, with no loose tail showing
- [ ] Overlaps are 0.5 in (1.3 cm), and the scallops hang free
- [ ] 0.75 in (1.9 cm) of trunk shows below the bottom tier
- [ ] Hanging loop is secure and about 1.25 in (3.2 cm) long
- [ ] Total height is 5.5 in (14.0 cm), or 6.75 in (17.1 cm) with the loop
Troubleshooting
The triangle curls. The apex is too tight. Work a full ch 3 at every apex, and never skip the ch 1 between groups.
The apex is off-center. You missed a ch-1 sp on one side. Row n must have n groups on each half.
The scallops ruffle. Work them more loosely, or replace the middle dc of each scallop with an hdc.
The slanted sides wave. You added extra sc. Check that each side has 10, 14 or 22 sc.
The ring hole is too big. Pull the magic ring tail tighter, then secure it with 2 backstitches.
The tiers tilt. Before sewing, check that each upper ring sits directly above the lower apex.
Care
Hand wash in cool water with mild soap, roll in a towel and lay flat to dry. If you used stiffener, spot clean only and store the ornament flat in tissue paper.
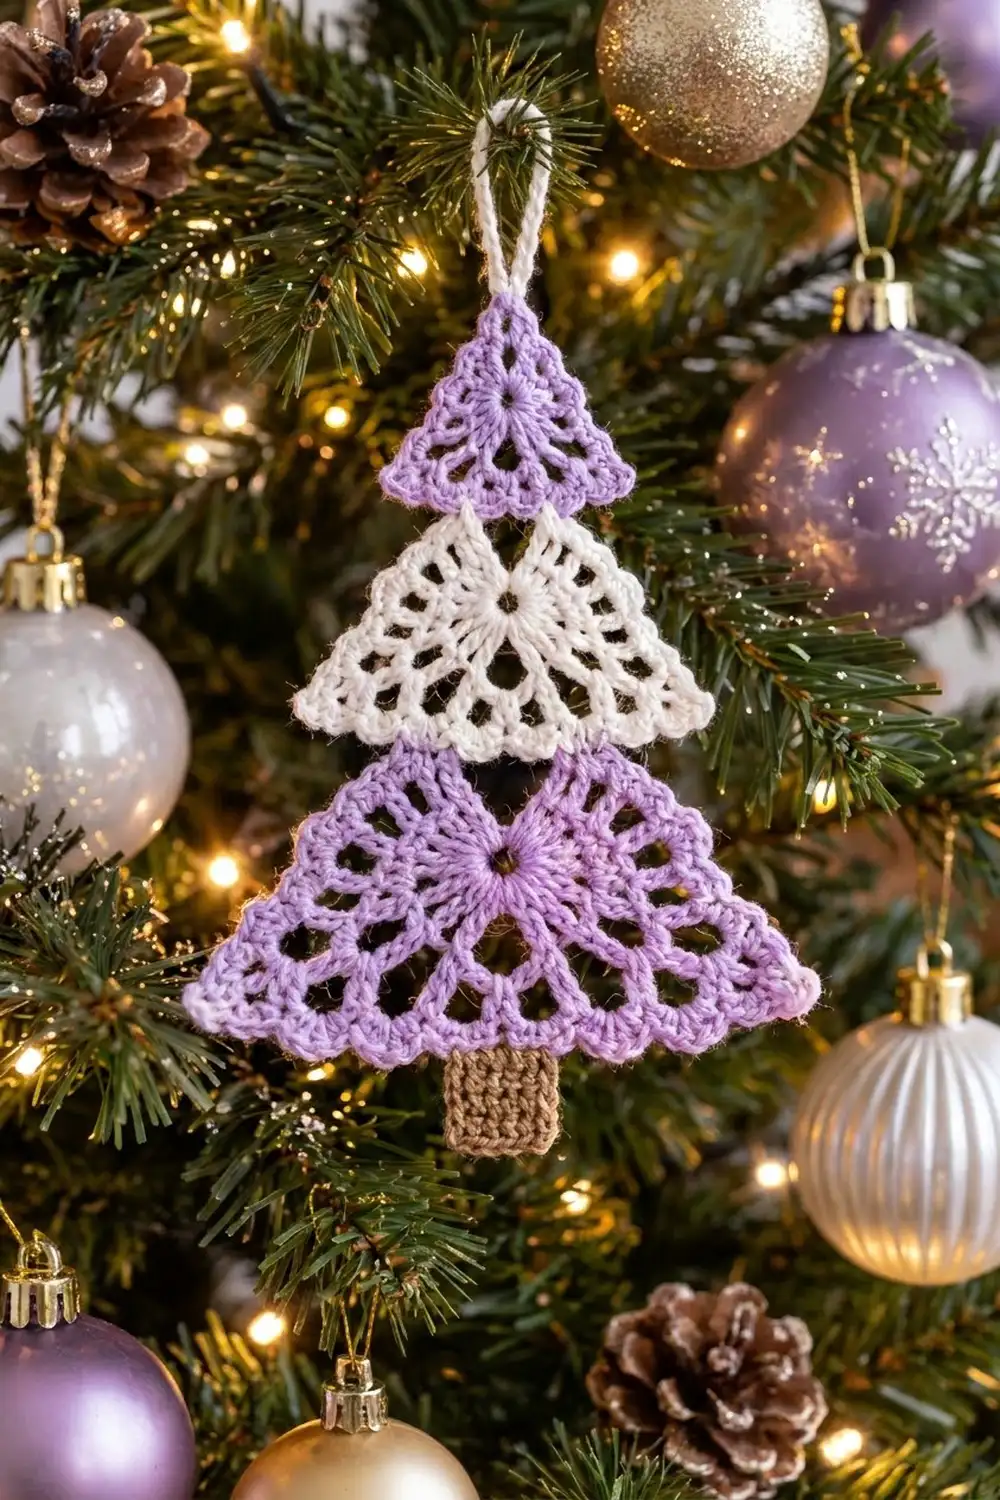
Final Notes
Every size in this ornament comes from one chain of measurements. Your gauge sets each body at 1 in (2.5 cm) of base width per row. Two, three and five rows give bodies 2, 3 and 5 in (5.1, 7.6 and 12.7 cm) wide. The border adds 0.25 in (0.6 cm), so the tiers are 2.25, 3.25 and 5.25 in (5.7, 8.3 and 13.3 cm) wide. Stacked with 0.5 in (1.3 cm) overlaps and finished with the trunk, the tree is 5.5 in (14.0 cm) tall. Check each step, and the finished ornament will match.
Happy crocheting!