

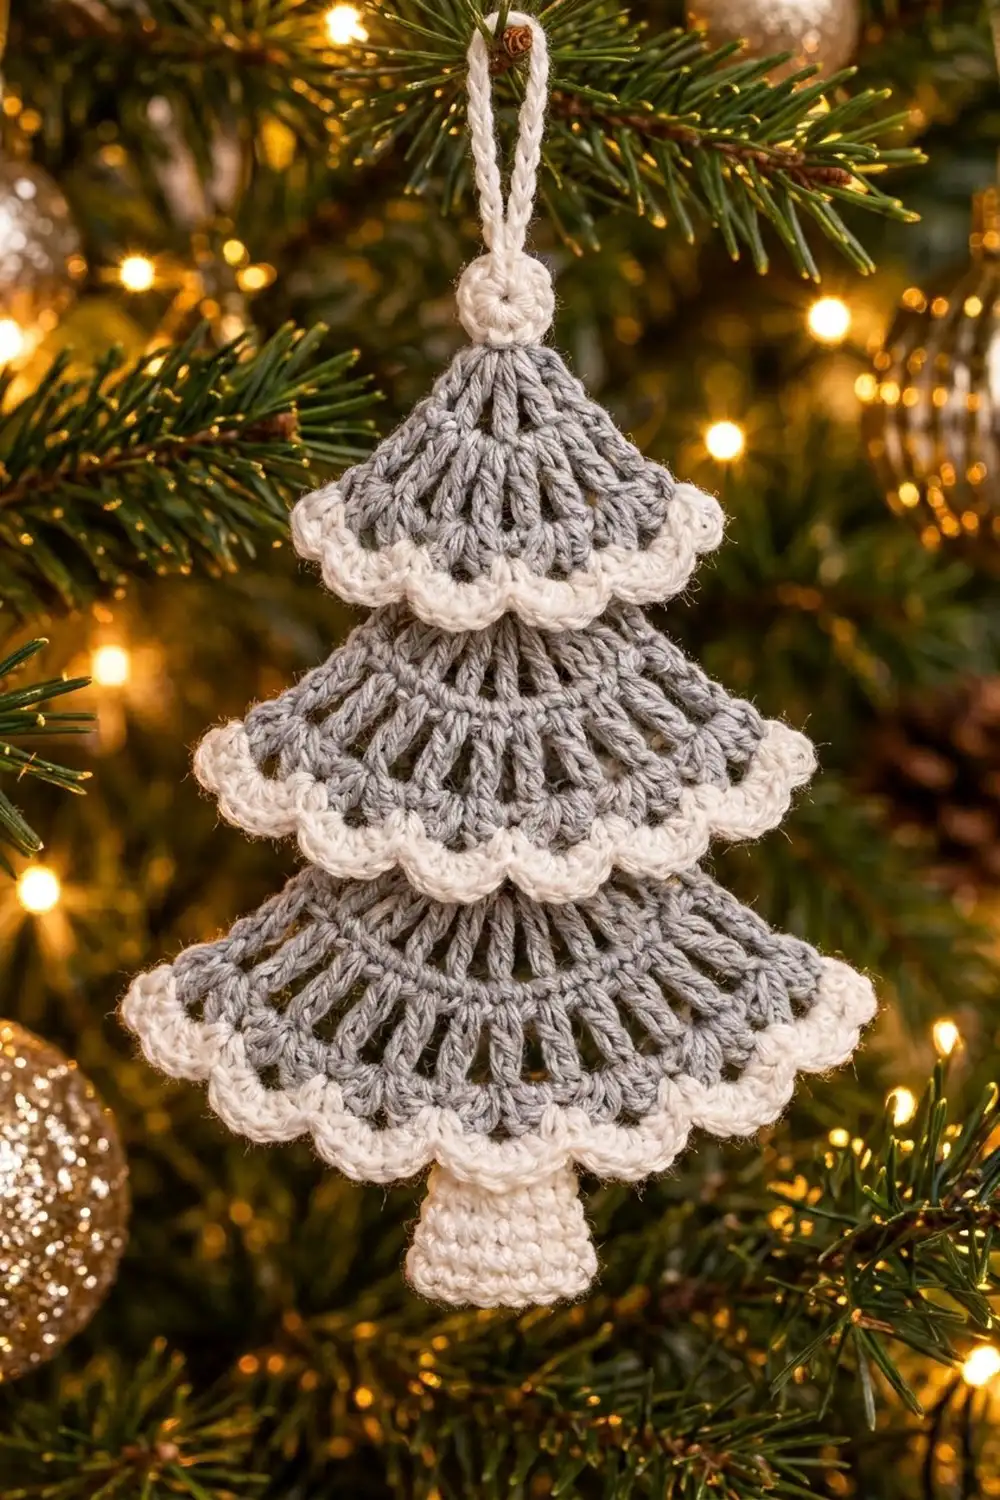
This little tree ornament is made from three lacy fans in soft dove gray, stacked on top of each other. Each fan has a crisp cream scalloped edge. A small cream ring sits at the top with a cream hanging loop, and a short cream trunk shows below the bottom tier. The tree looks like frosted branches dusted with snow.
The colors are kept quiet: one gray and one cream. Open treble “spokes” make each tier light and airy, and the solid scallops give every layer a clean frame. The look is plain and Scandinavian, so it goes well with gold, silver or natural wood decorations.
The pattern uses US crochet terms. The finished ornament is about 3.75 in (9.5 cm) wide and 5 in (12.7 cm) tall. The hanging loop adds about 2 in (5.1 cm).
Construction is simple. You crochet three fan-shaped tiers flat in rows, starting from a magic ring, and add a cream scallop edging to each one. Then you make a trunk and a top ring. Finally, you stack the parts with a generous overlap and tack them together into one ornament.
Finished Size and Construction
- Finished size: 3.75 in (9.5 cm) wide x 5 in (12.7 cm) tall, plus a 2 in (5.1 cm) loop
- Skill level: Easy-intermediate
- Terminology: US crochet terms
- Yarn weight: Sport weight (#2) cotton or cotton blend
- Hook: 2.5 mm (US B/1 or C/2)
- Number of pieces: 5 (three tiers, one trunk, one top ring with loop)
- Layout: Tiers stacked vertically with the smallest on top and the center spokes lined up
- Tier sizes before edging: Tier 1 is about 1.75 in (4.4 cm) wide x 1 in (2.5 cm) deep. Tier 2 is about 2.75 in (7.0 cm) wide x 1.5 in (3.8 cm) deep. Tier 3 is about 3.25 in (8.3 cm) wide x 1.5 in (3.8 cm) deep.
- Edging (border) depth: 0.25 in (0.6 cm) on each tier
- Tier widths after edging: Tier 1 is 2.25 in (5.7 cm), Tier 2 is 3.25 in (8.3 cm) and Tier 3 is 3.75 in (9.5 cm)
Materials
Choose a smooth, tightly plied mercerized cotton. It shows the open spokes and scallops clearly and blocks crisply. Avoid fuzzy or very soft acrylic, because it blurs the lace.
- Color A, dove gray: 8 g, about 25 m
- Color B, cream: 6 g, about 19 m
- 2.5 mm crochet hook
- Tapestry needle
- Scissors
- Stitch marker
- Rust-proof pins and a foam blocking mat
- Spray bottle with water
- Optional: spray starch for a stiffer ornament
These amounts include about 20 percent extra for swatching and tails.
Abbreviations (US Terms)
- ch: chain
- sl st: slip stitch
- sc: single crochet
- dc: double crochet
- tr: treble crochet
- sp: space
- st(s): stitch(es)
- tch: turning chain
- MR: magic ring
Special stitch: Scallop. Work 5 dc in the same stitch. Each scallop sits between two sc anchors and uses 4 stitches of the row below: skip 1, scallop in the next, skip 1, sc in the next.
Gauge and Checkpoints
Gauge: 7 sc and 8 sc rows = 1 in (2.5 cm). One dc row is about 0.4 in (1.0 cm) tall, and one tr row is about 0.55 in (1.4 cm) tall.
Make Tier 1 first and use it as your test piece. It only takes a few minutes and tells you everything you need to know.
Checkpoints:
- Tier 1 after Row 3 (gray): about 1.75 in (4.4 cm) wide across the lower edge, and 1 in (2.5 cm) from the ring center to the edge
- Tier 1 after edging: 2.25 in (5.7 cm) wide and 1.25 in (3.2 cm) deep
- Tier 3 after edging: 3.75 in (9.5 cm) wide and 1.75 in (4.4 cm) deep
- Trunk: 0.75 in (1.9 cm) wide, flaring to 1 in (2.5 cm), and 1.25 in (3.2 cm) long
If Tier 1 is more than 0.25 in (0.6 cm) too wide, change to a 2.25 mm hook. If it is too small, change to a 2.75 mm hook. Don’t change the stitch counts, because every edging depends on them.

Tier 1 (Top Tier)
With Color A.
Row 1: MR, ch 3 (counts as dc), 8 dc in ring. Pull the ring closed, leaving a small center hole. Turn. (9 dc)
Row 2: Ch 4 (counts as dc + ch 1), [dc in next dc, ch 1] 7 times, dc in top of tch. Turn. (9 dc, 8 ch-1 sps = 17 sts)
Row 3: Ch 1, sc in first dc, [sc in next ch-1 sp, sc in next dc] 8 times, working the last sc in the 3rd ch of the tch. (17 sc)
Fasten off, leaving a 6 in (15.2 cm) tail. You now have a fan with 9 spokes.
Edging Row (Color B): With the right side facing, join Color B with a sl st in the first sc. Ch 1, sc in same st, [skip 1 sc, 5 dc in next sc, skip 1 sc, sc in next sc] 4 times. (4 scallops; 5 sc + 20 dc = 25 sts)
Fasten off, leaving an 8 in (20.3 cm) tail for sewing.
Tier 2 (Middle Tier)
With Color A.
Row 1: MR, ch 3 (counts as dc), 6 dc in ring. Close the ring. Turn. (7 dc)
Row 2: Ch 3 (counts as dc), dc in same st, 2 dc in each of next 5 dc, dc in top of tch. Turn. (2 + 10 + 1 = 13 dc)
Row 3: Ch 5 (counts as tr + ch 1), [tr in next dc, ch 1] 11 times, tr in top of tch. Turn. (13 tr, 12 ch-1 sps = 25 sts)
Row 4: Ch 1, sc in first tr, [sc in next ch-1 sp, sc in next tr] 12 times, working the last sc in the 4th ch of the tch. (25 sc)
Fasten off. The fan now has 13 long spokes.
Edging Row (Color B): Join Color B in the first sc. Ch 1, sc in same st, [skip 1, 5 dc in next, skip 1, sc in next] 6 times. (6 scallops; 7 sc + 30 dc = 37 sts)
Fasten off, leaving an 8 in (20.3 cm) tail.
Tier 3 (Bottom Tier)
With Color A.
Row 1: MR, ch 3 (counts as dc), 8 dc in ring. Close the ring. Turn. (9 dc)
Row 2: Ch 3 (counts as dc), dc in same st, 2 dc in each of next 7 dc, dc in top of tch. Turn. (2 + 14 + 1 = 17 dc)
Row 3: Ch 5 (counts as tr + ch 1), [tr in next dc, ch 1] 15 times, tr in top of tch. Turn. (17 tr, 16 ch-1 sps = 33 sts)
Row 4: Ch 1, sc in first tr, [sc in next ch-1 sp, sc in next tr] 16 times, working the last sc in the 4th ch of the tch. (33 sc)
Fasten off. The fan has 17 spokes and forms roughly a half circle.
Edging Row (Color B): Join Color B in the first sc. Ch 1, sc in same st, [skip 1, 5 dc in next, skip 1, sc in next] 8 times. (8 scallops; 9 sc + 40 dc = 49 sts)
Fasten off, leaving an 8 in (20.3 cm) tail.
Trunk
With Color B.
Row 1: Ch 6, sc in 2nd ch from hook and in each ch across. Turn. (5 sc)
Rows 2-9: Ch 1, sc in each st across. Turn. (5 sc)
Row 10 (flare): Ch 1, 2 sc in first st, sc in next 3 sts, 2 sc in last st. (7 sc: 5 worked one per stitch + 2 added)
Fasten off, leaving an 8 in (20.3 cm) tail. The trunk is 0.75 in (1.9 cm) wide, flares to 1 in (2.5 cm) at the base and is 1.25 in (3.2 cm) long.
Top Ring and Hanging Loop
With Color B.
Round 1: MR, ch 1, 10 sc in ring, sl st to first sc. Pull the ring fully closed. (10 sc)
The ring is about 0.5 in (1.3 cm) across.
Loop: Ch 30, sl st into the same sc. Fasten off, leaving an 8 in (20.3 cm) tail. The loop hangs about 2 in (5.1 cm) above the ring.
Make All Pieces
Before assembly, check that you have:
- Color A + Color B: 1 Tier 1 (4 scallops), 1 Tier 2 (6 scallops) and 1 Tier 3 (8 scallops)
- Color B only: 1 trunk and 1 top ring with loop
Layout from top to bottom. Each tier overlaps the one below it:
          [ loop ]
          ( ring )
       [  Tier 1  ]      4 scallops, 9 spokes
     [    Tier 2    ]    6 scallops, 13 spokes
   [      Tier 3      ]  8 scallops, 17 spokes
          | trunk |
Joining
Lightly block each tier flat before joining (see Final Blocking). Flat pieces are much easier to line up.
Alignment logic: Every tier has an odd number of spokes, so each one has a single center spoke. In Tier 1 it is spoke 5 of 9, in Tier 2 spoke 7 of 13 and in Tier 3 spoke 9 of 17. Mark each center spoke and keep all three on one vertical line.
Vertical placement, measured from the top of the ring:
- Ring: from 0 to 0.5 in (0 to 1.3 cm).
- Tier 1: tuck its magic ring 0.1 in (0.3 cm) behind the top ring. Its scallop edge lands at about 1.65 in (4.2 cm).
- Tier 2: place it behind Tier 1 so its scallop edge sits 1.25 in (3.2 cm) below the edge of Tier 1, at about 2.9 in (7.4 cm). Its magic ring is hidden behind Tier 1.
- Tier 3: place it behind Tier 2 so its scallop edge sits another 1.25 in (3.2 cm) lower, at about 4.15 in (10.5 cm). Its magic ring is hidden behind Tier 2.
- Trunk: tuck the top 0.4 in (1.0 cm) behind Tier 3, so 0.85 in (2.2 cm) shows below it.
Stitching: Work from the back using matching tails. For each lower tier, tack its magic ring and Row 1 to the back of the Row 2 spokes of the tier above. Use 3 to 4 small stitches through the center spoke and the spokes next to it. Sew the top of the trunk to the spokes of Tier 3 the same way. Sew the ring to the top of Tier 1 with Color B.
Tension: Pull each stitch just snug. Tacking that is too tight puckers the spokes and pulls the scallops out of line.
Size checkpoint: The assembled ornament should be 5 in (12.7 cm) tall from the top of the ring to the base of the trunk, and 3.75 in (9.5 cm) wide across Tier 3.
Border (Scallop Edging)
The cream scallop edging on each tier is the border. You work it once per tier, in a single row, as given above.
Border gauge: One scallop uses 4 sc of the gray edge, so at 7 sc per inch it spans about 0.57 in (1.4 cm). The edging adds 0.25 in (0.6 cm) of depth.
Counts per tier:
- Tier 1: starts with 17 sc; 4 scallops; 5 sc + 20 dc = 25 sts
- Tier 2: starts with 25 sc; 6 scallops; 7 sc + 30 dc = 37 sts
- Tier 3: starts with 33 sc; 8 scallops; 9 sc + 40 dc = 49 sts
Why the math works: The scallop repeat is 4 stitches, plus 1 stitch for the opening sc. So the gray row must have a multiple of 4, plus 1. Each gray row is built from spokes and gaps: N spokes + (N – 1) gaps = 2N – 1 sc. With 9, 13 and 17 spokes you get 17, 25 and 33 sc. Those equal 4 x 4 + 1, 4 x 6 + 1 and 4 x 8 + 1. Every edging starts and ends on an sc, so both sides of each tier finish evenly.
Final Blocking
- Mist the finished ornament until it is damp, not soaked.
- Lay it face up on the blocking mat.
- Pin the ring and the trunk base first, and check that the total height is 5 in (12.7 cm).
- Pin the center scallop of each tier on the vertical center line.
- Pin the outer scallops of Tier 3 so they are 3.75 in (9.5 cm) apart.
- Pin each scallop tip, easing the dc into round, even arcs.
- Gently straighten the spokes so they fan out evenly.
- Apply spray starch if you want a firmer ornament.
- Let it dry completely before you remove the pins, usually 4 to 6 hours.
Final Quality-Control Checklist
- Tier 1 has 9 spokes and 4 scallops
- Tier 2 has 13 spokes and 6 scallops
- Tier 3 has 17 spokes and 8 scallops
- All center spokes line up vertically
- No magic ring shows from the front
- The trunk shows 0.85 in (2.2 cm) below Tier 3
- The ornament is 3.75 in (9.5 cm) wide and 5 in (12.7 cm) tall
- The hanging loop is centered and firmly attached
- All tails are woven in on the back
Troubleshooting
Tier ruffles or waves: Your trebles are too loose or your hook is too large. Go down a hook size and check Tier 1 again.
Tier cups and won’t lie flat: Your tension is too tight, especially in Row 1. Crochet more loosely or go up a hook size.
Scallops don’t end on an sc: The gray row count is wrong. Recount the sc row (17, 25 or 33) before you add the edging.
Magic ring shows a hole: Pull the tail tighter and weave it through Row 1 once more.
Tree leans: The center spokes are out of line. Unpick the tacking and line them up again.
Loop twists: Block it straight, or redo the ch 30 a little more loosely.
Care
Hand wash in cool water with mild soap, press the water out in a towel and dry flat. Re-block and re-starch as needed.
Final Notes
The measurements build on each other in a simple chain. Tier 1 should be 1.75 in (4.4 cm) wide before edging and 2.25 in (5.7 cm) after. Tier 2 grows to 3.25 in (8.3 cm), and Tier 3 to 3.75 in (9.5 cm). When you stack the tiers 1.25 in (3.2 cm) apart, with the ring above and the trunk below, you get a 5 in (12.7 cm) tree. Check Tier 1 first and keep each gray edge at a multiple of 4 plus 1, and the rest will fall into place.
Happy crocheting!