

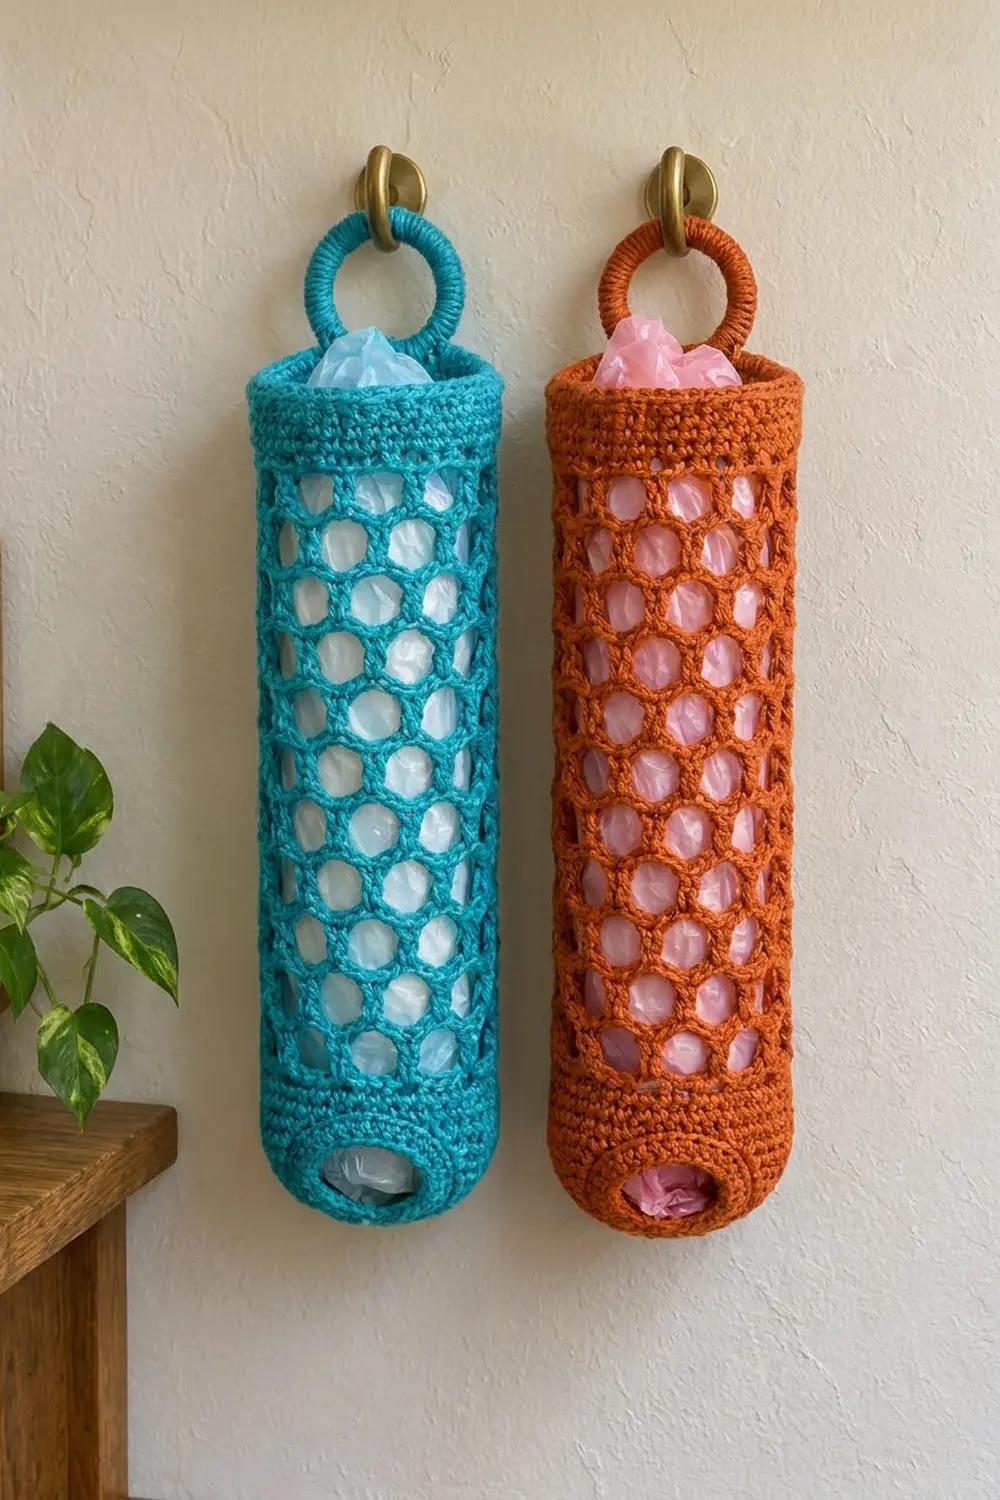
The Honeycomb Hive Plastic Bag Holder is a tall, slim tube that keeps grocery bags tidy and easy to reach. You push bags in at the top and pull them out one at a time through the smaller opening at the bottom. The open honeycomb mesh lets you see how many bags are left.
The sample is worked in bright turquoise, and a second holder is shown in warm rust orange. Each holder uses one color throughout, so it is easy to make several in different colors for the kitchen, laundry room or garage.
This pattern uses US crochet terms. The finished holder is 4 in (10.2 cm) across and 16.5 in (41.9 cm) long, not counting the ring. With the ring, it hangs about 18.75 in (47.6 cm) long.
Construction is simple. You work the body in joined rounds from the bottom opening up. First comes a shaped solid base, then 20 rounds of chain-loop mesh, then a solid top band and a rolled rim. Last, you cover a ring with single crochet and sew it inside the back of the rim.
Finished Size and Construction
- Finished size: 4 in (10.2 cm) diameter × 16.5 in (41.9 cm) long, body only
- Hanging length with ring: about 18.75 in (47.6 cm)
- Skill level: Easy
- Terminology: US
- Yarn weight: Worsted (medium, #4) cotton or cotton blend
- Hook: 5 mm (H-8)
- Number of pieces: 1 tubular body + 1 covered ring
- Layout: Single vertical tube with the ring centered at the back
- Body circumference: 44 sts = 12.5 in (31.8 cm)
- Size before border: 16 in (40.6 cm) long
- Border depth: Top rim 0.5 in (1.3 cm); bottom edge is 1 round of trim that adds no length
Materials
Use a smooth worsted-weight cotton or cotton blend. Cotton keeps its shape when the holder is packed with bags, and it shows the mesh clearly. Pure acrylic also works, but it stretches more over time.
- Main color (turquoise or rust orange): 130 g, about 245 yd (224 m)
- 5 mm (H-8) crochet hook
- 1 wooden or metal ring, 2.5 in (6.4 cm) outer diameter
- Stitch marker
- Tapestry needle
- Scissors
- Measuring tape
The yarn amount includes about a 15% margin for gauge differences and for your test swatch.
Abbreviations (US Terms)
- ch – chain
- sc – single crochet
- sl st – slip stitch
- st(s) – stitch(es)
- sk – skip
- sp – space
- inc – 2 sc in the same stitch
- rnd(s) – round(s)
- rev sc – reverse single crochet (crab stitch)
Special stitch – reverse single crochet (rev sc): Work from left to right (right to left if you crochet left-handed). Insert the hook into the next stitch to the right, yarn over, and pull up a loop. Yarn over again and pull through both loops. This makes a firm, rope-like edge.
Gauge and Checkpoints
Solid gauge: 14 sc and 16 rnds = 4 in (10.2 cm) in sc worked in the round.
Mesh gauge: 5 mesh rnds = 3 in (7.6 cm), so each mesh round is about 0.6 in (1.5 cm) tall when relaxed.
Before you start the full holder, work the bottom band (Rnds 1–8) as your test piece. It is the first part of the pattern, so if your gauge is correct you just keep going.
Checkpoints:
- After Rnd 4, lay the tube flat. It should measure 6.25 in (15.9 cm) across, which is half of 12.5 in (31.8 cm).
- After Rnd 8, the bottom band should be 2 in (5.1 cm) tall.
- After Mesh Rnd 10, the mesh should be about 6 in (15.2 cm) tall when gently relaxed.
- After Mesh Rnd 20, the body should be about 14 in (35.6 cm) long.
- Before the border, the body should be 16 in (40.6 cm) long.
If the piece is too big, go down one hook size, to 4.5 mm (7). If it is too small, go up to 5.5 mm (I-9). A difference of 0.25 in (0.6 cm) in flat width is fine. More than that changes how bags feed through, so restart with the new hook.

Pattern: Bottom Band
Start at the bottom opening. Join each round with a sl st to the first sc. The ch 1 at the start of each round does not count as a stitch.
Foundation: Ch 24 and join with a sl st to the first ch to form a ring. Don’t twist the chain.
Rnd 1: Ch 1, sc in each ch around, join. (24 sts)
Rnd 2: Ch 1, sc in next 2 sts, inc 8 times, join. (32 sts)
Rnd 3: Ch 1, sc in next 3 sts, inc 8 times, join. (40 sts)
Rnd 4: Ch 1, sc in next 9 sts, inc 4 times, join. (44 sts)
Rnds 5–8: Ch 1, sc in each st around, join. (44 sts)
These increase rounds make the curved base that pulls in toward the opening. The opening stays 24 sts around, or about 6.9 in (17.5 cm), which is about 2.2 in (5.6 cm) across. That is snug enough to hold the bags in and loose enough to pull one out.
Checkpoint: The bottom band is 2 in (5.1 cm) tall and 6.25 in (15.9 cm) across when flat.
Pattern: Honeycomb Mesh
The mesh is made of ch-5 loops. Each round anchors its sc in the center of the loops below, which offsets the holes into the honeycomb pattern.
Mesh Rnd 1: Ch 1, sc in first st, ch 5, sk 3 sts, sc in next st 10 times, ch 5, sk 3 sts, join to first sc. (11 sc and 11 ch-5 loops)
Check: 1 + (10 × 4) + 3 = 44 sts used, so each loop spans exactly 4 base stitches.
Mesh Rnd 2: Sl st in each of the next 3 ch to reach the center of the first loop. Ch 1, sc in the same loop. Ch 5, sc in next ch-5 sp 10 times, ch 5, join to first sc. (11 sc and 11 ch-5 loops)
Mesh Rnds 3–20: Repeat Mesh Rnd 2. (11 sc and 11 ch-5 loops each round)
The 3 slip stitches move the start of each round slightly sideways. This is normal and doesn’t show once the holder hangs.
Checkpoint: The mesh section is about 12 in (30.5 cm) tall when relaxed, and the body is about 14 in (35.6 cm) long. Count the loops every few rounds, because a missed loop narrows the tube quickly.
Pattern: Top Band
Rnd T1 (conversion round): Ch 1, sc in first sc, 3 sc in next ch-5 sp. Sc in next sc, 3 sc in next ch-5 sp 10 times, join.
(11 sc worked 1 per existing sc + 33 sc worked into the 11 loops = 44 sts)
Rnds T2–T8: Ch 1, sc in each st around, join. (44 sts)
Checkpoint: The top band is 2 in (5.1 cm) tall. The body is now 16 in (40.6 cm) long, which is the size before the border. It is 6.25 in (15.9 cm) across when flat, matching the bottom band.
Pattern: Covered Hanging Ring
Cover the ring: Make a slipknot on your hook. Holding the ring, insert the hook through the center of the ring, yarn over, and pull up a loop. Yarn over and pull through both loops to make the first sc around the ring. Work about 60 sc around the ring, pushing the stitches together as you go so no ring shows. The exact count depends on your ring; stop when the ring is fully covered. Join with a sl st to the first sc and leave a 12 in (30.5 cm) tail for sewing.
Checkpoint: The covered ring measures about 3 in (7.6 cm) across the outside.
You will attach the ring after the border (see Final Blocking, step 6).
Border
Border gauge: The border uses the same 14 sc = 4 in (10.2 cm) gauge as the body.
Top Rim
Rnd B1: Ch 1, sc in each st around, join. (44 sts)
Rnd B2: Ch 1, rev sc in each st around, join. (44 sts)
Fasten off and weave in the end.
Bottom Opening Edge
Turn the holder upside down. Join yarn with a sl st in any remaining loop of the foundation chain.
Rnd E1: Ch 1, rev sc in each foundation ch around, join. (24 sts)
Fasten off and weave in the end.
Why the Math Works
The tube has 44 sts from Rnd 4 to Rnd T8. The top rim also has 44 sts, so it lies flat with no ruffling or pulling in. The rev sc round rolls slightly and makes the firm rim seen at the top of the holder.
The bottom edge has 24 sts, the same as the 24 foundation chains. That keeps the opening at about 2.2 in (5.6 cm) across. Rev sc also reinforces the opening, which gets the most wear.
The top border adds 0.5 in (1.3 cm), so the body goes from 16 in (40.6 cm) to 16.5 in (41.9 cm). The bottom trim turns slightly inward and adds no measurable length.
Final Blocking
- Wet the holder in cool water, then gently press out the water. Don’t wring it.
- Roll it in a towel to remove more moisture.
- Slide a rolled towel, a paper towel tube, or a 4 in (10.2 cm) bottle inside the body.
- Shape the mesh so the holes are evenly open and the tube is 16.5 in (41.9 cm) long. Don’t stretch it longer, because filled bags will add a little length over time.
- Let it dry completely.
- Attach the ring. Find the center back of the top band, which is the side where the rounds were joined. Place the covered ring on the inside so its bottom 0.75 in (1.9 cm) overlaps the band. Using the ring tail and a tapestry needle, whipstitch the ring to the inside of the band through Rnds T6–B1, across about 6 sts. Go over the seam twice so it holds the weight of the bags. The ring should stick up about 2.25 in (5.7 cm) above the rim.
Final Quality-Control Checklist
- Bottom opening: 24 sts, about 2.2 in (5.6 cm) across
- Bottom band: 44 sts, 2 in (5.1 cm) tall
- Mesh: 11 loops in every round, 20 rounds, about 12 in (30.5 cm) tall
- Top band: 44 sts, 2 in (5.1 cm) tall
- Top rim: 2 rounds, flat, firm and not ruffled
- Body: 4 in (10.2 cm) across and 16.5 in (41.9 cm) long
- Ring: fully covered and firmly stitched at the center back
- All ends woven in securely on the inside
Troubleshooting
The mesh slants or twists. Check that you join every round and don’t spiral. Twisting can also mean the foundation ring was twisted when you joined it.
The tube gets narrower partway up. You probably missed a loop. Count 11 loops, take out the rounds back to the error and rework them.
The holes look stretched or too long. Your chains are loose. Try ch 4 instead of ch 5, or go down a hook size for the mesh only.
The top rim flares. Your rev sc is too loose. Rework Rnd B2 with a hook one size smaller.
Bags drop out of the bottom. The opening is too loose. Rework Rnd E1 more tightly, or work it with a smaller hook.
The ring tilts forward. Sew the ring lower so it overlaps more of the band, and add a second line of stitching.
Care
Hand wash in cool water and lay flat to dry, reshaping the tube while it is damp. Cotton holders can also be machine washed on a gentle cycle inside a mesh laundry bag.
Final Notes
Each part of this holder depends on the measurement before it:
- The 24-chain opening grows to 44 sts, or 12.5 in (31.8 cm) around.
- That circumference gives a 4 in (10.2 cm) tube.
- Eleven 4-stitch mesh repeats keep the honeycomb even.
- The conversion round restores exactly 44 sts.
- The 44-stitch rim lies flat at 16.5 in (41.9 cm) long.
If your test band matches the gauge, the rest of the holder will match too. Try a few colors and give the extras as practical gifts.
Happy crocheting!