

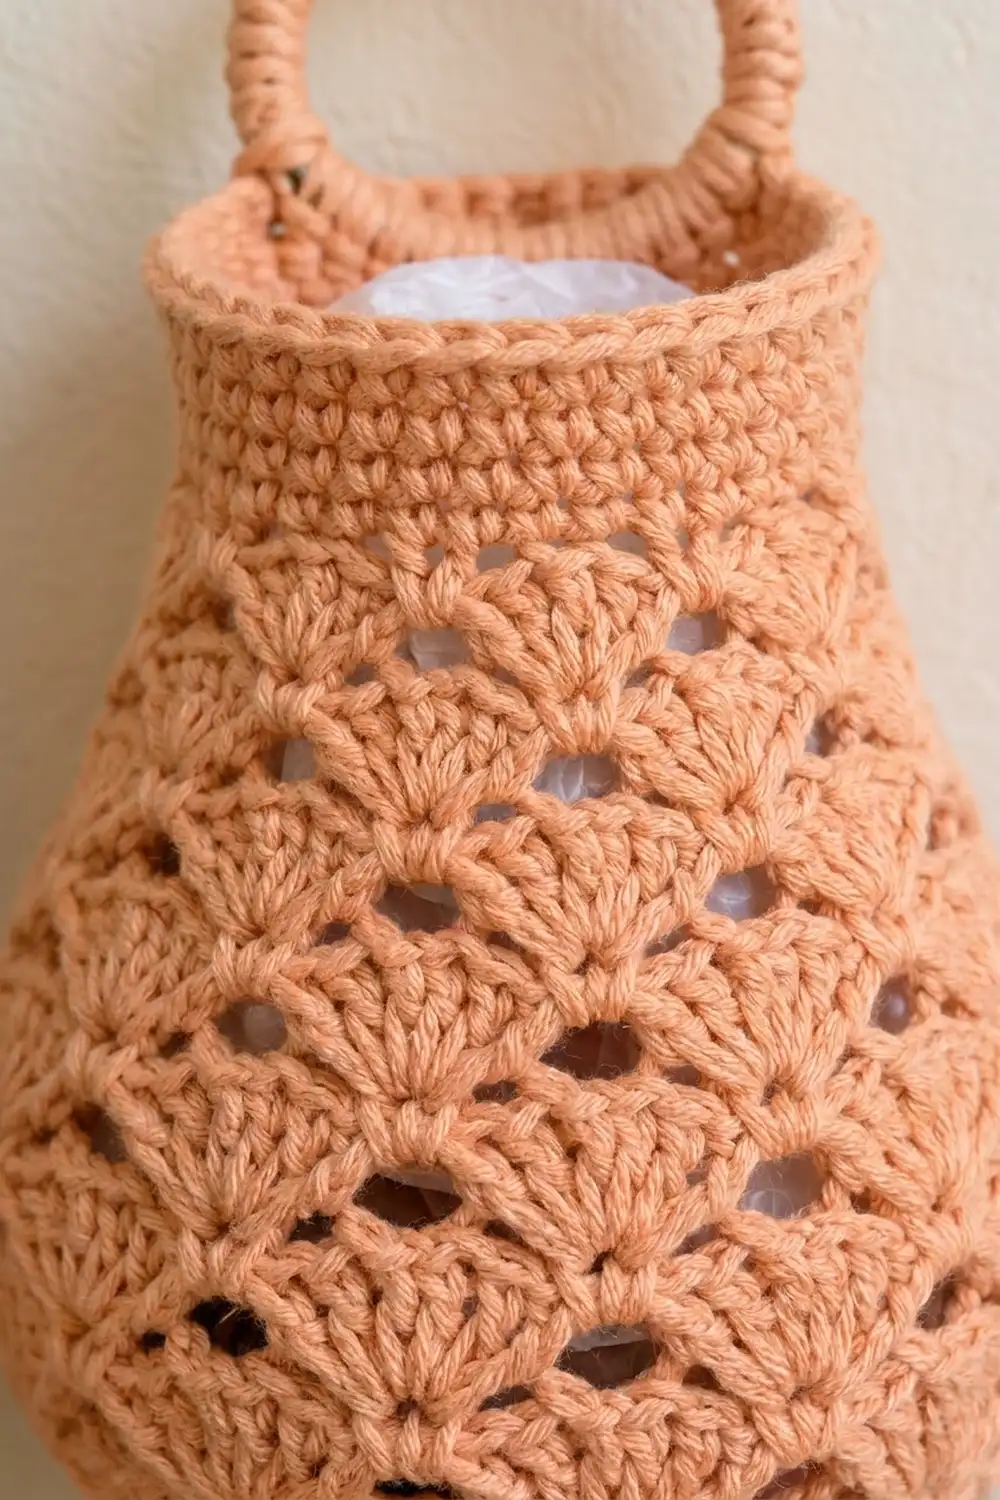
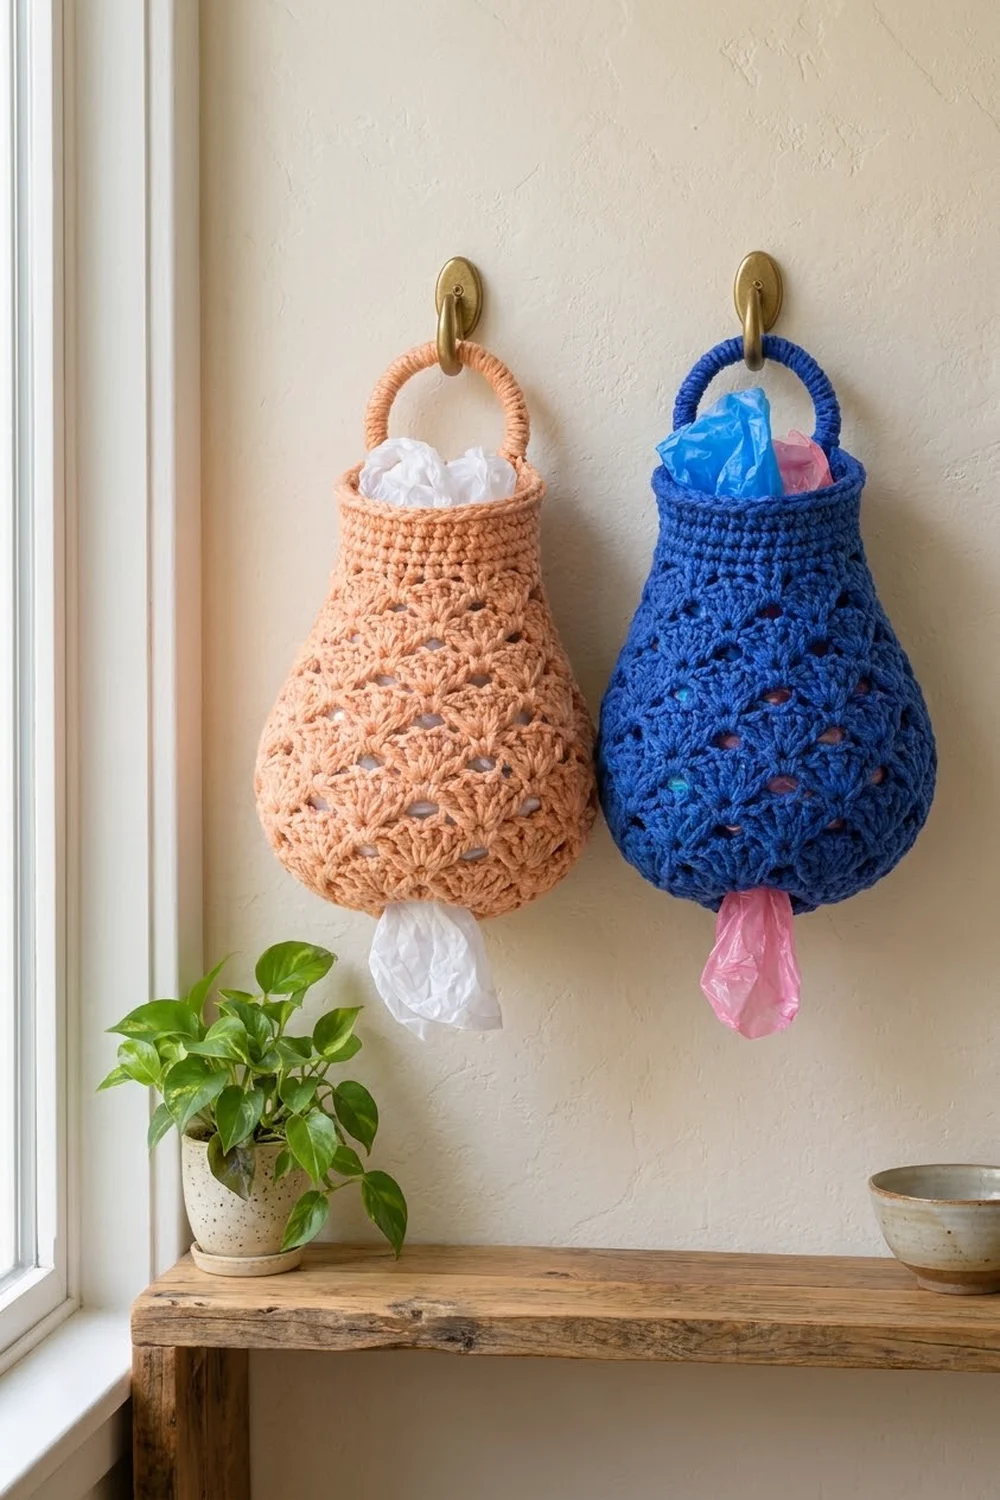
This grocery bag holder hangs from a ring and takes the shape of a soft pear. You stuff plastic bags in at the top and pull them out one at a time through a small opening at the bottom. The body is covered in offset rounds of fan-shaped shells, which look like overlapping scallops with small windows between them.
The sample is in a warm peach, and a second holder in royal blue shows how well the stitch pattern works in a bold color. Each holder uses one color only, so it’s a good project for leftover worsted cotton.
This pattern uses US crochet terms. The finished body measures about 8.5 in (21.6 cm) wide at its widest point and 9.5 in (24.1 cm) tall. With the ring handle, the total hanging height is about 12 in (30.5 cm).
You work the holder from the bottom up in joined rounds. You start with the bottom opening, change the size of the shells to shape the pear, finish with a single-crochet neck band, and sew on a covered ring for hanging.
Finished Size and Construction
- Finished size: 8.5 in (21.6 cm) wide × 9.5 in (24.1 cm) tall, body only; 12 in (30.5 cm) including the ring
- Skill level: Easy–Intermediate
- Terminology: US crochet terms
- Yarn weight: Worsted (#4)
- Hook: 5.0 mm (H-8)
- Number of pieces: 1 body + 1 covered ring
- Layout: Seamless tube worked in joined rounds, open at both ends
- Piece size: Bottom opening 2.7 in (6.9 cm) across; widest point 8.5 in (21.6 cm) flat
- Size before rim band: 5.7 in (14.5 cm) wide at the top × 8 in (20.3 cm) tall
- Rim band depth: 1.5 in (3.8 cm)
Materials
Use a worsted-weight cotton or cotton blend. Cotton holds the pear shape and doesn’t stretch much under the weight of the bags. Avoid very fuzzy yarns, because they hide the shell texture.
- Peach (main sample): 100 g / about 180 m (197 yd)
- Royal blue (optional second holder): 100 g / about 180 m (197 yd)
These quantities include a margin of about 20%, which covers your gauge swatch and the ring covering.
Tools:
– 5.0 mm (H-8) crochet hook
– 1 wooden or plastic ring, 3 in (7.6 cm) outer diameter
– Stitch marker
– Tapestry needle
– Scissors
– Measuring tape
– Spray bottle and pins for blocking
Abbreviations (US Terms)
- ch – chain
- sl st – slip stitch
- sc – single crochet
- dc – double crochet
- st(s) – stitch(es)
- rep – repeat
- Rnd – round
Special stitch – Shell: Work the stated number of dc (3 or 5) into the same stitch. The middle dc of the shell is the “center dc.”
Start of a shell round: When a round begins with a shell, ch 3 counts as the first dc of that shell.
Gauge and Checkpoints
Sc gauge: 14 sc and 16 rounds = 4 in (10.2 cm). One sc round is about 0.25 in (0.6 cm) tall.
Shell gauge: One 5-dc shell repeat (shell + sc, 6 sts) is 1.7 in (4.3 cm) wide. One shell round is 0.75 in (1.9 cm) tall.
Test the gauge on the holder itself. Work Rnds 1–4, then lay the piece flat and check it against the first two checkpoints. If it doesn’t match, it’s quicker to rip back four rounds than to finish a holder in the wrong size.
Checkpoints (measured flat):
– After Rnd 2: the opening measures 2.7 in (6.9 cm) across, and the piece is 0.5 in (1.3 cm) tall.
– After Rnd 4: 8.5 in (21.6 cm) wide, 2 in (5.1 cm) tall
– After Rnd 9: 8.5 in (21.6 cm) wide, 5.75 in (14.6 cm) tall
– After Rnd 12: 5.7 in (14.5 cm) wide at the top, 8 in (20.3 cm) tall
– After Rnd 18: 5.7 in (14.5 cm) wide at the rim, 9.5 in (24.1 cm) tall
If your piece is too big: go down to a 4.5 mm hook. If it’s too small: go up to a 5.5 mm hook. Keep the stitch counts the same and change only the hook.
Pattern: Body
Bottom Opening
Rnd 1: Ch 30 and join with a sl st to the first ch, taking care not to twist the chain. Ch 1, then sc in each ch around. Join with a sl st to the first sc. (30 sc)
Rnd 2 (increase round): Ch 1. Sc in next 2 sts, 2 sc in next st; rep from * 9 more times. Join. (40 sc = 30 worked 1-per-stitch + 10 extra)
Keep these two rounds firm. They form the opening the bags are pulled through, and a tight edge holds the bags in place until you tug one out.
Shell Rounds
Starting at Rnd 3, the rounds alternate between two types:
- Round A starts with a sc in the center of a shell.
- Round B starts with a shell in the joining sc.
Every shell sits on top of a sc from the round below, and every sc sits in the center dc of a shell from the round below. This alternation offsets the scallops.
Rnd 3 (A, 3-dc shells): Ch 1. Sc in first st, skip 1, 3 dc in next st, skip 1. Sc in next st, skip 1, 3 dc in next st, skip 1; rep from * 8 more times. Join to the first sc. (10 shells + 10 sc = 40 sts)
Rnd 4 (B, 5-dc shells): Ch 3, then 4 dc in the same st as the join. Skip 1 dc, sc in the center dc of the next shell, skip 1 dc. 5 dc in next sc, skip 1 dc, sc in center dc, skip 1 dc; rep from * 8 more times. Join to the top of ch-3. (10 shells of 5 dc + 10 sc = 60 sts)
The bigger shells make the bottom flare out into its rounded shape.
Rnd 5 (A, 5-dc shells): Sl st in the next 2 dc so you are in the center dc of the first shell. Ch 1 and sc in the same st. Skip 2 dc, 5 dc in next sc, skip 2 dc. Sc in center dc of next shell, skip 2 dc, 5 dc in next sc, skip 2 dc; rep from * 8 more times. Join to the first sc. (60 sts)
Rnd 6 (B, 5-dc shells): Ch 3, then 4 dc in the same st as the join. Skip 2 dc, sc in center dc, skip 2 dc. 5 dc in next sc, skip 2 dc, sc in center dc, skip 2 dc; rep from * 8 more times. Join to the top of ch-3. (60 sts)
Rnds 7–9: Work Rnd 5 (A), then Rnd 6 (B), then Rnd 5 (A). (60 sts each)
This is the widest part of the pear, measuring 8.5 in (21.6 cm) flat.
Shoulder Taper
Rnd 10 (B, 3-dc shells): Ch 3, then 2 dc in the same st as the join. Skip 2 dc, sc in center dc, skip 2 dc. 3 dc in next sc, skip 2 dc, sc in center dc, skip 2 dc; rep from * 8 more times. Join to the top of ch-3. (10 shells of 3 dc + 10 sc = 40 sts)
The smaller shells pull the fabric in to form the shoulders.
Rnd 11 (A, 3-dc shells): Sl st in the next dc, which is the center of the first shell. Ch 1 and sc in the same st. Skip 1 dc, 3 dc in next sc, skip 1 dc. Sc in center dc, skip 1 dc, 3 dc in next sc, skip 1 dc; rep from * 8 more times. Join to the first sc. (40 sts)
Rnd 12 (B, 3-dc shells): Ch 3, then 2 dc in the same st as the join. Skip 1 dc, sc in center dc, skip 1 dc. 3 dc in next sc, skip 1 dc, sc in center dc, skip 1 dc; rep from * 8 more times. Join to the top of ch-3. (40 sts)
Check that the piece is 8 in (20.3 cm) tall and 5.7 in (14.5 cm) wide at the top.
Rim Band and Opening Edge
This band stands in for a border on a single-piece holder. It gives the top a straight, sturdy edge to attach the ring to.
Band gauge: The band uses the same sc gauge: 14 sc = 4 in (10.2 cm), with each round 0.25 in (0.6 cm) tall.
Rnd 13 (leveling round): Ch 1. Sc in next 3 dc, dc in next sc; rep from * 9 more times. Join. (40 sts = 40 worked 1-per-stitch + 0 extra; 30 sc + 10 dc)
The dc stitches fill the low dips above each sc, which levels the scalloped edge.
Rnds 14–18: Ch 1, sc in each st around, and join. (40 sc each)
Count per side: When the holder is flattened, the band has 20 sts across the front and 20 across the back. There are no corners, so nothing is counted twice.
Opening edge: Turn the holder upside down. Join yarn at the foundation chain and work 1 sl st in each ch loop around (30 sl st). Fasten off. This keeps the opening from stretching.
Why the math works: 40 sc at 3.5 sts per inch measures 11.4 in (29.0 cm) around, or 5.7 in (14.5 cm) flat. The 3-dc shell round has 10 repeats of 4 sts each, which also measures 11.4 in (29.0 cm) around. Since the band and the round below it are the same width, the band won’t ruffle or pull in. The widest rounds have 10 repeats of 6 sts each, measuring 17 in (43.2 cm) around, or 8.5 in (21.6 cm) flat.
Covered Ring Handle
- Make a slipknot and hold it at the back of the ring.
- Work sc over the ring, pushing the stitches together as you go, until it is fully covered. This takes about 54 sc. Add or skip a few so that no plastic or wood shows.
- Join with a sl st and leave a 12 in (30.5 cm) tail.
- Lay the holder flat with the joins at the center back. Tuck the bottom of the ring 0.5 in (1.3 cm) behind the rim so that the ring stands 2.5 in (6.4 cm) above the band.
- Using the tail, whipstitch the ring through the top 2 rounds of the band across 6 sts, which is 1.7 in (4.3 cm). Go over the area twice for strength, then weave in the end.
Final Blocking
- Weave in all ends along the inside of the sc rounds.
- Mist the holder until it is evenly damp, without soaking it.
- Stuff it firmly with a plastic bag or a small towel so that it takes on the pear shape.
- Push the shells outward with your fingers so each scallop opens up.
- Pinch the rim into a neat circle 5.7 in (14.5 cm) across.
- Hang it from the ring, or stand it on a towel, and let it dry completely.
- Remove the stuffing and check the measurements again.
Final Quality-Control Checklist
- [ ] Rounds 3–12 have 10 shells each
- [ ] The shell counts per round are 40, 60, 60, 60, 60, 60, 60, 40, 40, 40
- [ ] The rim band has 40 sts, or 20 per side when flat
- [ ] The widest point is 8.5 in (21.6 cm) flat
- [ ] The body is 9.5 in (24.1 cm) tall
- [ ] The bottom opening is 2.7 in (6.9 cm) across and firm
- [ ] The ring is fully covered and securely sewn at center back
- [ ] No ends are showing
Troubleshooting
The shells don’t line up and look like stripes. You probably put a shell in a shell. Each shell must go into a sc, and each sc into a center dc.
The body ripples. Your dc stitches are too loose compared with your sc. Tighten the dc tension or use a hook 0.5 mm smaller for the shell rounds only.
The top edge looks wavy. Check that Rnd 13 has a dc above every sc.
Bags fall out of the bottom. The opening is too loose. Rework Rnd 1 tighter or add a second sl st round.
The ring tilts forward. Sew it across a wider span, such as 8 sts, and through 3 rounds.
Care
Hand wash in cool water, press out the excess, and reshape the holder while it’s damp. Lay it flat or hang it to dry, and don’t tumble dry.
Final Notes
Here is how the measurements fit together:
- Opening: The 30-sc opening measures 2.7 in (6.9 cm) across.
- Bottom flare: It grows to 40 sts, then flares out to 60 sts with the 5-dc shells. Six 60-st rounds hold the widest part at 8.5 in (21.6 cm).
- Shoulders: Three rounds of 3-dc shells taper the shoulders to 5.7 in (14.5 cm). At this point the piece is 8 in (20.3 cm) tall.
- Rim band: The 40-st band adds 1.5 in (3.8 cm), bringing the body to 9.5 in (24.1 cm).
- Ring: The ring adds 2.5 in (6.4 cm), for a total hanging height of 12 in (30.5 cm).
If each checkpoint matches, the finished holder will too. Make one in every kitchen color you like.
Happy crocheting!