

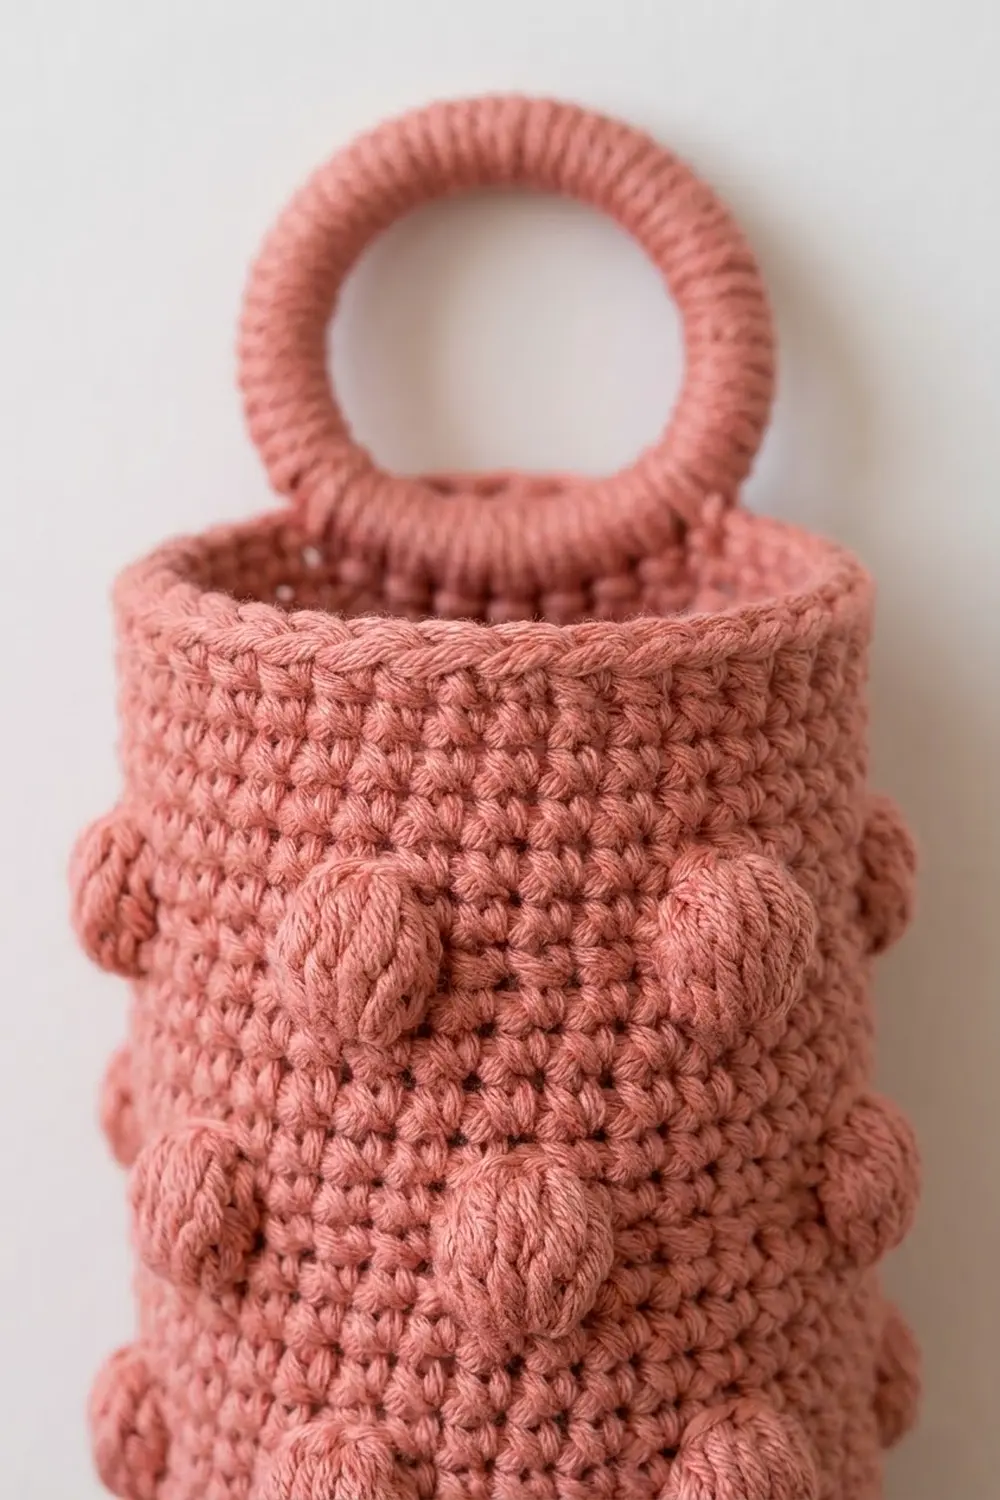
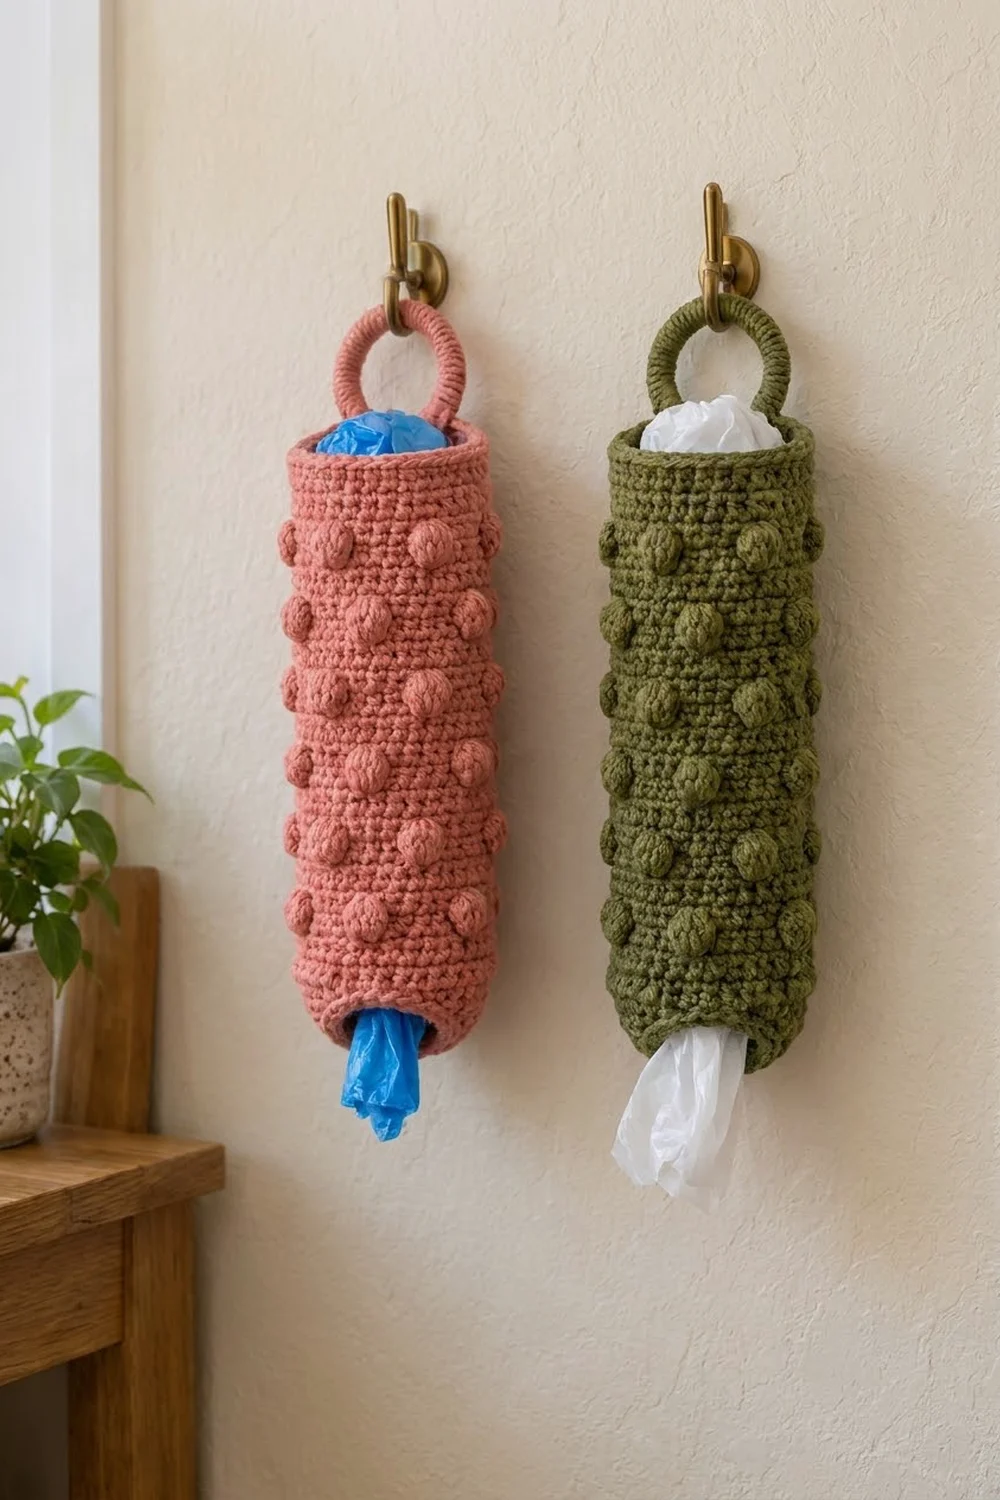
This bobble bag holder is a tall, cheerful tube that hangs from a crochet-covered ring and keeps a kitchen’s worth of plastic bags in one tidy place. You stuff bags in at the top and pull them out one at a time through a small round hole in the flat base.
The texture comes from rows of raised bobbles on a firm single crochet background. Each bobble row is offset from the one below it, which gives a staggered cobblestone look. The sample photos show two colorways: a dusty coral pink and a deep olive green. Each holder is made in one solid color.
The pattern uses US crochet terms. The finished holder measures 6 in (15.2 cm) wide when flat, 12 in (30.5 cm) around, and 16 in (40.6 cm) tall from the base fold to the top rim. With the hanging ring, it measures about 18 in (45.7 cm) overall.
Construction is simple. You start at the base with a chain ring that becomes the dispensing hole. You increase out to a flat ring-shaped base, turn the edge up, and work the tube in joined rounds. Bobble rounds are worked with the wrong side facing, so the bobbles pop to the outside. A two-round rim finishes the top, and a covered ring is sewn inside the back of the rim.
Finished Size and Construction
- Finished size: 6 in (15.2 cm) wide flat x 16 in (40.6 cm) tall; 12 in (30.5 cm) circumference
- Overall hanging length: about 18 in (45.7 cm) including the ring
- Skill level: Easy-intermediate
- Terminology: US
- Yarn weight: Worsted (#4)
- Hook: 5.0 mm (H-8)
- Number of pieces: 1 crocheted body, plus 1 covered hanging ring sewn on
- Layout: Single vertical tube, open at the top, small hole in the base
- Stitches around: 42 (21 per side when flattened)
- Size before border: 15.5 in (39.4 cm) tall after Rnd 66
- Border (top rim) depth: 2 rounds, about 0.5 in (1.3 cm)
Materials
Choose a smooth worsted-weight cotton or cotton blend. Cotton holds its shape, resists stretching under the weight of the bags, and shows the bobbles clearly. Acrylic also works, but the tube may get a little longer with use.
- Colorway A, dusty coral pink: 80 g / 160 yd (146 m), or
- Colorway B, olive green: 80 g / 160 yd (146 m)
Each holder uses one color only. These quantities include a margin of about 20% for your gauge swatch and for differences in tension.
Tools:
- 5.0 mm (H-8) crochet hook
- 1 metal or plastic ring, 2.75 in (7.0 cm) outer diameter
- Stitch marker
- Tapestry needle
- Scissors
- Tape measure
- Rust-proof pins and a towel for blocking
Abbreviations (US Terms)
- ch – chain
- sc – single crochet
- dc – double crochet
- sl st – slip stitch
- st(s) – stitch(es)
- BLO – back loop only
- rev sc – reverse single crochet (crab stitch), worked left to right
- Rnd – round
- RS / WS – right side / wrong side
Bobble (special stitch): Yarn over, insert hook in st, yarn over and pull up a loop, yarn over and pull through 2 loops (2 loops on hook). Repeat from the start 4 more times in the same st (6 loops on hook). Yarn over and pull through all 6 loops. A bobble counts as 1 st.
Gauge and Checkpoints
Gauge: 14 sc and 16 rounds = 4 in (10.2 cm) in sc worked in joined rounds.
That works out to 3.5 sts per inch and 4 rounds per inch. Every measurement in this pattern comes from those two numbers.
Test the base and the first few body rounds before you commit to the full tube. The checkpoints below help you catch a gauge problem early.
- After Rnd 1: the center hole is about 2.2 in (5.6 cm) across.
- After Rnd 4: the flat base is about 3.8 in (9.7 cm) across.
- After Rnd 28: the wall measures 6 in (15.2 cm) from the base fold.
- After Rnd 52: the wall measures 12 in (30.5 cm).
- After Rnd 66: the wall measures 15.5 in (39.4 cm).
- After Rnd 68: the wall measures 16 in (40.6 cm).
If your piece is too big (more than 0.25 in / 0.6 cm wider than 6 in / 15.2 cm when flat), go down a hook size. If it is too small, go up a hook size. You can change the height by adding or removing plain rounds at the top. Fix the width with hook size only, so the base and body still match.
Base
The base is a flat ring, and the foundation chain becomes the dispensing hole.
Foundation: Ch 24, sl st to the first ch to form a ring, taking care not to twist.
Rnd 1 (RS): Ch 1, sc in each ch around, sl st to first sc. (24 sts)
Rnd 2: Ch 1, sc in next 3 sts, 2 sc in next st; repeat from * 5 more times, sl st to first sc. (30 sts)
Rnd 3: Ch 1, sc in next 4 sts, 2 sc in next st; repeat from * 5 more times, sl st to first sc. (36 sts)
Rnd 4: Ch 1, sc in next 5 sts, 2 sc in next st; repeat from * 5 more times, sl st to first sc. (42 sts)
Lay the base flat. It should measure about 3.8 in (9.7 cm) across, with a 2.2 in (5.6 cm) hole in the center. If it ruffles, your tension is loose. If it cups, your tension is tight.
Body
Every round in the body has 42 sts. Place a marker in the joining sl st and move it up as you go. This seam line will be the center back.
Rnd 5: Ch 1, sc in BLO of each st around, sl st to first sc. (42 sts)
This round turns the edge upward and makes the neat ridge around the bottom of the tube.
Rnds 6–7: Ch 1, sc in each st around, sl st to first sc. (42 sts)
Bobble Round Method
Bobble rounds are worked with the WS facing so the bobbles push outward. At the end of the round before a bobble round, sl st to join, ch 1, and turn. Work the bobble round. Then sl st to join, ch 1, and turn again so the RS faces you for the next plain round.
Bobble Round A: Ch 1, turn, sc in next 5 sts, bobble in next st; repeat from * 6 more times, sl st to first sc. (42 sts: 35 sc + 7 bobbles)
Bobble Round B (offset): Ch 1, turn, sc in next 2 sts, bobble in next st, sc in next 5 sts, bobble in next st; repeat from * 5 more times, sc in last 3 sts, sl st to first sc. (42 sts: 35 sc + 7 bobbles)
Check Round B: 2 + 1 + (6 x 6) + 3 = 42. Its bobbles land 3 sts away from the bobbles in Round A, so they sit between them.
Plain Round: Ch 1, sc in each st around, sl st to first sc. (42 sts) On the first plain round after a bobble round, start with ch 1, turn. On all other plain rounds, do not turn.
Body Sequence
Rnd 8: Bobble Round A.
Rnds 9–13: Plain Round (5 rounds).
Rnd 14: Bobble Round B.
Rnds 15–19: Plain Round (5 rounds).
Rnds 8–19 form a 12-round repeat with 2 bobble rows. The bobble rows are 6 rounds apart, which is 1.5 in (3.8 cm). Within each row, the bobbles are 6 sts apart, about 1.7 in (4.3 cm).
Rnds 20–55: Repeat Rnds 8–19 three more times.
Rnd 56: Bobble Round A.
Rnds 57–61: Plain Round.
Rnd 62: Bobble Round B.
Rnds 63–66: Plain Round (4 rounds).
You now have 10 bobble rows (70 bobbles). The A rows are Rnds 8, 20, 32, 44, and 56. The B rows are Rnds 14, 26, 38, 50, and 62. The wall (Rnds 5–66) is 62 rounds, or 15.5 in (39.4 cm). Do not fasten off.
Hanging Ring
Cover the ring: Make a slip knot, put the hook through the center of the ring, and work sc over the ring. Push the sts together as you go, until the ring is fully covered with 56 sc. Sl st to the first sc. Fasten off, leaving a 12 in (30.5 cm) tail.
The 56 sts should sit snugly with no ring showing. If there are gaps, add sts in pairs. If the sts buckle, remove a pair.
You will attach the ring after the rim is done.
Border: Top Rim
Border gauge: Work the rim at the same gauge as the body, 3.5 sts per inch. That way 42 sts still equal 12 in (30.5 cm) around, or 21 sts per side when the tube is flattened. No stitches are added or removed, so the rim won’t flare or pull in.
Rnd 67: Ch 1, sc in each st around, sl st to first sc. (42 sts; 21 per flattened side)
Rnd 68: Ch 1, do not turn, rev sc in each st around, working left to right, sl st to first rev sc. (42 sts; 21 per flattened side) Fasten off and weave in the end.
Why the math works: The body has 42 sts, the rim has 42 sts, and the rev sc is worked 1 per st. The rev sc adds a corded edge about one round high, so the 2 rim rounds bring the height from 15.5 in (39.4 cm) to 16 in (40.6 cm). The corded edge also firms up the opening so bags slide in cleanly.
Bottom edge (optional): If the foundation chain looks loose, join yarn on the RS at the base hole and sl st loosely in each foundation ch around (24 sts). This adds no width and keeps the dispensing hole firm.
Attach the Ring
Flatten the tube with the marker seam centered on the back. Place the covered ring inside the tube at center back so that the bottom 0.75 in (1.9 cm) of the ring overlaps the inside of the rim and the rest stands above it. This leaves about 2 in (5.1 cm) of ring above the rim.
Using the long tail, sew 6 ring sts to the inside of Rnds 66–67 across 6 body sts, centered on the seam. Go back and forth twice for strength. Keep the stitches on the inside so they don’t show from the front. Weave in the tail.
Final Blocking
- Turn the holder RS out and check that every bobble points outward.
- Soak the holder in cool water and gently squeeze out the extra water. Do not wring it.
- Roll it in a towel and press to remove more water.
- Stuff the tube lightly with a rolled towel or a bundle of plastic bags so it keeps a round shape.
- Lay it flat and pat it to 6 in (15.2 cm) wide and 16 in (40.6 cm) tall.
- Press the base so it sits flat with the hole centered.
- Pop each bobble outward with a fingertip.
- Let it dry completely before hanging.
Final Quality-Control Checklist
- Every round has 42 sts, and the base hole has 24 sts.
- There are 10 bobble rows with 7 bobbles each, 70 bobbles total.
- A and B rows alternate, with each bobble set between the bobbles above and below.
- All bobbles face outward.
- The holder is 6 in (15.2 cm) wide flat at the base, middle, and top.
- The holder is 16 in (40.6 cm) tall from the base fold to the rim.
- The rev sc rim is even and corded all the way around.
- The ring is fully covered and sewn securely at center back.
- All ends are woven in on the inside.
Troubleshooting
Bobbles appear on the inside: You forgot to turn before a bobble round. Rip back to the start of that round, then ch 1 and turn.
The seam spirals: End each round with a sl st into the first sc, and don’t count the ch 1 as a st.
The tube gets wider at the top: Count your sts. An extra sc often sneaks in at the join, so recount to 42.
Bobbles look flat: Keep the sc on each side of a bobble snug, and pop each bobble out once you finish.
Ring tilts forward: Sew across all 6 body sts, not just the center ones, and stitch through both Rnd 66 and Rnd 67.
Base cups: Your increases are too tight. Go up a hook size for Rnds 2–4 only.
Care
Hand wash in cool water and lay flat to dry, lightly stuffed so it keeps its shape. Don’t use the dryer, which can shrink cotton and flatten the bobbles.
Final Notes
The whole pattern rests on a short chain of measurements. A gauge of 3.5 sts per inch makes 42 sts equal 12 in (30.5 cm) around and 6 in (15.2 cm) flat. A gauge of 4 rounds per inch makes 62 wall rounds equal 15.5 in (39.4 cm), and the 2-round rim brings that to 16 in (40.6 cm). The 2.75 in (7.0 cm) ring adds about 2 in (5.1 cm), for an 18 in (45.7 cm) hanging length. If your gauge matches at each checkpoint, your finished holder will match too.
Happy crocheting!