

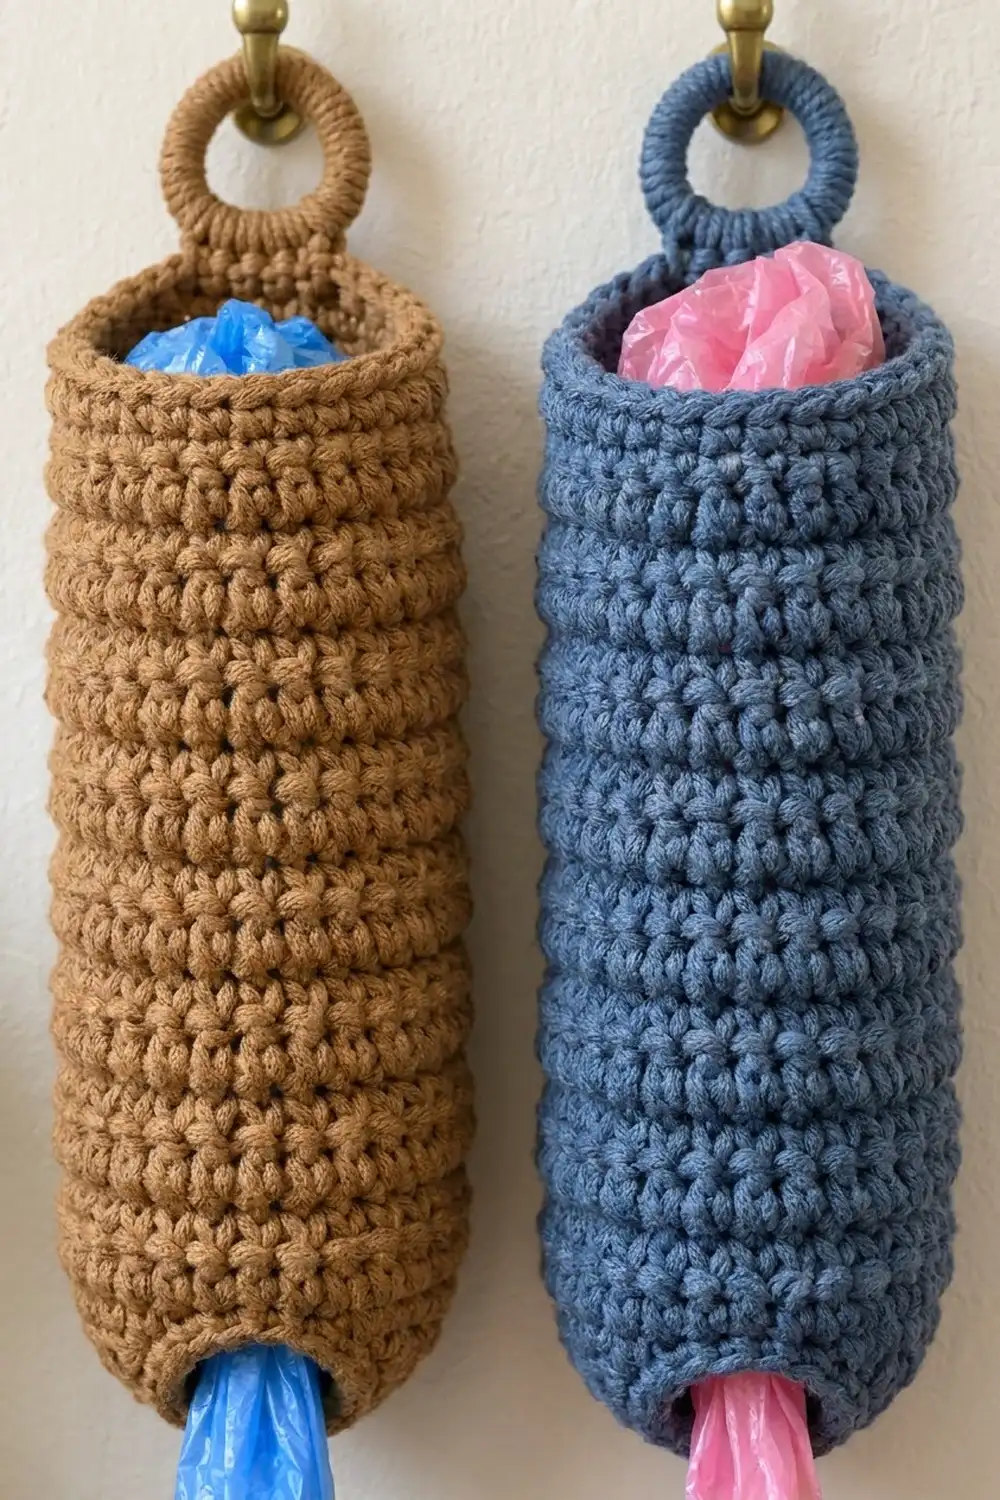
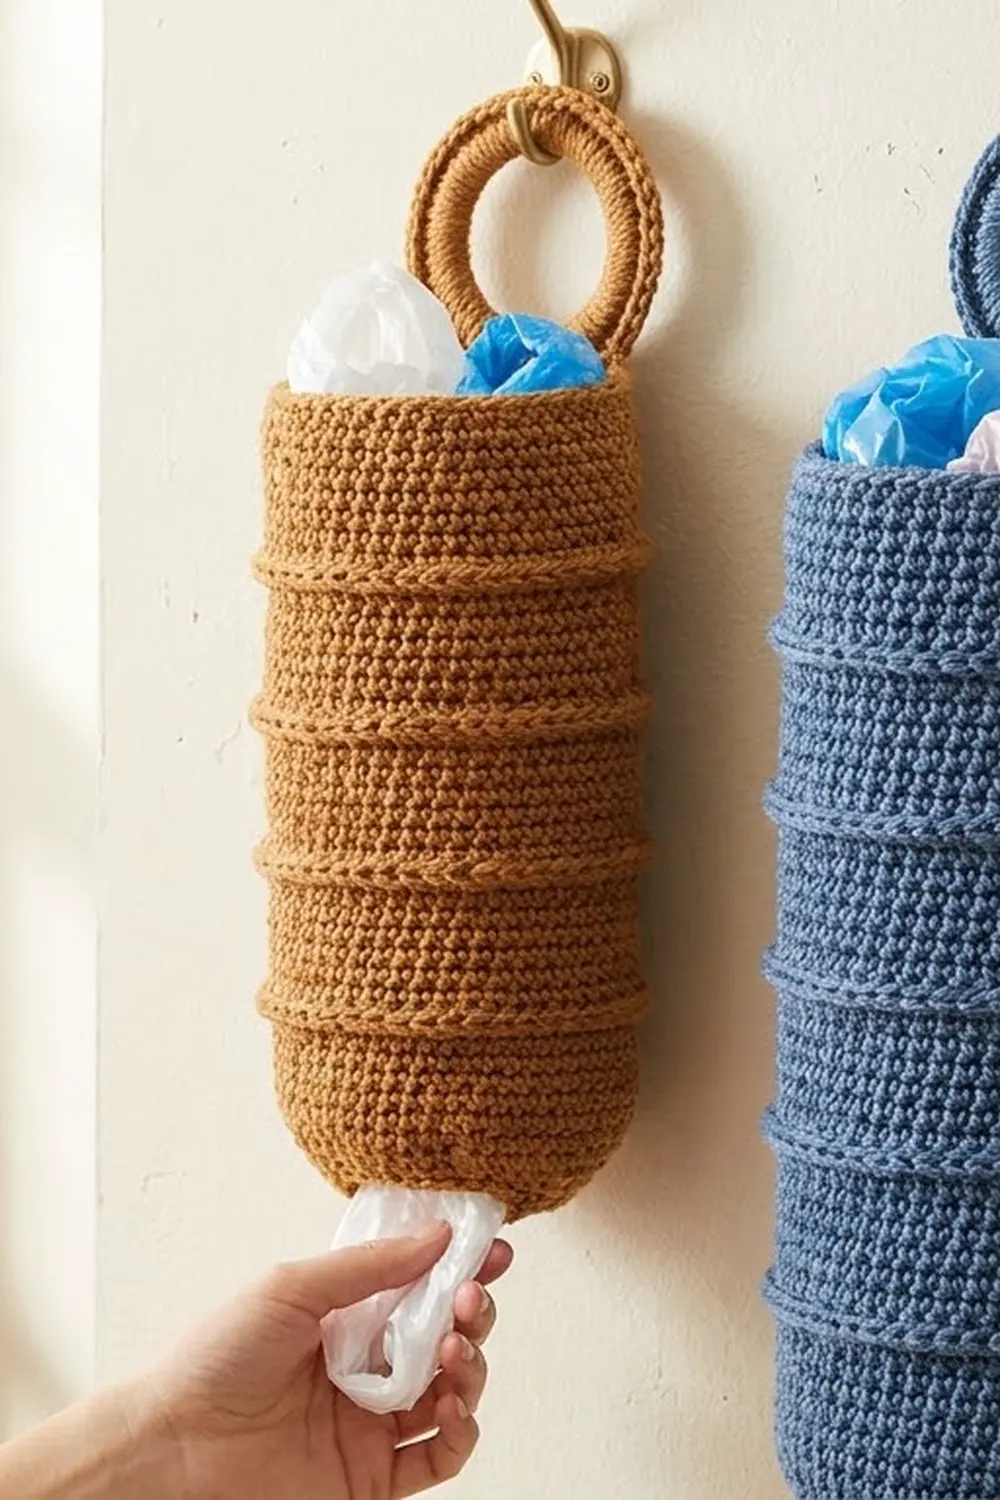
This hanging bag holder is a tall, soft tube that holds a stash of plastic grocery bags. You push used bags in at the top and pull them out one at a time through the small opening at the bottom. A covered ring at the top hangs it on a wall hook, a door knob, or the inside of a pantry door.
The sample is made in a warm caramel brown, and the same pattern looks just as good in denim blue. The fabric is dense single crochet with a raised horizontal ridge every third round. The ridges give it a stacked, coiled look, a bit like a woven basket. It is a simple, sturdy design that works in a farmhouse, Scandinavian or plain modern kitchen.
The pattern uses US crochet terms. The finished body measures 6 in (15.2 cm) wide laid flat and 16.75 in (42.5 cm) tall. With the hanging ring included, the total height is about 18.5 in (47.0 cm).
You start with a foundation ring at the bottom opening and work upward in joined rounds. You increase to shape a rounded base, work the ridged body straight, then decrease slightly near the top. A short rim finishes each opening, and finally you cover a metal ring with single crochet and sew it to the back of the top rim.
Finished Size and Construction
- Finished size: 6 in (15.2 cm) wide flat x 16.75 in (42.5 cm) tall body; 18.5 in (47.0 cm) total with ring
- Skill level: Easy
- Terminology: US crochet terms
- Yarn weight: Bulky (#5)
- Hook: 6 mm (US J-10)
- Number of pieces: 1 tubular body plus 1 covered hanging ring, sewn together into one item
- Layout: A single vertical tube, hung from the ring at center back
- Piece size: Body circumference 12 in (30.5 cm), or 6 in (15.2 cm) flat; top 5 in (12.7 cm) flat; bottom opening 3 in (7.6 cm) flat
- Size before border: 6 in (15.2 cm) wide flat x 16 in (40.6 cm) tall
- Border depth: About 3/8 in (1.0 cm) at each opening
Materials
Yarn: Use a bulky (#5) yarn that makes a firm fabric. A cotton blend or a sturdy acrylic works best. Very fuzzy or loosely plied yarns will snag on the bags and let the tube sag.
- Main color (caramel brown, or denim blue for the alternative): 150 g, about 165 yd (151 m)
Only one color is needed per holder. If you want a pair like the brown and blue ones shown together, buy the full amount for each color.
Tools:
- 6 mm (US J-10) crochet hook
- One metal or plastic ring, 2 in (5.1 cm) outer diameter
- Locking stitch markers (at least 2)
- Tapestry needle
- Scissors
- Tape measure
- A rolled hand towel or a cardboard tube for blocking
The quantity above includes a margin of about 20% for your gauge swatch and for slight differences in tension.
Abbreviations (US Terms)
- ch = chain
- sl st = slip stitch
- sc = single crochet
- BLO = back loop only
- sc2tog = single crochet 2 together (decrease)
- inc = 2 sc in the same stitch
- st(s) = stitch(es)
- rnd(s) = round(s)
Special stitch: BLO sc. Work a single crochet into the back loop of the stitch only. The unused front loop stays on the outside of the tube and forms the raised horizontal ridge.
Round structure: Every round begins with ch 1, which does not count as a stitch. Work the first sc into the same stitch as the join. End each round with a sl st into the first sc. Keep the joins stacked in one line; this line becomes the center back, where the ring goes.
Gauge and Checkpoints
Gauge: 12 sts and 13 rnds = 4 in (10.2 cm) in the ridge pattern.
To check it, work the bottom shaping (Rnds 1-7) and about 6 rounds of the body, then measure. Treat this as your test piece. If the gauge is right, just keep going.
Checkpoints:
- After Rnd 1: The bottom opening is 3 in (7.6 cm) flat, or about 1.9 in (4.8 cm) across when opened into a circle.
- After Rnd 7: The tube is 6 in (15.2 cm) wide flat and about 2 1/8 in (5.4 cm) tall.
- After Rnd 26: The height is about 8 in (20.3 cm).
- After Rnd 49: The height is about 15 in (38.1 cm).
- After Rnd 52: The height is 16 in (40.6 cm) and the top is 5 in (12.7 cm) flat.
If the tube is too wide (over 6.25 in, or 15.9 cm, flat at Rnd 7), change to a 5.5 mm hook. If it is too narrow (under 5.75 in, or 14.6 cm), change to a 6.5 mm hook. Height matters less than width, because you can add or remove one 3-round ridge repeat. Width matters most, since the top must be wide enough for a hand full of bags.
Body
Begin at the bottom opening.
Foundation: Ch 18. Without twisting the chain, join with a sl st to the first ch to form a ring.
Rnd 1: Ch 1, sc in each ch around, join. (18 sts)
Rnd 2: Ch 1, sc in next 2 sts, inc in next st; repeat from * 5 more times, join. (24 sts)
Rnd 3: Ch 1, sc in each st around, join. (24 sts)
Rnd 4: Ch 1, sc in next 3 sts, inc in next st; repeat from * 5 more times, join. (30 sts)
Rnd 5: Ch 1, sc in each st around, join. (30 sts)
Rnd 6: Ch 1, sc in next 4 sts, inc in next st; repeat from * 5 more times, join. (36 sts)
Rnd 7: Ch 1, sc in each st around, join. (36 sts)
The base now curves in from 6 in (15.2 cm) flat down to the 3 in (7.6 cm) opening. Increasing over every other round gives a gentle rounded taper rather than a flat bottom.
Ridge Pattern (Rnds 8-49)
Rnd 8 (ridge round): Ch 1, BLO sc in each st around, join. (36 sts)
Rnd 9: Ch 1, sc in each st around, join. (36 sts)
Rnd 10: Ch 1, sc in each st around, join. (36 sts)
Rnds 11-49: Repeat Rnds 8-10 thirteen more times. (36 sts in each round)
This gives 14 ridge repeats in total. The ridge rounds are Rnds 8, 11, 14 and so on, up to Rnd 47. Rnds 48 and 49 are the plain rounds of the last repeat. Keep the stitch count at 36 throughout; if it drifts, the sides of the tube will lean or pucker.
Checkpoint: The body is 6 in (15.2 cm) flat and about 15 in (38.1 cm) tall.
Top Shaping (Rnds 50-52)
Rnd 50: Ch 1, sc in next 4 sts, sc2tog; repeat from * 5 more times, join. (30 sts)
Rnds 51-52: Ch 1, sc in each st around, join. (30 sts)
This small decrease pulls the top in to 5 in (12.7 cm) flat. That gives a soft opening that holds the bags without letting them spill. Do not fasten off; continue with the top border.
Hanging Ring
Cover the ring: Make a slip knot on your hook. Hold the ring behind the hook, and work the first sc through the center of the ring and around it. Keep working sc around the ring, pushing the stitches together as you go, until the ring is completely covered: about 36 sc. The exact number depends on your ring and yarn, and the goal is full coverage with no metal showing. Sl st to the first sc. Fasten off, leaving a 24 in (61.0 cm) tail for sewing.
The covered ring measures about 2.5 in (6.4 cm) across.
Border
The borders are worked straight from the last round at the top and into the foundation chain at the bottom. They firm up both openings so they keep their shape after many uses.
Border gauge: The border uses the same 12 sts = 4 in (10.2 cm). Each border is 1 sc round plus 1 sl st round, about 3/8 in (1.0 cm) deep.
Top Border
Rnd 1: Ch 1, sc in each st around, join. (30 sts)
Rnd 2: Sl st loosely in each st around. (30 sl sts) Fasten off and weave in the end.
Bottom Border
Turn the tube upside down. Join yarn with a sl st at the back seam, in a free loop of the foundation chain.
Rnd 1: Ch 1, sc in each of the 18 free loops of the foundation chain, join. (18 sts)
Rnd 2: Sl st loosely in each st around. (18 sl sts) Fasten off and weave in the end.
Why the math works: Each border is worked one stitch into each existing stitch, with no increases or decreases. The top stays at 30 sts, or 5 in (12.7 cm) flat, and the bottom stays at 18 sts, or 3 in (7.6 cm) flat. The opening sizes from your checkpoints do not change. The sl st round stops the edge from flaring and adds a neat rolled finish. If your sl sts pull the edge in, go up one hook size for that round only.
Total body height: 16 in (40.6 cm) + 3/8 in (1.0 cm) top + 3/8 in (1.0 cm) bottom = 16.75 in (42.5 cm).
Attach the Ring
- Lay the tube flat with the line of joins centered at the back.
- Place the covered ring at center back so that its bottom 3/4 in (1.9 cm) sits inside the tube against the back wall. About 1.75 in (4.4 cm) of the ring then shows above the rim.
- Using the long tail, whipstitch the ring to the inside wall. Sew through the ring’s sc and across 6 sts of the top border and the round below it.
- Go back across the same 6 sts a second time for strength. Take stitches through the inner layer only, so they don’t show on the front.
- Fasten off and weave in the tail.
The finished height to the top of the ring is 16.75 in (42.5 cm) + 1.75 in (4.4 cm) = 18.5 in (47.0 cm).
Final Blocking
- Roll a hand towel into a cylinder about 3.8 in (9.7 cm) across and slide it into the tube. A cardboard tube wrapped in a towel also works.
- Shape the bottom so it curves in evenly toward the 1.9 in (4.8 cm) opening.
- Mist the whole piece with water until it is damp, not soaked.
- Straighten the ridges so they run level all the way around. Line up the join seam so it runs straight up the back.
- Check the measurements: 6 in (15.2 cm) wide flat and 16.75 in (42.5 cm) tall.
- Let it dry completely, standing upright, then remove the towel.
- For acrylic yarn, you can steam lightly from 1 in (2.5 cm) away instead of misting. Never press the iron onto the fabric.
Final Quality-Control Checklist
- Rnds 1-7 end with 18, 24, 24, 30, 30, 36 and 36 sts.
- All body rounds from Rnd 8 to Rnd 49 have 36 sts.
- There are 14 ridges, evenly spaced, with 2 plain rounds between them.
- The top has 30 sts and measures 5 in (12.7 cm) flat.
- The bottom opening has 18 sts and measures 3 in (7.6 cm) flat.
- The join seam runs in a straight line up the center back.
- The ring is fully covered, centered over the seam, and sewn on firmly.
- The body is 16.75 in (42.5 cm) tall, or 18.5 in (47.0 cm) including the ring.
- All ends are woven in on the inside.
Troubleshooting
The seam spirals around the tube. You are probably starting rounds in the join sl st. Work the first sc in the same st as the join, not in the sl st itself.
The ridges are faint. Make sure you are working the ridge round into the back loop, the loop farthest from you. The front loop must stay unworked on the outside.
The bags fall straight through. The bottom opening is too loose. Rework the bottom border with a hook 0.5 mm smaller, or work Rnd 1 of the bottom border as sc 4, sc2tog around for 15 sts, which gives 2.5 in (6.4 cm) flat.
The tube sags after it fills up. The fabric is too loose. Go down a hook size, or choose a firmer yarn.
The ring tilts forward. Sew it lower inside the tube, so that more of the ring lies against the back wall.
Care
Hand wash in cool water and lay flat or stand upright to dry. Remove all bags before washing, and reshape the tube over a rolled towel while it is damp.
Final Notes
The measurements build on each other in a simple chain. The ch-18 opening is 3 in (7.6 cm) flat. The base increases to 36 sts, or 6 in (15.2 cm) flat. Fourteen ridge repeats bring the height to about 15 in (38.1 cm), and the top decrease to 30 sts gives 5 in (12.7 cm) flat at 16 in (40.6 cm) tall. The borders add 3/8 in (1.0 cm) at each end, for 16.75 in (42.5 cm), and the ring adds 1.75 in (4.4 cm), for 18.5 in (47.0 cm) overall. If your checkpoints match at each stage, the finished holder will too.
Happy crocheting!